In the News: Vehicle Towing Industry Injury and Fatality Rate Higher Than Other Emergency Responders

A NIOSH study has found a high rate of work-related injury and death in the motor vehicle towing industry. Workers in this field may assist individuals in emergency situations that present risks to the worker, such as traffic incidents requiring work on the side of highways or busy roads. Historically, studies have focused on the safety of other types of first responders, such as fire-fighters, police or emergency medical personnel; NIOSH investigators aimed to address this research gap using data from Bureau of Labor Statistics’ Survey of Occupational Injuries and Illnesses, and Census of Fatal Occupational Injuries.

From 2011 through 2016, 6,400 nonfatal injuries and ill- nesses occurred in the motor vehicle towing industry. The rate for this industry was 204 per 10,000 full-time employees, which is more than double the rate of 98 per 10,000 full-time employees for all U.S. private industries. The leading causes of injury was contact with objects and equipment, overexertion and bodily reaction from bending, kneeling, crawling or reaching. Most injuries involved sprains, strains and tears.

During the same period, 191 deaths occurred in the motor vehicle towing industry. According to researchers, this translates to 43 deaths per 100,000 workers, which is more than 15 times the rate of 2.8 workers per 100,000 workers for all U.S. private industries. The leading cause of death was motor vehicle incidents (commonly involving workers on the side of the road being struck by passing vehicles) and contact with objects and equipment.

NIOSH investigators note that nonfatal injuries and deaths in the motor vehicle towing industry have been largely overlooked. They say the findings from this study underscore the need for additional research and tailored prevention efforts.

Read more at https://bit.ly/ 2VmaQ8j.


Laborer Electrocuted When Jackhammer Strikes Underground Power Line

A 38-year-old laborer was electrocuted when the jackhammer he was using struck an underground power line. The incident happened at a hospital parking lot where his employer was a subcontractor hired to install a storm water drainage system. His employer was a site preparation contractor.

His job duties for this project included digging trenches and laying and connecting storm drain pipe. On the day of the incident, the victim and two other employees were digging trenches and installing storm drains. At the location they were working there was a buried duct bank which was in the way and conflicted with the plans for installing the storm drain.

This duct bank contained three lines of PVC electrical conduit piping encased in concrete. Each line of conduit piping contained four power line cables carrying 7,200 volts each. In order to install the storm drain pipes to the necessary grade, the employees were using an excavator, breaker bar, and a rivet-buster-type jackhammer to chip away at the duct bank concrete.

The victim was in the trench chipping the duct bank’s concrete when his rivet buster punctured the conduit and contacted the power line cable. He was electrocuted and died at the scene.

Incident scene where the laborer struck the 7,200-volt power line with his jackhammer as he was chipping away at the concrete encasement of the duct bank.

Final Word

Inspectors had the following recommendations to prevent future similar incidents: Determine the exact locations of buried power lines before beginning work.

• Always assume that power lines are energized unless you have confirmation from the power line owner or utility company that the lines have been de-energized and grounded.

• Do not perform work that may expose employees to contact with energized power lines.

• General contractors and subcontractors should plan before the start of a project and coordinate during the project on a site safety plan that identifies and addresses hazards to employees.

http://www.lni.wa.gov/Safety/Research/Face/Files/711362015LaborerElectrocuted.pdf


The Deadly Outdoors

Here are three briefs on outdoor workers who died on the job. Three different incidents (one that you may never have heard of or realized it was even a hazard) with one common thread – working outdoors.

Landscaper Dies from Asphyxia When Compressed by Palm Fronds

A landscaper died while trimming a palm tree in the back yard of a homeowner. Neither the victim nor the landscaper who hired him were certified tree trimmers. The palm tree was approximately 60 feet high. The victim was about halfway up the tree when the skirt of dead palm fronds directly above him broke loose and slid down, compressing him against the tree trunk and suffocating him. The fire department performed a technical rescue, but when they reached the victim he was in cardiac arrest.

Investigators determined that, in order to prevent future incidents, landscapers and self-employed tree trimmers who trim or remove palm trees should be performed or supervised by workers trained and certified by organizations such as the Tree Care Industry Association (TCIA) or the International Society of Arboriculture (ISA). Proper work procedures and equipment are used, such as using an aerial lift and cutting fronds from above. Property owners should only hire tree trimmers who are certified by organizations such as TCIA or ISA. In addition, they should only hire companies that have a current tree trimming contractor’s license (in states where this is applicable). https://www.cdc.gov/niosh/face/pdfs/16ca007.pdf

Date Palm Worker Dies After Being Stung by Bees

A date palm tree worker died after being stung by numerous bees while working in an organic date orchard. The victim and a co-worker were spraying the dates with high-pressure water when the incident occurred. The victim was reportedly allergic to bee stings and his employer was unaware of his medical condition. The victim was not carrying an epinephrine autoinjector, and the co-worker or others on the farm were not trained in emergency response for bee stings.

Investigators determined that, in order to prevent similar future incidents, agricultural employers should ensure the following. Workers who are allergic to insect stings or bites should be advised to visit a health care professional to obtain a prescription for an epinephrine auto-injector, always carry it with them, and inform their employer and co-workers of their allergy to insect stings or bites. A hazard assessment, prevention steps, and incident response plan for insect stings and bites should be incorporated into the company’s Injury and Illness Prevention Program (IIPP). https://www.cdc.gov/niosh/face/pdfs/17ca003.pdf

Mower Operator Crushed and Dies After Lawn Mower Rolls Over

A 22-year-old lawn mower operator was killed when he was involved in a lawn mower rollover incident. The victim was mowing horizontally on a hill with a 30-degree slope when his mower slid down the hill and rolled onto him. Landscaper crewmembers also working in the area discovered the victim pinned beneath the mower at the bottom of the slope and immediately removed the lawn mower from on top of the victim, discovering he was deceased. The medical examiner identified the cause of death as asphyxia caused by chest compression.

Contributing factors to the incident include operating a riding mower on a slope that exceeds manufacturer’s specifications; the riding mower was not equipped with a rollover protection structure; and the employee was working alone.

Area where mower overturned.

Recommendations to prevent future incidents – never operate a lawn mower on a slope that exceeds the angle limits specified by the lawn mower manufacturer; use lawn maintenance equipment designated for steep slopes. Employees should receive safety training on slope mowing with riding lawn mowers that includes slope calculation, manufacturer specifications, and terrain assessment.

To prevent rollover injuries, riding lawn mowers should be equipped with roll-over protective structures (ROPS) and seat belts. Lastly, employers should consider implementing a buddy system when working in hazardous areas such as steep slopes. https://www.cdc.gov/niosh/face/pdfs/15Ky041.pdf


Supervisor Secret: 10 Tips for First-Time Supervisors

Here are 10 great tips for first-time supervisors from Sharlyn Lauby’s blog HR Bartender. Psst, here’s a secret – these tips are also great for any supervisor.

  1. Don’t try to be everyone’s friend. This doesn’t mean you shouldn’t be friendly. There’s a difference. But it’s not realistic to think that you can be everyone’s friend. Especially if at some point you need to discipline an employee or deliver bad news. This is particularly true if you’ve “moved up through the ranks” and are supervising recent coworkers.
  2. Fair and equal are not the same thing. Employees want to be treated fairly. It’s possible to be fair and not give everyone the same thing. Recognition is a good example. Everyone enjoys being recognized but all people do not want to be recognized the same way.
  3. Ask for feedback and input. You don’t have to know everything. Often, we put additional pressure on ourselves by assuming incorrectly that being a supervisor means we need to have all the answers. Being a supervisor means we should be able to find all the answers, not that all the answers are located in our heads.
  4. Learn how to run a good meeting. People complain about meetingsall the time. Developing a reputation for chairing a good meeting will do wonders for your career – because people will attend your meetings and participate at a high level. This leads to productive conversations and measurable results.
  5. Find time to relax. Let’s not sugar coat it – most times becoming a supervisor includes extra work. We must be able to effectively manage our workload without getting burned out. Our team relies upon us to be healthy and energetic. Otherwise, we’re a drain on the organization.
  6. Find someone you can trust (and vent to) about work. Sometimes as a supervisor, you will have access to confidential information. And you’ll hear things that can be frustrating. Supervisors don’t always have the ability to share everything with employees. Find a place where you can talk confidentially. It could be human resources, someone at home, or a colleague. Just make sure you can trust that the source will handle the conversation appropriately.
  7. Take every opportunity to improve your people skills. No matter how long you’re in the corporate world, never turn down training. You can even learn something from bad training.
  8. Learn how to say “no” comfortably. The answer to everything is not “yes”. Being able to say “no” when necessary will allow you to keep your sanity. See #5.
  9. Understand how you manage change. Business is all about change. No sooner do we get into our rhythm with a project or process and it changes. Get used to it. Become self-aware about how you personally process change and what resources you need to manage change successfully. Agility is critical.
  10. Master the art of delegation. Remember #8? You do not have to complete every task. You are responsible for making sure the task is completed. But you don’t have to do it all yourself.

Becoming a supervisor is about developing your team. When your team can effectively do the work, then you can attend training, take a vacation or go to a meeting and the department doesn’t fall apart. That’s the work of a supervisor.


Hand and Power Tools Checklist

Guidelines: This checklist applies to hand and portable power tools and equipment including pneumatic power tools.

General Requirements Please Circle
1. Are all portable hand or power tools maintained in a safe condition? Y   N   N/A
2. If compressed air is used for cleaning purposes, is it used at pressures less than 30 psi and only with effective chip guarding and personal protective equipment? Y   N   N/A
3. Are power tools equipped and used with guards whenever possible? Y   N   N/A
4. Are all belts, gears, shafts, pulleys, sprockets, spindles, drums, flywheels, chains, or other reciprocating, rotating or moving parts of equipment guarded if operator is exposed to contact or if they otherwise create a hazard? Y   N   N/A
5. Is all necessary personal protective equipment provided whenever the use of hand and power tools could create falling, flying or splashing debris, or harmful dusts, fumes, mists, vapors, or gases. Y   N   N/A
6. If tools and equipment are brought in from home, are they subject to the same safety requirements as supplied tools and equipment? Y   N   N/A
7. Are all chain saws, percussion tools, and hand-held powered circular saws (with blades greater than 2 inches in diameter) equipped with a constant pressure switch that shuts off power when released? Y   N   N/A
8. Are all hand-held powered drills; tappers; fastener drivers; horizontal, vertical and angle grinders (with wheels greater than 2 inches in diameter); disc sanders (with discs greater than 2 inches in diameter); belt sanders; reciprocating saws; saber, scroll, jig saws (with blade shanks greater than a nominal one-fourth (1/4) inch); and other similarly power tools equipped with a constant pressure switch or control? Y   N   N/A
9. Are all-hand held powered platen sanders, grinders (with wheels two-inch diameter or less), routers, planers, laminate trimmers, nibblers, shears, scroll saws, and jig saws (with blade shanks one-fourth (1/4) of an inch wide or less), equipped with a positive “on-off” control? Note: A positive “on-off” control means a switch that you must push to turn the tool on and then push again to turn it off. Control switches as described in questions seven and eight may also be used. Y   N   N/A
10. On hand-held power tools, is the operating control located to minimize the possibility of accidental operation? Note: This requirement does not apply to concrete vibrators, concrete breakers, powered tampers, jackhammers, rock drills, garden appliances, household and kitchen appliances, personal care appliances, medical or dental equipment, or to fixed machinery. Y   N   N/A
11. Are all portable power-driven circular saws (with blade diameter greater than 2 inches) equipped with guards above and below the base plate or shoe? Note: This requirement does not apply to meat cutting saws. Y   N   N/A
12. Does the upper guard on a circular saw cover the saw to the depth of the teeth, except for the minimum arc required to permit the base to be tilted for bevel cuts? Y   N   N/A
13. Does the lower guard on a circular saw cover the saw to the depth of the teeth, except for the minimum arc required to allow proper retraction and contact with the work? Y   N   N/A
14. When a circular saw is removed from the material being sawed, does the lower guard automatically and instantly return to the covering position? Y   N   N/A
15. Are belt sanding machines provided with guards at each nip point, where the sanding belt runs onto a pulley? Y   N   N/A
16. If a saw cracks, is it immediately removed from service? Y   N   N/A
17. Are all portable, electrically powered tools properly grounded or double insulated? Y   N   N/A
18. Are impact tools, such as drift pins, wedges, and chisels, kept free of mushroomed heads? Y   N   N/A
19. Are the wooden handles of tools kept free of splinters or cracks and are they fixed tightly in the tool? Y   N   N/A
20. Is it prohibited to lower or hoist a tool by the cord? Y   N   N/A
21. Do woodworking tools meet the American National Standards Institute (ANSI) or
the Standards Council of Canada (SCC) safety codes?
Y   N   N/A
Pneumatic Power Tools and Hose
22. Are pneumatic power tools secured to the hose or whip by some positive means, to prevent the tool from being accidentally disconnected? Y   N   N/A
23. Are safety clips or retainers used on pneumatic impact (percussion) tools to prevent attachments from being accidentally expelled? Y   N   N/A
24. Are all pneumatically driven nailers, staplers, and other similar equipment which have automatic fastener feeds and which operate at more than 100 psi pressure at the tool equipped with a safety device on the nozzle to prevent the tool from ejecting fasteners, unless the muzzle is in contact with the work surface? Y   N   N/A
25. Are all compressed air hoses and hose connections designed for the pressure and service to which they are subjected? Y   N   N/A
26. Is it prohibited to lower or hoist tools by the hose? Y   N   N/A
27. Do all hoses (exceeding one-half inch inside diameter) have safety devices at the source of the supply or branch line, to reduce pressure in case of hose failure? Y   N   N/A
28. Are airless spray guns [of the type which atomize paints and fluids at high pressure (1,000 pounds or more per square inch)] equipped with automatic or visible manual safety devices which prevent accidental release of paint or fluid? Note: In lieu of the above, a diffuser nut which will prevent high pressure, high velocity release while the nozzle tip is removed, plus a nozzle tip guard which will prevent the tip from coming in contact with the operator (or other equivalent protection) shall be provided. Y   N   N/A
29. Are all fuel powered tools stopped while being refueled, serviced, or maintained? Y   N   N/A
30. Is all fuel transported, handled, and stored in accordance with applicable regulations? Y   N   N/A
31. When fuel powered tools are used in enclosed spaces, are measures taken to prevent the build-up of toxic gases? Y   N   N/A

Comments/Corrective action:

https://www.isri.org/


Pre-Use Inspection Checklist for Hand and Power Tools

Before using hand tools inspect for the following:

The outside of the tool is free of grease, oil and accumulated foreign matter

The tool has no visible cracks in jaws or handle

Blades or bits are not damaged, cracked, etc.

Handles are not cracked, damaged or loose from heads of hammers, axes mauls and other similar tools

Tips of screwdrivers, chisels or other similar tools show no excessive wear

Gripping surfaces pliers, wrenches or other similar tools are not worn

Tools such as chisels and punches do not have mushroomed heads

Cutting tools such as chisels and axes are sharp

Tool appears to be in generally good condition

Before using power tools inspect for the following:

The outside of the tool is free of grease, oil and accumulated foreign matter

Tool power-source shows no damage (cord, airline, battery, etc.)

Tool is double insulated and tool housing is not damaged

If so equipped, electrical cord third prong (ground) is intact

All shields, guards or attachments required by OSHA or manufacturer are present

Rotating or moving parts of tool are guarded to prevent physical contact

Tool is not leaking fluid such as gasoline, oil etc.

Blades or bits are not damaged, cracked, excessively worn, etc.

Tool appears to be in generally good condition

Proper PPE is available


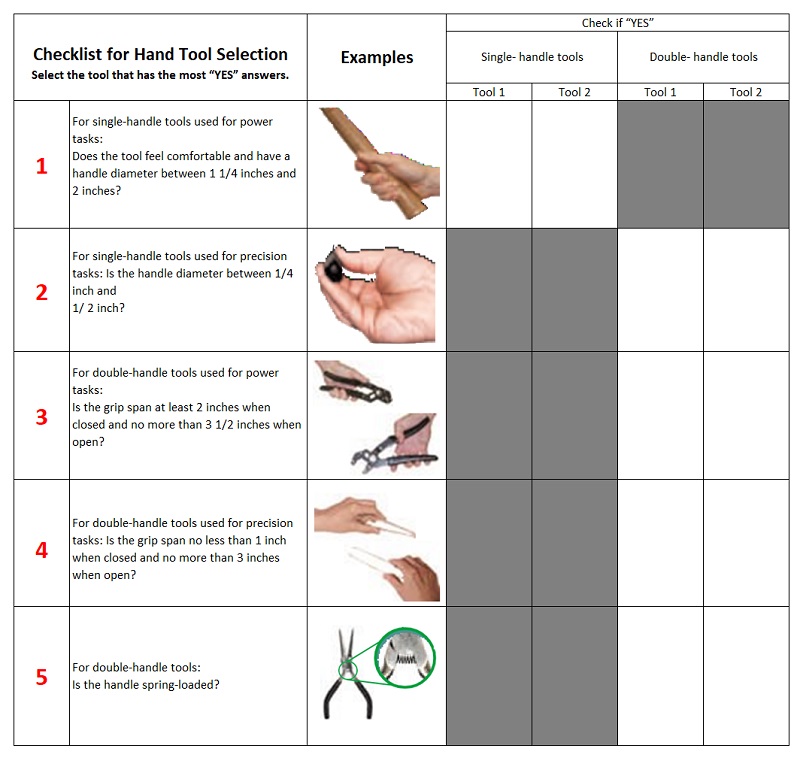
Ergonomic Checklist for Hand Tool Selection

Ergonomic Checklist for Hand Tool Selection

Use questions 6-11 to compare similar tools. For example, if you have two pliers and want to select the best of the two, compare each tool against the features on the checklist. The more “Yes” answers the tool has, the better the tool.

CAL/OSHA and NIOSH Dababneh A, Lowe B, Krieg E, Kong Y, and Waters T, A Checklist for the Ergonomic Evaluation of Non-Powered Hand Tools, accepted for publication in the December 2004 issue of the Journal


Tool: Heat Index – Summary of Risk Levels and Associated Protective Measures

Heat Index: Summary of Risk Levels and Associated Protective Measures

The most critical actions to take to help prevent heat-related illness at each risk level:

Heat Index Risk Level Protective Measures
<91°F Lower
  • Provide drinking water
  • Ensure that adequate medical services are available
  • Plan ahead for times when heat index is higher, including worker heat safety training
  • Encourage workers to wear sunscreen
  • Acclimatize workers

If workers must wear heavy protective clothing, perform strenuous activity or work in the direct sun, additional precautions are recommended to protect workers from heat-related illness. *

91°F to 103°F Moderate

In addition to the steps listed above:

  • Remind workers to drink water often (about 4 cups/hour)**
  • Review heat-related illness topics with workers: how to recognize heat-related illness, how to prevent it, and what to do if someone gets sick
  • Schedule frequent breaks in a cool, shaded area
  • Acclimatize workers
  • Set up buddy system/instruct supervisors to watch workers for signs of heat-related illness

If workers must wear heavy protective clothing, perform strenuous activity or work in the direct sun, additional precautions are recommended to protect workers from heat-related illness.*

  • Schedule activities at a time when the heat index is lower
  • Develop work/rest schedules
  • Monitor workers closely
103°F to 115°F High

In addition to the steps listed above:

  • Alert workers of high-risk conditions
  • Actively encourage workers to drink plenty of water (about 4 cups/hour) **
  • Limit physical exertion (e.g. use mechanical lifts)
  • Have a knowledgeable person at the worksite who is well-informed about heat-related illness and able to determine appropriate work/rest schedules
  • Establish and enforce work/rest schedules
  • Adjust work activities (e.g., reschedule work, pace/rotate jobs)
  • Use cooling techniques
  • Watch/communicate with workers at all times

When possible, reschedule activities to a time when heat index is lower

>115°F Very High to Extreme

Reschedule non-essential activity for days with a reduced heat index or to a time when the heat index is lower

Move essential work tasks to the coolest part of the work shift; consider earlier start times, split shifts, or evening and night shifts.

Strenuous work tasks and those requiring the use of heavy or non-breathable clothing or impermeable chemical protective clothing should not be conducted when the heat index is at or above 115°F.

If essential work must be done, in addition to the steps listed above:

  • Alert workers of extreme heat hazards
  • Establish water drinking schedule (about 4 cups/hour) **
  • Develop and enforce protective work/rest schedules
  • Conduct physiological monitoring (e.g., pulse, temperature, etc.)
  • Stop work if essential control methods are inadequate or unavailable.


*The heat index is a simple tool and a useful guide for employers making decisions about protecting workers in hot weather. It does not account for certain conditions that contribute additional risk, such as physical exertion. Consider taking the steps at the next highest risk level to protect workers from the added risks posed by:

  • Working in the direct sun (can add up to 15°F to the heat index value)
  • Wearing heavy clothing or protective gear

**Under most circumstances, fluid intake should not exceed 6 cups per hour or 12 quarts per day. This makes it particularly important to reduce work rates, reschedule work, or enforce work/rest schedules.


Workplan: 6-Step Heat Stress Workplan

Heat and humidity, either courtesy of mother nature or from man-made equipment and environments are hard on workers. Working in hot environments can easily fatigue workers and quickly lead to serious heat-related illness if not properly managed.

 Step 1: Conduct Heat Stress Assessment

Are workers exposed to direct sunlight; is the humidity high along with the temperature; do workers wear PPE or protective clothing (respirators, fire-resistant clothing, and even hard hats); are there heat-producing equipment or processes?

Step 2: Measure Heat Exposure

The WetBulb Globe Temperature (WBGT) is a measure of the heat stress in direct sunlight, which considers temperature, humidity, wind speed, sun angle and cloud cover (solar radiation). This differs from the heat index, which takes into consideration temperature and humidity and is calculated for shady areas. The use of the WBGT as a guide to managing workload in direct sunlight is common. https://www.weather.gov/tsa/wbgt

It’s worth taking the time to learn more about the WBGT and other work/rest schedules, like the Heat Index or the Humidex, but here is an example using the WBGT:

https://arielschecklist.com/wbgt-chart/

Step 3: Allow for Acclimatization

The body will get used to working in a hot environment gradually – it can take anywhere from 7-14 days.  This is known as acclimatization or acclimating to the heat. What that means is the body becomes better at cooling itself down – it redirects blood to the skin’s surface; the heart becomes more efficient; sweating starts sooner, there is more of it and the sweat contains less salt.

During this adjustment period, symptoms of fatigue, dizziness, heat rash, and stomach discomfort are common. Dehydration can cancel the benefits of acclimatization so providing and allowing for frequent intake of water and sports drinks is a must.

And while acclimatized workers will generally be able to work longer in a hot environment than unacclimated workers, caution must still be taken, and heat stress is still possible.

Step 4: Prevent Dehydration

Extreme temps and high humidity can make workers more susceptible to becoming dehydrated. Symptoms of dehydration include thirst, fatigue, muscle cramps, nausea, dizziness or confusion, excessive perspiration, and hot, dry skin.

Provide water nearby on the job site and ensure everyone drinks even if they’re not thirsty. As a general guideline, the recommended amount of water intake is one quart per hour of active work or exercise for the average adult. That is the equivalent of 128 ounces (3.78 liters) every four hours at minimum. It is also suggested that the water intake be distributed over a period of time, such as every 15-30 minutes per shift.

Step 5: Manage Heat Exposure

In addition to allowing for acclimatization and preventing dehydration, there are other steps you can take to help workers manage heat exposure. Establish a first-aid response system with trained first-aid providers and a way to record and report heat stress incidents. Use the buddy system so workers can look out early signs of heat stress in each other. Provide shaded shelter and allow for frequent breaks.

Provide lift aids for material handling — dollies, carts, lifting devices — to reduce physical activity. Organize the work to reduce the pace of activity – if possible, postpone strenuous work until a cooler time of the day. Another option is to use job rotation and rotate workers in and out of hot areas.

Fans can be helpful under certain conditions – since fans do not cool the air, so air currents flowing over the body must be cooler than your body temperature to cool you down. So, provide fans when air temperature is below skin temperature (98.6°F/ 35°C) and the humidity is below 70%. Consider cooling or dehumidifying the workplace. When the temperature exceeds 98.6°F/ 35°C and the relative humidity is above 70%, the use of fans will increase worker’s temperature because there will be little evaporation of sweat.

Step 6: Provide Training

Train workers on the different types of heat-related illnesses, their signs and symptoms, and response and treatment. Educate them on the importance of staying hydrated and that thirst is not an indicator of hydration – which is why they must drink fluids regularly even if they aren’t thirsty. Finally, make sure they understand that medications they take, and activities done outside of work, including drinking alcohol, can affect their response to heat.

https://www.safetyandhealthmagazine.com/articles/12512-worker-hydration

http://www.ohcow.on.ca/edit/files/heatstressawareness/Heat%20Stress%20Awareness%20Guide.pdf


Focus On: Selecting Hand Tools

The Risks

Using the wrong tool or using a tool incorrectly can cause debilitating ergonomic injuries. An increased risk of injury occurs when workers are frequently exposed to awkward postures, contact pressure, or a pinch grip. Over time, exposure to awkward postures or harmful contact pressures can contribute to an injury.

Be a Better Supervisor

Hand tools that fit a worker’s hands and the job they are doing can reduce the risk of injury. Here are 11 tips for hand tool selection to share with your employees.

  1. For single-handle tools used for power tasks: Select a tool that feels comfortable with a handle diameter in the range of 1 1/4 inches to 2 inches. You can increase the diameter by adding a sleeve to the handle. The power grip provides maximum hand power for high force tasks.  All the fingers wrap around the handle.
  2. For single-handle tools used for precision tasks: Select a tool with a handle diameter of 1/4 inch to 1/2 inch.
  3. For double-handle tools (plier-like) used for power tasks: Select a tool with a grip span that is at least 2 inches when fully closed and no more than 3 1/2 inches when fully open. When continuous force is required, consider using a clamp, a grip, or locking pliers.
       Closed Grip Span                              Open Grip Span
  1. For double-handle tools (plier-like) used for precision tasks: Select a tool with a grip span that is not less than 1 inch when fully closed and no more than 3 inches when fully open.
  2. For double-handled pinching, gripping, or cutting tools: Select a tool with handles that are spring-loaded to return the handles to the open position.
  3. Select a tool without sharp edges or finger grooves on the handle.
    NO                                                 YES
  4. Select a tool that is coated with soft material. Adding a sleeve to the tool handle pads the surface but also increases the diameter or the grip 7 span of the handle.
  5. Select a tool with an angle that allows you to work with a straight wrist. Bent handles are better than straight handles when force is applied horizontally (in the same direction as your straight forearm and wrist). Straight handles are better than bent handles when force is applied vertically.
    NO                                         YES
  6. Select a tool that can be used with your dominant hand or with either hand.
  7. For tasks requiring high force: Select a tool with a handle length longer than the widest part of your hand – usually 4 inches to 6 inches. Prevent contact pressure by making sure the end of the handle does not press on the nerves and blood vessels in the palm of your hand. If the handle is too short, the end will press against the palm of your hand and may cause an injury.
  8. Select a tool that has a non-slip surface for a better grip. Adding a sleeve to the tool improves the surface texture of the handle. To prevent tool slippage within the sleeve, make sure that the sleeve fits snugly during use.

See Ergonomic Checklist for Hand Too Selection.


https://choosehandsafety.com/sites/default/files/docs/NIOSH_guide_to_selecting_hand_tools.pdf


Focus On: Working Outdoors

The Risks

Working outside in the heat exposes workers to the possibility of a heat-related illness. In fact, heat-related fatality cases show that with temperatures above just 70°F/21°C can present a heat hazard when work activities are at or above a moderate workload. Other hazards of working outside in the summer include exposure to Ultraviolet (UV) radiation, Lyme Disease/Tick-Borne Disease, West Nile Virus, and Poison-Ivy Related Plants.

Be a Better Supervisor

Sun

Sunlight contains ultraviolet (UV) radiation, which causes premature aging of the skin, wrinkles, cataracts, and skin cancer. Here’s how employees can block those harmful rays.

Cover up and wear loose-fitting, long-sleeved shirts and long pants. Use sunscreen with a sun protection factor (SPF) of at least 30. Wear a hat with a wide brim hat, not a baseball cap, because it protects the neck, ears, eyes, forehead, nose, and scalp. Wear UV-absorbent sunglasses – they don’t have to be expensive, but they should block 99 to 100 percent of UVA and UVB radiation. Check the product tag or label. Lastly, limit sun exposure – UV rays are most intense between 10 a.m. and 4 p.m.

Heat

The combination of heat and humidity can be a serious health threat during the summer months. There are three kinds of major heat-related disorders—heat cramps, heat exhaustion and heat stroke. Train your employees know how to recognize each one and what first aid treatment is necessary.

Lyme Disease/Tick-Borne Diseases

Lyme disease and other tick-borne illnesses (i.e., Rocky Mountain spotted fever) are transmitted by bacteria from bites of infected deer (blacklegged) ticks.

Protection involves wearing light-colored clothes to see ticks more easily; long sleeves and tucking pant legs into socks or boots – high boots and closed shoes are a must; and putting on a hat. Other safe work practices to enforce include the use of tick repellants; encouraging workers to check themselves for ticks directly after work and shower when they get home; and wash and dry work clothes at high temperature.

If any ticks are found remove them promptly and carefully by gripping the tick with fine-tipped tweezers and removing them – DON’T use petroleum jelly, a hot match, or nail polish to remove the tick.

West Nile Virus

West Nile virus is transmitted by the bite of an infected mosquito. Workers can protect against mosquito bites in these ways – applying Picaridin or insect repellent with DEET to exposed skin; spraying clothing with repellents containing DEET or permethrin. (Do not spray permethrin directly onto exposed skin.) Wearing long sleeves, long pants, and socks; being extra vigilant at dusk and dawn when mosquitoes are most active; and getting rid of sources of standing water (used tires, buckets) to reduce or eliminate mosquito breeding areas.

Poison Ivy-Related Plants

Poison ivy, poison oak and poison sumac have poisonous sap (urushiol) in their roots, stems, leaves and fruits. About 85% of the population will develop an allergy if exposed to poison ivy, oak or sumac. Forestry workers and firefighters who battle forest fires have developed rashes or lung irritations from inhaling the smoke of burning plants.

Protection again starts by wearing long-sleeved shirts and long pants, tucked into boots and wearing cloth or leather gloves and applying barrier creams to exposed skin. Educate workers on the identification of poison ivy, oak, and sumac plants and on signs and symptoms of contact with poisonous ivy, oak, and sumac and keep rubbing alcohol accessible. It removes the oily resin up to 30 minutes after exposure. 


Focus On: Four Elements of a Safety and Health Program – Part 1 Management Commitment and Employee Involvement

Not sure where to start when it comes to creating a safety and health program? Or maybe you want to review and update your current program. In this series of articles, we will cover the four basic elements common to all good safety and health programs.

  1. Management Commitment and Employee Involvement –The manager or management team leads the way, by setting policy, assigning and supporting responsibility, setting an example and involving employees.
  2. Worksite Analysis
  3. Hazard Prevention and Control
  1. Training

Part 1 – MANAGEMENT COMMITMENT AND EMPLOYEE INVOLVEMENT

If you demonstrate concern for employee safety and health and make it a priority your employees will make it a priority too.

Here are some ways to do that:

  • Hold a meeting with all employees to communicate your safety and health policy and discuss your objectives for the safety and health program. Institute a system where everyone is held accountable for not following safety and health rules.
  • Make your support visible by getting personally involved in the activities that are part of your safety and health program. Post your safety and health policy where all employees can see it. Review all inspection and accident reports and ensure that follow-up occurs when needed. Ensure you, your managers, and your supervisors follow all safety requirements even if you are only in an area briefly – i.e. if you require a hard hat and safety glasses in an area, wear them yourself when you are in that area.
  • Make clear assignments of responsibility for every part of the safety and health program, and make sure everyone understands them. Then, give those with safety and health responsibility enough people, time, training, money and authority to get the job done. Follow up and make sure the job gets done. Recognize and reward those who do well and correct those who don’t.
  • At least once a year, review what you have accomplished and re-evaluate whether you need new objectives or program revisions.


Workplan: Hand and Power Tools

Cuts and other hand injuries to the hands are one of the most frequent and common injuries workers face. Hand injuries, including amputations, can keep workers away from the job for several days and can cost employers big money. But they are a preventable and avoidable risk to employees and cost to employers.

 Step 1: Tool Assessment

Take stock of the types of tasks, jobs, and operations that require the use of hand or power tools. Are these available and in good working condition? Are workers using the right tools for the work they are performing? Do they need a different tool? Would a power tool lessen the repetitiveness or force needed to do the job?

Step 2: Hazard Assessment

Conduct a hazard assessment wherever hand or power tools are used. The assessment should identify sources of hazards that could expose employees to flying objects, shock or electrocution, sparks, punctures, cuts, and crushing forces. Each hazard assessment will identify hazards, recommend controls, and provide guidance on appropriate personal protective equipment (PPE) selections when a hazard can’t be eliminated.

Step 3: Hazard Controls

Remove or eliminate the hazard whenever possible. If that can’t be done here are some examples of hazard controls for tool use. Ensure power tools are fitted with guards and safety switches. Provide PPE to protect against flying objects, dust, or and enforce its use. Use caution with gloves and prohibit their use when using powered equipment if there’s a chance the glove could get caught.

Establish and enforce a housekeeping schedule that includes keeping workplace floors as clean and dry as possible to prevent accidental slips with or around dangerous hand tools.

Implement an ergonomics program for hand and power tools to prevent repetitive motion and other ergonomic-related injuries. Refer to the Selecting Hand Tools and Checklist for the Hand Tool Selection Checklist for additional information.

Step 4: Establish Inspection Procedures

All tools should be inspected before use. Look at handles, tool edges, power cords, hoses & connections, switches, triggers, casings and attachments. Check hand tools for cracks dings and chips. Don’t use damaged tools. Generally, hand tools cannot be repaired and should be thrown away. Power tools should only be repaired by someone trained and qualified to make repairs checklist templates you can use as is or edit.

Step 5: Establish Maintenance and Safe Storage Requirements

Tools must be kept clean, sharp, and well-maintained to be used safely and effectively.  Set up areas where tools will be protected from the elements and damage from other tools and equipment. Make sure workers know how to safely sharpen knives and blades and when to sharpen them. Here are some additional maintenance and storage items to implement:

Clean tools after use. Wipe down with a rag or towel to remove dirt, grease and debris. As you are cleaning, check for damage or defects. If the tool cannot be repaired, tag it and dispose of it. Clean metal surfaces with an approved solution and scrape away any soil and dirt. Completely dry the tool with a towel or rag before it is placed in storage. Coat the metal parts of the tools with a lubricant.

Don’t place tools directly on the ground for storage. Place small hand and power tools on shelving. Store short-handled tools in a plastic bin or box. Tie together long-handled tools in a bin or hand them on the wall.  Power tools should have all surfaces cleaned and completely dry before storage. Spray lubricant on all metal surfaces. https://www.ezstorage.com/blog/how-store-hand-and-power-tools/

Step: 6 Training

  • Ensure employees have been trained and fully understand operations and maintenance procedures and safe tool use.
  • Provide employees with the right PPE and train them how to use and care for it.
  • Educate workers on the dangers of loose or baggy clothing, long hair, and jewelry. Long hair must be pulled back and the safest bet is to remove all jewelry before using tools.


Picture This: Shrubbery Balancing Act

https://i.redd.it/ceimh24gxo911.jpg

Pros – He has on shoes and gloves.

Cons – He should not be standing on the railing obviously. One wrong move and he could end up falling and cracking his head on the concrete or being cut and seriously injured by the trimmer. While he’s not working very off the ground it is absolutely possible that a fall from this height could cause traumatic brain injury or death.

A hedge trimmer is designed to cut through branches the width of your finger – so amputation is also possible. Likewise, a cut from the trimmer to a major artery could cause this worker to bleed out before help can arrive – especially if he is working alone.

He should have on long pants and a long sleeve shirt to protect against cuts and scratches from flying branches and debris.


Other – It’s not obvious from this picture if he is wearing safety glasses or hearing protection, but he should be wearing both. Remember, sunglasses aren’t the same as safety glasses – sunglasses aren’t designed to withstand impact in the way that safety glasses are.

Final Word

In general, whenever you are operating trimmers, mowers, or other landscaping equipment always read the manual first. Pick up any items and remove obstructions before beginning work. Wear sunscreen, and a wide-brimmed hat along with long pants and long sleeve shirt.

If you are using an electric trimmer or mower use extreme caution – electrocution is a possibility. Start trimming/cutting close to your power source and work away from it. This will allow your cord to follow behind you instead of getting twisted up underfoot.

Finally, wait until the grass or bushes are dry before you mow or trim. Grass and branches will stick to the blades and there’s an increased chance you could slip on the wet grass.


Picture This: Hand and Power Tools – Close Calls

Among the dangers of tool use, is the risk of being shocked or electrocuted. The worker who submitted this photo did not check to see if the cable he was about to cut was live. A few seconds later he got his answer. Thankfully the worst he got was a shock and was not fatally wounded.

In the second image, the worker who submitted it said his safety glasses saved his sight when this drill bit snapped and flew up in his face.

Correct use, safe work practices, and PPE are a must when using tools!

https://www.reddit.com/r/OSHA/comments/bkinqp/cut_a_cable_without_checking_if_it_was_live_can/

https://www.reddit.com/r/OSHA/comments/bb7k1t/wear_your_ppe_people_safety_glasses_saved_my_eyes/


Protecting Yourself Against Bloodborne Pathogens – Spanish

¿QUE ESTÁ EN RIESGO?

Los agentes patógenos transmitidos por la sangre son agentes infecciosos que pueden causar enfermedades y la muerte. El VIH, la hepatitis B y la hepatitis C son los tres agentes patógenos transmitidos por la sangre más comunes que encontrará en la mayoría de los escenarios de trabajo. La exposición a patógenos transmitidos por la sangre puede ocurrir en casi cualquier tipo de ocupación. Esto incluye al trabajador de la fábrica, los trabajadores de la construcción, el personal médico, de laboratorio, y el personal de conserjería e instalaciones.

¿CUÁL ES EL PELIGRO?

Usted está en riesgo de contraer un agente patógeno transmitido por la sangre si la sangre o el fluido corporal contaminado de una persona infectada ingresa a su torrente sanguíneo. La transmisión en el trabajo es más probable que ocurra a partir de:

  • La sangre de entrar en las membranas mucosas de los ojos, la nariz o la boca; a menudo el resultado de una salpicadura o rociado de sangre.
  • Un pinchazo con aguja contaminada o pinchazo con un alfiler contaminado como una navaja de afeitar o vidrios rotos.
  • Sangre o fluidos corporales contaminados que ingresan en cuerpo a través de una herida abierta, cortada, acné o sarpullido.

El contacto diario normal no presenta un riesgo de exposición ocupacional.

COMO PROTEGERSE

Protegerse contra la exposición a patógenos transmitidos por la sangre es simple.

Primero, siga las prácticas de trabajo seguro de su empleador y las precauciones estándar o universales. Esto significa tratar con toda la sangre humana y otros fluidos corporales como si contuvieran virus mortales, incluso si no lo hacen.

  • En segundo lugar, practique métodos seguros de manejo y eliminación. Esto incluye el uso de contenedores apropiados para objetos cortantes, como agujas y vidrios rotos. Recuerde, nunca recoja los vidrios rotos con sus manos.
  • En su lugar, use pinzas o cepillos para limpiar los desechos que contengan objetos afilados, incluso si usa guantes.
  • En tercer lugar, limpie y descontamine cualquier equipo y superficies que puedan haber estado en contacto con materiales infecciosos.

En cuarto lugar, use el equipo de protección personal (EPP) que se le indique usar, si su trabajo lo expone a fluidos corporales. Esto podría incluir guantes, batas o batas de laboratorio, gafas, protectores faciales y protección respiratoria.

Finalmente, si está expuesto a un patógeno transmitido por la sangre, siga estos tres pasos:

  1. Lave la zona, el sitio o corte con agua y jabón.
  2. Enjuague con agua cualquier salpicadura de fluido corporal en los ojos, la nariz, la boca o la piel.
  3. Informe la exposición a su supervisor e inmediatamente busque tratamiento médico.

CONCLUSIÓN

Elimina el miedo de los patógenos transmitidos por la sangre. Siga las precauciones universales, siga las prácticas de trabajo seguro, use el EPP requerido y limpie el equipo y las áreas contaminadas para protegerse contra las enfermedades transmitidas por la sangre.


Keep Guard Up Around Machines – Spanish

¿QUE ESTÁ EN RIESGO?

La exposición a máquinas desprotegidas o mal protegidas causa más de 1000 muertes y 20,000 cortes graves, lesiones por aplastamiento, amputaciones cada año. Estas lesiones son espantosas, dolorosas y a menudo incapacitantes y ocurren cuando se trabaja con cualquier máquina o herramienta que pueda golpear, girar, cizallar, cortar, rodar, moler o rebanar.

¿CUÁL ES EL PELIGRO?

Las máquinas tienen uno o más de los siguientes cuatro movimientos peligrosos involucrados en su operación.

  1. Rotación – o movimiento circular.
  2. Movimiento recíproco – o de ida y vuelta o de arriba hacia abajo.
  3. Movimiento transversal o en línea recta
  4. Puntos de compresión en marcha: también llamados puntos de pellizco.

Conseguir que cualquier parte de su cuerpo quede atrapada en estos movimientos puede magullar, cortar, atrapar, aplastar o cortar una parte del cuerpo.

COMO PROTEGERSE

Si bien su empleador es responsable de garantizar que las máquinas estén debidamente protegidas, hay cosas que puede hacer para garantizar su seguridad.

Antes de usar:

  • Solo opere las máquinas que está capacitado y autorizado para usar.
  • Inspeccione las máquinas y el equipo antes de cada uso para verificar que todas las protecciones estén en su lugar.
  • Revise las pautas de seguridad y los procedimientos operativos estándar.
  • Observe todas las pautas de seguridad y los procedimientos operativos estándar.
  • Use el EPP requerido.
  • Nunca puentee o quite las protecciones u otros dispositivos de seguridad; y
  • Nunca opere máquinas sin protecciones y protecciones en su lugar y funcionando
  • Realice el mantenimiento requerido.
  • Limpie la máquina y el área según sea necesario
  • Con seguridad apague la máquina si es necesario.

En cualquier momento:

  • Informe cualquiera de los siguientes a su supervisor:
  • Faltan guardias.
  • Mal funcionamiento de guardias; y cualquier.
  • Peligros de máquina.

CONCLUSIÓN

Manténgase seguro y no baje la guardia cuando trabaje con o alrededor de máquinas.


Be Handy and Safe with Hand and Power Tools – Spanish

¿QUE ESTÁ EN RIESGO?

Meta los pulgares en las palmas de las manos e intente atar los zapatos, abrir una botella o sostener un utensilio. ¿Qué tan difícil fue? ¿Podrías incluso hacerlo? Piensa en lo difícil que sería hacer estas y otras tareas cotidianas si te lastimaran las manos. Cientos de miles de lesiones de manos, muñecas y dedos ocurren en el trabajo cada año.

¿CUÁL ES EL PELIGRO?

¿Cómo ocurren estas lesiones? Muchos de estos ocurren a partir de herramientas manuales y eléctricas defectuosas o mal utilizadas. Otra causa común de accidentes y lesiones en herramientas es la falta de atención. Quitarle los ojos de la tarea por una fracción de segundo es lo suficientemente largo como para dejarte con una lesión en la mano, la muñeca o los dedos.

Otras causas incluyen: inexperiencia o exceso de confianza. La inexperiencia es un peligro fácil de entender. Es posible que simplemente no sepa cómo usar la herramienta correctamente porque no la ha usado mucho, o no ha recibido la capacitación adecuada sobre el uso seguro de la herramienta. El exceso de confianza puede ser un poco más complicado de entender. Cuando tiene confianza en lo que está haciendo o ha hecho algo durante un largo tiempo tiende a sentirse cómodo y olvidarse de que puede ser peligroso. La confianza hace que sea tentador tomar atajos y trabajar más rápido. Presta menos atención a las prácticas de seguridad y está menos alerta a los peligros.

Finalmente, pasar por alto, quitar o usar herramientas con protectores faltantes y no usar EPP o no usar el tipo correcto de EPP son otras dos causas comunes de lesiones con herramientas.

COMO PROTEGERSE

  1. Preste atención – Concéntrese en la tarea que tiene entre manos y si lo interrumpen o distraen por algún motivo, deténgase inmediatamente y no comience a trabajar nuevamente hasta que pueda prestarle toda su atención.
  2. Hágalo personal: El Equipo de Protección Personal es imprescindible para trabajar con herramientas. Se requieren cascos, guantes, gafas de seguridad, tapones para los oídos y zapatos de seguridad para la mayoría del trabajo con herramientas.
  3. Sosténgalo apretado – Use abrazaderas o un tornillo de banco para evitar resbalones accidentales. Las abrazaderas y las prensas también dejan ambas manos libres para operar y controlar la herramienta.
  4. No sea una herramienta – Use la herramienta correcta y no tome atajos usando una herramienta improvisada. Por ejemplo, un destornillador no es un cincel. Usarlo como uno podría hacer que el destornillador se parta, se eleve y lastime a alguien.
  5. Eso es impactante – Las herramientas de metal que entran en contacto con cables eléctricos activos o con equipos energizados pueden sacudirlo y matarlo. Recuerde nunca usar herramientas eléctricas en el agua o cerca de ella.
  6. No sea una mala influencia – Nunca use herramientas bajo la influencia de medicamentos, drogas o alcohol. Esto incluye medicamentos recetados y de venta libre. Estar bajo la influencia puede hacerte menos alerta y más lento para reaccionar. Esto los pone a usted y a sus compañeros en peligro.
  7. No olvides: Por último, siempre inspeccione sus herramientas antes de cada uso. Mantenga sus herramientas limpias, nítidas y bien mantenidas. Almacénelas adecuadamente para un uso máximo seguro y efectivo.

CONCLUSIÓN

Tus manos son dos de las herramientas más útiles que tienes. Siga las prácticas de trabajo seguro y use un EPP adecuado para protegerlos y mantenerlos trabajando para usted.


Steer Clear of Heavy Lifting – Spanish

¿QUE ESTÁ EN RIESGO?

Busque formas de evitar el levantamiento. Esto no significa que deba esconderse en el almacén cuando hay que levantar algo. Significa que debe tratar de idear estrategias para hacer su trabajo sin levantar cosas pesadas.

¿Cómo lo haces?

Una forma es examinar sus rutinas de trabajo para ver cómo hacer las cosas de manera diferente. Por ejemplo, en lugar de recoger los artículos de un palé a nivel del suelo, ¿podrían almacenarse a la altura de la cintura? ¿Podrían comprarse los suministros a granel y trasladarse por cinta transportadora en lugar de bolsas manipuladas manualmente?

Los equipos de elevación están disponibles para innumerables aplicaciones. Operados por electricidad, resortes, hidráulica, presión de aire y otras fuentes de energía, los equipos de elevación toman el peso y requieren que el operador sólo controle y dirija el trabajo. Una compuerta hidráulica en un camión, un polipasto de cadena, un saco de elevación inflable, una plataforma con resortes y un banco de trabajo que puede elevarse o bajarse con controles eléctricos son ejemplos de esos equipos de elevación. ¿Podría realizar sus tareas de forma más segura con estos equipos? Hable con su supervisor si tiene ideas de mejoras.

Incluso en un ambiente de oficina, levantar objetos puede causar graves lesiones en la espalda. Deberías usar una carretilla para mover los muebles y los cartones de papelería. Busque un lugar a la altura de la cintura para la caja de papel que normalmente se guarda en el suelo junto a la impresora o copiadora.

Los enfermeros, ya sea que estén empleados en un centro de salud o ayudando a un familiar, corren el riesgo de sufrir lesiones en la espalda por levantar y colocar a los pacientes. Los dispositivos de elevación se utilizan cada vez más tanto en el ámbito laboral como en el doméstico.

Si tienes un equipo de elevación disponible, úsalo. Tómese el tiempo para agarrar una carretilla de mano o un gato de paletas en lugar de mover algo manualmente. Utilice los dispositivos de elevación de pacientes portátiles o fijos siempre.

Las lesiones de espalda son la principal causa de días perdidos en el trabajo. Estas lesiones ocurren tanto en el trabajo como fuera de él. Algunas lesiones graves de la espalda ocurren de una sola vez, pero muchas parecen ser el resultado de pequeñas lesiones acumuladas causadas por levantar demasiado peso y por levantar desde posturas incómodas.

La forma correcta de levantar manualmente es agacharse cerca del objeto, agarrarlo firmemente y levantarlo usando la fuerza de las piernas, no dé la espalda.

Mejor aún, consiga ayuda. Haga que otra persona le ayude, o use un dispositivo de elevación. También es importante mantener la salud general para ayudar a prevenir las lesiones de espalda.

Mantener un peso saludable, dormir lo suficiente, descansar y hacer ejercicio, y manejar el estrés ayuda a mantener la espalda fuerte y flexible. Mantenga una buena postura cuando esté de pie o sentado, y evite forzar su espalda sea lo que sea que esté haciendo.

Use su cabeza para salvar tu espalda ideando estrategias para evitar levantar cosas pesadas e incómodas.


Safely Handling Materials – Spanish

¿QUE ESTÁ EN RIESGO?

El trabajo de manejo de materiales es parte de muchos trabajos. Piense en las diferentes cosas que levanta, mueve y almacena como parte de su trabajo, con frecuencia o con poca frecuencia.

¿CUÁL ES EL PELIGRO?

Para aquellos que realizan regularmente el manejo de materiales, usted sabe que a veces puede ser un trabajo agotador y monótono. Esto puede provocar descuido, complacencia y errores por aburrirse, perder la concentración o agotarse física y mentalmente.

Lo que a su vez puede conducir a pilas inestables de materiales, fugas y derrames de productos químicos, productos dañados, frustración y pérdida de tiempo en la búsqueda de materiales, y en última instancia, lesiones y muertes.

COMO PROTEGERSE

Siga los procedimientos de seguridad, siempre practique técnicas de levantamiento seguro y obtenga ayuda cuando la necesite, para garantizar que el trabajo de manejo de materiales se realice de manera segura y eficiente.

Aquí hay 10 pautas de manejo de materiales:

  1. Inspeccione minicargadores, carretillas elevadoras, carros de mano y otros equipos utilizados para mover materiales, antes de usarlos.
  2. Antes de apilar cualquier material, considere el tipo, la altura y el peso del material.
  • Los artículos más grandes y pesados deben estar en la parte inferior de la pila.
  • Coloque los materiales que no se usan con frecuencia hacia la parte posterior y mantenga los artículos de uso frecuente cerca de la parte frontal del área de almacenamiento, la repisa o el estante.
  • Mantenga los artículos a su alcance. Los materiales de apilamiento demasiado altos o demasiado profundos aumentan el riesgo de lesiones cuando se mueven los materiales.
  1. Comience con una base sólida y nivelada cuando apile y almacene el material y siga las pautas para un apilamiento seguro para que los materiales no se caigan ni rueden.
  • Cuando apile bidones y barriles, use un patrón simétrico.
  • Si van a apilarse en sus extremos, use una lámina de madera contrachapada o un patín insertado entre los niveles para proporcionar estabilidad y una superficie uniforme para cada nivel.
  • Cuando se almacenen en sus lados, bloquee el nivel inferior para evitar que los tambores inferiores se desplacen por debajo de la carga.
  • Cuando apile bolsas o paquetes, use filas entrelazadas para aumentar la estabilidad de la carga.
  • Todos los materiales cilíndricos, como el acero estructural, los postes y los tubos deben apilarse y bloquearse para evitar que se propaguen o se inclinen.
  • Las tuberías, barras y tubos deben almacenarse en un bastidor que corra paralelo a los pasillos del almacén para eliminar el peligro para la seguridad de quienes utilizan esos pasillos.
  1. Retire los clavos de la madera antes de apilar.
  • Esté atento a las rebabas, bordes irregulares y otros peligros al almacenar materiales.
  1. Observe los límites de carga máxima para pisos, estanterías, bastidores, elevadores y otras superficies.
  • Recuerde, las estanterías deben estar firmemente ancladas para evitar que se vuelquen y se caigan.
  1. Mantenga los espacios apropiados.
  • El personal de emergencia debe poder llegar a un trabajador, combatir un incendio o limpiar un derrame peligroso.
  • No almacene materiales directamente debajo de las cabezas de los rociadores. Consulte con su supervisor sobre los requisitos de autorización.
  1. Almacene los materiales no compatibles por separado.
  • Los productos inflamables, los oxidantes y los reactivos tienen requisitos de almacenamiento especiales debido al riesgo de incendio, explosión o reacción química.
  1. Practique un buen mantenimiento.
  • Limpie la basura y los derrames para evitar resbalones, tropiezos y caídas.
  • Deseche adecuadamente las tiras de acero desechadas para evitar cortes.
  • Mantenga los pasillos libres de desorden y materiales almacenados para evitar tropiezos y caídas, y asegúrese de que haya espacio suficiente para la operación segura de montacargas, transpaleta y otros equipos.
  1. Practique levantar y transportar con seguridad.
  • Los sacos deben levantarse usando esquinas opuestas. Una vez que haya levantado el saco, cámbielo para que descanse contra su cadera o estómago, luego gire el saco hacia arriba y sobre su hombro. Si no puede balancearlo sobre su hombro, el saco es demasiado pesado.
  • Los objetos irregulares pueden tener una forma irregular o un peso desigual. Si el objeto no es manejable y no puede agarrarlo y levantarlo de manera segura, obtenga ayuda o use una carretilla de mano.
  • Los objetos largos, como tuberías y tubos, deben ser transportados por dos o más personas cuando sea posible, caminando al paso. Si lo maneja solo, mantenga el extremo frontal lo más alto posible.
  1. Use equipo de manejo de materiales para mover cargas cuando sea posible.
  • Dependiendo del trabajo, una carretilla elevadora, grúa, polipasto, transportador o mesa elevadora puede ser apropiado.
  • Use este equipo solo si ha sido entrenado y autorizado para hacerlo.

CONCLUSIÓN

El manejo de materiales es una parte importante de muchos trabajos, pero también puede ser peligroso. Practique técnicas seguras de levantamiento, movimiento y almacenamiento, y siga los procedimientos de seguridad establecidos para mantener su seguridad y la de los demás.


Avoiding Caught-In/Caught Between Incidents – Spanish

¿QUE ESTÁ EN RIESGO?

Atrapado y aplastado entre los peligros se justifica con:

  • Aproximadamente 100 muertes cada año
  • El 5% de todas las muertes en la construcción
  • Más de 2 amputaciones CADA día de trabajo
  • Más de 550 amputaciones cada año
  • Miles de lesiones incapacitantes

¡No se dejes convertir en una de esas estadísticas!

¿CUÁL ES EL PELIGRO?

Los incidentes de “atrapado/aplastado” ocurren cuando un trabajador es aplastado entre objetos

  • Algunos ejemplos podrían ser los derrumbes durante la excavación de zanjas, el arrastre de prendas de vestir en la maquinaria o el aplastamiento y atrapamiento de objetos móviles.
  • Algunas de las condiciones de trabajo que contribuyen a que queden atrapadas o aplastados entre los objetos incluyen, maquinaria que tiene partes móviles no protegidas o que no se bloquean durante el mantenimiento, excavaciones y zanjas no protegidas, y el trabajo entre materiales en movimiento y estructuras, vehículos o equipos inmóviles.

Riesgos de la maquinaria: Casi todos los sitios utilizan maquinaria que tiene partes móviles o giratorias, y esa maquinaria suele requerir mantenimiento o reparación en algún momento de la construcción.

  • Cuando las máquinas o las herramientas eléctricas no están debidamente vigiladas durante la construcción, los trabajadores pueden ver su ropa o partes de su cuerpo atrapadas en las máquinas.
  • Si las máquinas no se desenergizan (se bloquean) durante el mantenimiento o la reparación, pueden funcionar en ciclo o ponerse en marcha de otra manera y atrapar una parte del cuerpo o la ropa de un trabajador, causándole lesiones o la muerte.

Enterrados-en-suelo-en-cuevas: de zanjas y excavaciones sin protección son el principal peligro para ser enterrados.

  • Los derrumbes aplastan o asfixian a los trabajadores.
  • Las zanjas pueden contener factores peligrosos; los trabajadores pueden ahogarse en el agua, las aguas residuales o los productos químicos de las zanjas.
  • Si trabajan cerca de servicios subterráneos, los trabajadores también pueden sufrir quemaduras, electrocución o explosiones de vapor, agua caliente, gas o electricidad.
  • Otra preocupación adicional para los peligros de los que quedan enterrados es trabajar debajo de grandes andamios y/o paredes que pueden colapsar.

Ser atrapado: Este tipo de peligros puede resultar en múltiples huesos rotos, asfixia o muerte. Los trabajadores pueden quedar atrapados entre ellos:

  • Equipo y un objeto sólido, como una pared u otra pieza de equipo.
  • Materiales que se apilan o almacenan y un objeto sólido, como una pared u otra pieza de equipo.
  • Apuntalamiento y materiales de construcción en una zanja.

COMO PROTEGERSE

Sobre la base de los tres factores principales para los peligros atrapados o aplastados, hay algunas precauciones generales para evitar los riesgos:

Maquinaria vigilada: Sólo utilice maquinaria que esté debidamente protegida; nunca quite una protección de seguridad cuando se utilice una herramienta.

  • Por ejemplo, las correas, los engranajes, los ejes, las poleas, los piñones, los husillos, los tambores, las ruedas volantes, las cadenas u otras piezas móviles del equipo deben ser protegidas si dichas piezas están expuestas a los trabajadores.
  • Además, asegúrese de evitar el uso de ropa o joyas sueltas que puedan quedar atrapadas en las partes móviles.

Maquinaria de apoyo: Asegúrate de que el equipo está sin energía y no puede ser arrancado accidentalmente

  • En primer lugar, desconecte las herramientas cuando no estén en uso, antes de realizar el mantenimiento y cuando cambie los accesorios como cuchillas, brocas y cortadores.
  • Apague los vehículos antes de hacer trabajos de mantenimiento o reparación. Si es posible, bloquee la fuente de alimentación del equipo.
  • Bajar o bloquear las cuchillas de las excavadoras, raspadores y equipos similares antes de hacer reparaciones o cuando el equipo no está en uso

Evita los pinchazos: Protéjase de quedar atrapado entre equipos, materiales u otros objetos siendo consciente del equipo que le rodea y manteniéndose a una distancia segura de él.

  • Nunca te pongas entre materiales en movimiento y una estructura inamovible, un vehículo o materiales apilados.
  • Asegúrate de que todas las cargas transportadas por el equipo sean estables y estén aseguradas.
  • Manténgase fuera del radio de giro de las grúas y otros equipos.

Protección de la excavación: Nunca trabajes en una zanja desprotegida que tenga 5 pies de profundidad o más.

  • Entrar o salir de una zanja o excavación sólo se puede hacer por medio de una escalera, una escalera o una rampa debidamente diseñada que se coloque dentro del área protegida de la zanja.
  • La protección podría incluir métodos de prevención como la inclinación, el asentamiento o el apuntalamiento.
  • La inclinación está recortando los lados de la zanja a un ángulo seguro, para que no se derrumbe.
  • El banco utiliza una serie de pasos que se aproximan al ángulo de inclinación seguro.
  • Los apuntalamientos son estructuras de madera o sistemas mecánicos o hidráulicos que soportan los lados de una excavación.
  • El uso de una caja de trinchera o un escudo actuará como protección para los trabajadores si se produce un derrumbe

Entrenamiento: Su empleador debe capacitarlo para realizar su trabajo y usar el equipo provisto de manera segura. Es responsabilidad del empleador instruir a cada empleado:

  • el reconocimiento y la evitación de condiciones inseguras.
  • las normas aplicables a su entorno de trabajo.
  • formas de controlar o eliminar cualquier peligro.

CONCLUSIÓN

El uso y el mantenimiento adecuado de la maquinaria, el tiempo que se dedica a salvaguardar el equipo y la garantía de una prevención adecuada durante la excavación de zanjas y la construcción en general pueden reducir en gran medida los peligros y riesgos asociados con los incidentes atrapados o aplastados entre dos objetos.


Infographic: Working Outdoors


Hot Weather Checklists – Planning Ahead and Daily

Use the following checklists to prepare for hot weather and to make sure all precautions are in place.
Planning Ahead for Hot Weather: Employer Checklist

Develop a list of hot weather supplies (e.g., water, shade devices, etc.). Estimate quantities that will be needed and decide who will be responsible for obtaining and transporting supplies and checking that supplies are not running low.
Create emergency action plan for heat-related illnesses (who will provide first aid and emergency services, if necessary).
Develop acclimatization schedule for new workers or workers returning from absences longer than one week.
Identify methods to gain real-time access to important weather forecast and advisory information from the National Weather Service and ensure the information is available at outdoor work sites (e.g., laptop computer, cell phone, other internet-ready device, weather radio).
Determine how weather information will be used to modify work schedules, increase the number of water and rest breaks, or cease work early if necessary.
Train workers on the risks presented by hot weather, how to identify heat-related illnesses, and the steps that will be taken to reduce the risk.
Plan to have a knowledgeable person on the worksite who can develop and enforce work/rest schedules and conduct physiological monitoring, when necessary, at high and very high/extreme risk levels for heat-related illness.

Daily Planning for Hot Weather: Employer Daily Checklist

Water Is there plenty of fresh, cool drinking water located as close as possible to the workers?
Are water coolers refilled throughout the day? (Has someone been designated to check and make sure water is not running low?)
Shade Is shade or air conditioning available for breaks and if workers need to recover?
Do workers know the:
Common signs and symptoms of heat-related illness?
Proper precautions to prevent heat-related illness?
> Importance of acclimatization?
> Importance of drinking water frequently (even when they are not thirsty)?
> Steps to take if someone is having symptoms?
Emergencies Does everyone know who to notify if there is an emergency?
Can workers explain their location if they need to call an ambulance?
Does everyone know who will provide first aid?
Knowledgeable Person For high and very high/extreme heat index risk levels, is there a knowledgeable person at the worksite who is well-informed about heat-related illness and able to determine appropriate work/rest schedules and can conduct physiological monitoring as necessary?
Physiological Monitoring Are workers in the high or very high/extreme heat index risk levels being physiologically monitored as necessary?
Worker Reminders Drink water often
Rest in shade
Report heat-related symptoms early


Workplan: Creating Energy Control Procedures

Step 1: Identify Where Energy Control Procedures Are Needed

Energy control procedures (ECP) are required for any operations where unexpected energization, start up or release of stored energy could harm workers during the servicing or maintenance of machines and equipment.

OPERATIONS COVERED BY LOTO OPERATIONS NOT COVERED BY LOTO
Non-repetitive or non-routine maintenance or servicing. Minor, repetitive or routine tool changes and adjustments.
Operations that involve removal of guards or disabling of safety devices. Minor, repetitive or routine servicing essential to normal and basic equipment/machine activity – if safeguards are in place.
Operations in which workers must place body parts into danger zones. Work on unplugged electrical equipment or machines IF the worker performing service or maintenance has exclusive control over plug.
Clearing a jammed or blocked machine; rebuilding equipment; equipment set up. Hot tap operations on transmission and distribution systems for gas, steam, water or petroleum products where employer can show:

·        Continuity of service is essential.

·        System shutdown is impractical.

·        Effective protective measures are in place.


Step 2: Pick the Controls

Energy control procedures must indicate the method used to control the release of hazardous energy for the processes you identified in Step One.

Lockout – applying a locking device to the equipment’s energy isolating device – safest method – it is a physical barrier to prevent start-up.

Tagout – tag on equipment/machine notifies people the machine/equipment is being serviced so they don’t start it up – riskier method and can only be used when:

  • The machine/equipment being serviced isn’t capable of being locked out; and
  • You can demonstrate that tagout provides the same level of safety and protection as lockout/tagout.

Combination of both methods – best option.

Step 3: Create Energy Control Procedures

Energy control procedures must be specific and clear and list at a minimum:

  • Name of the company and description of equipment/machine the procedure covers.
  • Statement of the procedure’s “intended use” or purpose it serves and statement requiring workers to comply with the procedure.
  • Steps for shutting down, isolating, blocking and securing machines or equipment.
  • Steps for placement, removal and transfer of LOTO devices and who’s responsible for performing them.
  • Steps for verifying machine or equipment is effectively locked out/energy is controlled.
  • Description of LOTO sequence and how equipment/machine is returned to service.

Step 4: Authorized and Affected Employees

The individual who performs the actual energy control procedure is called an “authorized employee,” – a person who locks out or tags out machines or equipment to perform service or maintenance.

An “affected employee,” is one whose job requires them to operate or use the machinery or equipment being serviced or maintained; or whose job requires them to work in the area where the servicing or maintenance is performed.

Step 5: List Steps of Energy Control Procedure

The actions listed below must be performed in the following sequence before service and maintenance work can begin.

Step 1 Prepare for shutdown – authorized employees must know the type and magnitude of the energy, the hazards involved, and the means to control the energy.
Step 2 Notify affected workers. Shut down the equipment in an orderly and safe manner.
Step 3 Operate all isolating devices (valves or switches) to deenergize the equipment. Check primary and secondary sources of energy.
Step 4 Attach all LOTO devices to the energy isolating devices (and, if appropriate, personal LOTO devices to group LOTO mechanisms).
Step 5 Release all stored energy (electric charge, pressure, charged springs, etc.).
Step 6 Verify equipment energy isolation has been accomplished.

Step 6: Procedure for Releasing LOTO

There must be a procedure for releasing and removing LOTO devices and restarting equipment and machines, so they aren’t removed, and power isn’t accidentally restored while service/maintenance is going on.

The equipment can only be reenergized when the authorized employee verifies nonessential items have been removed from the work area; machine or equipment components are operationally intact; and all employees have been safely positioned or removed.

The authorized employee must also ensure all affected employees are notified after LOTO device(s) have been removed. Startup can’t begin until all affected employees are notified.

An energy isolating device(s) must only be removed by the authorized employee who attached it except under these conditions. If the authorized employee isn’t available, it may be removed by somebody else, if, (1) the Energy Control Procedure includes specific steps and training requirements for removal by another person; (2) the alternative removal procedure is just as safe as removal by the authorized employee; and (3) steps are taken to verify the authorized person isn’t at the facility or still working on the equipment; (4) reasonable efforts were taken to locate the employee, before he or she returns to work, and notify them the lockout/tagout device has been removed.

There must also be specific procedures to ensure the continuity of lockout or tagout protection through changes in shifts or personnel, including procedures for the orderly transfer of lockout or tagout device protection between the off-going and oncoming employees.

Step 7: Coordinate ECP’s with Contractors

If you rely on an outside contractor or subcontractor to carry out energy control procedures, you and the contractor must notify each other of your lockout/tagout procedures and decide which procedures to use.

If you use your own procedure, make sure the contractor’s employees understand and comply with it; if you use the contractor’s procedure, make sure your employees understand and comply with it. The contractor’s LOTO procedures should be at least as rigorous as your companies.

Step 8: Use the Right Lockout/Tagout Devices

You must provide locks, chains, wedges, key blocks, adapter pins, self-locking fasteners or other hardware for isolating, securing or blocking machines or equipment from energy sources. The actual lockout devices and tags used must meet US and Canadian standards.

Step 9: Periodically Inspect Energy Control Procedures

Inspect your energy control procedures at least once a year to verify the procedures and LOTO requirements are being followed. Inspections must be carried out by an authorized employee who is not utilizing the energy control procedure being inspected. It must include reviews with authorized employees who are using it (and affected employees affected by it).

Document each inspection by creating a written certification that lists the (1) identity of the machine/equipment on which the energy control procedure is being used; (2) date of the inspection; (3) employees included in the inspection; and (4) who performed the inspection.

Step 10: Provide LOTO Safety Training

You must train and instruct workers, so they have the knowledge and skills to safely carry out their role in any energy control procedures.

Authorized employees must be trained to recognize hazardous energy sources, the type and magnitude of energy available in the workplace and the necessary methods of energy isolation and control.

Affected employees must be instructed in the purpose and use of the energy control procedure.

All other employees whose work operations are or may be in an area where energy control procedures may be used must be instructed about the procedure and that restarting, or reenergizing locked out or tagged out machines or equipment is prohibited.

Authorized and affected employees must be retrained whenever (1) their job assignments change; (2) there are changes in machines, equipment, or processes that pose a new hazard; (3) energy control procedure changes; and/or (4) you have reason to believe there are deviations from or inadequacies in the employee’s knowledge or use of the energy control procedures.

Finally, you must document LOTO training took place and is current by creating a written certification that lists each trainee’s name and the date(s) training was provided.

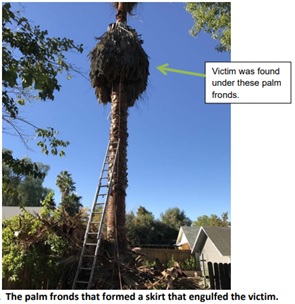
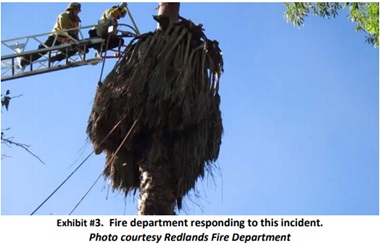

LOTO Program Annual Inspection and Training Assessment Checklist

Copy or customize this checklist from the University of Washington to meet the needs of your LOTO Annual Inspection and Training Assessment.

Department: ____________________________________________
Location: _______________________________________________
Equipment: _____________________________________________

Yes No Comments
Has there been a change in job assignments, machines, equipment or processes?
If so, have employees been re-trained when job assignments, machines, equipment or processes have changed?
Are the locks uniquely identified, uniquely keyed, and only used for the purpose of LOTO?
Does the tag used with the lock identify the worker servicing the machine or equipment?
Have equipment and machine-specific LOTO procedures been documented in writing?
Does the authorized employee know where the written LOTO procedures are located?
Does the authorized employee notify affected employees and all other employees in the area before starting the LOTO procedure?
Can the authorized employee identify all hazardous energy sources and associated hazards for the equipment or machine to be locked out?
Does the authorized employee follow the proper LOTO procedures for deenergizing the equipment or machine?
Does the authorized employee demonstrate the proper steps for the placement, removal and transfer of LOTO devices?
Does the authorized employee use the proper methods to verify the equipment or machine was de-energized?
Before releasing the machine or equipment from LOTO, does the authorized employee do the following:

A)     Inspect the machine or equipment to ensure it is operationally intact?

B)     Ensure that all employees are safely positioned?

C)     Notify affected employees and all other employees in the area that the LOTO devices have been removed?

If you answered “No” to questions 2-11, has the employee been retrained?


Lockout – Tagout Annual Inspection – Authorized Employees Observed (Please print)

Name Job Title Name Job Title
1   2  


3   4  


5   6  


7   8  


9   10  


11   12  


13   14  


15   16  


17   18  


19   20  


Deficiencies Observed and Corrective Actions: ___________________________________________________________________________________________________________________________________________________________________________________________________________________________________________________________________________________________________________________________________________________________________________________________________________________________________________________________________________________________________________________________________________________________________________________________________________________

Date: _______________________________________________________________
Inspection Done By: ___________________________________________________