Are LOTO Procedures Always Followed At Your Workplace?


The good news:  The electric panel explosion portrayed in this video is only a dramatization.

The bad news: LOTO procedural shortcuts are all too real and common. And so are the fatal and gruesome injuries they cause.

Although it’s quite disturbing, this video is very effective in demonstrating how even the slightest LOTO shortcut can lead to disaster.

The Moral: The LOTO procedure must be followed to the letter 100% of the time.

LOTO HAZARDS & HOW TO PREVENT THEM : WHAT’S THE HAZARD?

You wouldn’t perform repairs on an electrical panel if the juice was on. So you de-energize the panel before the work begins to avoid getting electrocuted or burned by arc flash.

It makes perfect sense, right?

But. . .

Bad Things Can Happen Once You Start the Work

  • Somebody who doesn’t know you’re working on the panel may turn on the power;
  • You might accidentally turn the power on yourself;
  • It might turn out that the power really wasn’t shut off after all; or
  • There may still be residual power in the system that causes the panel to energize.

Were Any of These Things to Happen. . .

You’d probably get electrocuted or engulfed in an electrical explosion like the worker in the video.

WHAT OSHA SAYS

OSHA requires employers to implement a LOTO procedure to ensure these things don’t happen. The LOTO procedure must list a method to:

  • De-energize the equipment, i.e., turn it off; AND
  • “Lock out” the energy source, i.e., use a lock or some other device to isolate it so nobody can turn it on while the work is being done.

The work can’t begin until an “authorized employee,” i.e., one who’s trained and in charge of the lockout operation, verifies that both of these things have happened.

WHAT WENT WRONG IN THE VIDEO

The “authorized employee” in the video was Sean, the guy in the gray shirt. Maybe because he was distracted by his fiancée’s call, he allowed the service worker to work on the panel without verifying that:

  • The panel was de-energized—the power might have still been on because Gretchen had overridden his power down order; or
  • The power source was properly locked out—somebody with a key to the room might have come in and turned on the power when the worker was fixing the panel.

And you saw what happened as a result.

 LOCKOUT TAGOUT DO’s & DON’Ts

  • DO follow your workplace LOTO procedure
  • DON’T ever take shortcuts in carrying out the procedure
  • DO make sure all affected workers and contractor workers know what the LOTO procedure is
  • DON’T repair or service machinery or equipment until and unless you know it’s been de-energized and the energy source has been locked out


Is This the Kind of Confined Space Entry You Want for Your Workplace?

What’s wrong with this operation?

Sadly, it seems the worker didn’t survive the explosion inside this confined space. It’s not clear exactly what the worker was doing or how the explosion happened. Theories:

  • While welding the worker cut through his line causing the flame to travel up his tubing and ignite his pressurized oxygen tank;
  • The worker was welding when a spark from his oxygen torch set off a pocket of gas that had somehow formed inside the confined space;
  • His oxygen tank exploded while he was welding either because it was faulty or because the temperature or pressure inside the space was too high; and
  • The worker was using a process called “lancing” to free up a jammed tooth, i.e., chunk of metal, that instead of just “popping” away shot off with great force and went through his chest.

The Moral: What is clear is that working inside a confined space is extremely dangerous especially when performing hot work.


Do Your Fire Exits Look Like This?

Imagine that you were a worker inside this building counting on getting through that exit to flee a fire. That padlock is sealing not just your escape exit but your fate.

The Moral: Fire exits must be secured from the inside and in such a way that it doesn’t prevent workers from using them in an emergency.

WHAT’S AT STAKE: The Humanity—The Triangle Shirt Factory Fire

Take another hard look at the photo. Now close your eyes as we take you back more than 100 years to New York City.

It’s March 25, 1911. You work at the Triangle Waist Company shirt factory. It’s the very definition of a sweatshop. You and your co-workers, mostly young women immigrants who barely speak English, earn pennies a day. Hundreds of you are crowded together on floors 8 through 10 in hot, dirty and appalling conditions

At about 4:30 in the afternoon, a fire breaks out on the eighth floor. The work space is crammed with flammable cloth and the fire quickly spreads to the ninth and tenth floors. The building has no fire protection and the only exit doors on each floor are locked from the outside—just like the fire exit in the photo above. You’re trapped. 114 workers are killed.

The building owners are tried but under the laws of the day, they can’t be convicted. The so-called Triangle Shirt Fire and its aftermath provoke outrage. It gives a huge boost to the labor movement and led to major reforms, including the enactment of fire and building codes and the first workplace safety laws.

We’ve come a long way since then. But apparently we still have a ways to go before fire exits locked from the outside become a relic of history.

WHAT’S AT STAKE: The Legality—Liability for Sealed Fire Exits

In addition to creating a death trap, sealing emergency exits from the outside is the kind of safety violation likely to get you into big big trouble with regulatory agencies and inspectors. Here’s an example from the U.S.

A Hawaii food warehouse owner learned this lesson the hard way. OSHA inspectors found some fire exits were locked from the outside and sealed shut and others blocked by storage racks.

Result: It cited the owner for a willful violation, i.e., one committed with intentional, knowing or voluntary disregard for the law, or plain indifference to worker safety, and fined it $56,000. The owner was fined another $195,000 for other violations, 2 of them willful.

The press release announcing the fine leaves no doubt that OSHA hasn’t forgotten Triangle:

“Employers must follow safety and health rules to prevent horrific tragedies, such as the Triangle Shirtwaist Factory fire in New York in 1911 when 146 workers died, unable to escape due to blocked exits. We hope to never see such a tragedy again, in Hawaii, or anywhere.”

Unicold Corp.,No. 13-1602-SAN (SF-124), Reg. 9, August 12, 2013

8 EMERGENCY EXIT DO’s & DON’Ts

  1. DO make sure you know the emergency exit(s) in your building
  2. DON’T keep large objects like boxes or equipment in emergency exits
  3. DO remove any large objects that are blocking emergency exits—or ask your supervisor to do
  4. DON’T keep explosives or flammable objects in emergency exits
  5. DO make sure emergency exits are well lit—if they’re not tell your supervisor
  6. DO make sure emergency exits are kept unlocked from the inside so people can use them to escape the building in an emergency—no padlocks!
  7. DO tell your supervisor if an emergency exit is padlocked or otherwise not readily available to use in an emergency
  8. DON’T panic or stampede if an emergency does occur—evacuate calmly and help those who need assistance evacuating


Is This Any Way to Protect Your Visitors?

What’s wrong with this picture?

Dad is probably somewhere inside that jet. But while it might make for a Hallmark moment, seeing mom and baby carriage so close to that parked plane is a little scary. At least the wheels are chocked; but I wonder if hearing protection comes in infant sizes. . .

The Moral: Workplace safety is about protecting not just you and your co-workers but the visitors who come to your site.

3 Reasons Work Safety Must Account for Visitors

  1. Visitors to your workplace are apt to get hurt—especially if they’re not trained to recognize and deal with the hazards it contains.
  2. Visitors’ safety mess-ups can endanger you and your co-workers.
  3. These injuries can and should be prevented by applying the safety rules of your workplace to the people who visit it.

8 Best Practices for Preventing Visitor Injuries

Here are 8 things you can do to ensure that visitors don’t injure themselves or others at your workplace:

1. Make visitors sign in at a central reception area

2. Have visitors read your workplace safety rules before signing in

3. Warn visitors of any hazards they face while visiting your workplace

4. Make sure all visitors know what to do in case an emergency arises during their visit

5. Require visitors to follow your safety rules while they’re on the site

6. Make visitors wear appropriate PPE

7. Require visitors to follow a safety code of conduct, e.g., obey supervisor instructions, heed warning signs, stay out of restricted areas, refrain from pranks, etc.

8. Make visitors log out when they leave


Is This a Safe Place for a Smoke?

 Is This a Safe Place for a Smoke? What’s wrong with this picture?

Well, you can’t say he wasn’t warned! Maybe he doesn’t speak English; maybe he just flat missed the “NO SMOKING” warning he’s directly facing; or maybe he’s so hard up for a cig that he just doesn’t care if lighting up could detonate an explosion.

The Moral: There’s no such thing as a safe place to smoke. But when workers ply the nasty habit around flammables, they endanger not only themselves but everybody in the vicinity.

WHAT’S AT STAKE: 3 Reasons to Pay Attention

1. Your work area contains flammable liquids like fuels, solvents and cleaning chemicals that can explode and burst into flames if something causes them to ignite.

2. The things you do while working with or near flammable liquids can ignite fires and explosions—like smoking near them a la the gentleman in the photo.

3. Although we’ve taken steps to protect you—like installing ventilation and storing flammables in specially designed containers—you need to do your part by controlling “ignition sources.”

8 FLAMMABLE LIQUIDS SAFETY DO’s & DON’T’s

To prevent explosions and fires when working with or near flammable liquids:

  • DO look at the label of the container to determine the kind of flammable liquid inside
  • DON’T store or use flammable liquids near an ignition source
  • DO make sure all storage drums are grounded to prevent static electricity when transferring flammable liquids from one container to another
  • DON’T smoke when using or near flammable liquids
  • DO place fire extinguishers near areas where flammable liquids are stored
  • DON’T fill containers of flammable liquid past 80% of the container’s capacity
  • DO transport flammable liquids in the back of a truck or trunk of a car rather than inside the vehicle
  • DON’T use flammable liquids unless you’ve been trained to do so properly


Is This Safe Posture for Stacking?

What’s wrong with this picture?

Work that requires awkward and unnatural postures like reaching with both hands over your head, causes fatigue and strain to your neck, back, joints and muscles. The result: Musculoskeletal disorders (MSDs).

The Moral: Work tasks should fit the worker’s body—not the other way around.

Real Life MSD Victims: MEET REBECCA RHOADS, RN, BSN

“I was an expert nurse at the pinnacle of my career.  ‘One of the best,’ according to the CEO of my hospital.

“Ironically, three months after the CEO made that statement, I hurt my back trying to lift a patient. A back injury is known as “the kiss of death” for a nurse’s career. This proved true for me as it has for many.

“My career is gone but the pain endures. Two spinal fusion surgeries later, I’m still struggling.”

7 Ways to Protect Yourself

Make it possible to do the work using your normal posture without having to reach—or reducing the distance you have to reach. Methods to consider:

1. Raising or tilting the work to get better access to the object you’re working on

2. Placing the tool or item you’re working on in front of you, at shoulder height, and as close as comfortably possible

3. Extending your reach using long handled tools, extension poles and tool extenders like bit extension shafts for drills and screw guns

4. Positioning yourself on devices that extend your reach like height ladders and movable stairs;

5. Taking frequent breaks

6. Limiting the amount of time you spend doing awkward posture tasks to 4 hours per day

7. Always following company safe work procedures


Is This a Safe Way to Guard a Floor Opening?

What is wrong with this picture?

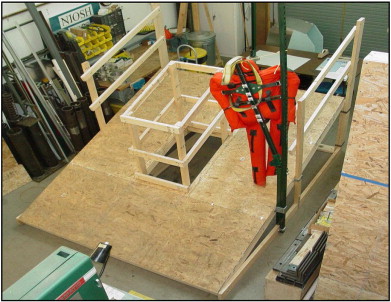
The railing arrangement in this photo is in some ways more dangerous than the floor hole it’s guarding:

  • There’s no intermediate railing; and
  • The post ends jutting out from over the top railing are uncapped and could cause serious damage if workers stumble into them.

Moral: Make sure your floor hole guarding arrangements meet OSHA standards and don’t expose workers to additional hazards.

FLOOR HOLES & FALLS: 3 Reasons to Pay Attention

  1. Falls are the leading cause of workplace accidents
  2. 15% of all workplace deaths are the from falls (the second leading cause of fatalities trailing only motor vehicle crashes
  3. Many of these fall accidents and deaths are the result of stepping into floor holes like the one in the picture

MAKE SURE FLOOR HOLES ARE PROPERLY GUARDED

OSHA (Sec. 1910.23(a)(8)) says that floor openings must be guarded by EITHER:

1. A Floor Hole Cover of standard strength and construction;

OR

2. A Standard Railing and Toeboard on all exposed sides.

MAKE SURE RAILINGS ARE SAFE

According to OSHA (Sec. 1910.23(e)(1)), there are 5 things a railing must have to be considered “standard railing”:

  1. A top rail that’s smooth-surfaced throughout the length of the railing;
  2. An intermediate rail that’s located about halfway between the top rail and floor/platform/runway/ramp;
  3. Posts;
  4. At least 42 inches in height measured from the upper surface of the top rail to the floor/platform/runway/ramp;
  5. Ends of rails that don’t overhang the terminal posts (unless the overhang doesn’t constitute a projection hazard).

The railing in this photo is clearly not up to “standard.”


Is This the Right Way to Use a Welding Torch?

What’s wrong with this picture?

The Good News: He’s putting on his hard hat and hearing protection.

The Bad News: He’s chosen a bad place to put his torch so he can free up his hands.

The Moral: If I were to start a line of work safety fortune cookies, my first slogan would be:

“Only the fool fixes one safety hazard by creating another.”

WELDING SAFETY: 3 Reasons to Pay Attention

  1. Welders get killed on the job at a rate of 4 per 1,000
  2. The odds of a serious or fatal injury go way down when welders use PPE
  3. But using PPE and other welding equipment the wrong way—like the worker in the photo—actually increases the danger

WEAR THE RIGHT CLOTHING FOR WELDING

One of the best ways to protect yourself from welding hazards is by wearing the right kind of protective clothing, including:

1. Woolen clothing

2. Flame-proof aprons

3. Gloves

4. Long sleeve shirts

5. Straight legged trousers without cuffs

8 WELDING SAFETY DO’S & DON’Ts

There are 10 things to do/not do to weld safely:

  • DO check your protective equipment before each use
  • DON’T weld in clothes caked in grease and oil
  • DO follow all safe work procedures when welding
  • DON’T weld unless and until you ensure that the place is properly ventilated
  • DO keep clothing and equipment dry to avoid electric shock
  • DON’T weld near explosive chemicals or fire hazards
  • DO use proper eye and face PPE when welding
  • DON’T keep your welding torch between your knees—especially when it’s on


Is This the Right Way to Use a Nail Gun?

He’s not wearing eye protection or safety gloves and his nail gun posture is a repetitive stress injury waiting to happen.

Oh, and one more thing. “He” is Stephen Harper, Prime Minister of Canada. So I guess we should add operating a nail gun without training to the list of violations.

The Moral: Nail guns and other dangerous tools should be operated only by the workers trained to use them, not by politicians.

NAIL GUN SAFETY

3 Reasons to Pay Attention

  1. Nail gun injuries are responsible for over 37,000 ER visits each year
  1. Construction workers are especially vulnerable to nail gun injuries
  1. Nail gun injuries are usually not fatal. I stress the word “usually.” There are exceptions like the 26-year-old Idaho construction worker who was killed when he slipped and fell while framing a house with his hand on the trigger of his nail gun. The nosepiece hit his head as he fell, driving a 3-inch nail into his skull.

KNOW YOUR TRIGGERS*

Nail guns use 2 basic controls: a trigger and a contact safety tip located on the nose of the gun. Trigger mechanisms differ by:

  • The order in which the controls are activated; AND
  • How many nails can be fired by a single squeeze of the trigger.

There are 4 kinds of trigger mechanisms:

1. Full Sequential Triggers are the safest because the trigger will fire only when all of the controls are taken in the right order.

2. Contact Triggers which fire a nail when the safety contact and trigger are activated in any order.

3. Single Sequence Triggers which like full sequential triggers, will only fire when the con­trols are activated in a certain order. First, the safety contact tip must be pushed into the work piece. Then, you must squeeze the trigger. To fire a second nail, you only need to release the trigger.

4. Single Actuation Triggers which like contact triggers, fire a single nail when the safety con­tact and trigger are activated in any order but also fire a second nail by releas­ing the trigger, moving the tool and squeezing the trigger again without releas­ing the safety contact tip.

10 NAIL GUN SAFETY DO’S & DON’Ts

There are 10 things to do/not do to ensure safe use of nail guns:

DO make sure you know how your nail gun trigger works before using it

DON’T bypass the nail gun safety mechanisms

DO follow all safe work procedures and manufacturers’ instructions when operating a nail gun

DON’T leave your nail gun around unattended

DO check the trigger, safety contact and other mechanisms before you use the nail gun

DON’T use a nail gun that is broken or not working properly

DO shoot nail guns away from your body and co-workers

DON’T use a nail gun without eye protection and safety gloves

DO tell your supervisor immediately if your nail gun isn’t working right

DON’T use a nail gun if you’re the Prime Minister of Canada (or, for that matter, in any other job if you haven’t received nail gun training)


How’s This for Protective Clothing?

reflective clothing safety training

*Also available in hamster sizes. 

What’s wrong with this photo? Spot the violation.

It’s a gray day and the officer needs her reflective arm bands so the vehicles she’s directing can see her. Her dog is in the same danger zone. So why shouldn’t he/she have reflective garb, too?

The Moral: Reflective clothing is a must for anybody–or anything–exposed to traffic hazards.

REFLECTIVE CLOTHING:  Why You Should Pay Attention

  • EVERY 14 MINUTES: How often somebody gets hurt in a road construction zone accident
  • EVERY 15 HOURS: How often somebody gets killed in a road construction zone accident
  • 25: The percentage of road construction zone fatalities involving large trucks.  

5 KINDS OF REFLECTIVE CLOTHING

Reflective, aka high-visibility clothing, reduce your risks of getting hit by a vehicle when you’re exposed to traffic hazards. The 5 common types of reflective clothing include:

1. Reflective Vests

2. Reflective Belts

3. Reflective Arm Bands

4. Reflective Jackets

5. Reflective Hats

WHO SHOULD WEAR REFLECTIVE CLOTHING?

Answer: You (and Your Dog) if You:

  • Work in construction
  • Work on highways and roads
  • Are a fire fighter, school crossing guard or a parking attendant
  • Work in EMS
  • Work as a baggage handler or other outdoor operation at an airport
  • Jog, bike, or do any other roadside activity after work


Is This Safe Posture for Keyboard Use?

computer workstation ergonomics 101

What’s wrong with this picture?

The worker in this picture is doing 3 things that increase his risk of a repetitive stress injury (RSI):

  1. He’s hunched over in a posture that places stress on his back, neck and shoulders
  2. Because his wrists are anchored to the desk surface, he has to stretch his fingers and twists his wrists to reach the keys
  3. Leaning his forearms against the desk creates contact stress

The Moral: The right posture is essential to avoiding carpal tunnel syndrome, tendonitis and other RSIs associated with keyboard work

3 Reasons to Pay Attention

  1. More than 1 in 4 workers’ compensation claims filed are for RSIs
  2. Office workers who work in computer work stations suffer RSIs at a disproportionately high rate
  3. Roughly 75% of office workers suffer pain in their neck, shoulders, wrists and back during the week, according to a recent survey of over 1,000 office workers

Safe Posture for Sitting at Computer Workstations

computer workstation ergonomics 101

Don’t be like the worker in the picture. If you sit at a workstation all day, make sure you maintain an ergonomically neutral posture:

A Neutral Posture Means…

  • Hands, wrists, and forearms are straight, in-line and roughly parallel to the floor;
  • Head is level (or bent slightly forward), forward facing, balanced, and in-line with your torso;
  • Shoulders are relaxed;
  • Upper arms hang normally at the side of your body;
  • Elbows stay close to the body and are bent between 90° and 120°;
  • Feet are fully supported by the floor or a footrest if the desk height is not adjustable;
  • Back is fully supported with appropriate lumbar support when you are sitting vertically or leaning back slightly;
  • Thighs and hips are supported by a well-padded seat that is parallel to the floor;
  • Knees are about the same height as your hips; and
  • Feet are slightly forward.

Other Workstation Ergonomic Risk Factors

  • Being too close to or far from your computer monitor—20 to 40 inches is optimal distance
  • A computer monitor that’s tilted too far left or right—monitors should be tilted no more than 35° degrees to either side
  • A monitor or keyboard that’s too high or too low to use in a neutral posture
  • The amount of work surface on and clearance room beneath your work desk
  • A desk or chair that’s either too high or too low
  • Glare on your monitor
  • Too much or too little light in your workstation


Is This Any Place to Flush an Eye Injury?

What’s wrong with this picture?

Welcome to the eyewash station from hell

Welcome to the eyewash station from hell:

  • The basin is filthy and caked with dirt.
  • The fluid pumps appear bone dry.
  • Access is blocked by mops, buckets, watering cans and goodness knows what else.

Other than that, it’s a terrific place to flush an eye injury.

The Moral: Keep your own eyewash facilities clean, supplied with rinsing fluid and easy for workers to get at.

3 Reasons to Pay Attention

  1. More than 2,000 U.S. workers suffer an eye injury at work each day
  2. More than 100,000 workers lose total or partial sight as a result of work-related eye injuries each year
  3. Immediately flushing the injured eye can save your vision

4 CRITICAL THINGS TO KNOW ABOUT EYEWASHING

Eyewash stations resemble water fountains in design and appearance. But their purpose is not for drinking but ensuring that workers exposed to flying debris, chemicals and other hazards to the eye have a place to go in case they need to flush their eyes. For eyewashing to be effective:

1. The Eyewash Station Must Be within 10 Seconds’ Reach

Objects blocking access to the eyewash station like in the picture cost you precious time!

2. Eyewash Station Must Provide Enough Fluid for at Least 15 Minutes of Flushing

3. Fluid in the Eyewash Station Should Be between 60°F and 100°F

4. Eyewash Stations Should Also Have a Sign or Conspicuous Markings

8 EYEWASH DO’S & DON’Ts

There are 8 things to do/not do to ensure safe use of eyewash facilities

DO know where the closest eyewash station is at all times

DON’T place mops, cans or any other objects in front of eyewash stations

DO keep eyewash facilities clean and sanitary

DON’T place covers over eyewash facilities

DO be sure you know and follow instructions for proper eyewashing

DON’T tamper with eyewash facilities

DO tell your supervisor right away if you notice any problems with eyewash stations like obstructions, dirt, missing fluid, etc.

DON’T forget to use your eye and face protection when working in or near things that can hurt your eyes—remember that 90% of all eye injuries are preventable


Is This the Right Way to Beat Heat Stress?

Workers down some beer on a hot day

Cold drinks are essential to ward off heat. But drinking alcoholic or caffeinated beverages, such as coffee, teas, and colas, are not recommended for optimal hydration. These fluids tend to pull water from the body and promote dehydration.

The Moral: Make sure your workers keep themselves properly hydrated when they work in hot conditions.

WHAT’S AT STAKE

Meet the Late Anthony Dalton

May 20, 1992

Boilermakers Anthony Dalton and Ronald Morrissey report for their first day of work repairing pipes in a New Brunswick paper mill.

New Brunswick is in Canada. So the last thing Dalton and Morrissey are expecting is 94° F and 35% humidity. It’s even hotter inside the mill where chemicals are heated in enclosed spaces—especially on the scaffolds where the men are working.

Dalton and Morrissey work all day in the heat. Dalton starts experiencing fatigue. It’s the first warning of danger. But since neither man has received any training about the dangers of heat stress, it goes unrecognized. Opportunity lost.

May 21, 1992

99° F, 33% humidity. Dalton and Morrissey work the entire day. Dalton is getting worse. When the two get back to their motel after work, Dalton has muscle cramps. He’s exhausted. He passes out on the bathroom floor of the motel room. He drinks a beer, not realizing that the last thing somebody in his condition should do is drink alcohol.

May 22, 1992

101° F. Dalton manages to drag himself to work. He spends the morning inside one of the tanks helping to build a scaffold. He’s in big trouble. After his afternoon break, he tells the supervisor that he’s just too exhausted to go back to work. He sits on the floor with his back against the base of a column. When the shift ends, he can barely stand up. He’s incoherent. He stumbles about 100 yards and finally collapses. Even now, nobody knows what’s wrong. The ambulance takes Dalton to the hospital. But it’s too late. Dalton dies of heat stroke the next day.

The Moral

Perhaps the saddest part of the death of Anthony Dalton is that it could have been prevented. There was ample warning: Dalton’s fatigue, the cramps, his passing out on the bathroom floor, etc. Anybody attuned to the signs of heat stress would have recognized what was going on and acted while there was still time. Tragically, because none of the workers or supervisors with whom Dalton worked had received any education on heat stress, every opportunity to save him was missed.

HEAT STRESS HYDRATION DO’s & DON’Ts

WHEN WORKING IN THE HEAT:

  • DO drink cold water
  • DON’T drink:
    • Beer or other alcoholic beverages
    • Coffee or other caffeinated beverages
    • Soda or other heavily sugared beverages
    • Salty beverages
  • DO take regular water breaks during hot work, e.g., once every 15 minutes
  • DO step up the frequency of water breaks if the heat or workload increases
  • DO take your water breaks in the shade or inside in an air conditioned space
  • DO drink enough cold water during breaks—at least one pint per hour


Is This the Kind of PPE Example You Want Your Supervisors to Set?

Why it's important to use PPE

The gentleman in the red shorts and tee-shirts who is apparently directing this dangerous operation is dressed more like a California surfer dude than a supervisor. While his crew is properly attired with reflective vests, hard hats and protective boots, the dude isn’t using any PPE at all.

The Moral: Ensure that your work crews are directed by competent supervisors who recognize the hazards of the work and set the right example.

3 Reasons to Pay Attention Based on historical statistics:

  • More than 500,000 U.S. workers will suffer disabling injuries to the head, hands, eyes or feet this year
  • Only 16% of the workers who suffer a disabling head injury will be wearing head protection
  • Only 23% of the workers who suffer a disabling foot injury will be wearing protective shoes or boots

3 Kinds of Hard Hats

There are 3 classes of hard hats, each of which protects against some head hazards but not others:

Class G (formerly called Class A): General service hard hats:

Why it's important to use PPE

  • Protect you from impact
  • Provides only limited protection from electricity

Class E (formerly called Class B): Used for electrical work:

Why it's important to use PPE

  • Protects you against falling objects
  • Protects you against high voltage shock/burns

Class C: Designed for comfort and provide only limited protection:

ppe3

  • Protects you against bumping into fixed objects
  • Doesn’t protect you against falling objects or electrical shock

9 Kinds of Protective Footwear

Flip flops aren’t appropriate foot protection. But the following footwear may be—depending on the hazards to which you’re feet are exposed:

1. Metatarsal (Mt rated) Footwear
• Designed to protect the toes

2. Conductive (Cd rated) Footwear
• Designed to protect against static electricity
• Dissipate static electricity from the ground

3. Electrical Hazard (EH rated) Footwear
• Made of materials that don’t conduct electricity and that resist shock
• Designed to protect against electrical contact

4. Static Dissipative (SD) Footwear
• Reduce accumulation of static electricity
• Conduct body charge to ground while maintaining a high level of resistance

5. Puncture Resistant (PR) Footwear
• Prevent sharp objects from piercing the sole of the foot
• Conduct body charge to ground while maintaining a high level of resistance

6. Heat Resistant (HR) Footwear
• Protect feet against burns and high temperatures

7. Cold Resistant Footwear
• Protect feet against freezing and cold temperatures

8. Chemical Resistant Footwear
• Protect feet from hazardous chemicals

9. Slip Resistant Footwear
• Prevent falls by providing grip on slick and slippery surfaces


Is This a Safe Way to Use a Scissor Lift?

Scissor lift safety pitfalls to avoid

The workers in this photo are committing at least two dangerous safety violations that any OSHA inspector would jump all over:

  1. Using the side rails of the scissor lift as a ladder—can the rail support the worker’s weight? I can’t say for sure because I didn’t read the manufacturer’s operator’s manual but I’ll bet these workers didn’t, either
  2. There’s fall protection equipment but nobody’s using it.

The Moral: Make sure workers use scissor lifts and other elevated platforms the way OSHA requires and the manufacturer’s instructions stipulate

What’s at Stake

Meet Declan Sullivan

Meet Declan Sullivan

20-year-old Declan Sullivan was a sophomore at Notre Dame, a college whose football tradition are as deeply rooted as the game of college football itself. Declan had a dream job—student manager of the football team.

On a Wednesday afternoon, October 27 2010, Declan ascended a hydraulic scissor lift 20 feet off the ground to film football practice from the bird’s eye vantage. The wind was whipping. The tower began to sway. Declan was swept with terror. The notes he posted on Facebook, which have just come to light, are chilling:

“Holy **** holy ***** this is terrifying.”

“Gusts of winds up to 60 mph, well today will be fun at work. I guess I’ve lived long enough.”

Inevitably, the tower came crashing down, hurtling onto a road near the practice field. Attempts were made to dig him out but Declan was gone.

There are two important facts that stand out in the investigation report:

FACT: The scissor lift that Declan was on isn’t supposed to be used in winds over 40 km/hour.

FACT: At the time of the accident, the winds in South Bend, Indiana, where the Notre Dame campus is located, actually exceed 80 km/hour.

8 Common Scissor Lift Safety Pitfalls to Avoid:

Sadly, Declan Sullivan is not the only person killed needlessly in an avoidable scissor lift accident. Common mistakes resulting in scissor lift fatalities include:

  1. Using scissor lifts in windy conditions—the mistake that cost Declan Sullivan his life
  2. Using the scissor lift as a hoist
  3. Exceeding the maximum lift capacity listed in the operator’s manual
  4. Using the frame to climb onto or down from the raised platform
  5. Standing on the handrail or midrail—like the worker in the above photo is doing
  6. Using a ladder on the platform
  7. Parking the scissor lift on a slope
  8. Not using fall protection when working on the scissor lift at unsafe heights (like the workers in the photo)


Is This What You’d Call Machine Safety?

What’s wrong with this photo?

lab1

Let’s just hope this machine has been properly de-energized.

The Moral: Machines are generally not a good place to stick your head.

MACHINE HAZARDS

3 Reasons to Pay Attention

  1. More than 6,000 workers lose a limb in a workplace accident each year
  2. The vast majority of work-related amputations are machine accidents
  3. Amputation injuries are almost always permanently disabling—and they’re much more serious than that when the “amputated” appendage is the head

3 KINDS OF MACHINE GUARDING

OSHA rules and common decency require protecting workers against the risk of machine injuries. There are three basic kinds of machine guarding:

1. Physical Barriers that prevent workers from making contact with a machine

lab 2

2. Guarding Devices like light screens, interlocks and pullbacks that don’t prevent contact but stop moving hazards before the contact occurs

lab 3

3. Guarding by Location, i.e., putting the machine somewhere that workers can’t reach

lab 4

8 MACHINE SAFETY DO’S & DON’Ts

There are 8 things to do/not do to ensure proper use of face protection:

DO read all warnings on the machine before operating it

DON’T operate or even go near machines unless you’re trained and authorized to do so

DO check all motion control switches at least once a day

DON’T operate a machine unless and until you verify that all machine guards, interlocks, and other safety devices are in place and working properly

DO let the machine and spindle come to a complete stop before touching parts, tools or the spindle

DON’T operate machines with electrical cabinets or safety door enclosures open

DO use extra guards if necessary

DON’T perform service, maintenance or repairs on machines unless they’re properly de-energized under the lockout tagout program


How’s This for Face Protection?

What’s wrong with this picture?

Face Protection

It may be great for keeping sandwiches fresh but Saran wrap doesn’t quite work as face protection. But at least the worker in this photo has something covering his face; too bad you can’t say the same about his feet.

The Moral: You must ensure that workers exposed to flying debris and sparks are equipped with and use proper eye and face protection.

3 Reasons to Pay Attention

  1. 3 out of 5 workers who suffer face and eye injuries on the job weren’t wearing any face or eye protection
  2. 2 out of 5 workers who suffer face and eye injuries on the job who were wearing face or eye protection got hurt because they were wearing the wrong kind of protection
  3. Cellophane wrap is the wrong kind of face protection—in fact, it’s like having no face protection at all

4 Kinds of Face & Eye Protection

The first thing you need to do is select the right kind of face protection to use. The 4 most common types are:

1. Safety Spectacles have safety frames (usually metal or plastic) + impact-resistant lenses + sometimes side shields

  • Protect  the eyes from flying objects, sparks & dust

Face Protection

2. Goggles completely cover the eyes, eye sockets and facial area around them

  • Protect the eyes from impact, dust & splashes
  • May come with tinted lenses

Face Protection

3. Welding Shields are made of vulcanized fiber or fiberglass and fitted with filtered lenses that must be of a shade number necessary to protect against the particular hazard

  • Protect eyes from burns caused by intense light
  • Protect eyes & face from flying sparks & metal splatter & slag chips from welding/brazing/soldering/cutting operations

saran 4

4. Face Shields are transparent plastic sheets that extend from the eyebrows to below the chin and across the entire width of the head and may be polarized to protect against glare

  • Protect against dust, splashes & sprays
  • Don’t protect against impact—unless you wear safety spectacles or goggles underneath

Face Protection

8 Face Protection Dos & Don’ts

There are 8 things to do/not do to ensure proper use of face protection:

DO clean your face protection regularly following company/manufacturer instructions

DON’T use goggles if they’re scratched, don’t fit right or the elastic band is frayed

DO inspect your face protection each time before you use it

DON’T use safety spectacles if they’re scratched, bent or don’t fit right

DO ensure that face & welding shields are disinfected periodically

DON’T use face protection that’s not designed to protect you from the actual hazard you face in doing the job

DO make sure you actually use your face protection

DON’T use face protection equipment if it doesn’t fit right, obstructs your movement or blocks your vision


Is this a Proper GHS/Hazcom Label?

What’s wrong with this picture?

GHS/Hazcom Labels Training

The answer, of course, is no. And while it may be better than no label at all, this makeshift “UNKNOWN” tag is appallingly inadequate—especially when you consider that this photo comes from a chemical laboratory.

The Moral: Hazardous chemicals must have a proper Hazcom/GHS label. If you’re not sure what’s inside a container, either find somebody who does or get rid of the thing. And please, please do not keep the container in a pantry!!

GHS & Hazcom Labels: What’s at Stake

5 Reasons You Need to Know about Hazcom & GHS Labels

  1. You work with or near hazardous chemicals that can make you seriously ill or even kill you
  1. OSHA and company rules guarantee your Right to Know about these chemical hazards
  1. One of the most important parts of ensuring your Right to Know is via putting labels on containers of hazardous chemicals listing key information about the chemical, why it’s dangerous and what to do to protect yourself
  1. Even if you’re already familiar with chemical labels, new laws require replacing those old “Hazcom” labels with new what are called “GHS labels”
  1. The new GHS labels aren’t required until 2015; so for the next 2 years, you’re likely to see both old Hazcom and new GHS labels at your workplace

3 Differences between Hazcom & GHS Labels

1. Appearance

Here’s a side by side comparison of Hazcom (HCS) and GHS labels:

GHS/Hazcom Labels Training

Notice that the GHS label:

  • Lists more information than the current label;
  • Includes graphic symbols; and
  • Contains a third color—red.

2. Information Label List

The current Hazcom (HCS) label must list:

  • Identity of hazardous chemical, i.e., IUPAC chemical or common name as listed on the MSDS;
  • Appropriate hazard warnings or words, pictures, symbols or combination, providing: i. at least general information about chemical’s hazards; and, ii.that, in conjunction with the other information immediately available to employees under the Hazcom program, furnish them specific information about the chemical’s physical or health hazards; and
  • The name and address of the chemical’s manufacturer, importer or other responsible party.

The GHS label must list:

  • Product identifier, i.e., hazardous chemical’s name or number;
  • Signal word, i.e., “danger” for more severe hazards, “warning” for less severe ones;
  • Hazard statement(s), i.e., statements assigned to a hazard class and category describing the nature of the hazard(s) of a chemical and, where appropriate, the degree of hazard;
  • Pictogram(s) in the shape of a square set at a point that include a black hazard symbol on a white background with a red frame wide enough to be clearly visible;
  • Precautionary statement(s), i.e., phrases describing recommended measures to take to minimize or prevent adverse effects of exposure, improper storage or handling; and
  • Name, address & phone number of manufacturer, importer or other responsible party.

Chemical Safety Dos and Don’ts

  • DO store chemicals in their original containers
  • DON’T use chemicals that aren’t properly labeled like the one in the photo above
  • DO follow the label instructions and safe work procedures when working with chemicals
  • DON’T keep chemicals in lunchrooms or other areas where people eat and drink
  • DO use the recommended PPE when working with a chemical
  • DON’T mix chemicals unless you’re sure they won’t react
  • DO ask questions if you’re not sure about a chemical’s dangers or how to work with it safely
  • DON’T use flammable chemicals near a source of ignition
  • Dos and Don’ts when using chemicals in the workplace


Is this Proper PPE for Operating a Jackhammer?

What’s wrong with this picture?

jackhammer1

Let’s do a quick PPE inspection of the gentleman operating this jackhammer:

  • Reflective vest? √
  • Eye protection? X
  • Hearing protection? X
  • Foot protection? Not sure
  • Hand protection? X

The Moral: There sure is a lot to talk about in this photo. But let’s focus on just one of the worker’s many PPE violations: his failure to use anti-vibration gloves while operating a jackhammer.

Vibration Hazards: What’s at Stake

5 Reasons to Pay Attention

  1. Your work puts you at risk of a type of injuries known as Musculoskeletal Disorders (MSDs, for short)
  1. Although they won’t kill you, MSDs are very painful and potentially disabling
  1. Hand-arm vibration from holding a jackhammer or other vibrating tool increases your  risks of MSD injuries like Carpal Tunnel, white finger and Raynaud’s Syndrome
  1. Using the right personal protective equipment (PPE) while operating a jackhammer can significantly cut your risks
  1. Unfortunately, the worker in this picture is not using the right PPE or safety equipment

3 Kinds of Hand-Arm Vibration Protection

PPE and safety equipment to use when operating vibrating machinery include:

ANTI-VIBRATION gloves that minimize the effects of vibration that can fatigue your muscles and make you more vulnerable to an MSD

jackhammer2

ANTI-VIBRATION TOOL HANDLES OR WRAPS that make the handles of tools vibrate against your hands less intensely

jackhammer3

WARM CLOTHING FOR OPERATING VIBRATING EQUIPMENT IN COLD TEMPERATURES—the cold restricts blood flow and makes your muscles quicker to fatigue

jackhammer4

Vibrating Safety Tool Tips

  1. Use non-vibrating or low vibration tools whenever possible
  2. When using high vibrating tools like impact wrenches, chainsaws, jackhammers and riveting hammers is necessary, limit your exposure to 30 minutes per day
  3. When using moderately vibrating tools like grinders, jig saws, and sanders, limit your exposure to 2 hours per day
  4. Use battery operated rather than air powered tools whenever possible
  5. Make sure tools are properly maintained to eliminate vibrations caused by unbalanced mechanical parts
  6. Use personal protective equipment and other safety equipment to reduce the impact of vibration
  7. Keep your hands warm when using vibrating tools—cold hands reduce grip and increase MSD risks.

REMEMBER,

This. . .

jackhammer1

. . . can lead to this

jackhammer5


How’s This for Ladder Safety?

What’s wrong with this picture?

ivy1

While it might be great for the circus, ladder-balancing-on-ladder hijinks is something you never, ever want to see at your job-site.

The Moral: Make sure your workers don’t tie, fasten, tape or, like the workers in this picture, balance ladders together to extend their reach. If a ladder isn’t long enough, they should get a ladder that is.

Ladder Safety: 3 Reasons to Pay Attention

  1. Falls are the second leading cause of workplace deaths
  1. The largest percentage of workplace fall deaths were falls from ladders (according to 2009 statistics)
  1. Your odds of a fatal or serious ladder accident are especially high if you work in construction

5 Common Causes of Ladder Accidents

1. A metal ladder comes into contact with a power line
ivy2


2. The ladder isn’t securely anchored
ivy3


3. The spreaders aren’t fully opened and locked
ivyladdder


4. The ladder is knocked aside by an open doorway, piece of equipment or passerby


5. Look Ma! One hand! Circus tricks should stay at the circus. Use both hands when ascending or descending ladders.
ivy6


8 Ladder Safety Dos and Don’ts

  • DO maintain 3 points of contact with the ladder at all times
  • DON’T work from the top two rungs, steps or cleats or bucket/pail shelf of a portable ladder unless the manufacturer’s says it’s safe to do so
  • DON’T splice, lash or tape ladders together to make them longer
  • DO face the ladder and stand in the center of the side rails.
  • DO make sure the ladder is stable and securely anchored before you use it
  • DON’T use ladders that have damages or defects
  • DO make sure the ladder can support the weight of yourself and any tools and equipment you’re using
  • DON’T place ladders in front of or against a door unless the door is blocked in the open position, locked or otherwise guarded


Is This What You’d Call a Safe Electrical Circuit?

What’s wrong with this picture?

plug1

Problem: The round male prongs don’t fit into the female outlet. Solution: Drive in a pair of nails that do. Then, since the nails conduct electricity, they can be hooked up with the prongs to establish the circuit.

While it may rate an A for ingenuity, this arrangement gets an F for safety given that the charged nails represent an electrocution hazard of the first order.

The Moral: Workers may go to all kinds of lengths to engineer their way around problems. Unfortunately, these makeshift solutions may lead to serious injury and even death especially when they involve something as dangerous as electrical circuits.

WHAT’S AT STAKE: 3 Reasons to Pay Attention

  1. Each year, more than 7,000 U.S. workers get hurt on the job as a result of coming into contact with electricity
  1. 3,600 of these injuries leave the worker disabled and unable to return to work
  1. Approximately one worker gets killed at work each day as a result of electrocution

5 Electrical Dangers to Watch Out for

1. Using electrical tools or equipment in damp or wet locations


2. Frayed electrical wiring or extension cords
Is This What You'd Call a Safe Electrical Circuit


3. Splices or taps in flexible cords and cables


4. Disconnecting switches and circuit breakers without labels describing their use or the equipment they serve
plug5


5. Unguarded electrical equipment


8 Electrical Dos and Don’ts

  • DO report electrical dangers to your supervisor immediately
  • DON’T use electrical equipment until after you’ve inspected it to ensure it’s safe to use
  • DON’T use portable electrical tools and equipment that isn’t grounded or of the double insulation type
  • DO use the appropriate electrical PPE when working with or near electrical equipment
  • DO remove extension cords from receptacles by pulling on the plugs, not the cords
  • DON’T use multiple plug adaptors
  • DO be aware of and follow all of the company’s electrical safety policies and procedures
  • DON’T freelance or try to engineer your own electrical solutions—like the one in the photo above


Is This What You Want Your Workers Wearing for Hot Work?

If we can believe our site metrics, pictures of workers doing dangerous jobs without the right PPE seem to resonate with you folks. And this photo might just turn out to be the most startling of these PPE nightmares that we’ve ever run.

The Moral: We can’t see his face but let’s assume the worker’s wearing the right head, face and eye protection. And just maybe his boots provide adequate foot protection. The one problem there’s no getting around is the jeans and tee shirt. OSHA (Section 1910.252(b)(3)) requires you to ensure that workers performing hot work operations like brazing and welding wear suitable protective clothing. Unless these items are made of fire-resistant materials, the jeans and tee shirt the worker in this photo is wearing don’t make the “protective” grade.

Body Protection for Hot Work: WHAT’S AT STAKE

3 Reasons to Pay Attention

  1. More than 500,000 U.S. workers in a variety of industries perform hot work like welding, cutting and brazing
  1. Statistically, more than 125 of these workers will be killed on the job
  1. Wearing the right protective equipment goes a long way toward cutting your own risks of death or serious accident

5 Kinds of Protective Clothing

Protective clothing shields you from hot work hazards like extreme heat, splashes from molten metals and other hot liquids, potential impacts from tools and machines and hazardous chemicals. Protective clothing comes in a variety of materials designed to protect a different kind of hazards. 5 common types:

1. Paper-like fiber used for disposable suits protect against dust and splashes


2. Treated wool and cotton adapt to temperature changes, resist fire and protect against dust, abrasions, i.e., rubbing and friction and rough, irritating surfaces


3. Duck, a closely woven cotton fabric that protects against cuts and bruises when handling heavy, sharp or rough materials


4. Leather protects against dry heat and flames


5. Rubber, rubberized fabrics, neoprene and plastics protect against different chemical and physical hazards—check the label to find out what a particular item protects against


8 Protective Clothing Types

  • Keep protective clothing clean and free of oils, greases and stuff that can catch fire
  • When using protective shirts, wear one that’s long sleeved, has button cuffs and a collar to protect your neck
  • Tape shirt pockets closed or button them up so they don’t collect sparks or dusts
  • Make sure pants don’t have cuffs that can also collect sparks and dusts
  • Repair any frayed edges, tears or holes in protective clothing—or throw the stuff out if it can’t be repaired
  • Remove ignitions sources like matches from your pockets
  • Try to keep sparks away from your clothing
  • Be aware that fire-resistant fabrics become less effective after they’ve been laundered a lot


Is This a Safe Way to Use a Forklift?

What’s wrong with this picture?

Forklift Operation: 3 Reasons to Pay Attention

  1. Roughly 100 U.S. workers die in forklift accidents each year
  2. Roughly 36,340 workers suffer serious injuries as a result of such accidents over that same one year
  3. At least 20% to 25% of these accidents occur because the forklift operator wasn’t adequately trained

According to OSHA, you may not operate a forklift—or, as it’s technically referred to “powered industrial truck” (PIT)—unless and until you get training on these 11 topics:

1. Operating instructions, warnings and precautions relating to the particular type of PIT you’re allowed to operate.

Forklift Training Manual


2. Differences between the PIT and a car


3. Where the PIT’s controls and instruments are located, what they do and how they work

PIT Controls


4. How the PIT’s engine/motor operates


5. How to steer and maneuver the PIT

PIT Steering


6. Visibility, i.e., the importance of being able to see where you drive both forward and reverse and with and without a load (a lesson that obviously failed to sink in with the worker in the above photo).

Forklift Visibility


7. Fork and attachment adaptation, operation and use limits

Forklift Attachment


8. The PIT’s capacity, i.e., what it can/can’t do and safely carry


9. The PIT’s stability, i.e., how it can flip over and ensure that it doesn’t

PIT Stability


10. Any inspection or maintenance on the vehicle that you’re expected to perform

PIT Inspection and Maintenance


11. Refueling and/or charging and recharging batteries safely

Refueling a PIT


12. Operating limitations, e.g., how fast the PIT can go, what kinds of surfaces you can and can’t use it on, etc.

Surfaces a PIT is approved to drive on


8 FORKLIFT DRIVING DO’s & DON’Ts

There are 8 things to do/not do when operating a forklift

  • DO turn off the engine before refueling the forklift
  • DON’T ever operate a forklift if you don’t have the proper training—EVER
  • DO look in the direction you’re travelling at all times
  • DON’T carry others as passengers or use the forklift to lift a pallet while somebody’s standing on it
  • DO conduct a visual inspection of the forklift at the start of your shift before you use it
  • DON’T try to move loads that weigh more than the forklift’s safe lifting capacity
  • DO place forks under the load as far as possible
  • DON’T park a forklift on an incline unless the wheels are safely blocked


Is This How You Want Your Workers to Lift Heavy Objects?

What’s wrong with this picture?


The techniques the worker is using to lift this object are misguided. You can’t spell “misguided” without the letters m, s and d. MSD is also short for “musculoskeletal disorders,” a fancy term for strains and sprains to the lower back, shoulders and arms.

Moral: If you see workers using misguided lifting techniques like this, you need to take action not just to protect them from getting MSDs but to avoid being cited for failing to protect workers from “recognized hazards” under the General Duty Clause.

The Dangers of Improper Lifting: What’s at Stake

3 Reasons to Pay Attention

  1. Sprains and strains to the back, shoulders and arms (aka “musculoskeletal disorders” or MSDs) hurt like crazy and often last a lifetime
  1. More than half a million U.S. workers suffer MSDs each year
  1. Scientific studies show that using improper techniques to lift heavy objects like the worker in the photo make you much more vulnerable to MSDs

The 7 MSD Risk Factors

For manual lifting, i.e., lifting and moving heavy or bulky objects without using a tool or machine like a forklift, pulley or crane, the MSD risk factors include:

1. The object’s weight


The heavier the object, the greater the energy needed to lift and move it and the higher the MSD risk

2. The object’s weight distribution and shape


Moving lighter objects might present a high risk of MSDs if the object’s shape or bulkiness makes it hard to lift and carry

3. Horizontal distance of load from the body


The horizontal distance of the load away from the body means the distance from the low back to the hands when handling on object in front of the body

4. The object’s vertical location


Vertical location means where the object is located in relation to the floor before, during and at the end of the lifting process

5. How long you handle the object


Lifting and moving objects involves a greater risk of MSDs when you do it over a frequent or sustained period

6. Your lifting posture


Bending the back and bending forward—like the worker in the photo above—puts major stress on your spine; bending your knees and using your legs to lift significantly reduces that stress

7. Your grip


In addition to increasing the risks of dropping the object, a poor grip reduces the amount of weight you can safely carry

10 Do’s & Don’ts for Safe Lifting

  1. Stretch your muscles before lifting
  2. Size up the load before you try lifting it to ensure you can handle it safely
  3. Get as close as possible to the load before lifting it
  4. Keep the load as close to your body as possible
  5. Don’t lift objects that obscure your vision or footing
  6. Don’t twist your back and waist when you lift
  7. Don’t jerk the load
  8. Organize the work so you can avoid lifting from floor to shoulder level or above
  9. If possible, spread your lifting chores throughout the day rather than trying to complete them all at once
  10. Use dollies, carts and other lifting tools whenever possible—rule of thumb: try not to carry loads more than 10 feet without getting mechanical help


Do You Really Want Your Workers Breathing This Air?

What’s wrong with this picture?


This dusty vent isn’t just an embarrassing eyesore; it’s also a serious health and liability risk.
Moral: OSHA doesn’t have a general ventilation or Indoor Air Quality standard. But an OSHA inspector who sees a vent like the one in this picture wouldn’t hesitate a moment to cite you under the General Duty Clause, Sec. 5(a)(1) of the Occupational Safety and Health Act, which requires employers to protect workers from known hazards that can cause serious illness or injury

Ventilation and Indoor Air Quality

What’s at Stake: 3 Reasons to Pay Attention

  1. The air of many workplaces contain dusts, molds, gases and other “contaminants” that can harm your health if you breathe them in
  1. Industrial ventilation systems are designed to protect you against these airborne contaminants and make the air safe to breathe
  1. Ventilation systems that aren’t properly cleaned and maintained—like the one in the photo above—not only won’t protect you but may make the indoor air quality even worse

5 Types of Ventilation Systems

There are 5 types of basic ventilation systems used in industrial work settings:
1. Dilution & General Exhaust Removal Systems


2. Local Exhaust Systems


3. Makeup Air (or Replacement) Systems


4. HVAC (Heating, Ventilation & Air-Conditioning) Systems


5. Recirculation Systems


Ventilation Safety Types

Here are 8 things to do to ensure the air you breathe at work is properly ventilated and safe to breathe.

Know Your Rights—Recognize that you have a right (and the company has an obligation to supply) safe, breathable air at work

Speak Up—Recognize your responsibility to assert your rights to clean air and notify your supervisor if you ever see a filthy vent like the one in the photo.

Ask Questions—To ensure that the ventilation system is properly maintained, ask if:

  • All work performed on ventilation systems is done by what OSHA considers a “competent person”
  • The ventilation system and all of its components are inspected regularly
  • The ventilation is cleaned regularly
  • Routine and preventive maintenance is performed on the system
  • Ventilation openings are unblocked and clean
  • The company notifies you about dangerous contaminants in the air and what you must do to prevent them from getting you sick