Wind Hazards

People tend to think of windy conditions as being an annoyance, such as when it blows dust into one’s eyes or throws objects around a yard. But in outdoor work settings, it can be much more than annoying. There have been many cases of workers being injured or killed by objects caught by the wind, or by being thrown off elevated areas while carrying sheets of plywood or other objects.

Weather can affect your safety both on and off the job. Even if you don’t work outside, just getting to and from work in bad weather can be hazardous.

Download the latest special report and learn more about Wind Hazards and how to protect workers from getting caught up in a wind gust.


Selling Safety to the Executive Suite

Why does your company spend  money on safety? While the answer to the question might seem obvious to you, for an executive who hasn’t seen an injury report in over a year, cutting down the safety budget might seem like a reasonable way to save the company some money.

Could you convince your executives that maintaining, or increasing the company’s investment in safety will ultimately save the company money?

Learn how with our latest whitepaper: Selling Safety to Executives Suites.

Why does your company spend  money on safety? An effective safety program costs money. Your job, as a safety director, is to get the CEO and upper management to come up with the funds to build and maintain such a program. Learn how with our latest whitepaper: Selling Safety to Executives Suites.


Spot the OSHA Violation: Is This a Safe Job for a Worker Working Alone?

Is This a Safe Job for a Worker Working Alone?

Would you want your workers doing this job on their own?

confined space

Entering a permit required confined space like this one requires at least 2 workers:

  • The entrant; and
  • An attendant to remain outside the space at all times.

It looks like the workers in this photo are following the rules. Unfortunately, that isn’t always the case.

The Moral: Confined space entries are just one example of jobs that are too hazardous for a single worker to perform alone or in isolation (i.e., cut off from immediate help).

WHAT’S AT STAKE

THE DANGERS OF WORKING ALONE

Just about all jobs pose some kind of safety hazard. Working with or near co-workers and supervisors is an effective way to manage those hazards because those other people can:

  • Look after you and keep you out of trouble; and
  • Give you immediate help if you do get injured, ill or caught in some kind of emergency situation.

By the same token, performing a job when you’re alone or isolated from others increases your risks of serious injury or illness.

HOW TO PROTECT YOURSELF

FOLLOW THE SAFETY RULES FOR WORKING ALONE

Sometimes, the hazards of working alone or in isolation can be managed. The company has implemented safety controls, procedures and equipment to protect workers who work alone or in isolation.
Don’t work alone or in isolation unless you understand and are capable of using these safety measures.
KNOW THE JOBS THAT CAN’T BE DONE WORKING ALONE

Some operations are so dangerous that they should never be undertaken by a single worker working alone; they require at least 2 workers to carry out safely.

Example: A worker must never go into a confined space requiring a permit to enter unless there’s an attendant stationed outside to monitor the entry and deliver help in the event of an emergency.

Make sure you know these jobs and don’t try to carry them out unless you’re with or within easy reach of at least one co-worker or supervisor.

1. Firefighting operations inside structures that contain atmospheres which are immediately dangerous to life and health
fire-fighter


2. Installation, removal or repair of electrical lines over 600 volts
electric-cables


3. Installation, removal or repair of de energized electrical lines exposing you to risk of contact with parts over 600 volts
600watts


4. Handling of radioactive, explosive or highly reactive substances
toxic-workers


5. Handling of toxic gases, liquids or solids
handling-flammable-liquids


6. Handling of flammable liquids
presirised systems


7. Working on highly pressurized systems
combustable materials


8. Welding or cutting near combustible materials
Welding it together


9. Using fall arrest equipment or scaffolding
fall arrest equipment


10. Working in extreme weather
working in extreme weather


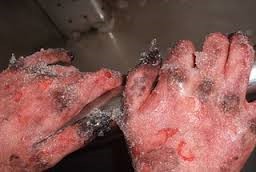
How Would You Treat Hands Like These?

frostbite fingers
Would you know what to do if a co-worker had frozen hands like these?

Step 1: Diagnose: Frozen, stiff and blackened fingers are a sure sign of frostbite.

Step 2: Treat: The best way to treat frostbite is to get the victim to a warm room and loosely cover the affected area until it warms up. Do NOT warm the affected area by rubbing it or directly exposing it to fire, a heat lamp or other heat source.

The Moral: There are different forms of cold stress and you need to be able to recognize the signs and symptoms of each so you know how to properly treat it.

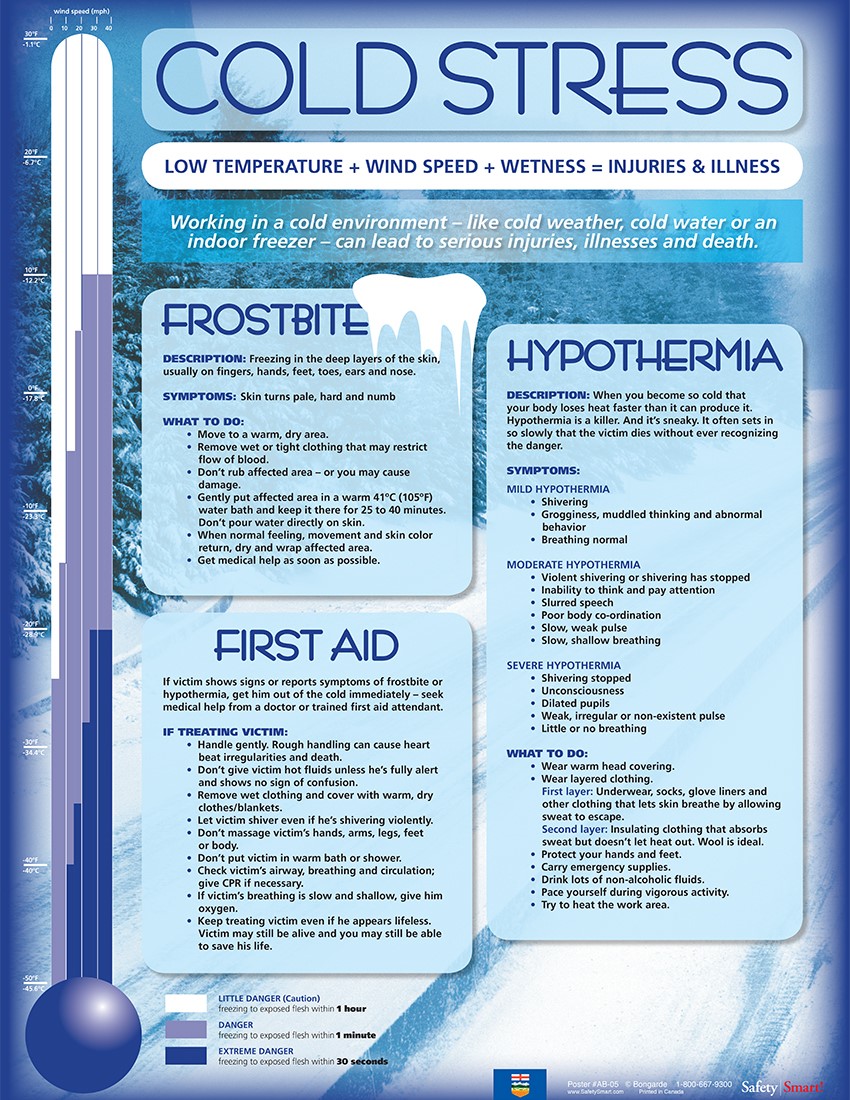
COLD STRESS CAN KILL

WHAT’S AT STAKE

Being cold isn’t just uncomfortable; it can cause serious injury and, in extreme cases, even kill you. In the U.S., approximately 700 people die of cold-related injuries each year—that’s higher than the number of fatalities caused by floods and tornadoes. These cold-related injuries, which are known as “cold stress” can happen at work.

WHO’S AT RISK

You’re at risk of cold stress if you work outdoors, in/near/above water or inside freezers or refrigerated facilities, including:

  • Construction;
  • Utilities;
  • Mining;
  • Oil and gas extraction;
  • Transportation and truck driving;
  • Agriculture;
  • Lumber;
  • Fishing;
  • Mortuaries; and
  • Food production and warehousing.

HOW COLD STRESS HAPPENS

Normal body temperature is 98.6° F. Minor and short-term decreases in body temperature are uncomfortable but generally not dangerous; but when core body temperature drops below 95.0° F, the body has trouble circulating blood. Result: The body becomes susceptible to cold stress. The longer the exposure to sub-95.0° F temperatures, the greater the danger.

HOW TO RECOGNIZE & TREAT COLD STRESS

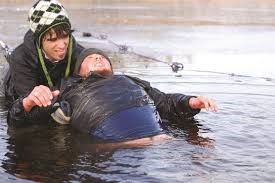
If you work in cold conditions, you and your co-workers may be at risk of 4 kinds of cold stress. Make sure you know the signs and symptoms of each one so you can recognize and properly treat the condition:

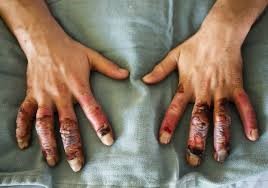
1. Frostbite
frostbite fingers 2
Freezing of the extremities (fingers, toes, nose, earlobes, etc.) caused by loss of blood flow, which can cause tissue damage and amputation
Frostbite Signs & Symptoms

  • Bluish or pale, waxy skin
  • Blackened skin (extreme cases)
  • Blistering
  • Numbness, tingling, stinging sensation

Frostbite First Aid Treatment

  • Get into warm room ASAP
  • Loosely cover affect area
  • Give victim warm, sweetened (nonalcoholic) drinks
  • Allow victim and affected area to warm up
  • DO NOT rub affected area
  • DO NOT directly expose the affected area to fire, heat lamp or other heat source that can cause burns
  • DO NOT break blisters


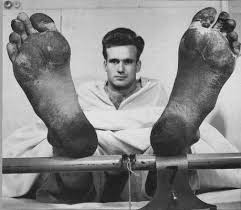
2. Trench Foot (aka Immersion Foot)
trench foot
Injury to the feet caused by prolonged exposure to cold and/or wet conditions which causes blood flow to the feet to shut down, potentially resulting in tissue damage and amputation
Trench Foot Signs & Symptoms

  • Reddening
  • Foot turns dark purple, blue or gray (extreme cases)
  • Swelling
  • Blistering
  • Bleeding under the skin
  • Numbness
  • Tingling pain
  • Leg cramps

Trench Foot First Aid Treatment

  • Remove wet shoes, boots and socks
  • Dry the feet
  • DO NOT let the victim walk because it can cause tissue damage to the feet


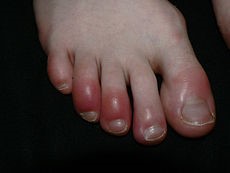
3. Chilblains
chilblains
Tissue damage, typically to the feet or hands that occurs when exposure to cold damages beds of capillary or small blood vessels in the skin
Chilblains Signs & Symptoms

  • Reddening
  • Inflammation
  • Blistering
  • Ulceration, i.e., formation of open sores (extreme cases)
  • Itchiness

Chilblains First Aid Treatment

  • Slowly warm skin
  • Keep blisters/ulcers clean and covered
  • Treat with corticosteroid creams
  • DO NOT scratch the itch
  • DO NOT break blisters


4. Hypothermia
hypothermia
The most dangerous form of cold stress that occurs when body temperature drops so low that the body can no longer replace lost body heat and uses up its stored energy. Possible result: Body systems and functions shut down and the victim essentially freezes to death

Hypothermia Signs & Symptoms

Early Symptoms

  • Shivering
  • Fatigue
  • Loss of coordination
  • Confusion/Disorientation

Late Symptoms

  • Shivering stops
  • Blue skin
  • Dilated pupils
  • Slowed pulse & breathing
  • Loss of consciousness

Hypothermia First Aid Treatment

  • Call for immediate medical help
  • Move victim to warm area or room
  • Remove wet clothing
  • Warm center of body—chest, neck, head, groin
  • Have victim drink warm beverages without alcohol
  • When body temperature increases, keep victim dry and wrapped in a warm blanket—including the head and neck
  • Begin CPR if victim has no pulse

HOW COLD STRESS CAN BE AVOIDED
The key to protecting yourself against cold stress is being aware of the danger and taking steps to keep your core body temperature at or above the critical 95.0° F threshold.

  • The company will do its part in achieving this goal by implementing appropriate engineering and work controls to minimize your exposure to work conditions that can lead to cold stress;
  • By you also have to do your part and protect yourself.

10 Ways to Protect Yourself When Working in the Cold:

1. Be aware of and follow all safe work procedures

s.o.p.


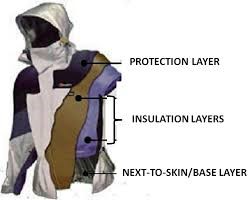
2. Wear at least 3 layers of protective clothing:

  • An inner layer of wool, silk or synthetics to insulate your body against moisture
  • A middle layer of wool or synthetics for insulation in case the outer layer gets wet
  • An outer layer to protect against wind and moisture and that’s ventilated to prevent overheating

protective clothing


3. Wear a hat or hood to keep from escaping from your head

cold protection hat


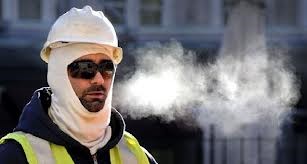
4. If necessary, wear a mask to protect your face and mouth

cold protection mask


5. Wear insulated and water-proof gloves

insulated gloves


6. Wear warm, insulated and, if necessary, water-proof boots or footwear

waterproof boots


7. Take rest breaks to warm-up

warm up breaks


8. Keep yourself hydrated by drinking water and warm beverages—but not alcohol

stay hydrated


9. Keep an eye on your co-workers and how they’re faring in the cold

cold coworkers


10. Make sure you know how to recognize and treat the 4 kinds of cold stress

cold stress infographic


Building a Safety Culture by Measuring Results

This desire for measurement and feedback—for keeping score–is critical to how we live our lives. It is also the key to the success of our safety program. For one reason, it lets us know how well we’re doing. For another, it can serve as a motivating force to the extent that people in the workplace will make the effort to earn a “good score.” Let’s discuss how to measure safety performance and use measurement and feedback as a motivating force to exert positive change on our organization’s safety culture.

The Power of Measurement

Each of us uses measurements every day, both consciously and sub-consciously. Sometimes the act of gathering and analyzing data is as simple as a glance at a clock or gas gauge, a look at a bank statement or a check of the stock market report or a baseball box score. Sometimes the data is more complex such as reports on cycle times and quality yields. Each of these things provides us with valuable information that affects our decision-making and behavior.

But we are also bombarded with data and not all of it is equally important. To process data effectively, we need to be able to sort the important from the less important and analyze it, sometimes in milliseconds, sometimes in minutes and sometimes in hours. We either store the data in our brain for future use or act on it right away.

What We Keep Score of

Keeping score is a way to process data. The term keeping “track” or “score” generally suggests something fun rather than weighty, an activity or measure that is important to us even though it seems trivial or minor to others. For example, we keep score in recreational activities and sporting events.

The “score” may not always be measured by numbers. Sometimes we measure our level of satisfaction, pleasure or feeling of accomplishment. We know if we had a good time whether we were fishing, playing golf, scrap-booking, exercising, playing chess or even playing tic-tac-toe. Even though these measures are more subjective, we could quantify them if we had to.

How We Typically Measure Safety

Safety, or safety performance, by contrast, is something we generally deem too complicated to “keep score” of. Traditionally, we measure “safety” by analyzing what is not safety, that is, injury statistics occurring at each plant site such as recordable injuries, lost time accidents, number of lost or restricted days, workers’ compensation claims paid, etc.

But there are problems even with the data we use to measure “safety” in the traditional way. As safety professionals, we all agree that this injury data does not tell the whole story. For example, it does not indicate all that occurred; rather, it is a compilation only of what has been reported regarding undesirable events. It also doesn’t indicate the quantity or quality of the effort we put forth to maintain or improve safety. The occurrence of an injury measures only failure and doesn’t capture the positive things that were accomplished.

Moreover, all of these measures are “trailing” measures. They’re after the fact. And they lead to after-the-fact solutions that are akin to closing the barn door after the horses have already left.

How Trailing Indicators Hurt the Safety Culture

Current safety measurement systems don’t do justice to how we are performing relative to safety. Moreover, because of their lack of positive feedback and acknowledgement of positives achieved, they often serve to de-motivate employees and cause them to maintain negative attitudes toward safety.

The injury data that safety professionals have traditionally used to measure performance are trailing indicators. They identify problems and solutions only after incidents have occurred. The use of trailing indicators to measure safety generally produces a de-motivating effect. It leads to corrective actions that can be perceived by employees to be reactive. “The only time anything gets done around here is after someone gets hurt,” employees think. This causes employees to develop a negative view of safety and fosters doubt about the sincerity and level of management’s commitment to protecting them.

Once this approach to managing safety occurs a few times, it becomes the norm in the eyes of employees. This undermines the credibility of the safety program. Because employees feel that their safety interests are not in line with management’s, when an incident occurs employees tend to take a defensive attitude stating “it wasn’t my fault.” Couple this with another common negative perception held by employees that investigations are exercises in blame and fault-finding. These negative perceptions encourage employees to dismiss the pursuit of new safety programs and label them as a “flavor of the month.” Instead of motivating, our good intentions regarding safety become de-motivating.

Unfortunately, once they develop, these attitudes tend to become embedded in the culture of the organization. That makes them difficult to change.

Towards a Solution: Measuring “Safety” Not Injury

How do you solve this problem? The starting point is to consider our very definition of safety. Traditionally, safety has been thought of as the avoidance of incidents, accidents and injuries. But I submit that safety is actually the flip side of these things – it’s the state of being safe. It’s more of a behavior than an outcome.

Here’s an example. When we talk about a safe driver, we generally mean somebody who has not been in an accident, has not received a speeding ticket and has low insurance rates. Although these are good outcomes, they do not necessarily define the person as a “safe” driver. These outcomes could just as easily have been accomplished as a result of luck. Conversely, otherwise “good” drivers don’t necessarily become bad ones merely because they have the misfortune of getting into an accident that wasn’t their fault.

The truly “safe” driver is a person who engages in safe driving behavior – who uses turn signals, checks the blind spots when changing lanes, maintains the recommended distance behind the car in front, etc.

Another example: When we measure the performance of athletes, we look at the positive rather than the negative things they accomplish. A bowler is defined not by the number of gutter balls he throws but by how many pins he knocks down. A batter in baseball is evaluated not according to how often he strikes outs but by the number of times he reaches base.

Few safety professionals would argue with the logic of this. So why, then, is safety different? Why do so many of us use (or permit our management to use) a system of measuring safety that’s based on injury performance? As safety professionals, we must measure the right thing and use the right metrics. After all, if our decisions are based on faulty data, they’ll lead to faulty actions.

How Feedback Motivates Behavior

Many supervisors, managers and safety professionals fail to grasp the importance of feedback on measurement. Human beings by nature look to others to evaluate their performance. Why? We want to win, to be recognized for doing a good job and adding value. And we want to receive feedback as soon as possible, especially if we know we’ve done well.

Consider the example of sports. Games like baseball involve a steady stream of feedback while the performance is occurring, batter by batter, inning by inning. Figure skaters receive their feedback right after they skate their routine. In clock games like basketball, football and hockey, feedback in the form of the score and time remaining serve to motivate the players and the fans. Excitement builds when your team is ahead and the clock shows only a few seconds to go.

Applying the Lesson to Safety

Just think what we could do if we could build similar excitement and tension in safety. Sadly, we don’t use these feedback mechanisms to motivate safe behaviors. On the contrary, we only measure the negative behaviors like accidents and incidents. Sure, we provide feedback to our workers – but only to let them know that they have ‘screwed-up.’

Another big mistake managers make is waiting until the end of the month to provide feedback regarding safety performance. Feedback is best as a motivator when it’s delivered fresh, that is, during or right after the performance. It tends to get stale in a month and it can even be ineffective after only a week. Think about it. Have you ever done something you think deserves some form of recognition or acknowledgement and you don’t receive it until the following week? It isn’t the same as hearing back the next day, is it?

Changing Our Feedback Mechanisms

What should we do differently in the realm of safety performance? First of all, we need to define the right criteria to indicate successful performance. What is the “goal,” the “homerun,” the “touchdown?” In safety, we don’t do a good job of identifying the activities that equate to success. What we need to do is ask the question: Are we measuring what we have to do to win?

All too often, measuring safety performance falls into just being a numbers game that overlooks the value of the underlying activity being measured. Examples:

We typically measure and track numbers of employees who attend safety meetings. We shoot for a goal of 100% attendance. Although getting employees to show up at safety meetings is certainly important, the paramount concern, at least initially, should be the effectiveness of the meeting measured against pre-defined objectives. There are at least 15 safety meeting objectives that can easily be identified to be part of a simple survey that would be completed by attendees.

We routinely measure the number of safety audits performed against the required number for the month. But shouldn’t we be measuring the percentage of audits performed that have met the agreed upon objectives? For example, was feedback provided to individuals when warranted; were deficiencies handled appropriately; and were results communicated back to the area that was audited? These as well as other objectives could be easily answered by the audit team upon completion of the audit.

Safety suggestions are often measured by submittals per employee per year. Rather, shouldn’t we be measuring the effectiveness of safety suggestions – that is, the percentage of suggestions that have been successfully implemented, suggestions responded to within a certain period of time and feedback provided to the person who suggested it?

Scorekeeping and Safety

Sports has got it right because it keeps score. This is why so many people care deeply about the outcome of games involving their favorite team. This applies to players as well as fans who, even though they do not physically participate, have a psychological attachment to the team.

There’s real power in scorekeeping and that we as safety professionals can and must try to harness this power to improve safety performance. If we can identify the desired outputs, that is, the actual effectiveness of our safety-related activities, we will have a clearer understanding of what should be changed, continued and prioritized. We’ll understand the value of different outcomes and establish a frame of reference complete with our own version of singles, doubles, triples and home runs.

We can also put managers, supervisors and employees in the position to keep score of their performance and empower them to win. At that point, when everyone in the organization is playing the same game, using the same rules, on the same playing field and under the same understanding of how to win, we will be in a better position to achieve our safety outcomes and thereby, our safety goals. The result will be a highly motivated workforce and improved safety performance.

An Example of the Principles in Action

Let’s use a concrete example to help you turn these abstract principles into a plan for action. Assume you want to use safety meetings to improve performance. The typical approach would be to measure the number of attendees for each meeting. But, as we discussed last week, this is not the most appropriate measurement. The real starting point is to measure the effectiveness of the overall meeting itself. In other words, were the meeting objectives met and executed to a satisfactory level. After all, 100% attendance won’t improve safety if the substance of the meeting is devoid of any real value or was executed poorly.

One way to measure the effectiveness of safety meetings is to give attendees a survey to fill out with yes, no or N/A answers. The survey would have all the important objectives listed. Survey results would provide a way to assess whether safety meetings are “winning” (or improving) or not, shift by shift, month to month, or even supervisor to supervisor, if desired. The survey results would also serve to motivate the person providing the meetings to make appropriate changes or, if the results are very good, keep it as it is. The result will automatically drive continuous improvement in safety meeting performance of future meetings.

Measuring the Right Things

Get your measurement and feedback systems right and safety performance will improve due to the motivation to win. How do you do this? First, find the right things to measure. To do this, define the desired objectives for key activities and desired outcomes that will provide a positive safety culture at your organization. Elements you’ll want to include in addition to activities are:

  • Management leadership and commitment to safety;
  • Employee attitudes and motivation to work safely;
  • Employee ownership and involvement in the safety program;
  • Communication and feedback effectiveness; and
  • The effectiveness of your current safety programs and initiatives, including incentive and recognition programs, employee suggestion programs, incident investigations, audits and inspections, management of change, work order system, committees and safety meetings.

Be sure to measure employee behavior at all levels of the organization including supervisors and management.

Establishing Goals and Delivering Feedback

Measurement doesn’t just gauge performance; it affects it. Remember the old saying: What you measure is what you get. Also remember the principles of keeping score. Give your employees a chance to win. Establish performance targets and define the desired outcomes of the programs you have established so they know how to win. Some people are self-motivated whereas others may need to have their scores posted or reviewed by others.

Goals should be defined in terms of actual vs. expected behavior. Once the desired outputs are defined, measured and the results communicated back to the appropriate individuals, everyone will be engaged in the process of continuous improvement. This method of measurement and feedback has been instrumental in providing safety managers in many industries with insight ands the capacity to allocate their resources more effectively.

Conclusion

Feedback and measurement can motivate or de-motivate. It all depends on the system we use. Unfortunately, the world of safety has things upside down. We measure failure (the occurrence of injuries and accidents) and deliver negative feedback (letting employees how they screwed up). What we get for these efforts is a workforce disenchanted with the safety program and unmotivated to behave safely.

Turn safety measurement into a motivating force to your advantage. Define your desired outputs and measure the extent the objectives are being met. Provide immediate feedback if possible, and positive encouragement to all employees, (don’t forget those on graveyards). Give employees a chance to win and establish a method of keeping score so they know what it takes to be a winner. Doing these things will put you on the road to improving safety performance and building a leading safety culture.


Is This a Safe Way to Clean Ebola-Infected Materials?

What’s wrong with this picture?

don't use a power washer to clean up Ebola vomit

A little explanation is in order:

This photo, which was taken by a news helicopter, shows the Texas apartment community of Thomas Eric Duncan. In case you haven’t heard the name, Mr. Duncan, aka “Patient Zero” is the first person in the US to be diagnosed with the Ebola virus.

The people in the picture are workers at the apartment community using a power washer to clean away Mr. Duncan’s vomit. This is a very, very bad idea! There are 3 reasons why.

Reason 1: Mr. Duncan’s vomit is infected with Ebola.

Reason 2: Pressure from the power washer causes the infected vomit to become airborne in the form of an aerosol mist

Reason 3: People—like the workers or tenants—may breathe in the tiny droplets of infected mist that linger in the air.

The Moral: Vomit and other bodily fluids infected with Ebola should not be cleaned with compressed air, pressurized water sprays or other methods that can create infected mists. The workers performing the cleanup operation should also be wearing proper PPE, including gloves, eye and face protection and surgical masks.

WHAT’S AT STAKE

Ebola Is Dangerous

The Ebola virus causes illnesses that are not only potentially fatal but contagious.

HOW YOU CAN GET EBOLA

The Risks of Infection

The good news is that Ebola is not very contagious. It generally doesn’t spread as a result of airborne exposure the way some other viruses like measles and influenza do. That means you can’t get infected with Ebola as a result of casual contact like getting sneezed or coughed on.

But you can get it by making direct contact with the blood or other bodily fluids of a person or animal that’s infected with Ebola. Such contact is most likely to happen to:

  • Healthcare workers and emergency medical responders who treat or encounter Ebola patients;
  • Lab workers who handle blood or materials of infected patients;
  • Airline and other travel workers, border guards and custom agents who encounter Ebola patients traveling to the US from parts of Africa and other locations where Ebola outbreaks have occurred; and
  • Mortuary or death care workers who work with infected corpses.

8 THINGS YOU CAN DO TO PROTECT YOURSELF FROM INFECTION

1.  Wear protective gloves to prevent contaminated blood and bodily fluids from making contact with open sores or being absorbed through the skin of your hands

2.  After taking off your gloves, wash your hands and throw the dirty gloves in properly labelled biohazard containers

3.  Wear a surgical mask or other appropriate respiratory equipment

4.  Wear goggles, face shields or other appropriate eye and face protection

5.  Wear gowns, aprons or fluid-resistant clothing to protect against being splattered or splashed with infected materials

6.  Wash your hands with soap and water or alcohol hand rubs immediately before and after handling contaminated material and after removing protective gloves

7.  When cleaning infectious materials, don’t use compressed air, power washers or similar methods that generate contaminated mists

8.  Seek immediate medical help if you develop fever of 101.5°F/38.6°C and any of the other following symptoms:

  • Headache
  • Muscle pain
  • Diarrhea
  • Vomiting
  • Stomach pain
  • Unexplained bruising or bleeding.


Is This a Safe Way to Use a Crane?

What’s wrong with this picture?

Safety violations

Crane operations are supposed to be overseen by a competent person to ensure they’re done safely. My sources tell me that such a person was, in fact, present when this photo was shot. The bad news is that apparently, he’s the guy standing on top of the load being moved!

The Moral: Cranes should be used to lift objects, not people—especially people not using fall protection.

What’s at Stake

Crane Accidents

Here are some sobering statistics about crane accidents:

  • 8 of 100 workers killed on construction sites lose their lives in a crane accident
  • 71 The average number of 71 U.S. workers are killed in crane accidents each year
  • 1,125 The estimated number of workers around the world killed in crane accidents in the past decade—and this counts just accidents involving tower cranes
  • 4 The states with the most crane fatalities are, in order, Texas, Florida, California and Louisiana

How Crane Accidents Happen to You

4 Most Common Causes

According to OSHA, the 4 most common causes of crane accidents are:

  1. Electrocution resulting from crane making contact with overhead power lines
  2. Cranes tipping over
  3. The victim falls from the crane—something that could easily happen to the worker riding the load in the photo above
  4. Mechanical failures

Don’t Let this Happen to You!

Top 8 Ways to Cut Risk of Crane Accidents

1. Do a Crane Hazard Assessment at the Site

Make sure that the site where cranes are to be use used has proper soil for crane use and enough room to assemble, disassemble and use the crane.

2. Maintain Adequate Clearance from Overhead Powerlines

Make sure that the site where cranes are to be use used has proper soil for crane use and enough room to assemble, disassemble and use the crane.

ALTERNATING CURRENT: Approaching Distances for Qualified Persons

Voltage Range (phase to phase) Minimum Approach Distance
300V and less Avoid Contact
Over 300V, not over 750V 1 ft. 0 in. (30.5 cm)
Over 750V, not over 2kV 1 ft. 6 in. (46 cm)
Over 2kV, not over 15kV 2 ft. 0 in. (61 cm)
Over 15kV, not over 37kV 3 ft. 0 in. (91 cm)
Over 37kV, not over 87.5kV 3 ft. 6 in. (107 cm)
Over 87.5kV, not over 121kV 4 ft. 0 in. (122 cm)
Over 121kV, not over 140kV 4 ft. 6 in. (137 cm)

3. Implement a Crane Safety Plan for Each Lift

The safety plan should be overseen by a qualified person and all workers involved must be familiar with it.

4. Ensure that Crane Has Correct Capacity for the Job

Before the lift, inspect the crane and ensure that it’s suitable for the job and that has been maintained in accordance with the manufacturer’s specifications. The load must also be properly rigged and inspected before the lift.

5. Make Sure a Competent Person is Present to Oversee Crane Operations

According to OSHA, competent means a person with thorough training, qualification, experience and knowledge to identify hazards. The competent person should have the authority to stop unsafe operations, not to mention greater sensitivity to safety concerns than the worker pictured riding the load in the photo above.

6. Use Qualified Operators

The crane operator must be capable of running the crane and competent with load charts, pre-inspection, and set-up.

7. Use Qualified Signal Persons

There must be a method for signaling and the person(s) who performs signaling operations must be capable of doing his/her/their job properly.

8. Train All Affected Workers in Safe Crane Operation

Safety training must be provided to any workers who are involved with or in the vicinity of the area where the lift occurs. Among other things, such workers must be familiar with the signaling methods and signals used to perform the lift.

Prevent Crane Accidents & Ensure Compliance with OSHA Requirements


Is This the Way You Want Your Workers Showing Up for Work?

What’s wrong with this picture?

Never mind the productivity concerns. Workers that nod off like this are a danger to everyone at the work site—including themselves.

Moral: Although it’s not so much an OSHA concern, workplace fatigue has become a serious problem. You need to recognize the hazard; you need to ensure the management of your organization recognizes it; and perhaps above all, you need to ensure that workers themselves recognize it.

The Dangers of Workplace Fatigue

What’s at Stake: 3 Reasons to Pay Attention

  1. As many as 2 in 5 workers admit to experiencing fatigue on the job
  1. Medically, fatigue has much the same effect on your body as being drunk—it significantly increases your risks of getting hurt or hurting somebody else at work
  1. Fatigue sneaks up on victims—knowing how to recognize it goes a long way in making sure you don’t get into an accident because of fatigue

The 3 Main Causes of Fatigue

The first step in protecting yourself is knowing how fatigue happens. Main causes include:

1. Not sleeping enough hours each night

Most adults need at least 7 hours of sleep per night. Reasons for missing sleep could include working too many hours, having more than one job and/or working irregular shifts:

2. Not being able to fall asleep

The magic 7 hours refers to the time you spend actually asleep, not how long you spend in bed. Tossing and turning is not sleep.

3. Aging

The older we get, the more sleep we need and the harder it becomes to avoid fatigue.

10 Signs of Fatigue

The next step in protecting yourself against it is being able to recognize when you—or a co-worker—are suffering from fatigue. Common signs of fatigue include:

  1. Sleepiness
  2. Irritability
  3. Finding it harder to pay attention
  4. Loss of appetite
  5. Forgetfulness
  6. Inability to process large amounts of information
  7. More willing to take risks
  8. More eager to find shortcuts to get the job done
  9. Headache
  10. Depression

8 Ways to Protect Yourself from Fatigue

  1. Manage your sleep time
  2. Avoid caffeine for 5 hours before bedtime
  3. Eat light, nutritious meals
  4. Drink plenty of water
  5. Avoid medications that induce or interfere with your sleep
  6. Take power naps
  7. Make sure your bed and bedroom are comfy
  8. Go to bed at a regular time


Spot the OSHA Violation: Is This What You’d Call a Safe Work Environment?

What’s wrong with this picture?

dusts in the air can cause deadly explosions

Leaving aside the fact that it may be toxic to breathe, the dust fouling the air in this space may be combustible, i.e., apt to catch fire and explode. If it is, in fact, combustible, heat from the machinery and lighting fixtures might be the ignition source that causes it to go off.

The Moral: Certain dusts in the air and on the floors and surfaces of work areas can explode if they’re exposed to heat, static electricity, friction or other ignition source. The 2 keys to preventing dust explosions:

  • Don’t let combustible dusts accumulate; and
  • Keep combustible dusts away from ignition sources.

Whoever’s responsible for the work space in the above photo did neither of these things.

DUST EXPLOSIONS ARE DEADLY

WHAT’S AT STAKE

Dust explosions aren’t just some kind of mad scientist nightmare. They really happen. And when they do, workers get killed, burned and maimed. Just a few notable examples:

Body Count from Recent Dust Explosions

Date What Happened Workers Killed Workers Maimed
Aug. 2014 Metal dust causes explosion at Chinese metal parts plant 68 187
April 2012 Saw dust causes explosion at Canadian sawmill 2 19
Dec. 2010 Titanium dust causes explosion at West Virginia chemical plant 3, including 2 brothers 11
Feb. 2008 Sugar dust causes explosion at Georgia refinery 14 36
Jan. 2003 Rubber dust causes explosion at North Carolina drug plant 6 36
May 2002 Rubber dust causes explosion at Mississippi recycling facility 6 5

In addition to tearing apart bodies and families, dust explosions destroy factories and jobs.

HOW DUST EXPLOSIONS HAPPEN

There are 5 elements that must be present for a dust explosion to occur.

dust explosion pentagon

  1. Combustible dust: There must be dust that can catch fire and explode if it’s ignited. Examples: Dusts from metals, wood, cotton, sugar, plastic and coal
  2. Ignition source: There must be a source of heat, friction, electricity or something else that causes the dust to ignite
  3. Oxygen: There must be oxygen in the area where the dust is present
  4. Dispersion: There must be a dust cloud that’s wide and dense enough to produce an explosion if ignited
  5. Confinement: If the first 4 elements are present, ignition of the combustible dust will cause what’s called “deflagration,” or rapid combustion. And if deflagration takes place in an area that’s enclosed, like a building, room or vessel, it may release pressure high enough to produce an explosion.

HOW TO KEEP DUST EXPLOSIONS FROM HAPPENING

A dust explosion can’t happen if any of these 5 elements is missing.

Oxygen is all but unavoidable since it’s part of the air.

Confinement is also almost impossible to prevent because combustible dusts are usually used in buildings, rooms and other enclosed work areas.

But you can control the other 3 elements.

Bottom Line: We all need to work together to make sure that dangerous dispersions of combustible dusts don’t get together with ignition sources.

The company will do its part by providing you with the necessary technical equipment, safe work procedures and training. In turn, you need to help us prevent dust explosions at your workplace by:

  1. Following good housekeeping practice in your work area to keep combustible dusts from building up to dangerous levels; and
  2. Keeping ignition sources out of areas that contain combustible dusts.

8 THINGS YOU CAN DO TO PREVENT DUST EXPLOSIONS

  1. Make sure you know which areas of your workplace contain or may contain combustible dusts
  2. Regularly inspect the equipment, floor and surfaces in those work areas for dust accumulations
  3. Recognize that a little dust can cause a big explosion; accumulations of as little as 1/16 inch —roughly the thickness of 2 dimes—can be dangerous
  4. Notify your supervisor of any dangerous dust accumulations you spot
  5. Use approved and safe methods to remove dusts
  6. Keep in mind that vacuums can be an ignition source and don’t use them to remove combustible dusts unless the company has approved the vacuum for such use
  7. Don’t smoke in work areas that contain or may contain combustible dusts
  8. Don’t use tools that generate heat or sparks in combustible dust areas without express approval


Spot the OSHA Violation: Is What You’d Call an Ergonomically Sound Work Practice?

What’s wrong with this picture?

Train your workers about contact stress and ergonomics

A direct hammer blow to the head like the one that Larry is about to deliver Curly is likely to result in a traumatic, i.e., immediate injury.

But what you might not realize is that much softer blows or sustained contact over a long period of time can also cause gradual injury.

The Moral: Contact with hard things can cause serious injury, whether traumatic or gradual. The term for this hazard is “contact stress” and if your job involves banging or leaning up against hard objects, edges or surfaces, you need to be aware of it.

CONTACT STRESS HAZARDS

WHAT’S AT STAKE

  • Your work puts you at risk of musculoskeletal disorders (MSDs, for short)
  • Although they won’t kill you, MSDs are very painful and potentially disabling
  • Contact stress is a common cause of MSDs.
  • Repeated or sustained contact can affect your nerves and bloodflow, especially where the part of the body you make contact with doesn’t have a lot of protective tissue like knees, elbows and the palms of your hands
  • If you understand the danger, you can protect yourself against it

8 Things You Can Do to Manage Contact Stress Hazards

1. Use tools that reduce contact stress like spring-assisted tools

2. Instead of using the palm of your hand, elbows or other parts of your body, hit objects with a rubber mallet, bean bag or other padded tool

3. Instead of using the palm of your hand, elbows or other parts of your body, press or hold objects in place using levers or hydraulic or pneumatic tools

4. If you can’t avoid making contact with the palm of your hand, minimize the impact by using viscoelastic padded palm pads and/or making sure the hard or sharp objects you hit are covered or padded

5. Protect your knees by using tools that don’t require knee kicks like long handled mallets

6. Protect your knees and elbows by wearing knee pads, elbow pads, or padded clothing

7. When in doubt, ask your supervisor for help 

8. Follow your company’s safety rules and safe work procedures

ANTI-VIBRATION gloves that minimize the effects of vibration that can fatigue your muscles and make you more vulnerable to an MSD


Is This What You’d Call an Emergency Exit?

What’s wrong with this picture?

Emergency exits that people can’t actually use in an emergency are a death trap responsible for countless deaths—and OSHA violations.

The Moral: OSHA (Section 1910.36(d)(1)) requires you to ensure that workers are able to open exit route doors “from the inside at all times without keys, tools or special knowledge.” The padlocked exit door in this photo is clearly not in compliance.

Safe Evacuation During Emergencies: What’s at Stake

3 Reasons to Pay Attention

  1. Fires, floods, tornadoes, earthquakes and other disasters can strike while you’re at work
  1. Being prepared significantly improves your chances of surviving these disasters without serious injury
  1. The most fundamental step in disaster preparation is knowing how, when and where to evacuate

6 Ways to Prepare for Emergencies

1. The method for reporting fires and other workplace emergencies


2. The evacuation policy and procedures


3. The emergency evacuation routes and exits


4. Names, titles, departments and contact information of emergency coordinators and evacuation wardens


5. The procedures for emergency shutdown, extinguish fires and any other procedures you’re responsible for performing under the emergency response plan


6. Any rescue or medical procedures you’re required to perform

8 Emergency Dos and Don’ts

  • DO make sure you know the emergency exit(s) in your building
  • DON’T keep large objects like boxes or equipment in emergency exits
  • DON’T keep explosives or flammable objects in emergency exits
  • DO remove any large objects that are blocking emergency exits—or ask your supervisor to do
  • DO make sure emergency exits are well lit—if they’re not tell your supervisor
  • DO make sure emergency exits are kept unlocked from the inside so people can use them to escape the building in an emergency—no padlocks!
  • DO tell your supervisor if an emergency exit is padlocked or otherwise not readily available to use in an emergency
  • DON’T panic or stampede if an emergency does occur—evacuate calmly and help those who need assistance evacuating


Planning For Workplace Emergencies and Evacuations

Retrieved from: Occupational Safety & Health Administration

Nobody expects an emergency or disaster — especially one that affects them, their employees, and their business personally. Yet the simple truth is that emergencies and disasters can strike anyone, anytime, and anywhere. You and your employees could be forced to evacuate your company when you least expect it.

This booklet is designed to help you, the employer, plan for that possibility. The best way to protect yourself, your workers, and your business is to expect the unexpected and develop a well-thought out emergency action plan to guide you when immediate action is necessary.

https://www.osha.gov/OshDoc/data_General_Facts/factsheet-workplaceevergencies.pdf


Is This a Safe Way to Control Hazardous Energy?

What’s wrong with this picture? Spot the safety violation!

There are 3 problems with this lockout/tagout arrangement:

  1. There is no locking device on the electric box;
  2. The tag out warning scrawled on that shred of red duct tape, which in case you can’t read it, reads “DO NOT TURN ON,” is obscure, unclear and very hard to notice; and
  3. Most important of all, the electric box is, in fact, turned on.

The Moral: To implement an effective lockout, the energy source of the machine being serviced must be turned off and either:

  • Locked out, i.e., physically isolated from the machine by a locking device; and/or
  • Tagged out, i.e., marked with a tag clearly warning people that the machine is being serviced and that the energy source may not be started up.

The arrangement in this photo meets none of these requirements and poses a significant danger to any worker who performs service on the machine powered by the electric box.

WHAT’S AT STAKE: The Dangers of Hazardous Energy

If you work in a plant, there are probably some pretty big machines in your work area—machines that cut, press, grind, stamp or shape different materials. Take a look at the scariest machine on the floor and ask yourself a question:

Would you want any part of your body in that machine’s point of operation, i.e., the part of the machine where the cutting, pressing, stamping, grinding, etc., is carried out?

Now ask yourself this: Would you like to clean or repair that machine while it was still running?

The answer, of course, is NO. And that’s why you turn off most machines before you service them.

Why Just Turning Off the Machine Isn’t Enough

The problem is that bad things can still happen after that machine is turned off while you’re working on it:

  •  Somebody who doesn’t know you’re working on the machine may turn the machine back on;
  •  You might accidentally turn the machine on yourself;
  •  It might turn out that the machine really wasn’t shut off after all; or
  •  There may still be residual power in the system that causes the machine to start up.

LOCKOUT/TAGOUT: What It Is & Why It’s So Important

OSHA requires employers to take measures to control hazardous energy and ensure these things don’t happen. The process of controlling hazardous energy is called lockout/tagout because of the 2 principle methods used:

  • Lockout, which involves isolating the machine by putting a locking device on an energy isolating device like an electrical breaker switch or hydraulic valve;
  • Tagout, which involves notifying people in the area that the machine is being serviced and shouldn’t be started up.

Lockout is the preferred method because it creates a physical barrier to prevent start-up; tagout is allowed only when the machine can’t be locked out and you can certify that the tagout method is just as safe. But in the real world, many companies use both methods in combination by attaching a lock and tag to each isolation point.

HOW LOCKOUT/TAGOUT WORKS: The 9 Steps of Controlling Hazardous Energy

Although methods differ based on the kinds of machine being serviced and servicing operation performed, hazardous energy control procedures involve the same basic 9 steps:

Step 1. Preparation for Shut Down

Before lockout begins, a designated worker called “an authorized employee” identifies all potential sources of energy to the machine and gathers the necessary LOTO devices.


Step 2. Notification of Lockout

Next, the authorized employee notifies all “affected employees,” i.e., workers that use or operate the machine to be serviced, and “other employees,” workers in the area where the LOTO operation is being carried out, that a lockout is about to take place.


Step 3. Shut Down of Machine

The machine is then shut down using the normal shutdown operation, e.g., hitting the OFF switch


Step 4. Isolation of Power Source

Remember that hitting the OFF switch isn’t enough; devices must be attached to isolate the machine from its power sources.


Step 5. Attachment of LOTO Devices

Next, the authorized employee attaches locking devices (or tags if it’s a tagout—or both) to each energy isolating device to ensure it isn’t moved or removed.


Step 6. Release of Stored Energy

Next, steps are taken to release any leftover energy that may still be in the system, e.g., by venting gases, stopping flywheels that may still be rotating, draining fluids, etc.


Step 7. Verification of Zero Energy State

Next, the authorized employee verifies that the locked out/tagged out machine has been effectively isolated and deenergized and that things have been put into what’s called a “zero energy state”.


Step 8. Servicing of Machine

Only now, after verification of isolation and deenergization, can the machine be serviced.


Step 9. Ending of Lockout/Tagout

After service is complete, the authorized employee notifies affected and other employees that the lockout is over and then, after verifying that it’s safe to do so, removes the LOTO devices and give the green light to reenergize the machine.


Is This a Good Look for a Machine Operator?

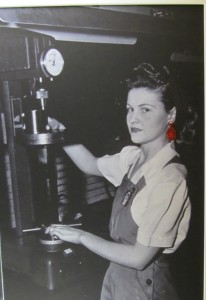
What fashion faux pas is this “worker” committing?

Veronica lake drill

As you might have gathered, that machine operator is no professional. That’s Veronica Lake, the movie star known for her peekaboo hairdo.

That magnificent hairdo helped Veronica Lake land juicy roles, often as the femme fatale in mystery films who lured men to their destruction. Ironically and unintentionally, this WW2 vintage propaganda photo, circa 1943, had the effect of making Veronica Lake a femme fatale in real life.

The victims were the female machinists populating the factories during the war who wanted, understandably, to look like Veronica Lake. And looking like Veronica Lake meant peekaboo hair. Unfortunately, peekaboo hair and moving machinery proved a fatal combination.

How many female machinists were actually killed because their Veronica Lake hair got caught in machinery is unknown. But one thing is certain. The War Department took notice. In 1943, the War Manpower Commission asked Ms. Lake to crop or confine her hair for the remainder of the war. Eager to contribute to the war effort, she happily agreed.

The moral: Workers who operate machinery should either have short hair or keep their hair confined (including facial hair), even if the machine has guards. This isn’t just a matter of good sense; it’s an OSHA requirement.

 3 Simple Facts: Long Hair and Machinery

Fact 1: Machines have belts, chains and other moving parts

Fact 2: Long hair can get caught in those moving parts

Fact 3: If that happens, workers can end up losing:

  • Their hair;
  • Their scalp;
  • A part of their face; or
  • Their life

Protect Yourself: Safe Hairstyles for Machine Operators

When you work with machines, you better wear your hair right—not to make a fashion statement but to stay alive! Here are some tips for machine operators:

1. Cut Your Hair Short

The best way to keep long hair out of machinery is not to have long hair at all

2. Shave Your Facial Hair

The best way to keep facial hair out of machinery is not to have facial hair at all

3. If You Do Have Long Hair, Don’t Just Tie It Back in a Ponytail or Braid. . .

Braids and ponytails that hang down a worker’s back are apt to get caught in machinery

4. . . . But Also Tie It Into a Bun or Knot

This way, there will be no loose ends to snag

5. Better Yet, Wear Hair Nets or Caps

haircut5

This is a great idea even if your hair is short

Dress Smart For Machines: 8 Key Details

1. Loose or Baggy Clothing

2. Neck Ties

3. Open-Toed Shoes

4. Chains or Necklaces

5. Bracelets or Wrist Bands

6. RINGS

7. Wristwatches

8. Dangling Earrings

haircutfinal


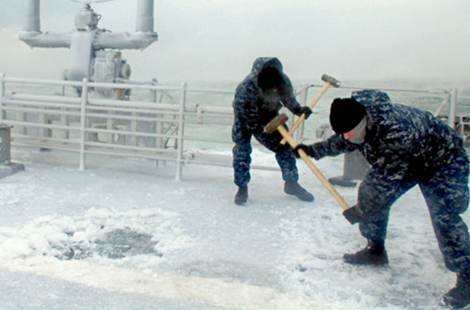
What PPE Are These Workers Missing?

What’s wrong with this picture?

Using_PPE_to_prevent_eye_injuries

These workers are actually missing two kinds of PPE:

  1. Safety glasses or goggles to protect their eyes from flying ice chips; and
  2. Footwear with slip-resistant soles to keep them from slipping on the ice.

Moral: As their employer, you’re responsible for ensuring that your workers use the right PPE for the job.

EYE PROTECTION

WHAT’S AT STAKE

4 Reasons to Pay Attention

1. Every day, more than 2,000 U.S. workers injure their eyes at work

2. Every year, more than 100,000 workers lose all or part of their sight as a result of a work-related eye injury

3. Not wearing any eye protection is the cause of 3 of 5 of these eye injuries

4. Wearing the wrong kind of eye protection is the cause of nearly 2 of 5 of these eye injuries


USE THE RIGHT EYE PROTECTION FOR THE JOB

5 Kinds of Eye Protection

Make sure you select the right kind of PPE for the job. The 5 most common types of eye protection are:

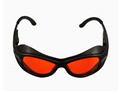
1. Safety Glasses have safety frames (usually metal or plastic) + impact-resistant lenses + sometimes side shields

  • Protect the eyes from flying objects, sparks & dust

safety_glasses

2. Safety Goggles completely cover the eyes, eye sockets and facial area around them

  • Protect the eyes from impact, dust & splashes

safety_goggles

3. Shaded Eyewear has tinted lenses to protect the eye from glare and harmful light

  • Protect against ultraviolet and other radiation
  • Used for outdoor work, welding and other jobs involving exposure to harmful light
  • Include safety glasses, goggles, and face shields with tinted lenses

shaded_eyewear

4. Welding Shields are made of vulcanized fiber or fiberglass and fitted with filtered lenses that must be of a shade number necessary to protect against the particular hazard

  • Protect eyes from burns caused by intense light
  • Protect eyes & face from flying sparks & metal splatter & slag chips from welding/brazing/soldering/cutting operations

welding_shields

5. Face Shields are transparent plastic sheets that extend from the eyebrows to below the chin and across the entire width of the head and may be polarized to protect against glare

  • Protect against dust, splashes & sprays
  • Don’t protect against impact—unless you wear safety spectacles or goggles underneath

face_shields

PROTECT YOURSELF FROM EYE INJURIES

8 EYE PROTECTION DO’S & DON’TS

There are 8 things to do/not do to ensure proper use of eye protection:

  • DO clean your eye protection regularly following company/manufacturer instructions
  • DON’T use goggles if they’re scratched, don’t fit right or the elastic band is frayed
  • DO inspect your eye protection each time before you use it
  • DON’T use safety spectacles if they’re scratched, bent or don’t fit right
  • DO ensure that face & welding shields are disinfected periodically
  • DON’T use eye protection that’s not designed to protect you from the actual hazard you face in doing the job
  • DO make sure you actually use your ey protection
  • DON’T use eye protection equipment if it doesn’t fit right, obstructs your movement or blocks your vision


Is This a Safe Way to Jack a Vehicle?

What’s wrong with this picture?

While it might be rather clever, using an easy chair as a jack stand to support a car is the kind of safety shortcut that can get your workers killed and your company a big, fat OSHA fine.

Moral: Jacks used to horizontally lift, lower, or move a load (like the vintage VW station wagon in this photo) must meet specific requirements set out in the OSHA Other Portable Tools and Equipment Standard (Section 1910.244).

JACK STAND SAFETY

WHAT’S AT STAKE

Meet the Late Christian Klorcyzk

On March 11, 2011, Christian Klorcyzk of Waterford, CT, was doing what he loved best: tinkering with cars. He was changing the oil of a BMW E46 3 series xi using a set of four-ton jack stands to support the vehicle.

Unfortunately, the stands didn’t have the proper safety pins. So when something tripped the right front jackstand from the underside, over a ton’s worth of car crashed into his skull and chest, instantly ending his life.

Christian was only 21.

USE THE RIGHT JACK

6 Kinds of Car Jacks

Safe use of car jacks begins with knowing what kind of jack to use. There are 6 basic types:

1. Mechanical Car Jacks

mechanical_car_jacks

2. Floor Car Jacks

floor_car_jacks

3. Hydraulic Car Jacks

hydraulic_car_jacks

4. Pneumatic Car Jacks

pneumatic_car_jacks

5. Farm Car Jacks

farm_car_jacks

6. Garage Car Jacks

garage_car_jacks

DON’T LET THIS HAPPEN TO YOU

8 Jack Stand Safety Tips

When Using a Jack Stand:

  1. Follow the manufacturer’s safety instructions
  2. Jack the vehicle on a level surface, not an incline
  3. Find the vehicle’s “curb weight”
  4. Check the jack’s load capacity and make sure it’s rated to support that weight
  5. Make sure the parking brake is on the vehicle to prevent the wheels from moving while it’s supported on the jack
  6. Install the jack on a solid, structural piece of the vehicle frame so the jack doesn’t slip
  7. Test your jack stands before each use
  8. Ask your supervisor for help if you have any questions or concerns


Is This Worker Using the Right PPE?

What’s wrong with this picture?

Hard hat…check

Eye protection…check

Safety gloves…check

Protective footwear…check

Respiratory protection: . . . uh oh . . .

Although he has almost everything he needs to operate that jackhammer safely, this worker is missing one important piece of PPE: respiratory protection to keep him from breathing in the dust he’s kicking up.

Moral: Workers who use jackhammers, saws, grinders, and other tools that generate dust (or work at construction sites, oil rigs and other workplaces that contain high levels of dust in the air) need respiratory protection.

HAZARDOUS DUSTS

WHAT’S AT STAKE

3 Reasons to Pay Attention

  1. A dusty workplace isn’t just a sanitary issue but a health hazard
  1. Dusts, or tiny particles in the air, can cause cancer, lung damage and other serious diseases if they get into your lung and blood stream—depending on the kind of substance the dust is made out of (e.g., asbestos can cause a disease called mesothelioma or asbestositis)
  1. One of the best ways to keep dusts from entering your body is to use respiratory protective equipment—something the worker in the photo is not doing

USE THE RIGHT RESPIRATOR FOR THE JOB

6 Kinds of Respiratory Protection Equipment

Recognizing the need to use respiratory protection is half the battle. You also need to select the right kind of respiratory equipment. Here’s an overview of the 6 basic kinds of respiratory protection equipment and what each one can and can’t be used for:

1.  SINGLE-STRAP DUSK MASKS  ( not NIOSH-approved)

Can Be Used for: Less severe atmospheric hazards like pollen, allergens and non-toxic nuisance dusts

Can’t Be Used for: Hazardous atmospheres

single_strap_dust_mask

2.  APPROVED FILTERING FACEPIECES (DUST MASKS)

Can Be Used for: Dust, mists, welding fumes, etc.

Can’t Be Used for: Gases, vapors, toxic minerals like asbestos and toxic metals like lead

filtering_facepieces_dust_masks

3.  HALF-FACE RESPIRATORS

Can Be Used for: Most vapors, acid gases, dust  or welding fumes as long as filter/cartridge matches contaminant and is changed periodically

Can’t Be Used for: Oxygen deficient or IDLH (immediately dangerous to life and health) atmospheres, confined space work or particulates the cartridge/filter isn’t designed to protect against

half_face_respirator

4.  FULL-FACE RESPIRATORS

Can Be Used for: Most vapors, acid gases, dust or welding fumes as long as cartridges/filters match contaminant(s) and are changed periodically

Can’t Be Used for: Oxygen deficient or IDLH atmospheres, confined space work or particulates the cartridge/filter isn’t designed to protect against

full_face_respirators

5.  LOOSE-FITTING POWERED AIR-PURIFYING RESPIRATORS (PAPR)

Can Be Used for: Most vapors, acid gases, dust or welding fumes as long as cartridges/filters match contaminant(s) and are changed periodically (and batteries to blowers are charged)

Can’t Be Used for: Oxygen deficient or IDLH atmospheres, confined space work or particulates the cartridge/filter isn’t designed to protect against

powered_air_purifying_resp

6. SELF-CONTAINED BREATHING APPARATUS (SCBA)

Can Be Used for: Entry and escape from IDLH or oxygen-deficient atmospheres

Can’t Be Used for: Protection of workers with facial hair that gets between the face-piece sealing area of the mask and the face and interferes with the seal

self_contained_breathing_app

PROTECT YOURSELF FROM HARMFUL DUSTS

8 Respiratory Protection Do’s & Don’ts

X DON’T use jackhammers, drills, and other dust generating tools without respiratory protection

√ DO select the right form of respiratory protection equipment for the job you’re doing

X DON’T use respiratory protective equipment if it’s defective or doesn’t fit you properly

√ DO immediately notify your supervisor if your respiratory equipment is broken or doesn’t fit you right

X DON’T tinker with your equipment, e.g., by drilling holes or painting it—your alterations might render the equipment ineffective

√ DO inspect your respiratory equipment each day before you use it

X DON’T eat, drink or smoke in work areas containing potentially harmful dusts

√ DO wash up and change your clothes after the shift ends so you don’t take the nasty dusts you were exposed to on the job site home to your family


Does This Worker Have a Reportable Injury?

Would You Record This Injury on the OSHA 300?

This is not a reportable injury—assuming that this is the only treatment the worker is getting.

Explanation: Under the OSHA injury reporting and recording regulations (Sec. 1904.7(b)(1)(iv)), workplace injuries and illnesses are recordable if the victim gets medical treatment “beyond first aid.” Bandaging a wound is considered a form of first aid. So, if this is the only treatment the worker receives for the injury, you wouldn’t have to record it on the OSHA 300.

INJURY/ILLNESS RECORDING

What is “First Aid”?

The 15 Kinds of First Aid Treatments

To determine whether an injury/illness is recordable as requiring medical treatment beyond first aid, you need to know what is and is not “first aid” under the OSHA rule. Sec. 1904.7(b)(5) lists 14 specific treatments defined as “first aid.”

These 15 treatments aren’t just examples; they’re the entire list.

Bottom Line: You need not record injuries/illnesses (at least under Sec. 1904.7(b)(1)(iv)) if any of the following is the only treatment a worker receives:

1. Non-Prescription Meds  

Use of a non-prescription medication at nonprescription strength

2. Administration of Tetanus Shots

Other immunizations, such as Hepatitis B vaccine or rabies vaccine, are considered medical treatment, rather than first aid

3. Cleaning, Flushing or Soaking Wounds on the Surface of the Skin

4. Use of Band-Aids™, Gauze Pads, Butterfly Bandages, Etc.

Use of sutures, staples and stitches to close wounds is considered medical treatment rather than first aid

5. Use of Hot or Cold Therapy

6. Use of Non-Rigid Means of Support such as Elastic Bandages, Wraps or Non-Rigid Back Belts

Use of devices with rigid stays or other systems designed to immobilize parts of the body are considered medical treatment not first aid

7. Use of Temporary Immobilizing Devices While Transporting a Victim

For example, splints, slings, neck collars and back boards

8. Drilling Fingernails or Toenails to Relieve Pressure

9. Draining Fluid from a Blister

10. Use of Eye Patches

11. Removing Foreign Bodies from Eyes Using Only Irrigation or Cotton Swabs

12. Removing Splinters or Foreign Material from Areas Other than Eyes by Irrigation, Cotton Swabs or Other Simple Methods

13. Use of Finger Guards

14. Massages

Physical therapy or chiropractic treatment are considered medical treatment for recordkeeping purposes

15. Drinking Fluids to Relieve Heat Stress


Is This a Safe Way to Use an Indoor Heater?

Can you spot the 3 safety hazards?

1. The electrical wire to the space heater is strung across the doorway and poses a tripping hazard.

2. The worker isn’t wearing a dust mask to protect himself—let’s hope the dust particles he’s breathing in don’t contain asbestos or some other toxic substance.

3. Emissions from the space heater might expose the worker to the risk of carbon monoxide poisoning.

Moral: Although all 3 are serious, let’s concentrate on the carbon monoxide poisoning hazard.

Carbon Monoxide Poisoning

What’s at Stake

3 Reasons to Pay Attention

  1. Because it’s invisible, odorless and poisonous, carbon monoxide is the leading cause of accidental poisoning deaths in the U.S.
  2. Although most cases occur at home, more than 1 in 10 accidental carbon monoxide poisoning deaths occur in the workplace
  3. Space heaters like the one in the above photograph may emit carbon monoxide that can make you a poisoning fatality

Recognize the Danger Signs

5 Indications of Carbon Monoxide Poisoning

You can’t see it.

You can’t smell it.

But you can feel it before it causes you to pass out and maybe die. Be tuned in to the following signs and symptoms of carbon monoxide poisoning:

1. Headaches

2. Weakness

3. Dizziness

4. Nausea

5. Rapid or Irregular Heartbeat

8 Ways to Protect Yourself, Your Family & Your Co-Workers from Carbon Monoxide

  1. Don’t use indoor space heaters unless and until you can verify that they won’t subject you to carbon monoxide poisoning dangers
  2. Make sure space heaters and other carbon monoxide emitting equipment is well maintained and used according to manufacturer’s instructions
  3. Don’t use gasoline- or propane-powered equipment in poorly ventilated areas (unless you’re wearing a respirator)
  4. Notify your supervisor if you experience any carbon monoxide poisoning symptoms
  5. If you get sick, tell your doctor you might have been exposed to carbon monoxide
  6. Make sure family members and co-workers recognize the signs and symptoms of carbon monoxide poisoning
  7. If you feel symptoms, avoid overexertion and immediately leave the area
  8. If you think somebody is suffering from carbon monoxide poisoning:
    • Move the victim to an open area where there’s fresh air
    • Call 911
    • Administer cardiopulmonary resuscitation if the victim stops breathing (and you’re qualified to give CPR)


Would You Want Your Workers to Drive This Car?

What’s wrong with this picture?

Best Case Scenario: The individual who chose to take this car onto the freeway without clearing the snow will get a traffic ticket for dangerous driving.

Worst Case Scenario: The decision not to clear the snow from the hood and roof of the car will cause a traffic accident

The Moral: Don’t be stupid and inconsiderate! Take 2 minutes to brush away the snow and ice from your hood and roof before taking your vehicle into traffic.

WINTER DRIVING SAFETY

WHAT’S AT STAKE:

3 Reasons to Clear the Snow from Your Car

1.  Driving in snow and ice is dangerous enough even when you can see—failing to clear your windshield increases your odds of getting into a traffic accident 10-fold.

2.  The snow that flies off your roof and windshield can cause a skid and/or blind or distract the drivers around you.

3.  Failing to remove snow from your roof or hood before driving can get you a traffic ticket and hefty fine.

DON’T BE THE CAUSE OF A TRAFFIC ACCIDENT!

12 Winter Driving Safety Do’s & Don’ts

  1. Don’t drive a vehicle until you clear all the snow and ice from the hood, roof and windshield
  2. Do give your vehicle a complete check—from tires to roof—before you drive it in the snow
  3. Don’t tailgate—what’s good advice in all conditions becomes imperative in the snow and ice where you need extra space to brake
  4. Do plan ahead and check the weather and road conditions before taking off on a long drive
  5. Don’t hit your brakes in a skid—unless that’s what the manufacturer of your vehicle instructs you to do
  6. Do wear your seat belt and make sure all your passengers do likewise—it may sound corny but it may also save your life
  7. Don’t believe those commercials about your 4-wheel drive or ATV being immune to the snow and ice
  8. Do stay in your car if you get stuck in the bitter cold—unless you absolutely have to get out
  9. Don’t leave your car idling for too long a period with the windows closed—crack the windows a tad to prevent carbon monoxide poisoning
  10. Do keep a first aid and emergency kit in your vehicle
  11. Don’t lose patience with vehicles ahead of you who are driving really slow—respect the cautious especially when the roads are icy
  12. Do make sure you have a full tank of gas and plenty of cash before heading out for a long trip—especially at night or during a storm


Is This Machine Safely Guarded?

What’s wrong with this picture?

The good news is that the mechanical power press in this picture has a frontal machine guard to prevent workers from reaching into the point of operation, i.e., the place on the machine where the material is placed so it can be cut, stamped, sheared, etc.

The bad news is that the guard isn’t narrow enough to keep a worker from reaching in.

The Moral: The OSHA Mechanical Power Presses standard (Section 1910.217(c)(2)(i)(a)) requires use of point of operation machine guards that “prevent entry of hands or fingers into the point of operation by reaching through, over, under or around the guard.”

The machine guard in this photo clearly fails the test. And it should come as no surprise that this photo was taken by an inspector after an actual incident in which a press operator lost his hand after reaching into the poorly guarded machine.

WHAT’S AT STAKE

How Power Press Injuries Happen

Power presses are machines that shear, punch, stamp, form, or assemble metal or other material by means of tools or dies attached to slides.

Of course, what works on metal works equally well on human flesh. That’s why power presses cause so many workplace amputations and crushing injuries each year. 4 ways you can get mutilated by a power press:

  1. You get caught by the tool and die
  2. You get trapped by other moving parts of the machine
  3. You get hit by a fast moving metal projectile launched by the machine after the tool breaks down
  4. Your limbs, clothes, hair, or jewelry get entangled in the rotating parts of the machine

HOW POWER PRESS INJURIES ARE PREVENTED

4 Most Common Machine Guards

The principal method of preventing power press and other machine injuries is to use machine guards, or physical barriers that block workers’ access to the danger areas. There are 4 basic kinds of machine guard:

Guards are physical barriers that block workers’ access to the danger area. There are 4 basic kinds of guards:

1. Fixed guards that are a permanent part of the machine

(Note: The machine guard in our “Spot the OSHA Violation” quiz above is also a fixed guard; but its openings are too wide to keep a worker from reaching into the guard and making contact with the point of operation.)

2. Adjustable guards that allow for flexibility in accommodating different sizes of stock fed into the machine

3. Interlocked guards that automatically shut off or stop the machine when a tripping mechanism is activated and keeping it stopped until the guard is put back in place

4. Self-adjusting guards in which the size of the opening in the barrier adjusts to accommodate the stock, e.g., enlarges to allow larger stock to enter

DON’T LET THIS HAPPEN TO YOU!

8 Power Press Safety Do’s & Don’ts

  1. DON’T wear loose clothing or dangling jewelry when operating a power press
  2. DO wear a hair net or baseball cap to confine long hair when operating a press
  3. DON’T try to oil, clean, adjust or repair a press while it’s running (unless specifically authorized to do so, e.g., for troubleshooting)
  4. DO wear safety glasses with side shields to protect your eyes from flying debris
  5. DON’T operate, touch or mess with any machines you’re not trained and operated to use
  6. DO immediately notify your supervisor of any defects in the machinery, missing guards or other safety hazards you notice
  7. DON’T lean or rest against a press, especially when it’s operating
  8. DO keep your hands and other body parts a safe distance away from moving machine parts, work pieces and cutters


Is This Car Safe to Drive?

What’s wrong with this picture?

The driver in this photo isn’t breaking any OSHA laws. OSHA doesn’t say anything about clearing snow from vehicles. But many states do.

Moral: Warn your workers to clear accumulated snow from their roof, hood and trunks before driving to avoid blowing snow distractions that can result in fatal traffic accidents.

Winter Driving: What’s at Stake

3 Reasons to Pay Attention

  1. Driving in snowy and icy conditions is dangerous enough
  1. Snow that blows off your car while you’re driving might blind you or another vehicle
  1. In addition to causing potentially deadly accidents, failing to remove snow from your roof or hood before driving it can get you a traffic ticket and hefty fine

8 WINTER DRIVING DO’s & DON’Ts

Here are 8 things to do/not do to avoid winter traffic accidents

  1. DO clear the snow and ice from the roof and hoods of your car before you drive—snow from the driveway has no place on the roads!
  2. DON’T tailgate in any weather and especially when driving on snow and ice where you need extra space to brake
  3. DO know and respect the limits of your vehicle, e.g., its tendency to fishtail in icy conditions
  4. DON’T get out of your vehicle if you stall or get stuck if it’s bitter cold unless you absolutely have to
  5. DO check your tires before setting off
  6. DON’T slam on the brakes during a skid
  7. DO pump the brakes gently and steer into the skid (unless the driver’s manual of your vehicle instructs you otherwise)
  8. DON’T idle your vehicle for a long time with your windows up, especially if you’re inside a garage or other enclosed space

REMEMBER,

This. . .

. . . can lead to this


>


Is This How Your Workers Do Electrical Work?

What’s wrong with this picture?

worker,electrical,puddle

You don’t have to be an electrical engineer to recognize that it’s not a great idea to repair electrical equipment with one’s feet immersed in a puddle. It’s just too bad the gentleman in the photo didn’t get the memo.

The Moral: To avoid getting electrocuted, workers should perform electrical work only in dry locations.

What’s at Stake

Electrocution Deaths By the Numbers

Maybe the worker in the picture wouldn’t have parked himself in that puddle if he had been aware of these numbers about electrocution:

  • 411 The average number of U.S. workers electrocuted each year
  • 5 Electrocution is the fifth leading cause of U.S. workplace deaths
  • 7 Seven out of 100 U.S. workers killed on the job are electrocuted
  • 2 Electrocution is the second most common cause of deaths on construction sites
  • 3 The 3 most common electrocution victims are workers in the electrical trades, construction and manufacturing

What is Electrocution?

How It Kills You

Electrocution is a fatal injury caused by absorption of too much electrical shock. It can happen to you at work if you touch a live wire or are otherwise exposed to shock strong enough to stop your heart.

Why Workers Get Electrocuted

5 Most Common Causes

Most workplace electrocutions happen for 1 or more of the following 5 reasons:

  1. There were no electrical safe work procedures at the workplace
  2. The victim had no or the wrong kind of PPE (personal protective equipment)
  3. Lockout/Tagout procedures either didn’t exist or weren’t followed
  4. The victim wasn’t adequately trained in electrical hazards
  5. The victim’s supervisor wasn’t adequately trained in electrical hazards

Don’t Let This Happen to You!

10 Electrical Safety Do’s & Don’ts

  • DO inspect electric cords and equipment to ensure they’re in good shape
  • DON’T run extension cords across doorways or under carpets
  • DO avoid overloading electrical outlets
  • DON’T work on electrical equipment or installations while standing in water
  • DO replace or repair damaged or loose electrical cords
  • DON’T repair electric cords or equipment unless you’re qualified and authorized to do so
  • DO use ground-fault circuit interrupters when working in damp locations
  • DON’T touch fallen power lines
  • DO call the electric company immediately to report downed lines
  • DON’T get any closer than 10 feet away from overhead power lines while working outdoors


Is This a Safe Way to Work Over Water?

What’s wrong with this picture?

I’ll bet that water is cold. And should he fall in—a prospect made more likely by his lack of fall protection—he may drown by the time somebody fishes him out.

The Moral: Failure to provide workers working over water protection against drowning hazards is not only highly dangerous but a violation of safety standards.

WHAT’S AT STAKE

3 Things You Need to Know

If you work on or over water or another liquid deep enough to drown you:

  1. You need some kind of fall protection so you don’t fall in.
  2.  You need a life vest or personal flotation device in case you do fall in.
  3. If you don’t have this protection, you’re in deep danger—no matter how strong a swimmer you are.

PERSONAL FLOTATION DEVICES

The 5 Kinds of PFDs

Whether you’re at work or on the water for fun, one of the most important ways to avoid drowning is to wear a device that will keep you afloat in the water. There are 5 principal types of personal flotation devices (PFDs):

Type I: Offshore Life Jackets are vests designed to keep you afloat, face-up and visible to rescuers and are suited for rough, open or remote waters where it’s likely to take a long time for rescuers to arrive.

PFD Type I

Type II: Near-Shore Vests are less bulky and thus offer less protection than Type I PFDs and are suitable for calm, inland waters where it probably won’t take a lot of time to rescue you.

Type III: Flotation Aids are lighter and less bulky garments that keep you upright. Although more comfortable, you shouldn’t use Type III PFDs unless you’re pretty sure you can be rescued fast.

Type IV: Throwable Devices are cushions or ring buoys that rescuers throw to you if you’re in the water. Type IVs are a supplement to and not a substitute for a Type I, II, or III vest or garment.

Type V: Special-Use Devices are PFDs approved only for particular activities like kayaking, waterskiing or windsurfing—always check the label to see what use the device is approved for.

DON’T BECOME A DROWNING CASUALTY

7 Drowning Safety DO’s & DON’Ts

  • DO wear drowning protection vests when working on or over water
  • DON’T chuck away your life vest because it’s bulky or uncomfortable
  • DO use the buddy system so you and your co-workers can look after each other
  • DON’T rely solely on buoy rings and Type IV PFDs to protect you from drowning
  • DO learn how to swim
  • DON’T drink alcohol when you’re working on or over water (or anyplace else for that matter!)
  • DO know the rescue procedure and how to put it into action in case you or a co-worker fall into water


Is This How You Want Your Workers to Handle Materials?

What’s wrong with this picture?

These paper rolls weigh about 3,000 pounds. Just imagine how much stress it puts on the worker’s back, shoulders, arms and wrists to roll these monsters by hand—especially across a concrete, sloped floor that’s pocked with holes and latticed with roll stand tracks! It’s a musculoskeletal disorder (MSD) just waiting to happen.

The Moral: Heavy, bulky and irregularly shaped materials should be moved with the aid of mechanical devices across a surface that’s smooth, level and even.

What MSDs Are

The things you do at work every day like lifting, moving or rolling big and bulky objects put a strain on your muscles, nerves, bones, joints, back, shoulders and limbs. If you work your body too hard or in the wrong way, you can cause serious damage resulting in painful injuries called MSDs.

Some MSDs are “traumatic”—that is, they happen in a single incident; many are “cumulative”—that is, they occur gradually as a result of repeated stress over a long time. Rolling 3,000 paper rolls the way the worker in this photo is a great way to suffer either a traumatic or cumulative MSD.

MSDs DON’T KILL YOU

They Just Ruin Your Life

MSD are more severe than normal work injuries because they can:

  • Sneak up on you
  • Cause you horrible pain that lasts your whole life
  • Keep you from ever working again
  • Make it impossible to do even simple everyday things you take for granted like walk, grip a steering wheel or hold a spoon.

MEET AN MSD VICTIM

The Story of Joe Baker (as told by his widow, Desi)

“My name is Desi Baker, and this is the story of my beloved, now-deceased, husband, Joe, who died at age 45.

“Joe was a wonderful man, husband, father and sportsman. He was a hard worker, and helped to raise his stepdaughter and stepson. He worked for 25 years as a welder and machinist. Two decades of lifting and bending heavy steel wore out two discs in Joe’s back. Joe was in constant pain and became deeply depressed. He couldn’t sleep, fish, or eat. He was 6′ 2” but weighed just 135 lbs. He slept 1 or 2 hours a night in the garage.

“The constant pain eventually drove Joe to shoot himself. After Joe’s suicide, I lost my husband and best friend.”

ERGONOMICS: 4 Ways to Protect Yourself from MSDs

Most MSDs happen because workers have to bend, twist, extend and exert their bodies in unnatural ways to perform a job task. The key to avoiding, MSDs, is to rethink the task and find a way to make it easier and more physically natural to carry out. The science of reworking job tasks to fit the human body—and not the other way around—is called ergonomics.

There are at least 4 ergonomic measures the worker in the picture could use to reshape his task and make it less of an MSD hazard:

1. Use Mechanical Devices to Move the Roll

2. Use a Team to Move the Roll

3. Use Tools that Make it Possible to Move the Roll in a Natural Posture

4. Lay Down Planks, Oil Mats or Other Objects to Make the Surface of the Floor More Even and Easier to Roll Things Across