By the Numbers: Six Safe Steps

Energy sources including electrical, mechanical, hydraulic, pneumatic, chemical, thermal, or other sources in machines and equipment can be hazardous to workers. During the servicing and maintenance of machines and equipment, the unexpected startup or release of stored energy can result in serious injury or death. Injuries may include electrocution, burns, crushing, cutting, lacerating, amputating, or fracturing body parts.

It’s estimated more than 120 deaths and over 50,000 injuries are prevented each year due to following proper lockout/tagout procedures.

Step 1 Preparation

Prepare for shutdown – authorized employees must know the type and magnitude of the energy, the hazards involved, and the means to control the energy.

Step 2 Shutdown

Notify affected workers. Shut down the equipment in an orderly and safe manner.

Step 3 Isolation

Operate all isolating devices (valves or switches) to deenergize the equipment. Check primary and secondary sources of energy.

Step 4 Lockout/Tagout

Attach all LOTO devices to the energy isolating devices (and, if appropriate, personal LOTO devices to group LOTO mechanisms).

Step 5 Stored Energy Release

Release all stored energy (electric charge, pressure, charged springs, etc.).

Step 6 Isolation Verification

Verify equipment energy isolation has been accomplished.


Crushed by Machine – No LOTO

A 46-year-old male employee was fatally injured when he was crushed by the upper ram of a rubber mixer. At the time of the incident the victim was working with a lab technician to ensure the proper ingredients were in place for a batch of a specific type of rubber.

Once the ingredients were placed on the feed conveyor; the conveyor was moved into position at the front of the mixer door. The conveyor fed the ingredients into the mixer and two rotors at the bottom of the mixer combined the ingredients. This batch was believed to be ruined due to overheating therefore the hopper had to be cleaned out by hand.

Once the hopper returned inside the mixer, the victim placed his head and both arms inside the front door of the mixer to clean out the bad batch. The ram began to move downward, and the downward motion of the ram pinned the victim inside the mixer door, crushing him.

The investigation revealed the victim did not lock-out the mixer before entering to clean it out; the pin used to keep the ram from falling was not inserted under the ram; and the ram switch at the main control panel was defective.

Investigators also found that energy control procedures were not developed, documented, or used when employees were engaged in activities such as cleaning and clearing out the machine. Which means there was not a procedure in place requiring employees to apply a lock in the end of the blocking pin so there was nothing to prevent the ram from coming down.

Lastly, the investigation revealed that authorized employees had not received training in the recognition of hazardous energy sources, the type and magnitude of the energy present, or the methods and means needed for energy isolation and control.


Lockout-Hazard-Identification-Risk-Assessment-Worksheet

BENEFITS

Companies have a duty to protect workers both while using equipment and machinery for their intended purpose and when repairing and maintaining that equipment. The primary way of fulfilling that duty is through what’s called “lockout,” which is when a equipment has been turned off and rendered inoperable with the use of a lock.  In order to ensure that all the hazards of a piece of equipment or machinery are identified, it’s necessary to do a hazard identification and risk assessment. The easiest way to do this is by using the Lockout Hazard Identification & Risk Assessment Worksheet, which lists the various types of energy involved with equipment or machinery.

HOW TO USE THE TOOL
  1. Identify the equipment or machinery and its location. Use the best description possible so that no one will make a mistake later about which piece of equipment or machinery the hazard assessment is for.
  2. Review the list of hazard types in Column A and identify those that will apply to the equipment / machine being assessed.
  3. In Column C, list the tasks that will be done on this equipment/machinery.
  4. In Column D, list the specific hazards that will affect each task. (Column B provides some typical examples that might apply).
  5. In Column E, list the method of isolating the energy that will be most effective for each hazard identified. Examples include blocking, closing valves, undoing linkage, bleeding hydraulics, etc.
  6. If de-energization or lockout is not possible, write “alternative procedures” in this column. This will require written procedures that provide equal or better protection to workers.
  7. In Column F clearly identify where the lockout point will be for this isolation source. If there is a number or other method of identification use it.  Provide a drawing if possible.

Once the form is completed, use the information to develop a Lockout Procedure for that machinery or equipment.

ADDITIONAL RESOURCES

AB: Guide to Part 15 of the OHS Code 2009
BC: Lockout Booklet; Lockout Safety Talk; Video: Lockout: A guide to safe work practices0
MB: Guideline for Safeguarding Machinery and Equipment
NB: Lockout Hazard Alert; Lockout Handout; Lockout Safety Talk; Lockout Checklist
NS: Lock-out: A Guide to Part 6 of the Occupational Safety General Regulations


Focus On: 9 Things You Must Do to Meet CSA Z460 and ANSIASSE Z244.1 Lockout Requirements

The Risks

Safety devices like barrier guards that are designed to keep workers away from operating machinery don’t do much good when machines are shut down for maintenance and repairs. The danger is that the machinery will start up while being serviced and crush, electrocute, burn and/or amputate the limbs of workers performing the servicing operations. These incidents are typically caused by the inadvertent and unforeseen release of energy left in the system. That’s why OHS laws require you not only to turn off the machine but ensure it’s isolated from its energy source before servicing it. The way to do this is by implementing what’s called a lockout/tagout (LOTO) program.

Be a Better Supervisor

In Canada LOTO rules vary by jurisdiction and in the U.S., LOTO rules are governed by either federal or state OSHA. However, regardless of the location, these OHS requirements represent the legal minimum. And given what’s at stake, many employers build their LOTO programs around the more rigorous standards created by non-governmental safety organizations. And in Canada, CSA Z460-13 “Control of Hazardous Energy – Lockout and Other Methods” is the gold standard for LOTO. In the U.S. ANSI/ASSE Z244.1-16 exists to provide a reliable standard practice that, if followed correctly, can assure safety from hazardous energy in machinery.

Here are the nine things you must do to comply with CSA Z460 and ANSI/ASSE Z244.1.

Step 1: Do a Hazard Assessment

Do a thorough hazard assessment that identifies each task to be completed in servicing the machine.

The risks associated with the task; all potential sources of hazardous energy—electrical, mechanical, gravity, chemical, thermal, pneumatic, hydraulic and radiation; the likelihood of the hazard’s occurrence; and the potential consequences if it were to occur.

(Click here for the TOOL – Lockout Hazard Identification & Risk Assessment Form

you can use to do your LOTO hazard  assessment.)

Step 2: Create a LOTO Policy

Establish a general LOTO policy that explains the purpose and objectives of the LOTO program; identifies the kinds of servicing operations for which LOTO is required; lists the basic LOTO procedures (see Step 3 below); addresses special LOTO situations, e.g., group lockouts and coordination with contractors; describes the LOTO training and education to be provided to authorized and affected persons (see Steps 6 + 7 below); and provides for regular auditing of the LOTO program and personnel (see Steps 8 + 9 below); and documentation of each aspect of the LOTO program.

Step 3: Create Machine-Specific LOTO Procedures

In addition to a general policy, both OHS laws and CSA/ANSI require you to implement a written procedure for locking and tagging out, servicing and then re-energizing machines. But while OHS requirements typically allow for a general LOTO procedure, CSA/ANSI requires a specific procedure for each machine that identifies the machine to be serviced and the sources of hazardous energy. In either case, the LOTO procedure should describe (and, where necessary, include photos and visuals) each of the 9 phases of the process.

Defining Our Terms: Authorized & Affected Persons
There are 2 crucial definitions you need to understand to implement a LOTO procedure:
* Authorized persons: those with competency & authority to implement key steps in the procedure.
* Affected persons, i.e., workers, supervisors and others affected by LOTO operations.

Phase 1: Preparation for Shutdown: Before servicing begins, an authorized person must identify the sources of energy that need to be controlled and how.

Phase 2: Notification:  The authorized person must notify affected workers that a lockout is going to happen; what machinery is going to be locked out; how long the machinery will be unavailable; who’s responsible for the lockout; and whom to contact for more information.

Phase 3: Machinery Shutdown: The machine must be shut off in accordance with manufacturer’s instructions. Somebody needs to verify all controls are in the “off” position and all moving parts have come to a complete stop.

Phase 4:  Isolation:  Methods must be implemented to isolate the machine from its source of energy, depending on the type of energy being isolated, e.g., electrical, chemical, thermal, etc.

Phase 5: Bleeding: Stored residual energy, e.g., electricity in the capacitors, must be dissipated so it doesn’t cause the machine to start up. Methods of dissipation include grounding, repositioning, blocking or bleeding depending on the type of energy involved.

Phase 6: Placing Locks & Tags: Locks must be used to secure the energy-isolating device and tags to signal a lockout is in process and the machinery must not be turned on.  Exception: Locks may not be required if they’re impractical to use and equally effective alternative means of securing the device are used.

Phase 7: Verification: Next, verify the machine is effectively isolated via visual inspection, testing the equipment and/or attempting to restart it.

Phase 8: Perform Servicing: Once you verify the effectiveness of the lockout, you can perform the maintenance operation that required you to implement it in the first place.

Phase 9: Re-Energize Machine: When maintenance ends, the following steps must be taken before the machine is restored to service: check the machinery to ensure equipment components are operationally intact and controls are in neutral; check the work area to ensure it’s been cleared of unnecessary tools, equipment and personnel; remove locks and tags; restart the machine; and notify affected workers the servicing is done.

Step 4: Ensure All LOTO Devices Meet Required Standards

As part of both your general LOTO policy and machine-specific procedures, specify that all lockout devices (including tags used with lockout devices) must be uniquely identified; be the only devices used for controlling hazardous energy; not be used for any other purpose; be capable of withstanding the environment to which they’re exposed; be substantial enough to prevent removal of the energy-isolating device without excessive force, unusual measures or destructive techniques; and be standardized within the facility in at least one of the following criteria:

  • Color
  • Shape
  • Size
  • Specific markings

Step 5: Ensure All LOTO Tags Meet Required Standards

An information tag must be used with each lockout device unless the device already has the required information attached. The informational tag must list the identity of the worker applying device; warn of hazardous conditions (as should the locks); and may include the date and reason for the lockout.

Step 6: Ensure All Authorized Persons Receive Proper Training

Authorized persons must receive proper training before carrying out their LOTO duties. Training can’t be generic but must be specific to the company’s LOTO program; it must be developed based on manufacturer’s documentation, industry best practices, OHS requirements and input from authorized persons themselves; it must include the type and magnitude of the energy in the workplace; each authorized person must be trained in the methods of controlling or isolating those energy types; training must incorporate samples of the machine-specific LOTO procedures and ensure trainees are able to interpret and implement them; and lastly, training must be documented in records listing the trainee’s name, training date and topics.

Step 7: Ensure All Affected Persons Receive Required Training

Affected persons’ training must be specific to the hazards to which the affected person is exposed; notify the trainee of the hazards posed to both affected and authorized persons; be carried out before the affected person enters the work area; be documented in records listing the trainee’s name, training date and topics; and be refreshed at least once every 3 years or immediately after changes in job tasks, technology/equipment or other conditions or situations the previous training didn’t address.

Step 8: Do Annual Audits

Complete an annual inspection of all LOTO procedures to ensure they’re still effective and suitable to the particular equipment, energy sources and servicing procedures being used. Retain your audit records for at least 3 years.

Conduct annual audits to ensure workers are following the LOTO program. You don’t have to audit all your workers, just a sample size that includes workers from all shifts, days of operation, groups, non-standard work situations and types of personnel. As with LOTO procedure audits, you must retain your worker audit records for at least 3 years. (Click here for a Checklist you can use to carry out your LOTO procedures and training audit.)

Step 9: Coordinate LOTO Measures with Outside Contractors    

Finally, it’s highly advisable to address situations where outside contractor personnel perform or are affected by LOTO activities within your facility. Specifically, you need to ensure servicing operations requiring LOTO are carried out in accordance with either your own LOTO procedures; or another suitable LOTO procedure, compliant with regulations and standards, and at least equally effective in protecting workers’ safety as your own procedures.



Supervisor Secret: How to Get Involvement During Meetings

Safety meetings work best if the whole crew actively participates. This makes it more interesting and more likely that people will remember the information you’ve given them. Here are six ways to encourage everyone to get involved:

  1. Ask questions instead of simply giving them the information. After you ask a question, wait a short time to let people think. Then, call on volunteers to answer.
  2. Ask about personal experience. This can help the group see how the topic is relevant to them. You could ask: Has anyone here fallen off a ladder? What happened?
  3. Make sure everyone has a chance to talk. If a crew member is talking too much, invite someone else to speak.
  4. Never make fun of anyone or put anyone down, especially for asking questions.
  5. Don’t fake it. If you don’t know the answer to a question, don’t guess. Write the question down and promise to get back to them.
  6. Stick to the topic. If the crew’s questions and comments move too far from the topic, tell them that their concerns can be addressed later, either privately or in a future safety meeting.


24 Foot Fall from Roof

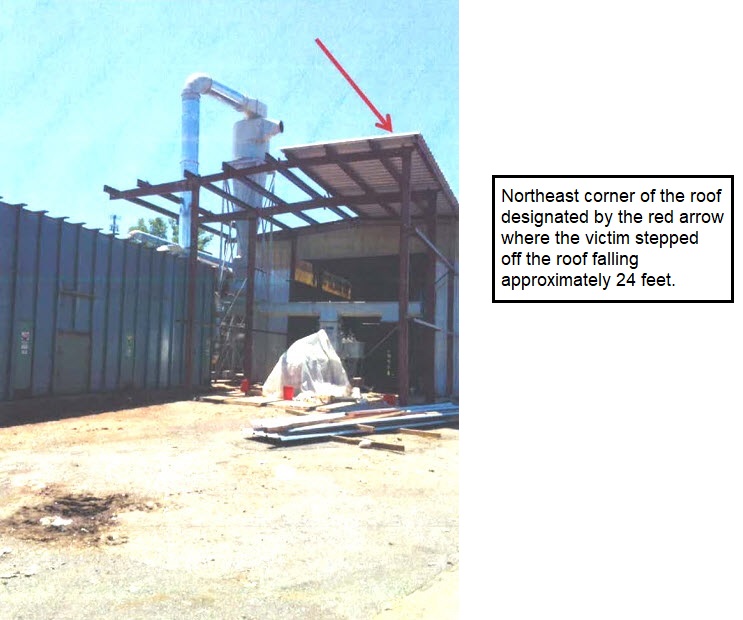
A 39-year-old male employee was fatally injured when he fell approximately 24 feet to the sidewalk below. On the day of the incident the victim, an Iron Worker, was installing metal roof panels on a pre-fabricated metal building.

The victim was working west to east on the northeast corner of the roof installing screws through the roof panels and into the purlins. He took a step backwards and fell off the northeast corner of the roof.

During the investigation it was determined employees were trained to wear harnesses and be tied-off 100% of the time when working at 15 feet and above. But there were no anchor points for a safety line on which to connect a safety harness on the site, nor was there any other forms of fall prevention, for example rails, nets, etc.

According to the foreman on site, the victim had worn his safety harness early in the day, but in the afternoon left his safety harness in his truck.

Investigators cited the company for not protecting workers from fall hazards using guardrail systems, safety net systems, personal fall arrest systems, positioning device systems or fall restraint systems.


https://www.tn.gov/content/dam/tn/workforce/documents/Employees/SafetyHealth/tosha/fatalityinvestigationarchive2017/17Fallfromroof-Inspection1234573.pdf


News You Can Use: Tips to Prepare Your Organization For An Older Workforce

People are living and working longer today than in the agricultural and industrial ages. The growth in the number and percentage of individuals over 60 and 80 years of age is already having a global impact.

From 1980 to 2017, the number of individuals over the age of 60 doubled to roughly 900 million. This segment of the world’s population will double again by 2050 to nearly 2 billion, according to the 2017 World Population Prospects report by the Department of Economic and Social Affairs of the United Nations Secretariat.


Risk professionals can prepare their organizations for the coming changes and opportunities of an older workforce with the following strategies:

  1. Customize a workplace safety program. Organizations can utilize various levels and different methods of training to improve safety awareness. These include new hire training, annual mandatory compliance refreshers, on-the-job training, shadowing and formal mentoring programs, educational programs, and certifications.
  2. Update the education and onboarding process.An important consideration is how different generations of employees learn, so specific training methods tailored to each generational group can be offered. Where online training modules may work for younger employees, older employees may prefer on-the-job or in-person training.
  3. Review training styles. In addition to receiving ongoing training, older employees may feel more engaged if they are asked to teach newer or less experienced employees. Companies should begin focusing efforts on how to relate to and the best way to supervise older workers.
  4. Know a role’s physical demands.Employers need to ensure they have a good understanding of the actual physical demands of each job position in addition to the physical limitations of individual employees. Post-offer and pre-employment functional capacity exams are recommended for all age groups in industrial and manufacturing sectors.
  5. Consider the intersection of technology, comfort and well-being.There are many low- and no-cost ideas that can make the workload more manageable for older employees. Standard workstations can be improved with ergonomics in mind. On-site clinics save time and are geared toward prevention as well as early disease detection. Investing in the health of all employees through wellness programs is a timeless and ageless benefit and will contribute to productivity and reduce costs.
  6. Promote an age-diverse business culture by recognizing and appreciating the skills/values of older workers. There is a common misunderstanding and stereotype with older employees that they are less efficient than their younger co-workers. However, in 2016 the Organization for Economic Co-operation (OECD) found the working proficiency (in both literacy and numeracy) of older employees is actually not significantly lower than their younger peers. In countries like the U.S., the proficiency of older workers is even at the same level as younger employees.
  7. Improve training against discrimination and negative attitudes to older workers on hiring, termination, compensation, and promotion. As risk management professionals, it is important to remind your organizations to review and improve the policy against discrimination and negative attitudes to older employees, in order to mitigate the potential legal risk.

As the global working population continue to grow older, corporations around the world could expect to see more age discrimination litigations to come. Risk managers can play an important role by taking initiatives to help their organizations against discrimination and negative attitudes to older employees.

Several members of the RIMS International Council contributed to this article.

http://www.riskmanagementmonitor.com/tips-to-prepare-your-organization-for-an-older-workforce/


By the Numbers: Falls in the Workplace

Unintentional falls are the most common form of injury across the country: every day last year, falls resulted in almost 1,800 reported emergency department visits and 417 hospital admissions, says a new report by the Canadian Institute for Health Information (CIHI).

In the U.S. in 2017, fatal falls were at their highest level in the 26-year history of the Census of Fatal Occupational Injuries (CFOI) accounting for 887 (17 percent) worker deaths.

  • 65% of fall-related injuries occur as a result of falls from same-level walking surfaces.
  • The services, wholesale, and retail trade industries together accounted for over 60% of injuries that resulted from same level falls.
  • An estimated 20 – 30% of people who experience a slip and fall will suffer moderate to severe injuries such as bruises, hip fractures, or head injuries.
  • The most common fractures that occur from slip and fall accidents are fractures are of the spine, hip, forearm, leg, ankle, pelvis, upper arm, and hand.
  • 1 in 6 of all lost-time work injuries result from slips, trips and falls.
  • Slips, trips and fall injuries make up almost 20 percent of all job-related injuries.
  • It is estimated that these injuries result in an average of 11 days away from work.
  • Slips, trip and fall injuries cost employers approximately $40,000 per incident

https://www.arbill.com/arbill-safety-blog/bid/203028/Painful-Statistics-on-Slips-Trips-and-Falls


Inspection Form, Fall Protection Equipment Safety Harness Inspection Checklist/Log


https://www.pshsa.ca/wp-content/uploads/2015/11/PSHSA-Sample-FallEquipmentInspectionForm.pdf


Focus On: Understanding the Leader’s Role in Creating High Performing Teams

“Not finance. Not strategy. Not technology. It is teamwork that remains the ultimate competitive advantage, both because it is so powerful and rare.”

This is how Patrick Lencioni began his book, Five Dysfunctions of a Team, in 2002. Seventeen years later, this is a still a provocative statement worthy of more discussion.

In over four decades of consulting at Vantage Leadership, we have found that high performing teams are indeed rare. Many teams under-perform or are average, at best, and while there is a myriad of reasons for this, the role of the team leader in creating high performing teams is worth exploring.

Vantage’s preliminary research conducted across 50 executive teams that have used our High-Performance Team survey suggest that team performance is highly correlated to leader performance, such that when team leaders are more effective, his/her teams are more effective.

The reality of team improvement, however, is generally not that simple: saying that team improvement comes about only because of the leader’s performance tempts an error of attribution. It is more likely that improvement comes from an interaction of the two where each leverages the strength other.

While both the team and the team leader combine to drive high-performance, the leader’s influence on setting the tone for the team’s interactions is such that we retain a focus on the leader as the catalyst for improvement.

Out of the five dimensions of High Performing Teams (see model), Mutual Respect and Camaraderie is one of the most critical factors contributing to the leader’s success, according to our research. Essentially, this dimension asks: does the team leader demonstrate respect and genuineness, and hold people accountable to a high level of collaboration?

Team leaders who score high on Mutual Respect and Camaraderie typically develop followership by building trust, respect and loyalty. They allow for and promote having tough conversations and challenging debates on business matters, and they say what they intend and act on their word.

These leaders make conflict productive and this positively impacts team behavior and collaboration. They take other’s opinions into consideration and weigh what others say carefully.

Perhaps most importantly, they don’t exercise positional authority – when a team and its leader are at their best, the leader becomes part of the team and everyone’s opinions are given a full hearing.

In our experience, this isn’t common as it can be hard for leaders to give up control and see beyond themselves in this way. It may not be surprising, then, that Mutual Respect and Camaraderie is also the most commonly reported developmental area for team leaders.

Taking it a step further, our research indicates that engaging in Transparent Communication is the most commonly reported developmental area for team members. This could reinforce the assertion that if the team leader does not establish an environment of trust, mutual respect and camaraderie wherein members feel comfortable being candid and open with one another, the entire team is impacted.

What the Best Teams Do

We have found that the best teams are continually being coached – by the leader and by each other. The leader engages the team, inspires it to action and holds it accountable to evolve, learn and grow. Scoring high on Mutual Respect and Camaraderie allows for this coaching to occur in a safe environment.

In “Senior Leadership Teams: What it Takes to Make them Great” (2008), Wageman et al. studied 120 executive teams and found that every CEO in a sample had a strong external focus, attending to matters in the broader environment. However, the leaders of outstanding teams had an equally strong internal focus on how the team coaches and develops itself.

In sum, one of the most critical elements of building a high performing team is the interaction between the leader and team members such that the leader becomes a facilitator for team development and not the sole driver of the team working together at a higher level.

Jacqueline Ackerman

Professional Training & Coaching

https://www.linkedin.com/pulse/understanding-team-leaders-role-creating-high-teams-ackerman/


Workplan: 8 Components of a Fall Protection Plan

A well-developed and implemented fall protection plan for working at heights will keep workers safe. Here are eight components of a well-developed fall protection plan.

Step 1: Perform a Hazard Assessment

The first step in creating a fall protection plan is to identify all fall hazards in the work area. Hazards include falls from ladders, a roof, scaffold, stairs, structural steel and falls through a floor or roof opening or roof surface not strong enough to support the weight of a worker.

Step 2: Determine How/Where Fall Protection will be Used and Type of Equipment Needed

Fall protection applications, or how and where protection will be used, include fall arrest, fall restraint, work positioning, and confined space or confined space rescue/general rescue.

Choices for types of equipment include a full body harness and lanyard, self-retracting lanyards, horizontal lifelines, guardrails, and anchorage points. Anchorage points can be built into a structure or may need to be created or attached to a structure. This can be done using a variety of roof anchors, trolley anchors, sliding anchors and anchors and guardrails designed specifically for use with trench boxes.

Step 3: Establish Procedures for Assembly, Maintenance, Inspection, and Disassembly

Follow manufacturer instructions and recommended procedures for assembly and disassembly of fall protection equipment. Have this process written in your fall protection plan along with a process for tagging, removal, and disposal or repair of damaged equipment.

Link to: Inspection Form, Fall Protection Equipment Safety Harness Inspection Checklist/Log.

Step 4: Rescue Plan

A plan for the rescue and recovery of fallen workers must be included in a fall protection plan. Employers are responsible to provide for prompt rescue of employees or self-rescue (if able) in the event of a fall. If employees are not rescued in a timely manner, they can experience serious injuries related to suspension trauma.

Step 5: Use and Storage of Equipment

Fall protection equipment can become damaged with rust, corrosion, discoloration, and deformation if it’s not used correctly and cared for and stored properly. It then becomes unsafe to use.  Storage will be unique to each jobsite but best practice and fall protection manufacturer guidelines are the same – avoid heat, moisture, and chemicals when storing equipment.

Step: 6 Get Specific

Every job and every work site are different, many are constantly changing. It’s important to perform a hazard assessment at each jobsite initially and then periodically to identify hazards and make changes to the fall protection plan as needed.

Step 7 Training

Train and educate new and current employees on the proper use of fall protection devices before they use them. All employees must be trained on fall protection plan requirements before going to into fall hazard areas. Prior to permitting employees into areas where fall hazards exist, all employees must also be trained regarding fall protection plan requirements.

Step 8: Availability

Review your written fall protection plan before work begins on any jobsite. Pass around a sign-in sheet for employees to sign saying they have been trained in and understand the fall protection plan. Keep documentation of what you covered in the training too. Follow up training with daily pre-job talks, pre-task meetings for particularly complex or dangerous work, and regular safety meetings.


Focus On: Plan, Provide, Train When Working from Heights

The Risks

Hundreds of workers die from falls every year. Working from heights while on a ladder, roof work – leading edge, skylights and other roof openings and holes, working from scaffolding, and bridge work are just a few of the fall hazards workers face.

Be a Better Supervisor

You can prevent such deaths by planning to get the job done safely, providing the right fall protection equipment, and training all workers when and how to use the equipment safely.

Here are some basic ideas for developing fall protection strategies.

“PLAN” ahead to get the job done safely — develop a plan and ensure the proper equipment, material and appropriately trained workers are available.

https://www.metalconstructionnews.com/articles/installing-low-slope-metal-roofing

In roofing work for example it’s important to know the pitch of the roof and follow the appropriate standard based on the slope. You need to know this before work is started so you have time to plan the best way to protect workers.

Remember, when it comes to protecting against hazards follow the hierarchy of controls. Eliminate the hazard if possible, if not use these methods of protection.

“PROVIDE” the right equipment and set workers up for safety — provide fall protection and the right equipment for the job, including the right kinds of ladders, scaffolds, and safety gear. Then provide for safe setup up of the equipment.

Here’s an example for setting up a personal fall arrest system.

The length of the lifeline or lanyard, the position of the anchor, and the distance to the lower level are all important. Select equipment that permits workers to operate efficiently while limiting the distance they could fall. This means you must properly calculate the fall clearance distance to ensure a worker will not contact the lower level in the event of a fall. You will also need to evaluate the potential for a pendulum or swing effect, which could swing a fallen worker into a nearby object. Swing-fall hazards can cause serious injuries, but they can be minimized by installing the anchorage point above the work area (i.e., up the roof slope from the worker) and setting up a maximum work range from the anchor point according to the manufacturer’s instructions.

“TRAIN” workers to use the equipment safely — train workers in hazard recognition and in the care and safe use of ladders, scaffolds, fall protection systems, and other equipment they will be using on the job.

Start by implementing safe work practices to reduce the possibility of falls. Then follow up training by supervising workers to ensure fall protection equipment is being used and maintained correctly. Finally, lead by example. Employers, project managers, and supervisors should follow the rules they are responsible for enforcing.


Tool: Injury Management – 12 Steps for Developing a Return-to-Work Policy

Carrying workers compensation coverage may be one the best ways to reduce the financial risk but relying on insurance is not enough—it is also critical to implement a well-executed and carefully tailored return-to-work (RTW) policy.

There are multiple benefits to a RTW program. Getting the employee back to the office or workplace reduces the amount of money being paid out by the carrier, and as a result, your immediate claim costs and future insurance rates also go down. For employees, returning to work improves their physical and psychological well-being, reduces the amount of medication they need, and lowers the risk of addiction to substances such as opioids.

RTW policies will vary from industry to industry, so it is important to consider the nature of the work and the specific needs of the company. The following 12 steps can serve as a guide to creating a successful program:

Step 1: Implement a written RTW policy and review with employees. The plan should apply to all employees equally and be handled by one individual or team to monitor and ensure even-handed application. Be sure to follow the core policy of any well-run HR system: treat all of your employees fairly and consistently. Make sure all employees have a clear understanding of the policy.

Step 2: Decide what position to offer. You do not need to place the employee back in their prior role. Indeed, this is often impossible. For example, if you are in the construction industry and an on-site employee sustains a burn, avoidance of heat is a common restriction. Look to a job far from the heat of power tools, perhaps working within the office on administrative tasks. The employee can even use his or her field experience to help with prospects and suggest improvements management can make for other field employees.

Step 3: Ensure clear understanding of the employee’s limitations. The injured employee should bring documents clearly stating the doctor’s restrictions. For example, if the injured employee is based in a packing and shipping department, a back injury may be difficult to accommodate due to lifting restrictions. Consider restrictions carefully and think creatively to find the best way to keep the employee in the facility, perhaps by assigning them labeling or freight tracking duties.

Step 4: Send an official light-duty job offer letter. Legally, you must notify the injured employee of the light duty, in writing, and via trackable means. A phone call telling your employee to return is not an acceptable form of communication. The letter does not need to state the job you are offering, the pay or even the shifts. You are only required to disclose that you have a position within the restrictions and advise the employee when and to whom they should report. If the employee refuses the job, notify the claims adjuster immediately.

Step 5: Manage the first day back with care. Once the employee reports to work, set forth the details of the assignment and your expectations. Ensure the tasks are within the scope of the most recent restrictions, and give them the information about the new role, the shifts and the pay. If an employee’s restrictions have been accommodated with a desk job, ensure that person knows he or she has the option to stand to stretch or take a few minutes to walk around each hour if needed.

Step 6: Manage co-workers and their reactions. Management must not only lead by example but play referee. Do not allow co-workers to gossip or spread false rumors. If co-workers are heard talking about money the injured worker is supposedly getting through the case, it is best to put an end that conversation immediately. These claims can be contagious.

Step 7: Know what you can and cannot say. Keeping the peace is critical and that begins with your executives at the top. Ask the employee how he or she is feeling or if they need help. Do not imply injuries and pain are fake or exaggerated. Above all, do not broach the topic of lawyers and legal cases.

Step 8: Monitor the actual work of the injured employee on light duty. It is important to make sure the employee is neither under- nor over-performing. Working through pain makes one more prone to re-injury. Not asking for help due to embarrassment often leads injured parties to act outside the restrictions. Take bending for example. If bending is a restriction, doing so can increase pain and lead to tighter restrictions or a no-work status, which can increase the claim costs. Management must watch to ensure the job is being performed properly and safely.

Step 9: Accommodate medical appointments as reasonably as possible. While you must allow your employees to go to their doctor and physical therapy appointments, work schedules may not match the standard workday of a doctor. Consider shifting your employee’s hours to accommodate appointments or encourage the injured employee to make their appointments around their scheduled workday.

Step 10: Respond to complaints from the injured worker. If your employee says, “This is work I am not allowed to do,” you might want to respond, “Let’s go over your most recent restrictions to ensure your safety.” The goal is not to create an adversarial relationship between the employee and employer.

Step 11: Decide how to pay the employee on light duty. To have the best financial outcome for your claim, the goal is to offer work that allows the employee to earn 80% of what was being earned pre-injury. Once you update the insurance adjuster on the RTW plan, the adjuster can assist in these calculations.

Step 12: Report earnings to your workers compensation carrier. There are circumstances under which the employee will be entitled to compensation from the insurance carrier. You are obligated to ensure the adjuster has the weekly earnings to ensure benefits are correctly and properly administered.

Ultimately, bringing back an injured worker may not be an easy task, but the financial benefits can be significant.  Perhaps more importantly, however, it will also benefit the physical and mental health of your employee.

http://www.rmmagazine.com/2019/03/01/12-steps-for-developing-a-return-to-work-policy/


About the Author

Amy Siegel Oran is a partner at Kelley Kronenbergh in West Palm Beach, Florida.


Picture This: This’ll Just Take a Second

“Brian must be done clearing out the compactor, so I’ll just go ahead and turn it back on…”


Meanwhile, back at the compactor Brian still appears to be very much into his work.

Please don’t be like Brian. Never trust your safety to someone else – which is exactly what you’re doing if you leave your personal lock compromised. Lock and tag your lock and keep the key with you. Never share your lock and key with anyone. Never assume that “this’ll just take a second” is a safety defense. A second is all it takes to flip the switch and start the machine in motion.

https://imgur.com/mZaKUxV https://www.reddit.com/r/OSHA/comments/6jv3pt/no_need_to_lock_out_thisll_just_take_a_second/


Picture This: Walking the Plank – Without Fall Protection

Ingenuity at its finest or accident waiting to happen? The walking space on the plank is limited and awkward which makes any movement dangerous. Reach back for the hammer, lose balance, slam into the stair guardrails on the way to concrete floor below.

https://i.redd.it/mhwaq7zg2ir21.jpg


LOTO Program Annual Inspection and Training Assessment Checklist Submission Form

Lockout/Tagout Annual Inspection and Training Assessment Checklist

Copy or customize this checklist from the University of Washington to meet the needs of your LOTO Annual Inspection and Training Assessment.

Department: ____________________________________________
Location: _______________________________________________
Equipment: _____________________________________________

Yes No Comments
Has there been a change in job assignments, machines, equipment or processes?
If so, have employees been re-trained when job assignments, machines, equipment or processes have changed?
Are the locks uniquely identified, uniquely keyed, and only used for the purpose of LOTO?
Does the tag used with the lock identify the worker servicing the machine or equipment?
Have equipment and machine-specific LOTO procedures been documented in writing?
Does the authorized employee know where the written LOTO procedures are located?
Does the authorized employee notify affected employees and all other employees in the area before starting the LOTO procedure?
Can the authorized employee identify all hazardous energy sources and associated hazards for the equipment or machine to be locked out?
Does the authorized employee follow the proper LOTO procedures for deenergizing the equipment or machine?
Does the authorized employee demonstrate the proper steps for the placement, removal and transfer of LOTO devices?
Does the authorized employee use the proper methods to verify the equipment or machine was de-energized?
Before releasing the machine or equipment from LOTO, does the authorized employee do the following:

A)     Inspect the machine or equipment to ensure it is operationally intact?

B)     Ensure that all employees are safely positioned?

C)     Notify affected employees and all other employees in the area that the LOTO devices have been removed?

If you answered “No” to questions 2-11, has the employee been retrained?

Lockout – Tagout Annual Inspection – Authorized Employees Observed (Please print)

Name Job Title Name Job Title
1   2  


3   4  


5   6  


7   8  


9   10  


11   12  


13   14  


15   16  


17   18  


19   20  


Deficiencies Observed and Corrective Actions: ___________________________________________________________________________________________________________________________________________________________________________________________________________________________________________________________________________________________________________________________________________________________________________________________________________________________________________________________________________________________________________________________________________________________________________________________________________________

Date: _______________________________________________________________

Inspection Done By: ___________________________________________________


Tool: Humidex Table

Humidity is the amount of water vapor in the air. High humidity makes people feel hotter than they would on a drier day. This is because the perspiration that cools us down cannot evaporate as quickly in moist, saturated air. To better describe how hot it feels in such circumstances, Canadian meteorologists developed the Humidex, a parameter that combines temperature and humidity in order to reflect the perceived temperature.

The Humidex combines the temperature and humidity into one number to reflect the perceived temperature. Because it takes into account the two most important factors that affect summer comfort, it can be a better measure of how stifling the air feels than either temperature or humidity alone.

Humidex Degree of comfort
20 to 29 Little discomfort
30 to 39 Some discomfort
40 to 45 Great discomfort; avoid exertion
Above 45 Dangerous; heat stroke possible


Sexual Harassment: Addressing and Reporting Complaints

What’s at Stake?

According to a recent study, when asked what happens to harassers, 70% of respondents stated they believed harassers face no consequences. Imagine what this belief does to the willingness and probability of a victim reporting an incident of harassment. It doesn’t matter if 100% of harassers did face consequences, perception is often seen as reality and in this case, the reality that’s being seen is likely one of the reasons harassment often goes unreported and unchecked.

What do you think the perception is at your organization? What’s the reality? Have you asked?

What You Should Know

  • Here’s one reality – employers must include in their sexual harassment policy, a statement explaining how complaints of sexual harassment can be brought to the attention of the employer.
  • To cultivate a culture of trust and responsibility and encourage reporting – employees must know that all claims of sexual harassment will be addressed to determine what actions are warranted.
  • Consistently addressing harassment claims is one way to encourage reporting, but you also must make reporting easy and non-intimidating.
    • If you fail to do this, it can send a message that the organization doesn’t want to deal with harassment issues – whether it’s true or not.
  • More and more collective agreements include specific clauses on preventing and resolving incidents of discrimination and sexual harassment in the workplace.
  • Where a person believes they have been sexually harassed in the workplace, they may also have recourse under the Occupational Health and Safety Act in Canada. In the US, employees can get assistance from the Equal Employment Opportunity Commission.

What You Should Do

In addition to a sexual harassment policy, that includes reporting procedures, ensure the following:

  • Supervisors are addressing and investigating all harassment claims according to company procedures.
  • Employees are aware through written procedures and through action and follow-up that complaints are taken seriously.
    • This also sends a message to would-be-harassers that sexual harassment is not tolerated.
  • Employees understand how to document and report a sexual harassment claim.
  • Here are guidelines to share with employees for reporting a claim of harassment. (Note: you can edit these to fit with your organization’s policies and procedures.)
  1. Leave a paper trail.a. Create a diary and keep an accurate account, including names, dates and times, of everything that happens.
    b. List any witnesses.
    c. Write down, as soon as possible after the incident, how you feel about the harassment.
  1. Let your harasser know that you are offended by his or her specific actions and that you want him or her to stop those actions.a. Send by email which will create an electronic record, listing date and time, which can be retrieved as proof later, if required.
    b. Always keep your tone and language businesslike.
  1. Confide in someone you trust about your problem.
  2. Request in writing, for a copy of your employer’s sexual harassment policy. If your employer does not have a written policy, make a record of it.
  3. If the harassment continues, then report the behavior, in writing, and request an investigation.
  4. Co-operate with the investigation.
Final Word

The reality is, what happens after a claim of sexual harassment is made is a critical component of your organization’s sexual harassment program. Have a plan for reporting and follow-up in place and ensure it’s being followed.


Sexual Harassment: Cost and Consequences

What’s at Stake?

Sexual harassment, and any kind of harassment in the workplace, can have devastating and profound emotional, physical, and financial effects on the victim and the workplace as a whole.

A workplace made hostile or poisoned by sexual harassment can cause morale to take a dive as the victim or victims, and their co-workers deal with the act and the aftermath of harassment. Turnover can skyrocket, it can be hard to recruit new employees once the word gets out that it’s a hostile environment, not to mention the fact, sexual harassment lawsuits can be long, time-consuming, and costly.

What You Should Know

As we go through these harassment effects, think about how each one can ripple out and cause a wave of damage throughout your entire organization.

Sexual harassment effects are classified in three general categories: emotional consequences, physical consequences, and psychological consequences.

Most victims of sexual harassment experience at least a few of these symptoms, and many victims find harassment traumatic enough to interfere with work, leisure, and relationships.

Emotional

  1. Humiliation
  2. Fear or anger
  3. Embarrassment
  4. Increased stress
  5. Shame (degradation, powerlessness)

Physical

  1. Headaches
  2. Stomach pain (ulcers, nausea)
  3. Changes in appetite and sleep disturbance (insomnia, nightmares, inability to sleep)
  4. Drug or alcohol use
  5. Sexual dysfunction

These physical issues can be extremely costly to a victim’s career and disruptive to relationships, and their quality of life in general.

Psychological

  1. Depression
  2. Difficulty concentrating
  3. Anxiety or panic disorders (anxiety or panic attacks)
  4. Social withdrawal
  5. Intimacy and trust issues

The psychological consequences of sexual harassment are often longer lasting than the other two types of consequences and can be debilitating to the victim and their family. These consequences, together or on their own, can cause the victim to:

  • Miss work more often.
  • Show up late to work and meetings.
  • Have poor work performance, and ultimately with the victim either leaving the job or requesting a transfer.

Which in turn means a possible loss of or decrease in income and benefits – which only adds to the feelings discussed above.

What You Should Do

An organization must have a clear and comprehensive sexual harassment policy in place. In cases of alleged sexual harassment, the policy will alert all parties to their rights, roles and responsibilities.

To minimize the costs and consequences of harassment, everyone in the organization should be aware of the existence of the sexual harassment policy and the steps in place for resolving complaints. This can be done by:

  • giving policies to everyone as soon as they are introduced or updated;
  • making all employees aware of them by including the policies in any orientation material;
  • training people, including people in positions of responsibility, on the contents of the policies, and providing ongoing education on human rights issues.

Final Word

It is important to realize the extent of damage and harm that sexual harassment can cause to victims, co-workers, and an organization. Without this understanding, the ripple caused by one incident can quickly turn into a tidal wave of accusations, complaints, distrust, and costly litigation.


Sexual Harassment: What Are Your Responsibilities?

Download Instructor-Led Material

Handout

PowerPoint

Quiz

Safety Talk

What’s at Stake?

More than half of adult women have experienced “unwanted sexual pressure” and more than one in 10 — both men and women — say sexual harassment of women in their workplace is “really quite common,” according to a recent study.

From a moral and legal standpoint, it is simply unacceptable to ignore the issue of sexual harassment in the workplace. Employers, supervisors, and employees all have responsibilities they must know, understand, and follow.

What You Should Know

Employer Responsibilities

  • Provide and require all employees, at all levels within the organization, to attend and complete training on sexual harassment.
  • Establish, distribute, and enforce a policy prohibiting harassment and setting out a procedure for making complaints.
  • Check with your jurisdiction, but in most cases, the policy and procedure should be in writing, posted and accessible to employees, and include:
    • A definition of what is considered sexual harassment.
    • A non-retaliation policy.
      • Complainants and witnesses must be protected from retaliation resulting from initiating or supporting a sexual harassment allegation.
      • Otherwise, the likelihood of people coming forward with concerns and complaints, will be drastically decreased.
    • Specific prevention procedures.
      • e. Making sexual harassment a disciplinary offense that could be punishable with termination.
    • An established reporting procedure that every employee is comfortable and familiar with.
      • The policy must actively encourage victims of sexual harassment to report the behavior, and identify several appropriate individuals authorized to receive the harassment complaint.
    • A timely, clear, and thorough investigation and remediation procedure that is enforced.

Supervisor Responsibilities

  • Know and comply with company policies and procedures on harassment.
  • Report any complaint they receive or incident they witness, immediately.
  • Demonstrate a willingness to hear and objectively discuss complaints and assist employees in reporting their complaint. This includes;
    • Responding to any complaint as soon as possible.
    • Clarifying to the employee that confidentiality will be maintained as much as possible, but can’t be guaranteed, in order to investigate a claim fully and properly.
  • Don’t object if an employee prefers to or does bypass the standard chain of command.
  • During a complaint investigation:
    • Make employees available for interviews.
    • Be available for interviews.
    • Provide as much information as possible.
  • Don’t engage in or condone retaliation by following these guidelines:
    • Treat any employee who complained the same as every other employee.
      • e. Don’t make an example of them or single them out – in either a good or bad way.
    • Take disciplinary action against any employee who retaliates against an employee who made a complaint.
      • Act quickly but fairly.
    • Ensure your own conduct is fair in both fact and in appearance.
    • Never discourage any employee from asserting their legal rights.

Employee Responsibilities

  • Be knowledgeable – know and understand company policies and applicable laws.
  • Be watchful.
    • Pay attention to co-workers so you can avoid inadvertent offences.
    • Be on the lookout for subtle forms of harassment and report any instances to your supervisor or HR.
  • Be active by confronting harassers directly, if you are comfortable doing so.
    • If this fails, file a grievance and always document in detail any harassing behavior.
    • Report harassing behavior.
    • Document instances of harassing behavior, retaliation, reporting, and follow-up.

What You Should Do

Know and follow the laws designed to prevent sexual harassment and protect workers.

Regarding sexual harassment, federal law is found in the Canada Labour Code (CLC). If you allege that you have, or are experiencing sexual harassment at work, and the company that you work for in Canada falls under federal jurisdiction, then that sexual harassment is covered under Division XV.1 of Part III (Labour Standards) of the Canada Labour Code (R.S.C., 1985, c. L-2).

Although all provincial and territorial jurisdictions have passed legislation regarding sexual harassment and sex discrimination, they are covered under human rights legislation and not under the individual labour codes or acts.

In the United States, the Equal Employment Opportunity Commission enforces the federal harassment regulations and many states have laws that go above and beyond the federal requirements.

Final Word

Having a clear understanding of your responsibilities and the responsibilities of others, will inform and empower you when it comes to sexual harassment.


Sexual Harassment: Understanding Unwelcome and Unwanted Behavior

What’s at Stake?

It is not uncommon to hear employees say things like this, “We can’t even give someone a compliment around here without being accused of sexual harassment.” Or, “I was just joking, she’s way too sensitive. There’s no way that was harassment.” No doubt you have several other phrases you could add to the list.

But it’s not that hard to understand what is and what is not considered sexual harassment when you look at in terms of a behavior being unwelcome and unwanted.

What You Should Know

Supervisors and employees must have a clear understanding of what might be considered unwanted and unwelcome conduct.  Here are some examples of unwelcome and unwanted behaviors.

  1. Sharing sexually inappropriate images or videos, such as pornography, with co-workers.
  2. Sending suggestive letters, notes, or e-mails.
  3. Displaying inappropriate sexual images or posters in the workplace.
  4. Telling lewd jokes, or sharing sexual anecdotes.
  5. Making inappropriate sexual gestures.
  6. Staring in a sexually suggestive or offensive manner, or whistling.
  7. Making sexual comments about appearance, clothing, or body parts.
  8. Inappropriate touching, including pinching, patting, rubbing, or purposefully brushing up against another person.
  9. Asking sexual questions, such as questions about someone’s sexual history or their sexual orientation.
  10. Making offensive comments about someone’s sexual orientation or gender identity.

https://www.thebalance.com/examples-of-sexual-and-non-sexual-harassment-2060884

Keep in mind, these and other behaviors, don’t have to be directed at a person to be considered harassment.

What You Should Do

  • Train supervisors and employees on the behaviors listed above and explain how and why they could be considered harassment.
  • Clearly define and communicate unacceptable behaviors through policies and actions.
    • Employees likely have differing viewpoints about what behaviors they consider harassing – so educate them on behavior standards so there’s no question.
  • Expect possible push-back and have a procedure in place for addressing these types of behaviors.
    • How to address an employee who has put up potentially questionable images in their work area.
  • Explain that the following does not mean the conduct was welcomed or wanted:
    • The victim did not complain to the harasser or to others about the behavior.
    • The victim engaged in coarse or lewd conduct outside the workplace on their own time.
    • The victim was heard to use curse words from time to time.
  • Set a good example and ensure your top-level executives and managers are setting a good example.
    • You can imagine, if a manager exhibits harassing behaviors, their employees could take that as a sign it’s okay for them to do the same.

Final Word

Sharing these guidelines with your employees can go a long way to communicating what is and what is not considered harassment.  And in doing so, setting expectations for what behaviors will be tolerated – and which ones won’t.


Optimizing Safety Training Retention

Date: May 22nd, 2019

Speaker: Richard Tobin, President & CEO at Bongarde (parent company of SafetyNow)

Download Slides: Click Here

Did you know employees forget 70% of their safety training within 24 hours of learning it? And that over the course of a month their retention decreases to almost 0? This can be prevented, but you need a strong understanding of how to train with retention in mind. In this webinar, learn how leading companies train their employees with methods that make safety STICK. You’ll leave with fresh ideas and strategies to ensure your next training session is a memorable one.

Richard, or Rick, Tobin originally joined Bongarde Media in 2013 in a marketing role, but quickly worked his way through Product to a take an active ownership of the P&L of one of the core business units in Bongarde.

In the fall of 2016, Rick took on the role of President and CEO for Bongarde and is focused on growing the people, services and business. With a strong passion for keeping workers safe, and companies compliant, Rick advocates for worker safety by speaking at conferences, and in webinars like this one.

Prior to joining Bongarde, Rick was a partner in F5 Marketing Group, where he helped clients like Disney, Sterling Commerce, and divisions of Lockheed Martin with their online market growth.

Rick has also previously served as Director of Research for Enquiro; authoring landmark research on SERP engagement, usability and UX design for companies like Google, Microsoft, Disney and more.

Rick holds multiple degrees from the University of British Columbia and the University of Edinburgh.


All About Blended Learning

Speaker: Richard Tobin

Date & Time: Sept 18, 2019 | 9am-10am PDT

Download Slides: Click Here


About the Webinar

What is blended learning? Why should you use it? Is what you are doing now considered blended learning by experts? In this webinar, we’ll explore the benefits of blended learning, how to correctly implement this approach so as not to overwhelm your team, and what sort of results you can expect from this training approach.

About the Speaker

Rick Tobin originally joined Bongarde Media in 2013 in a marketing role, but quickly worked his way through Product to a take active ownership of the P&L of one of the core business units in Bongarde. Within a year, Rick grew the business profit line by over 400% and has carried that determination and Grit to achieve in other core business areas within the company.

In the fall of 2016, Rick took on the role of President and CEO for Bongarde and is focused on growing the people, services and business.

Prior to joining Bongarde, Rick was a partner in F5 Marketing Group, where he helped clients like Disney, Sterling Commerce, and divisions of Lockheed Martin with online market growth.

Rick has also previously served as Director of Research for Enquiro, now Yellow Pages; authoring landmark research on SERP engagement, usability and UX design for companies like Google, Microsoft, Disney and more.

Rick holds multiple degrees from the University of British Columbia and the University of Edinburgh.


By the Numbers: 6,098 Reasons to do Workplace Inspections

Here are 6,098 reasons why workplace inspections are important. 6,098 Canadian and U.S. workers died in 2017 from work-related injuries or illnesses.

  • One worker dies on the job, on average, nearly every day in Canada, according to the Association of Workers’ Compensation Boards of Canada, AWCBC. Add the cancers and longer-term illnesses from occupational exposure, and the number climbs to nearly 1,000.
  • 951 workers died in Canada in 2017 – AWCBC
    • 217 in construction
    • 160 in manufacturing
    • 70 in transportation and storage
  • Every 7 seconds a worker in the U.S. is injured on the job – NSC, Bureau of Labor Statistics
    • 510/hour
    • 12,300/day
    • 86,500/week
    • 5 million/year
  • 5,147 workers were killed on the job in 2017 in the U.S. – Bureau of Labor Statistics
    • Over 99 a week
    • Over 14 deaths a day
    • 2,077 transportation-related fatalities
    • 887 fatal falls
    • 272 unintentional overdoses from nonmedical use of drugs or alcohol at work – 5th consecutive year this number has increased by at least 25%.


Workplace Safety Inspection Checklist

Use and modify this checklist to assist you and your teams during workplace safety inspections. Make sure any deficiencies are documented on the checklist.

Location Inspected: ____________________________________________________

Inspection Done By: __________________________________________________________

Date: ______________________________________________________________________

Yes No Comments
Housekeeping and General
Required safety materials posted, accessible, up-to-date.
Floor surfaces free of water, oil or other fluids.
Floor surfaces even – i.e. no loose tiles, rugs, or torn carpet.
Walkways/doorways clear of boxes, extension cords, and litter.
Stairways kept clear of boxes, equipment and other obstacles.
Work areas, walkways and stairs well lit.
Work stations tidy and well-maintained.
First Aid, Emergency Equipment, and Signs
Emergency equipment – i.e. eyewashes, showers, fire extinguishers – clear, inspections up-to-date, good working order.
First Aid Kits – easily accessible, clearly identified.
First Aid Kit contents – stocked, contents not past expiration.
Emergency procedures clearly displayed – including evacuation route for every floor.
Emergency exits and aisles unobstructed.
All exits clearly marked and free from obstruction.
Signs and arrows indicating the direction to exits.
Location of fire alarms/firefighting equipment clearly marked.
Materials Handling
Regularly used items in easy reach.
Enough area around machines and equipment for easy and safe access by people and vehicles.
Material handling aids available and in good condition.
Storage
Items placed neatly and securely on shelves.
Heavy items stored below shoulder height.
Items on high shelves easily reached, ladder available.
Electrical
Extension cords secured and in good condition (no exposed wires or bent prongs).
Portable hand tools grounded or double insulated; cord in good condition.
Machines properly grounded.
Clear access to electrical panels and no combustible material stored within restricted area around panels.
Machines and Tools
Guarding and safety devices in place.
Start/Stop switches clearly marked and easy to reach.
Safe operating procedures available.
Lockout procedures available.
No defective tools in use or in area.
Manufacturers’ manuals available for all tools and machinery.
Chemicals and Hazardous Substances
Hazardous substances are properly labelled, stored and disposed of properly – i.e. lids on chemical containers, oily rags in metal bins and not in regular trash.
Safety Data Sheets are available and easily accessible.
WHMIS or HAZCOM training: safe use and storage of hazardous substances and chemicals – ask worker questions to determine knowledge or need for training.
Flammable products properly stored – i.e. flammable storage cabinets, capped, labeled.
Flammable products within permissible quantities.
Personal Protective Equipment
PPE is available and observed being worn correctly.
PPE is properly stored and cared for – ask workers questions about care and storage to determine knowledge or need for training.
Security
Emergency numbers easily available – internal and external.
Visitor/contractor rules in place.
Lone worker safety procedures in place.
Safe money handling procedures in place.
Other