Employee Training – Program Audit

The following assessment provides insight into the stage of program implementation for each element of your Employee Training Program.

  1. Review each element of the Program.
  2. Compare the implementation of the Program Element against the definitions in the table and select the box in the column directly before the applicable definition.

* This document is meant to serve as a guide and may not be all inclusive to local and regional regulations. Review local and regional regulations to ensure proper compliance.


Harassment Leads to Suicide – Spanish

Los estudios muestran que el acoso en el lugar de trabajo (acoso sexual, intimidación y otras formas de acoso) puede tener efectos emocionales y físicos en una víctima y puede causar depresión, ansiedad y, en algunos casos, conducir a la autolesión e incluso al suicidio.

Carolyn Malkin cuenta la historia de su padre Wally Theodore, un impresor desplazado por la tecnología, que se convirtió en guardia armado de lo que ella llamó “camión de dinero”. Su padre también era representante del sindicato y ahí es donde empezaron los problemas.

Wally empezó a sufrir acoso después de no poder evitar el despido de un miembro del sindicato que fue sorprendido robando. El acoso no se limitaba al horario de trabajo, recibía llamadas acosadoras por las noches y también le regañaban en otros lugares. En mayo de 1982, Wally se disparó a sí mismo en la cabeza con su pistola de la empresa. No pudo soportar más el acoso. Su hija Carolyn tenía sólo 13 años en ese momento.

El acoso en el trabajo no es algo que la mayoría de las víctimas puedan dejar en el trabajo. Los efectos del acoso van más allá de los 9 a 5 años y tienen el potencial de devastar vidas y familias mucho después de que el acoso cese.


Heavy Equipment Mechanics Electrocuted – Spanish

Dos mecánicos fueron electrocutados mientras reparaban un rascador de movimiento de tierra.

Fueron enviados a una obra en construcción donde un raspador estaba aparcado bajo una línea eléctrica de 12.000 voltios. Una víctima de 40 años se paró en el fondo del rascador mientras una grúa montada en un camión ayudaba a reemplazar el diferencial trasero. Desde el interior de la plataforma del rascador, una víctima de 18 años operaba un control conectado a la grúa por cable. La pluma tocaba la línea de energía, que enviaba corriente a través de las máquinas.

Un operador de equipos a 12 metros de distancia escuchó el arco eléctrico y vio a las víctimas en llamas. Agarró un extintor de incendios y corrió hacia ellas, pero las corrientes de tierra lo dejaron inconsciente temporalmente. La compañía eléctrica desenergizó las líneas aéreas para que los paramédicos pudieran llegar a los cuerpos.

Si la compañía hubiera inspeccionado el sitio con seguridad, se podrían haber tomado medidas preventivas, como:

  • Colocar la grúa de manera que su brazo no pueda acercarse a menos de tres metros de la línea eléctrica.
  • Poner un observador.
  • Contactar con la compañía eléctrica para que desactive la energía o para que “mangue” (aísle) la línea.
  • Mover el rascador.
  • Instalar dispositivos de observación que permitan al operador ver la parte trasera de la grúa.


Hazardous Weather Safety Checklist – Spanish

No importa qué época del año sea, el clima puede tener un gran efecto en su seguridad tanto en el trabajo como fuera de él. Incluso si no trabaja en el exterior, ir y volver del trabajo con condiciones meteorológicas adversas puede ser peligroso.

Conducir cuando el clima es desfavorable puede ser muy peligroso. Durante una lluvia o una tormenta de nieve, por ejemplo, la visibilidad se reduce para todos los conductores, incluido usted, los peatones son más difíciles de detectar y es más probable que sus neumáticos patinen sobre la superficie resbaladiza de la carretera. Tener precaución al conducir con clima hostil es su mejor defensa. Las siguientes medidas de seguridad pueden ayudar:

  • Reduzca la velocidad, por debajo del límite de velocidad, y mantenga un parachoques de seguridad entre su coche y los demás en la carretera.
  • Familiarícese con los controles del tablero de mandos. Luego, si necesita atenuar las luces, ajuste la velocidad de los limpiaparabrisas o desempañe las ventanillas si puede hacerlo sin apartar la vista de la carretera.
  • Evite frenar bruscamente. Maneje usando un ligero toque.
  • Evite también conducir por charcos profundos o áreas inundadas. Si es necesario, conduzca muy despacio y con cuidado. El agua puede hacerle varias cosas a su auto. Los charcos pueden hacer que sus neumáticos pierdan el contacto con la superficie de la carretera. El agua más profunda puede mojar los frenos e impedir que funcionen cuando sea necesario. Y si se salpica el compartimiento del motor, el agua puede detener el auto y dejarlo varado en el área inundada.

Caminar con clima adverso también puede ser difícil. Como mencionamos antes, la lluvia le hace más difícil de ver, así que tenga más cuidado alrededor de los vehículos.

  • Asegúrese de que los conductores lo vean. Use ropa de color claro o reflectiva cuando camine con mal clima, o después de oscurecer.
  • Use el calzado apropiado para ayudarle a mantener el equilibrio. La nieve, el hielo e incluso la lluvia pueden hacer que se caiga de forma inesperada en una acera, un cruce de peatones o una parada de autobús.

Si debe trabajar fuera durante el mal clima, tenga en cuenta también otros peligros:

  • Los vientos fuertes pueden derribar escaleras o andamios, mientras que la lluvia, el hielo o la nieve pueden hacer que resbale y caiga. Evite trabajar en estas condiciones peligrosas.
  • Tenga cuidado con los rayos que pueden provocar descargas eléctricas o electrocución.
  • En caso de fuertes tormentas de lluvia, manténgase alejado de posibles fuentes de inundación, como ríos, pasos subterráneos y grandes alcantarillas.
  • En algunas zonas, un granizo o una tormenta eléctrica puede ser el primer signo de un tornado que se aproxima. Escuche la radio para conocer los avisos meteorológicos. Haga exactamente lo que se le indique en la radio. Pero, asegúrese de encontrar cobertura dentro de un edificio sólido o un refugio para tormentas. Los vehículos o las casas móviles no son seguros porque pueden ser levantados y destruidos por los vientos.
  • El calor excesivo puede ser un peligro para su seguridad y su salud. En tiempo caluroso, reduzca la velocidad, vístase para las condiciones y beba muchos líquidos sin alcohol. El calor añadido puede hacer que se sienta irritable y distraído, así que tómese su tiempo y preste mucha atención a su trabajo.
  • Las condiciones climáticas severas también pueden ser un riesgo para la seguridad cuando esté disfrutando de su deporte favorito como el golf, el béisbol o incluso la navegación.
  • Cuando observe un rayo o piense que se avecina una tormenta eléctrica, salga del campo de béisbol, abandone el campo de golf y llegue a la orilla si está nadando o navegando.
  • Deshágase de los bates de béisbol de metal y de los palos de golf. Aléjese de los altos mástiles metálicos de su velero. Todos son buenos conductores de electricidad.
  • Si no puede entrar en un edificio lo suficientemente rápido, encuentre un lugar bajo y agáchese. Nunca se refugie bajo un árbol alto.

Ya sea que trabaje afuera, que vaya al trabajo o que se relaje en sus días libres, vigile el clima. Puede ser un amigo bienvenido pero también un adversario peligroso.


Good Enough Mindset Fatality Report

One of the examples of a fatality that was labeled a “freak accident” was the tragic death of Marty Dale Whitmire in Greenville, South Carolina, in April 2017.  Whitmire was working on a paving operation when his truck clipped a live power line, which fell on him — a tragic, far-too-common — and completely preventable — cause of worker death.

Yesterday, Marty Whitmire’s nephew, Melvin Whitmire, posted a comment on that post which I am reprinting below to give it more attention. I defy you to read it without boiling over, and crying at the same time:

April 11, 2017 is a day my family and I will NEVER forget. Marty was my like a brother to me. He was actually my Uncle (my father’s baby brother) but because he was only 8 years older than me we were very close when I was a child and as I became an adult we grew to be best friends. He used to tell everyone that he and I were brothers.

Marty worked on my crew as a Pipefitter for 4+- years and the company we were working for layed him off in November of 2016. That’s when he took the job at King Asphalt to keep busy until the layoff ended. He wasn’t experienced and he was a flag man for the first 4 months he worked there. Towards the end of March 2017 he was “promoted” to the job the position that he was working when he was tragically killed, not accidentally either. This happened in my opinion (I have 22 years in Industrial Pipefitting an OSHA 30, and experience as Site Specific Safety Officer on a Federal Jobsite) due to Marty’s absence of proper training on the machine and lack of training for the foreman in the job. The power lines were lower than required by national code, the pole was not up to national codes, the spotter was out that day and no one filled his position and SCDOT inspector was sitting in his truck onsite because the road being paved was a State Road. The road has more overhead lines crossing the road than the average road in that particular area that the incident occurred, and no one notified the power company about safeguarding the power lines before work began. COMPLACENCY killed my “brother”!!!! This could have been avoided if either the paving or power company or SCDOT would have fulfilled their obligations to provide a safe place to work.


Selecting Hand Tools – Spanish

Los Riesgos

Usar la herramienta equivocada o usar una herramienta incorrectamente puede causar lesiones ergonómicas debilitantes. El riesgo de lesiones aumenta cuando los trabajadores están expuestos con frecuencia a posturas incómodas, presión por contacto o agarre con pellizcos. Con el tiempo, la exposición a posturas incómodas o a presiones de contacto perjudiciales puede contribuir a una lesión.

Sé un mejor supervisor

Las herramientas manuales que se ajustan a las manos de un trabajador y al trabajo que realiza pueden reducir el riesgo de lesiones. Aquí hay 11 consejos para la selección de herramientas manuales para compartir con sus empleados.

  • Para las herramientas de una sola mano utilizadas para tareas eléctricas: Seleccione una herramienta que se sienta cómoda con un diámetro de mango en el rango de 1 1/4 pulgadas a 2 pulgadas. Puede aumentar el diámetro agregando una funda al mango. El mango de potencia proporciona la máxima potencia de mano para tareas de alta fuerza.  Todos los dedos se enrollan alrededor del mango.
  • Para herramientas de una sola mano usadas para tareas de precisión: Seleccione una herramienta con un diámetro de mango de 1/4 de pulgada a 1/2 pulgada.
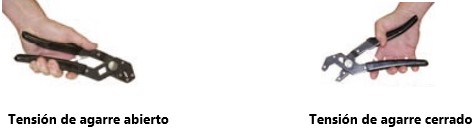
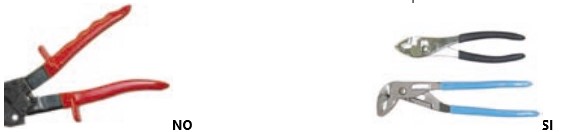
  • Para herramientas de doble mango (tipo alicate) utilizadas para tareas de energía: Seleccione una herramienta con una amplitud de agarre que sea de al menos 2 pulgadas cuando esté completamente cerrada y no más de 3 1/2 pulgadas cuando esté completamente abierta. Cuando se requiera una fuerza continua, considere el uso de una pinza, un agarre o una pinza de bloqueo.

  • Para herramientas de doble mango (tipo alicate) utilizadas para tareas de precisión: Seleccione una herramienta con una extensión de agarre que no sea menor de 1 pulgada cuando esté completamente cerrada y no más de 3 pulgadas cuando esté completamente abierta. 
  • Para herramientas de doble mango para pellizcar, agarrar o cortar: Seleccione una herramienta con mangos que tengan resortes para devolver los mangos a la posición abierta.
  • Seleccione una herramienta sin bordes afilados o ranuras para los dedos en el mango.

  • Seleccione una herramienta que esté revestida de material blando. Añadiendo un manguito al mango de la herramienta, se mejora la superficie pero también se aumenta el diámetro o la extensión del mango.
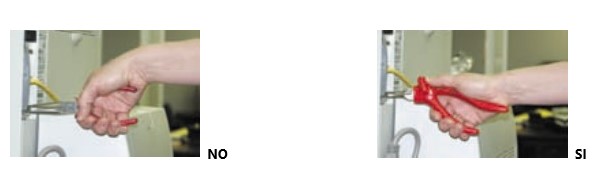
  • Seleccione una herramienta con un ángulo que le permita trabajar con la muñeca recta. Los mangos curvados son mejores que los rectos cuando se aplica la fuerza horizontalmente (en la misma dirección que el antebrazo y la muñeca rectos). Los mangos rectos son mejores que los mangos curvados cuando se aplica la fuerza verticalmente.


  • Seleccione una herramienta que pueda ser usada con su mano dominante o con cualquiera de las dos manos.
  • Para tareas que requieren mucha fuerza: Seleccione una herramienta con un mango más largo que la parte más ancha de su mano – generalmente de 4 a 6 pulgadas. Evite la presión de contacto asegurándose de que el extremo del mango no presione los nervios y vasos sanguíneos de la palma de su mano. Si el mango es demasiado corto, el extremo presionará contra la palma de la mano y puede causar una lesión.
  • Seleccione una herramienta que tenga una superficie antideslizante para un mejor agarre. Al agregar una funda a la herramienta se mejora la textura de la superficie del mango. Para evitar que la herramienta se deslice dentro de la funda, asegúrese de que la funda se ajuste bien durante el uso.

Véase la lista de control ergonómico para la selección de las herramientas manuales.

https://choosehandsafety.com/sites/default/files/docs/NIOSH_guide_to_selecting_hand_tools.pdf


Six Ways You Can Die in a Confined Space – Spanish

Los espacios confinados son notorios por los peligros, a menudo ocultos que no se pueden ver u oler. Demasiadas veces cuando se reconoce un peligro en un espacio confinado es demasiado tarde para que los que entran en el espacio se salven. Aquí hay seis situaciones peligrosas y mortales de espacios confinados.

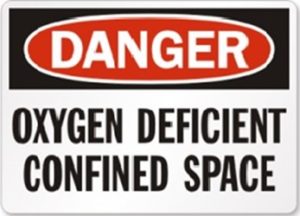
  1. Puede asfixiarse por la falta de oxígeno dentro del espacio. Otros químicos pueden desplazar el oxígeno y convertir la atmósfera en mortal en cuestión de segundos. Los niveles de oxígeno deben estar entre el 19,5% y el 23,5%. Todo lo que sea más bajo es una atmósfera con deficiencia de oxígeno. Todo lo que sea más alto es una atmósfera rica en oxígeno, lo que conlleva un mayor riesgo de incendio y explosión.
  2. Puede envenenarse por respirar aire tóxico o contaminado dentro del espacio. Este aire puede provenir del trabajo realizado en el espacio o del escape de máquinas, equipos y otros trabajos realizados fuera del espacio.
  3. Puede morir por una explosión causada por la ignición de sustancias inflamables o combustibles. El trabajo caliente, las chispas y las altas temperaturas/presiones se encuentran a menudo dentro de espacios confinados.
  4. Puede quedar atrapado dentro del espacio y no poder evacuar de un incendio u otra emergencia.
  5. Puede ser golpeado y atropellado por un vehículo o equipo al entrar o salir del espacio. Esto es común en trabajos de carreteras y servicios públicos donde los espacios confinados están en o cerca de las carreteras y otras áreas de tráfico.
  6. Puede ahogarse o asfixiarse si el espacio es engullido por agua, tierra u otros materiales.


Understanding the Leader’s Role in Creating High Performing Teams – Spanish

“No es las finanzas. No es una estrategia. No es la tecnología. Es el trabajo en equipo lo que sigue siendo la última ventaja competitiva, tanto por ser tan poderoso como raro”.

Así es como Patrick Lencioni comenzó su libro, “Cinco disfunciones de un equipo”, en 2002. Diecisiete años más tarde, esta es una declaración todavía provocativa que merece más discusión.

En más de cuatro décadas de consultoría en Vantage Leadership, hemos encontrado que los equipos de alto rendimiento son realmente raros. Muchos equipos tienen un bajo rendimiento o son promedio, en el mejor de los casos, y aunque hay un sinnúmero de razones para ello, el papel del líder del equipo en la creación de equipos de alto rendimiento merece ser explorado.

La investigación preliminar de Vantage llevada a cabo en 50 equipos ejecutivos que han utilizado nuestra encuesta sobre equipos de alto rendimiento sugiere que el rendimiento del equipo está altamente correlacionado con el rendimiento del líder, de tal manera que cuando los líderes de los equipos son más efectivos, sus equipos son más efectivos.

La realidad de la mejora del equipo, sin embargo, no suele ser tan simple: decir que la mejora del equipo se produce sólo por el rendimiento del líder tienta a un error de atribución. Es más probable que la mejora provenga de una interacción de los dos en la que cada uno aprovecha la fuerza del otro.

Mientras que tanto el equipo como el líder del equipo se combinan para impulsar un alto rendimiento, la influencia del líder en el establecimiento del tono de las interacciones del equipo es tal que mantenemos un enfoque en el líder como el catalizador para la mejora.

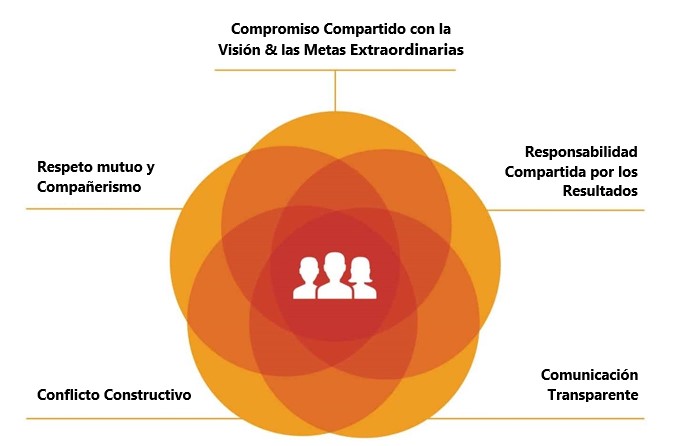
De las cinco dimensiones de los equipos de alto rendimiento (ver modelo), el respeto mutuo y la camaradería es uno de los factores más críticos que contribuyen al éxito del líder, según nuestra investigación. Esencialmente, esta dimensión pregunta: ¿demuestra el líder del equipo respeto y genuinidad, y responsabiliza a las personas de un alto nivel de colaboración?

Los líderes de equipo que obtienen una alta puntuación en Respeto Mutuo y Camaradería típicamente desarrollan el seguimiento mediante la construcción de la confianza, el respeto y la lealtad. Permiten y promueven tener conversaciones difíciles y debates desafiantes sobre asuntos de negocios, y dicen lo que pretenden y actúan de acuerdo con su palabra.

Estos líderes hacen que el conflicto sea productivo y esto impacta positivamente en el comportamiento y la colaboración del equipo. Tienen en cuenta las opiniones de los demás y sopesan cuidadosamente lo que dicen los demás.

Tal vez lo más importante es que no ejercen autoridad posicional – cuando un equipo y su líder están en su mejor momento, el líder se convierte en parte del equipo y las opiniones de todos son escuchadas.

En nuestra experiencia, esto no es común ya que puede ser difícil para los líderes renunciar al control y ver más allá de sí mismos de esta manera. No es sorprendente, entonces, que el Respeto Mutuo y la Camaradería sea también el área de desarrollo más comúnmente reportada para los líderes de equipos.

Llevándolo un paso más allá, nuestra investigación indica que la participación en la Comunicación Transparente es el área de desarrollo más comúnmente reportada para los miembros de los equipos. Esto podría reforzar la afirmación de que si el líder del equipo no establece un ambiente de confianza, respeto mutuo y camaradería en el que los miembros se sientan cómodos siendo sinceros y abiertos con los demás, todo el equipo se verá afectado.

Lo que hacen los mejores equipos

Hemos encontrado que los mejores equipos están siendo continuamente entrenados – por el líder y por cada uno de ellos. El líder involucra al equipo, lo inspira a la acción y lo hace responsable de evolucionar, aprender y crecer. La puntuación alta en Respeto Mutuo y Camaradería permite que este entrenamiento ocurra en un ambiente seguro.

En “Equipos de Liderazgo Superior”: What it Takes to Make them Great” (2008), Wageman y otros estudiaron 120 equipos ejecutivos y descubrieron que cada director general de una muestra tenía un fuerte enfoque externo, atendiendo a asuntos del entorno más amplio. Sin embargo, los líderes de los equipos destacados tenían un enfoque interno igualmente fuerte sobre cómo el equipo se entrena y desarrolla a sí mismo.

En resumen, uno de los elementos más críticos de la construcción de un equipo de alto rendimiento es la interacción entre el líder y los miembros del equipo, de tal manera que el líder se convierte en un facilitador del desarrollo del equipo y no en el único impulsor del equipo que trabaja en conjunto a un nivel más alto.

Jacqueline Ackerman

Formación profesional y entrenamiento

https://www.linkedin.com/pulse/understanding-team-leaders-role-creating-high-teams-ackerman/


Hand Protection – Spanish

En esta sección se abordan los peligros y el equipo de protección personal específicos de las manos y los dedos.

General

La protección de las manos se refiere a los EPP específicos para la región del codo y la parte inferior (por ejemplo, guantes, cubiertas para los brazos, protectores para los dedos, etc.). De acuerdo con las regulaciones de la OSHA, un empleador es responsable de seleccionar y ordenar el uso de la protección de manos adecuada para sus empleados. Los empleadores deben evaluar el área de trabajo para determinar los posibles peligros y riesgos de lesiones en las manos. Si se encuentra un peligro, los empleadores también deben exigir la protección de las manos. También se anima a proporcionar un nivel adicional de protección mayor del necesario.

Peligros que justifican la protección de las manos

  • El contacto con sustancias nocivas
  • Cortes graves
  • Abrasiones graves
  • Pinchazos
  • Quemaduras químicas
  • Quemaduras térmicas
  • Las temperaturas extremas

Tipos de protección

  • Tejido o tejido recubierto
  • Cuero, lona o malla metálica
  • Resistente a los químicos
  • Goma aislante


Program Evaluation and Improvement – Leading and Lagging Indicators – Spanish

Usted debe evaluar su programa de seguridad de manera regular – por lo menos anualmente – para determinar lo que funciona y lo que no, y si el programa está en camino de cumplir sus objetivos. Rastrear y analizar los indicadores adelantados y atrasados es una manera efectiva de monitorear el desempeño y el progreso de su programa de seguridad.

Indicadores adelantados y atrasados

En su artículo de 2014, Kyle W. Morrison dio un ejemplo perfecto de indicadores adelantados y atrasados. “Los indicadores adelantados son medidas previas al incidente, en oposición a los indicadores atrasados, que son medidas recogidas después de que ocurra un incidente. Por ejemplo, un neumático pinchado es un indicador de retardo porque el reventón ya ha ocurrido, pero una inspección que observa la mala calidad del neumático y evita que se produzca un reventón es un indicador líder”.

Para decirlo de otra manera:

  • Los indicadores adelantados son las mediciones previas al incidente; y
  • Los indicadores de atrasados miden el rendimiento basado en las cifras o estadísticas de incidentes y lesiones del pasado.

Los indicadores de atrasados le dicen cuántas personas resultaron heridas, cómo se lesionaron y qué tan graves fueron las heridas. Algunos ejemplos de indicadores de retardo incluyen:

  1. Registros de lesiones
  2. Frecuencia y gravedad de las lesiones
  3. Días fuera del trabajo/días de trabajo perdidos
  4. Costos de la compensación de los trabajadores
  5. Los costos de la prima de seguro
  6. Costos de los daños a los bienes y al equipo
  7. Liberación de químicos

Los indicadores de retardo no le dicen qué tan bien le va a su organización en la prevención de incidentes y lesiones. Ahí es donde entran los indicadores adelantados.

Los indicadores principales son todos sobre el rendimiento futuro y la mejora continua. Los indicadores adelantados le ayudan a ver qué tan bien le va a su organización midiendo las actividades dirigidas a prevenir lesiones. Algunos indicadores principales populares son:

  1. Entrenamiento
  2. Charlas de caja de herramientas/reuniones de seguridad
  3. Inspecciones y auditorías
  4. Evaluación de los peligros
  5. Presentación de informes sobre peligros y casi peligros (observaciones)
  6. Mantenimiento de equipos y máquinas
  7. Participación en el comité de seguridad

Los indicadores adelantados y atrasados pueden ser cuantitativos o cualitativos.

  • El número de peligros y casi peligros notificados sería un indicador cuantitativo.
  • Un solo trabajador que exprese una opinión favorable sobre la participación en el programa sería un indicador cualitativo.

Siempre que sea posible, seleccione indicadores que sean medibles (cuantitativos). Los indicadores cuantitativos le ayudarán a determinar mejor si ha alcanzado los objetivos de su programa.

Mejorar y corregir

Cuando se identifica un problema en su programa de seguridad y salud, usted (el empleador), en coordinación con los supervisores, los gerentes y los trabajadores, debe tomar medidas rápidas para corregir el problema y evitar que vuelva a ocurrir.

Cómo lograrlo

  • Si descubre deficiencias en el programa, determine cómo corregir el problema. Obtenga información de sus gerentes y empleados e investigue lo que otros en su industria han hecho o están haciendo.
  • Busque continuamente el aporte de los gerentes, trabajadores, supervisores y otras partes interesadas en las mejoras del programa.
  • Determine si los cambios en los equipos, instalaciones, materiales, personal clave o prácticas de trabajo desencadenan alguna necesidad de cambios en el programa.
  • Determine si sus indicadores y objetivos de rendimiento siguen siendo relevantes y, si no lo son, cómo cambiarlos para que cuenten con una visión más precisa y produzcan mejoras en general.

Alcance y tiempo

El alcance y la frecuencia de las evaluaciones del programa dependerán del alcance, la complejidad y la madurez del programa y de los tipos de peligros que debe controlar. Las evaluaciones del programa deben realizarse periódicamente (y al menos anualmente), pero también pueden ser desencadenadas por un cambio en el proceso o el equipo, o un incidente como una lesión grave, un daño significativo a la propiedad o un aumento de las quejas relacionadas con la seguridad.


That Feels Better: Ergonomics for Your Temporary Home Office

Due to COVID-19, your living rooms, bedrooms and dining tables have all been your everyday workstations for almost an entire year. While you’re getting the work done, you might find your workstation a literal pain in the neck – and back!

Watch this webinar to learn how to make your home office ergonomic so you can work comfortably and prevent injury.

In this webinar, you’ll learn

  • Tips to create an ergonomic at-home workstation
  • Risk factors and solutions to prevent injury
  • How to make adjustments for comfort in any room
  • Receive a workstation checklist to keep you feeling good

About your presenter

Brian Piñon, CSP, ARM

Brian Piñon is a Senior Risk Management Consultant for ICW Group Insurance Companies who specializes in Workers’ Compensation. Mr. Piñon is a Certified Safety Professional (CSP), holds an Associates in Risk Management designation (ARM) from the Insurance Institute of America, and is a graduate of the University of California, Davis.

Connect with Brian on LinkedIn

Download these helpful ergonomic resources for your home office

That Feels Better Presentation

View the “That Feels Better” webinar slides in PDF format

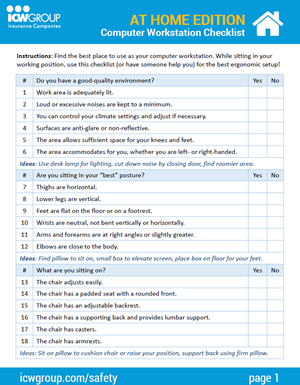
Computer Workstation Checklist: At Home Edition

Use this checklist at home for your best ergonomic setup.

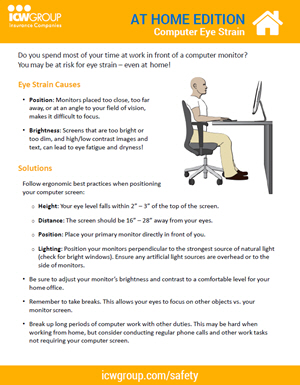
Computer Eye Strain: At Home Edition

Tips to avoid computer-related eye strain when working from home.

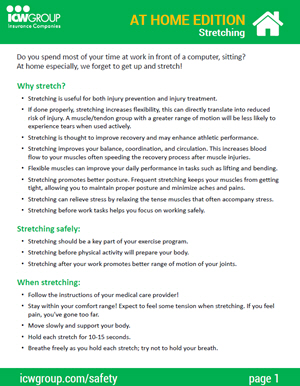
Stretching: At Home Edition

Stretching ideas for working at home, with photo images.

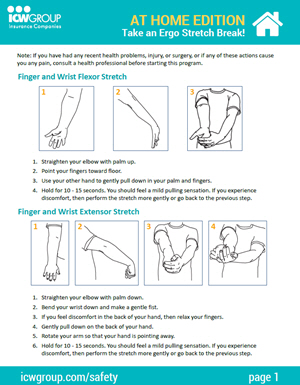
Take an Ergo Stretch Break: At Home Edition

Illustrated instructions for stretching hands, wrists, hamstrings, back, and neck.


Winter Driving Safety Talk

WHAT’S AT STAKE?

Driving safely in winter weather can be a challenge for even the most experienced driver. It’s easy to forget after months of mild conditions that snow and ice demand careful driving and special preparation for your vehicle. 17 percent of all vehicle crashes occur during winter conditions.

Winter is the perfect time to build crackling fires, hit the slopes, and snuggle up with a nice cup of cocoa. It also creates some of the most treacherous road conditions.

Snow and ice make even the most routine drive dangerous. Before winter weather arrives, make sure your vehicle is in good condition, keep in mind how you and your vehicle may be affected by the elements and be prepared for emergency situations.

WHAT’S THE DANGER?

People are killed and are injured each year by auto accidents that occur on snowy, icy, or slushy roads.

Roadways in Northern climes are subject to snow and other winter conditions.

Safe winter driving requires an abundance of caution, with defensive driving techniques employed and extra vigilance behind the wheel. Common sense practices — like never using a phone while driving and always wearing a seatbelt — are all the more important, while speeding and aggressive driving are especially dangerous.

Being an alert, defensive driver while on the road is critical for winter driving safety, but so too are the ways in which you prepare and care for your vehicle during the colder months. Depending on where you live and the types of roads on which you drive, winter driving may call for everything from different tires to different wiper blades to different fluids in the engine.

DRIVING DANGERS

Loss of Traction

Snow makes roads extremely slick and slippery, so when you’re driving in the snow it’s easy to lose control of your vehicle when it loses traction. This means your wheels can slide out of control and you’re at high risk of getting into an accident or collision.

Limited Visibility

Gray days and snowfall can make for seriously limited visibility when driving in the snow. This makes it difficult for you to navigate your surroundings and see what drivers around you are doing, putting you at a higher probability of getting into an accident.

Vehicle Malfunction

Cold weather can take a serious toll on your car, messing with the fluids under the hood as well as the durability of your car’s tires. You could wind up with a fluid freeze or a blowout if you’re not careful.

Rust

Snowy roads get salted to help melt the snow and ice and give you better traction. However, as you drive on salted roads the salt gets flung up onto your vehicle, and this can eat the paint and cause rust.

HOW TO PROTECT YOURSELF

Severe weather can be both frightening and dangerous for travelers. Winter storms, bad weather and sloppy road conditions are a factors in crashes and fatalities every winter.

COLD WEATHER DRIVING TIPS

  • Keep a bundle of cold-weather gear in your car, such as extra food and water, warm clothing, a flashlight, a glass scraper, blankets, medications, and more.
  • Make certain your tires are properly inflated and have plenty of tread.
  • Keep at least half a tank of fuel in your vehicle at all times.

TIPS FOR DRIVING IN THE SNOW

  • Stay home. Only go out if necessary. Even if you can drive well in bad weather, it’s better to avoid taking unnecessary risks by venturing out.
  • Drive slowly. Always adjust your speed down to account for lower traction when driving on snow or ice.
  • Accelerate and decelerate slowly. Apply the gas slowly to regain traction and avoid skids. Don’t try to get moving in a hurry and take time to slow down for a stoplight. Remember: It takes longer to slow down on icy roads.
  • Increase your following distance to five to six seconds. This increased margin of safety will provide the longer distance needed if you have to stop.
  • Know your brakes. Whether you have antilock brakes or not, keep the heel of your foot on the floor and use the ball of your foot to apply firm, steady pressure on the brake pedal.
  • Don’t stop if you can avoid it. There’s a big difference in the amount of inertia it takes to start moving from a full stop versus how much it takes to get moving while still rolling. If you can slow down enough to keep rolling until a traffic light changes, do it.
  • Don’t power up hills. Applying extra gas on snow-covered roads will just make your wheels spin. Try to get a little inertia going before you reach the hill and let that inertia carry you to the top. As you reach the crest of the hill, reduce your speed and proceed downhill slowly.
  • Don’t stop going up a hill. There’s nothing worse than trying to get moving up a hill on an icy road. Get some inertia going on a flat roadway before you take on the hill.

TIPS FOR LONG-DISTANCE WINTER TRIPS

  • Be Prepared: Have your vehicle checked by a AAA Approved Auto Repair facility before hitting the road.
  • Check the Weather: Check the weather along your route and when possible, delay your trip if bad weather is expected.
  • Stay Connected: Before hitting the road, notify others and let them know your route, destination and estimated time of arrival.
  • IF YOU GET STUCK IN THE SNOW:
  • Stay with your vehicle: Your vehicle provides temporary shelter and makes it easier for rescuers to locate you. Do not try to walk in a severe storm. It is easy to lose sight of your vehicle in blowing snow and become lost.
  • Don’t over exert yourself: When digging out your vehicle, listen to your body and stop if you become tired.
  • Be Visible: Tie a brightly colored cloth to the antenna of your vehicle or place a cloth at the top of a rolled up window to signal distress. At night, keep the dome light on if possible. It only uses a small amount of electricity and will make it easier for rescuers to find you.
  • Clear the Exhaust Pipe: Make sure the exhaust pipe is not clogged with snow, ice or mud. A blocked exhaust pipe can cause deadly carbon monoxide gas to leak into the passenger compartment of the vehicle while the engine is running.
  • Stay Warm: Use whatever is available to insulate your body from the cold. This could include floor mats, newspapers or paper maps. Pre-pack blankets and heavy clothing to use in case of an emergency.
  • Conserve Fuel: If possible, only run the engine and heater long enough to remove the chill. This will help to conserve fuel.

FINAL WORD

Winter driving demands special care; safe driving is a year-round habit. You and everyone in your vehicle should be wearing seat belts for every ride. Children should be in age- and size-appropriate child seats. Never drive after drinking. Never drive when distracted by an electronic device or anything else. Those are the essentials for safe driving, whatever the weather.


Working at Elevations Safety Talk

WHAT’S AT STAKE?

Humans experience adverse physical effects at altitudes above 1,500 meters. Since air pressure is low at high altitudes, oxygen is scarce and lungs require more effort to deliver oxygen into the bloodstream. Although the majority of major construction projects take place at altitudes where humans don’t need to acclimate, developments in parts of Bolivia, Peru, Tibet, and Ethiopia (to name a few) in the last 50 years exhibit signs of a future where we continue to push the limit and build skyward.

There are dangers that pose a threat to the wellbeing of your workers. Working at high altitudes is challenging and dangerous, but with OSHA on your side to guide you through the legal processes of fulfilling such a unique contract, you can rest assured that every precautionary stopgap is utilized to keep workers safe and your job site OSHA compliant.

WHAT’S THE DANGER?

Working at Heights

Working at heights means that an individual is working in a place that requires necessary precautions to prevent them from falling at a distance, resulting in serious injury. Working at heights is one of the most prominent causes of major work related injuries and fatalities. Falls from ladders, scaffolding, and lifts onto debris can cause serious injury even when the height is perceived to not be dangerous. Employers need to ensure that they take all measures necessary to lower the risk of their workers falling from a height using preemptive hazard recognition to constant site assessment.

Falls

Fall prevention should not be taken lightly. In 2016, 11,495 lost-time injury (LTI) claims were made in Ontario alone. That is 31 workers a day suffering from serious injury due to falls. Nine resulted in fatalities, while 70% of those falls were same level falls (ground level). Workers should try to avoid working at height if at all possible. If they can’t, they should ensure that they use the right equipment and safety procedures for their specific task, ensuring their personal workspace is safe for themselves and others around the site. Remember to secure all items when at height, as falling tools is as big a hazard as falling people!

Relevant OSHA Regulations

According to OSHA’s guidelines for respiratory protection as outlined in statute 1910.134, “air breathed by employees must have an oxygen content of at least 19.5 percent.” Oxygen content below the approved levels can result in physiological problems or render an employee unable to cope with other workplace hazards. Although OSHA recognizes the marked differences in an employee who is acclimated to low oxygen and an employee who is not, the definition of oxygen-deficient conditions are consistent across all employee needs. As such, the OSHA Respiratory Protection Standard insists that employees working at high altitudes are provided with a supplied-air respirator that delivers the approved 19.5 percent oxygen by their employer.

Altitude Sickness / Other Health Concerns

Altitude sickness usually occurs when a person makes a rapid ascent to an altitude of more than 8,000 feet. Altitude sickness can be classified as acute mountain sickness (AMS), high-altitude pulmonary edema (HAPE), and high-altitude cerebral edema (HACE). The symptoms of altitude sickness can be classified into two categories:

  • Early symptoms: headaches, fatigue, and insomnia
  • Later symptoms: shortness of breath, extreme fatigue, respiratory failure, cerebral edema, coma, and death

People with symptoms of AMS usually don’t require medical care, but if symptoms progress, they should consider consulting an emergency medicine physician, hyperbaric chamber expert, neurologist, or critical care specialist. If you believe you have symptoms of AMS, it’s imperative to return to a lower altitude immediately to offset the development of further symptoms. Remember that acclimation takes time, and it’s important to listen to your body when working at high altitudes.

HOW TO PROTECT YOURSELF

OVERHEAD PLATFORMS/ELEVATED WORK STATIONS/HOLES IN FLOOR AND WALLS

Falls are among the most common causes of serious work related injuries and deaths. Employers must set up the work place to prevent employees from falling off of overhead platforms, elevated work stations or into holes in the floor and walls.

Reduce Falls

Employers must set up the work place to prevent employees from falling off of overhead platforms, elevated work stations or into holes in the floor and walls. OSHA requires that fall protection be provided at elevations of four feet in general industry workplaces, five feet in shipyards, six feet in the construction industry and eight feet in longshoring operations. In addition, OSHA requires that fall protection be provided when working over dangerous equipment and machinery, regardless of the fall distance.

To prevent employees from being injured from falls, employers must:

  • Guard every floor hole into which a worker can accidentally walk (using a railing and toe-board or a floor hole cover).
  • Provide a guard rail and toe-board around every elevated open sided platform, floor or runway.
  • Regardless of height, if a worker can fall into or onto dangerous machines or equipment (such as a vat of acid or a conveyor belt) employers must provide guardrails and toe-boards to prevent workers from falling and getting injured.
  • Other means of fall protection that may be required on certain jobs include safety harness and line, safety nets, stair railings and hand rails.

OSHA requires employers to:

  • Provide working conditions that are free of known dangers.
  • Keep floors in work areas in a clean and, so far as possible, a dry condition.
  • Select and provide required personal protective equipment at no cost to workers.
  • Train workers about job hazards in a language that they can understand.

THE DO’S & DON’TS OF WORKING AT HEIGHTS

  • DO as much work as you can while you are on the ground.
  • DO make sure that the employees can safely move to and from the area where they are working at height.
  • DO ensure that the equipment that you’re using for the job is strong, stable and suitable enough to get the job done. Inspect and maintain them regularly.
  • DO be careful when you are working near to a fragile surface.
  • DO ensure that you are protected from falling objects.
  • DO make preparations for emergency evacuations and rescues.
  • DON’T overload the ladders that they are working on, with equipment or materials.
  • DON’T try to reach too far when you’re on a ladder or stepladder.
  • DON’T use ladders or stepladders to do work that entail heavy or strenuous tasks. Only use them to do work that’s quick and light.
  • DON’T allow incompetent workers do any work at height.
  • DON’T lean or place the ladder on or fragile upper surfaces.
  • DON’T stay quiet when you feel someone is compromising their own safety or the safety of others

FINAL WORD

Injuries from falls are one of the most common and severe workplace accidents. Employees must understand how to identify fall hazards and the ways they can protect themselves.


Back Safety Infographic


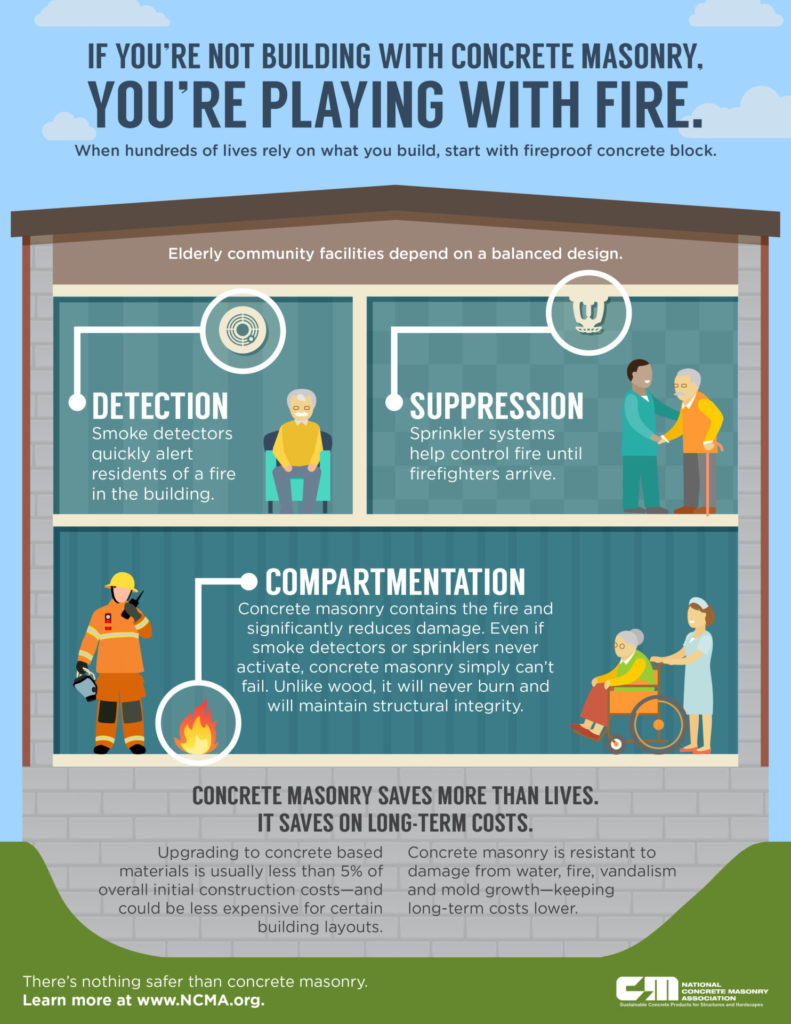
Concrete-Masonry Infographic


Hazard Communication Toolbox Talk

WHAT’S AT STAKE?

It is estimated that one in four workers come in contact with hazardous chemicals or substances at work. Often, the chemicals are no more dangerous than those typically used at home. But workplace exposure, thus the danger, may be greater, due to higher concentrations or more prolonged time of exposure.

An OSHA standard, known as Hazard Communication, exists to help control chemical exposure on the job and is also called “Hazcom” or “Right-to-Know.” It is found in OSHA 29CFR 1910.1200.

WHAT’S THE DANGER?

Over 30 million American workers are exposed to hazardous chemicals in their workplaces. The Occupational Safety and Health Administration’s (OSHA) Hazard Communication Standard (HCS) is intended to ensure that these workers and their employers are informed of the identities of these hazardous chemicals, associated health and safety hazards, and appropriate protective measures. The HCS covers some 650,000 hazardous chemical products found in over three million establishments.

CHEMICAL HAZARDS

Hazardous chemical products and ingredients are found in many items within the workplace including detergents, solvents, degreasers, odour control products, scale removers and surface cleaners. Some of these products and brands may seem so familiar that they can create a false sense of security about their safety. However, it is important that ALL products containing chemicals are identified and assessed for any chemical hazards.

PHYSICAL HAZARDS

  • Explosive
  • Flammable gases
  • Aerosols
  • Oxidizing gases
  • Flammable liquids
  • Flammable solids
  • Self-reactive substances & mixtures
  • Pyrophoric liquids
  • Pyrophoric solids
  • Self-heating substances & mixtures
  • Substances/Mixtures emitting flammable gases
  • Oxidizing liquids
  • Oxidizing solids
  • Organic peroxides
  • Corrosive to metals

ENVIRONMENTAL HAZARDS

  • Hazardous to the aquatic environment (acute and chronic).
  • Hazardous to the ozone layer.

Criteria for classifying chemicals have been developed for the following health hazard classes:

  • Acute toxicity
  • Skin corrosion/irritation
  • Serious eye damage/eye irritation
  • Respiratory or skin sensitization
  • Germ cell mutagenicity
  • Carcinogenicity
  • Reproductive toxicity
  • Specific target organ toxicity – single exposure
  • Specific target organ toxicity – repeated exposure
  • Aspiration hazard

HOW TO PROTECT YOURSELF

  1. THE HAZCOM PROGRAM

Your company should have a complete and comprehensive HAZCOM program. The program should be in writing and should include: a determination of the hazards present in your company, labeling of all chemical containers, training about the hazardous chemicals, an inventory of all of the hazardous chemicals, and safety data sheets. The program should also cover tasks that involve chemicals, but that are not routine.

  1. INFORMING EMPLOYEES

The employer must inform its employees of the hazards of the chemicals they use. This is done by training new employees or whenever new chemicals are brought in for use. Training should be repeated periodically. Other ways of informing employees about hazards include safety data sheets and labeling of containers that hold chemicals.

  1. Safety Data Sheet (SDS)

Safety Data Sheets contain in-depth information on hazardous chemical ingredients and their potential health effects including toxicological properties, physical hazards, safe use, storage, handling, disposal requirements and emergency procedures.

These documents must be made available by the manufacturer, importer or distributor of hazardous chemical products and made available to any person who is likely to be affected by the chemical, and to anyone who asks for the details. WHS Officers and Business owners must then make sure that the documents are available to all workers who come into contact with the substance.

The SDS is normally product related and not specific to workplace; nevertheless, the information on an SDS enables the employer to:

  1. Develop an active program of worker protection measures, including training, which is specific to the workplace.
  2. Consider measures necessary to protect the environment.

SDS also provides important source of information for other target audience in the GHS – so certain elements may be used for the transport of dangerous goods, emergency responders (including poison centers), and those involved in the professional use of pesticides and consumers.

An SDS should be produced for substances and mixtures which meet the harmonized criteria for physical, health, or environmental hazards under the GHS and for all mixtures which contain ingredients that meet the criteria for carcinogenic, toxic to reproduction or specific target organ toxicity in concentrations exceeding the cut-off limits for SDS specified by the criteria for mixtures.

PREVENTION

Companies that have dangerous chemicals stored and/or used on site also need to create a Written Hazard Communication Program. This program needs to be customized to the specific facility and should include information such as:

  • Chemicals– Identify which chemicals are used in the facility. This would include any chemicals that are present at any time, even if they aren’t always being used.
  • Safety Data Sheets– The program has to have safety data sheets (SDS) on each of the chemicals listed.
  • Warnings– Warning information about all of the chemicals so that employees can quickly see what risks are associated with exposure.
  • Response Plans– Instructions on what should be done in the event of exposure or an accident. This would include details on what to do for anything ranging from basic skin exposure to a full chemical spill or any other possible situation.

FINAL WORD

Your company should be mandated to have a written Hazard Communication Program (HAZCOM) to inform employees about how to use chemicals safely.

Understanding how to read and understand Safety Data Sheets is critical.


Heat Stress Toolbox Talk

WHAT’S AT STAKE?

Heat stress includes a series of conditions where the body is under stress from overheating. Heat-related illnesses include heat cramps, heat exhaustion, heat rash, or heat stroke, each with its own symptoms and treatments. Symptoms can range from profuse sweating to dizziness, cessation of sweating, and collapse

WHAT’S THE DANGER?

The main heat related illnesses are heat rash, heat stroke, heat exhaustion, and heat cramps.

Heat Rash. Heat rash is generally misunderstood to be an affliction for babies, but heat rash can affect adults, too, especially during hot, humid weather. Heat rash develops when blocked pores, or sweat ducts, trap perspiration under your skin.

Heat Cramps. Heat cramps are painful, brief muscle cramps where the muscles may spasm or jerk involuntarily. These cramps can begin during the activity in the heat, or may start several hours later. Muscles that are most susceptible to heat cramps are those that are usually fatigued by heavy work such as calves, thighs and shoulders.

Heat Exhaustion. Heat exhaustion is a result of your body overheating and can cause heavy sweating, rapid pulse, dizziness and low blood pressure upon standing. Causes of heat exhaustion include exposure to high temperatures, particularly when combined with high humidity and vigorous physical activity.

Heat Stroke. Heat stroke is the most serious form of heat injury and can occur if your body temperature rises to 104 Fahrenheit or higher. Heat stroke requires emergency treatment, and if left untreated, can quickly damage the brain, heart, kidneys and muscles. Damage to internal organs worsens the longer treatment is delayed, increasing your risk of serious complications or death.

Causes of Heat-Related illnesses

Dehydration – to keep healthy, our body temperature needs to stay around 37°C. The body cools itself by sweating, which normally accounts for 70 to 80 per cent of the body’s heat loss. If a person becomes dehydrated, they don’t sweat as much and their body temperature keeps rising. Dehydration may happen after strenuous exercise (especially in hot weather), severe diarrhea or vomiting, drinking too much alcohol, taking certain medications (for example, diuretics) and not drinking enough water.

Lack of airflow – working in hot, poorly ventilated or confined areas.

Sun exposure – especially on hot days, between 11am and 3pm.

Hot and crowded conditions – people attending large events (concerts, dance parties or sporting events) in hot or crowded conditions may also experience heat stress that can result in illness.

Bushfires – exposure to radiant heat from bushfires can cause rapid dehydration and heat-related illness. Bushfires usually occur when the temperature is high, which adds to the risk.

Some drugs, such as ecstasy and speed, also raise the body’s temperature, which can lead to heat stress.

As your body’s temperature rises, it releases heat in several ways: transfer from skin to air, evaporation by perspiration, exhaling hot air or touching a cool object. Drinking water, taking occasional breaks out of the heat, and slowing down are all necessary steps to preventing heat-stress. However, failing to see the signs and taking preventative measures could put you at risk to many hazards.

HOW TO PROTECT YOURSELF

REMOVE OR REDUCE THE SOURCES OF HEAT WHERE POSSIBLE:

  • Control the temperature using engineering solutions, eg change the processes, use fans or air conditioning, and use physical barriers that reduce exposure to radiant heat.
  • Provide mechanical aids where possible to reduce the work rate.
  • Regulate the length of exposure to hot environments by:
  • allowing workers to enter only when the temperature is below a set level or at cooler times of the day;
  • issuing permits to work that specify how long your workers should work in situations where there is a risk;
  • Providing periodic rest breaks and rest facilities in cooler conditions.
  • Prevent dehydration. Working in a hot environment causes sweating which helps keep people cool but means losing vital water that must be replaced. Provide cool water in the workplace and encourage workers to drink it frequently in small amounts before, during (where possible) and after working.
  • Provide personal protective equipment. Specialized personal protective clothing is available which can incorporate personal cooling systems or breathable fabrics. The use of some protective clothing or respiratory protective equipment may increase the risk of heat stress.
  • Provide training for your workers, especially new and young employees, telling them about the risks of heat stress associated with their work, what symptoms to look out for, safe working practices and emergency procedures.
  • Allow workers to acclimatize to their environment and identify which workers are acclimatized or assessed as fit to work in hot conditions.
  • Identify employees who are more susceptible to heat stress because of an illness, condition or medication that may contribute to the early onset of heat stress, eg pregnant women or those with heart conditions. You may need advice from an occupational health professional.
  • Monitor the health of workers at risk. Where a residual risk remains after implementing as many control measures as practicable, you may need to monitor the health of workers exposed to the risk. You should then seek advice from an occupational health professional.

WORKER PREVENTION

  • Learn to recognize the symptoms of heat stress. Pace the work, taking adequate rest periods (in shade or cooler environment).
  • Use adequate fans for ventilation and cooling, especially when wearing personal protective equipment (PPE).
  • Wear light-colored, loose clothing (unless working around equipment with moving parts).
  • Keep shaded from direct heat where possible (e.g., wear a hat in direct sunshine).
  • Drink plenty of water: in hot environments the body requires more water.

TREATMENT

Heat Rash

  • Heat rash will usually clear on its own by cooling the skin and avoiding exposure to the heat that caused it. If symptoms such as increased pain, swelling, redness, or warmth extend for longer than a few days reach out to a doctor for specialized treatment.

Heat Cramps

  • To treat heat cramps, begin with rest and a sports drink that includes electrolytes and salt or drink cool water. You can make your own salt solution by mixing a quarter to a half teaspoon of salt into a quart of water.

Usually, heat cramps will dissipate on their own, but if you begin to see conditions worsen and the patient becomes dizzy, nauseous, experiences shortness of breath and a fast heartbeat, you should see a doctor. Heat cramps often accompany a more serious heat-related illness: heat exhaustion.

Heat Exhaustion

  • If you see someone who might be experiencing heat exhaustion, instruct them to halt all activity and rest, move to a cooler place and drink cool water or a sports drink.

A doctor should be contacted if signs and symptoms worsen or if they don’t improve within one hour. A patient will need immediate cooling and urgent medical attention if their core body temperature reaches 104 Fahrenheit or higher. Those who exhibit confusion, agitation, loses consciousness or is unable to drink must also be taken to see a medical professional as soon as possible.

Heat Stroke

  • Someone who is suffering from a heat stroke must take immediate action to cool down their body while waiting for emergency treatment. To do this, move to shade or indoors, remove excess clothing and cool with whatever means available (put in a cool tub of water or a cool shower, spray with a garden hose, sponge with cool water, fan while misting with cool water, or place ice packs or cold, wet towels on the person’s head, neck, armpits and groin).

FINAL WORD

Every minute’s delay in cooling a person with heatstroke increases the likelihood of permanent injury or death. Apply first aid and seek medical assistance immediately if you, or someone you are with, shows any sign of heat exhaustion or heatstroke.


Hot Work Toolbox Talk

WHAT’S AT STAKE?

Working with ignition sources near flammable materials is referred to as “hot work.” Welding, soldering and cutting are examples of hot work. Fires are often the result of the “quick five minute” job in areas not intended for welding or cutting. Getting a hot work permit before performing hot work is just one of steps involved in a hot work management program that helps to reduce the risk of starting a fire by hot work in areas where there are flammable or combustible materials.

WHAT’S THE DANGER?

Common types of hot work include:

  • Welding, brazing, and soldering.
  • Grinding and cutting.
  • Thawing pipes.
  • The use of open flames, blow-lamps, and torches.
  • Using bitumen and tar boilers.
  • The use of hot air blowers and lead heaters.

This is not an exhaustive list, but it does include the most common examples of hot work and those that can pose significant risks without proper safety precautions.

HOT WORK COMMON HAZARDS

Hot work can present numerous types of hazards to workers and the environment around them. For example, hot work can harm people by causing burns, entrapment, illness due to fumes, eye damage from debris, or hearing loss due to noise.

However, the most common and significant risk of hot work is fire. All types of hot work can easily start a fire without proper safety procedures.

Fire hazards posed by hot work include:

  • Flying sparks. This is the main risk posed by hot work. Sparks can easily get trapped in cracks, pipes, gaps, holes, and other small openings, where it will potentially smolder and start a fire.
  • Flammable swarf, molten metals, slag, cinder, and filings. The debris and residue that hot work creates are often highly combustible and/or hot.
  • Heat conduction when working on pipes. Hot work can cause a pipe to heat up substantially and this heat can easily transfer through the process of conduction to another, potentially flammable surface and cause a fire.
  • Hot surfaces. If you don’t properly remove flammable materials or substances from the area before work, they could come into contact with a surface that has become hot during the work and easily start a fire.
  • Explosive atmospheres. In certain environments, there may be vapours or gases in the air that are highly combustible and could ignite when exposed to hot work. Similarly, the hot work could generate fumes that create an explosive atmosphere.

Caution

Watch for symptoms of metal fume fever, caused by breathing fumes formed while welding. Symptoms may include a metallic taste in the mouth, dry nose and throat, weakness, fatigue, joint and muscle pain, fever, chills and nausea. Notify your supervisor immediately if you experience any of these symptoms.

HOW TO PROTECT YOURSELF

Hot work management programs are put in place to control or eliminate hot work hazards and their risks. Programs include the development of policies, procedures, and the assignment of responsibilities and accountabilities for all aspects of hot work. A program includes:

  1. Policies
  2. Where hot work is permitted
  3. When hot work is permitted
  4. Who authorizes, performs, and monitors hot work activities
  5. Procedures
  6. What must be assessed before permitting/performing hot work in an area or on a process piece of equipment or area
  7. What to do to prepare an area for hot work
  8. What to do if hot work cannot be avoided in a particularly hazardous area
  9. What hot work tools are required
  10. How to obtain a hot work permit, when they are required, and who can administer them
  11. Training
  12. Employees, supervisors, maintenance individuals, fire wardens, trained fire watch individuals, and contractors all have different roles, and must be trained accordingly
  13. Communications
  14. Posting procedures
  15. Posting policies
  16. Posting signs in areas that are prohibited from having hot work performed in them

GOOD HOT WORK PRACTICES

  • Make sure that all equipment is in good operating order before work starts.
  • Make sure that all appropriate personal protective devices are available at the site and each worker has been trained on how to use, clean, and store them properly.
  • Inspect the work area thoroughly before starting. Look for combustible materials in structures (partitions, walls, ceilings).
  • Move all flammable and combustible materials away from the work area.
  • If combustibles cannot be moved, cover them with fire resistant blankets or shields. Protect gas lines and equipment from falling sparks, hot materials, and objects.
  • Sweep clean any combustible materials on floors around the work zone. Combustible floors must be kept wet with water or covered with fire resistant blankets or damp sand.
  • Use water ONLY if electrical circuits have been de-energized to prevent electrical shock.
  • Remove any spilled grease, oil, or other combustible liquid.
  • Vacuum away combustible debris from inside ventilation or other service duct openings to prevent ignition. Seal any cracks in ducts. Prevent sparks from entering into the duct work. Cover duct openings with a fire resistant barrier and inspect the ducts after work has concluded.
  • Make sure that appropriate fire extinguishers (e.g., ABC fire extinguishers) are available and easily accessible.
  • Make sure that the first-aid boxes are available and easily accessible.
  • Block off cracks between floorboards, along baseboards and walls, and under door openings, with a fire resistant material. Close doors and windows.
  • Cover wall or ceiling surfaces with a fire resistant and heat insulating material to prevent ignition and accumulation of heat.
  • Secure, isolate, and vent pressurized vessels, piping and equipment as needed before beginning hot work.
  • Inspect the area following work to ensure that wall surfaces, studs, wires or dirt have not heated up.
  • Post a trained fire watcher within the work area, including lower levels if sparks or slag may fall during welding, including during breaks, and for at least 60 minutes after work has stopped. Depending on the work done, the area may need to be monitored for longer (up to 3 or more hours) after the end of the hot work until fire hazards no longer exist.
  • Eliminate explosive atmospheres (e.g., vapours or combustible dust) or do not allow hot work. Shut down any process that produces combustible atmospheres, and continuously monitor the area for accumulation of combustible gases before, during, and after hot work.
  • If possible, schedule hot work during shutdown periods.
  • Comply with the required legislation and standards applicable to your workplace.

PERSONAL PROTECTIVE EQUIPMENT

Cautious is the word. Hot work is very dangerous work.

Wear your personal protective equipment (PPE), maintain a safe workplace and follow safety rules.

Your PPE should include:

  • Eye protection to shield against sparks, molten metal and welder’s flash
  • Hearing protection
  • Clothing made of heat-resistant materials, such as an apron made of leather
  • Safety boots
  • Gloves made of leather or other flameproof fabric
  • Respiratory protection to protect against toxic chemicals and gases. Before you use a respirator, get proper training and have it properly fitted.

FINAL WORD

Operations that create a spark or flame such as welding and soldering are referred to as hot work. Special precautions are necessary to perform hot work safely. Hot work procedures must be understood by operators and building managers and all occupants should be familiar with basic safe work practices.


Landscaping Safety Toolbox Talk

WHAT’S AT STAKE?

Landscaping is a dangerous profession. Heat, power tools, sharp implements, and repetitive work can all lead to painful and sometimes debilitating workplace injuries.

An energetic entrepreneur who enjoys the outdoors might find landscaping business ownership an attractive option. The United States Bureau of Labor Statistics projects that more time-crunched or elderly homeowners, plus corporate and educational facilities, will soon require landscaping services. To serve this increasing client base, the BLS estimates the need for grounds maintenance workers will increase.

WHAT’S THE DANGER?

LANDSCAPING HAZARDS

Accidents are common in an industry that uses heavy machinery, sharp blades, ladders and boom trucks. But there are more hazards to list: heat stress, overexertion, hearing loss, hand-arm vibration syndrome and chemical exposures.

Heat Stress

The United States National Oceanic and Atmospheric Administration identified heat as the No. 1 weather-related killer countrywide, claiming more lives each year than floods, lightning, tornadoes and hurricanes combined. Although you can’t control the temperature, you can control how much exposure workers have to hazardous heat conditions.

Overexertion Injuries

With constant lifting, digging, twisting, turning and carrying, landscape workers are prone to overexertion injuries.

Hazardous Noise Exposure

A Colorado professor recently found 95 percent of urban tree service workers worked in conditions that exceed the OSHA or the NIOSH limits for on-the-job noise exposure.

Vibration Injuries

Many tools used in landscaping present vibration hazards. Repeated exposure to vibration over time can cause damage to muscular, nervous and vascular systems.

Hazardous Chemicals

Lawn care chemicals such as fertilizers, pesticides and herbicides can be safe when handled and applied correctly. However, improper handling and application present risks to landscape workers and to those who live and work near the chemical-exposed property. Immediate injuries from caustic or acidic chemicals include irritation and burns as well as damage to internal organs. Over time, unsafe exposures may create long-term illnesses.

MORE HAZARDS

Though landscapers don’t usually face some of the more deadly construction hazards (falls from heights, silica or working in trenches, for example), they are still exposed to hazards that can cause serious injuries and lasting health problems.

Motor Vehicles and Equipment

Motor vehicle accidents are the leading cause of fatal accidents among landscapers. This includes traffic accidents (frequent travel from job to job means more time on the road) and struck-by incidents.

Pesticides and Other Health Hazards

Landscapers face several health hazards on a daily basis. Noise exposure, which is also common in construction, can be addressed through the use of hearing protection. But other hazards are more unique to the landscaping industry, such as exposure to pesticides.

As the Canadian Centre for Occupational Health and Safety (CCOHS) note that, pesticides can enter the body by mouth, through the skin and eyes or as vapors inhaled into the lungs.

Pesticides can cause a wide variety of health effects depending on the product, individual and level of exposure. Chronic, low-level exposure or a single acute exposure can cause workers to have allergic reactions and develop sensitivity to pesticides or occupational asthma.

Working outdoors and performing landscaping tasks can expose you to a lot of health and safety hazards. The job introduces you to a variety of sharp equipment, power tools, dangerous machines, and hand tools, that can cause debilitating injuries if not handled properly.

HOW TO PROTECT YOURSELF

SAFETY RECOMMENDATIONS

  1. Stay visible and dress for safety: Motor vehicle accidents are the leading cause of fatal accidents among landscapers. While at work, landscapers should always wear high-visibility colors. In addition, long pants, sturdy shoes, gloves, and ear and eye protection are a must for any landscaper. Dress for the weather and avoid any loose clothing or jewelry that could get caught in equipment.
  2. Keep tools sharp: A dull blade is far more dangerous than a sharp one because the user has to exert a lot more force to get the job done. Keeping hand tools in good working order can also help protect landscapers from repetitive-stress injuries.
  3. Know your machine: A lot of power tools—like tillers, blowers, mowers, and trenchers—can cause severe injuries if they malfunction or are used incorrectly. Workers should always read the safety manual before using a new tool for the first time.
  4. Be careful with repairs: Before attempting to fix or clear a jam from a power tool or mower, make sure that the power supply is turned off and all the blades have stopped moving. Too many landscapers experience tragic amputations from the spinning blades in lawnmowers and other tools.
  5. Introduce a Safety Procedure to Your Site; if you are a landscaping contractor, you might be working with a team of professional landscapers. In this case, the safety of your teammates is your responsibility. To protect your employees, you need to establish a safety procedure for your work location. Regular training and safety updates make perfect practice for a safer work environment. This is also a great idea to show your care and encourage your team to perform well without compromising on safety.
  6. Beat the Heat; don’t let excessive heat take charge of your landscape workers this summer. According to OSHA (Occupational Safety and Health Administration), the landscaping industry is one of the most affected industries by heat-related illness. If you don’t want the scorching heat to impact your team, you should focus on creating a program to protect your employees from sun exposure and heat illness. Encourage workers to stay hydrated and take breaks whenever they feel low. Make them wear long-sleeved shirts, long pants, and loose hats to cover their body and use glasses for eye protection. Also, learn the symptoms of heat exhaustion or heat stroke and know what to do in an emergency.
  7. Restrict Access to Your Working Location; if you’re working on a site individually or with your team, it’s an ideal to set up a perimeter and ensure that only employees working on the location have access to it. Non-employees coming into a work site is a common cause of mishaps. So make sure only necessary people have access to your site while your working.
  8. Carry out Walk-around Inspections; if you want to ensure your and your team’s safety, taking out some time from your schedule to do an inspection. Thoroughly examining all the machinery and tools before starting your operation can really help reduce the risk of on-site accidents. Inspect every detail carefully and if something seems slightly off or wrong, say something. Be diligent to look for cracks, cuts, leaks, and signs of wear and tear.
  9. Work on Your Driving Safety With an increasing workload in the summer, your crew members are on the road more. According to the report by the National Highway Traffic Safety Administration, a car crash takes place every 5 seconds in the U.S and most of these accidents happen when people are driving during their working hours. To reduce your risk of getting into an accident, you should include a driver-safety program into your landscaping business that involves training drivers to operate vehicles with trailers.

Also, be sure to show drivers proper lifting, load capacities and secure transportation protocols. Tell them not to over-exceed the specified load capacity of their vehicles as it can result in road accidents.

FINAL WORD

Landscaping work does not appear at first glance to be work area that is fraught with workplace hazards. But on analysis, it is clear that heat stress, overexertion, hearing loss, hand-arm vibration and chemical exposure dispel that notion.


Lead-Based Paint Toolbox Talk

WHAT’S AT STAKE?

Lead-based paint is a dangerous source of lead but precautions can be taken to reduce exposure. Removing, repairing or disturbing lead paint through normal wear-and-tear such as paint on doors, windows, stairs and railings can expose you and your family to health risks.

Medical and scientific research shows that absorption of even very low levels of lead into the blood may have harmful health effects on the intellectual and behavioural development of infants and young children.

WHAT’S THE DANGER?

Exposure to lead-based paint usually occurs from ingestion. Lead-based paint does not present a health hazard as long as the paint is not chipping, flaking, crushed or sanded into dust.

Low levels of exposure to lead can cause health effects such as learning disabilities and behavioural problems in children. High levels of exposure to lead may cause lead poisoning and other issues such as anemia and impaired brain and nervous system functions.

Currently there is no known safe level of lead exposure and no known safe blood lead concentration. However, as lead exposure increases, the range and severity of symptoms and effects also increases.

While the public’s exposure to lead has decreased over the years, lead can still be a problem. It is important to be aware of lead sources so you can minimize your health risks.

Lead paint is still present in millions of homes, sometimes under layers of newer paint. Deteriorating lead-based paint (peeling, chipping, chalking, cracking, damaged, or damp) is a hazard and needs immediate attention.

Lead-based paint may also be a hazard when found on surfaces that children can chew or that get a lot of wear-and-tear, such as:

  • Windows and window sills;
  • Doors and door frames; and
  • Stairs, railings, banisters, and porches.

HOW TO PROTECT YOURSELF

Lead-based paint is most likely to be found on window frames, doors, skirting boards, kitchen and bathroom cupboards, exterior walls, gutters, metal surfaces and fascias on homes or structures built before 1970, or even interior walls.

Sometimes lead-based paint may be covered by more recently applied paint and becomes a workplace health and safety issue when the paint deteriorates and becomes powdery or flaky during paint removal.

  • Test all surfaces and layers of paint to be removed to determine if the paint contains lead as lead-based paint cannot be identified by its appearance.
  • A simple test kit available from some paint manufacturers and distributors can determine the presence of lead-based paint. Carefully read the manufacturer’s instructions before using the test kit.
  • Test kits can give false results, so if the swab gives a negative reading, but the age of the house indicates that lead-based paint could have been used, assume that lead-based paint is present or have the paint tested by a laboratory. Some analytical laboratories can provide a precise analysis of lead presence and its concentration.

Removal Alternatives

If paint is in good condition there may be no need to remove it unless major renovation and comprehensive removal is planned. However, lead-based paint should be removed from areas that are likely to be chewed or licked by children, knocked or subject to friction.

ALTERNATIVES TO PAINT REMOVAL INCLUDE:

Painting Over Lead-Based Paint

  • Only paint over lead-based paint if surfaces are in good condition. If the paint is flaking or chalking, prepare the surface by a light wet sanding with wet-and-dry sandpaper to help the paint stick to the surface. Take care not to generate lead dust or contaminate the area with water from the wet-sanding process.
  • Painting over the paint is a temporary solution limited by the life of the paint.

Covering Lead-Based Paint with Other Materials

  • Cover lead-based paint on exterior surfaces with durable materials, such as aluminum cladding or weatherboard and thoroughly seal all gaps.
  • Cover internal surfaces with durable materials that will not tear, chip or peel. These include plasterboard, vinyl wall coverings, wood paneling and floor coverings such as carpet, tiles or vinyl.

SAFE REMOVAL METHODS

If you have decided to remove the paint, choose a safe removal method. Different ways of removing lead paint create different risks to health, which need to be properly controlled.

  • Wet Scraping
  • Chemical Strippers
  • Wet Hand Sanding
  • Low-Temperature Heat Processes

CLEANING THE SITE

  • Remain in protective clothing, including gloves and respirator when cleaning the site.
  • Place large disposable items including the plastic sheet and other debris into tough plastic bags.
  • Vacuum all surfaces including the tarpaulin used for exterior work with a suitable commercial vacuum cleaner fitted with a HEPA filter.
  • Wet-clean hard surfaces using a carpet steam cleaner or by wet mopping several times. Put dust into tough sealable plastic bags. Alternatively, some contract cleaning services offer an effective chemical method of removing lead dust.
  • Do not use a broom, compressed air or a vacuum cleaner without a HEPA filter as it will spread lead dust.
  • Use a spray bottle to wet down all dust and debris lying on the plastic sheeting before taking them up.
  • Wipe down all surfaces in the work areas with a damp cloth.
  • Wash the area with 25 grams of 5% trisodium phosphate (TSP) in five litres of hot water or sugar soap. Renew the solution frequently to prevent it becoming contaminated.
  • Dispose of cloths and mops to avoid spreading lead dust during cleaning.
  • Vacuum dry surfaces such as skirting boards, architraves, window sills, casings, shelves and counter-tops until no dust or residue remains.
  • Dampen dusty outside areas with spray from a garden hose and sweep and collect debris. Avoid dry sweeping since it spreads lead dust.
  • Shovel paint debris into heavy duty plastic bags.
  • Remove the top layer of contaminated soil and put into tough sealable plastic bags.
  • Clean tools with TSP solution or sugar soap.
  • Clean respirators after use and store them in a container away from the lead source.
  • Remove contaminated clothing before leaving the work area and place clothes in a plastic bag until washed.
  • Clean up the site frequently throughout the day and vacuum at the end of each day.

DISPOSING OF LEAD CONTAMINATED WASTE

  • Place lead-containing debris into deflated heavy duty plastic bags and seal them.
  • Pour lead-contaminated water generated as a result of wet scraping or sanding, or during clean-up, into a strong, securely sealed container.
  • Provide short-term secure storage.
  • Transport debris and solid waste materials containing lead to waste systems.
  • Check with the waste management section of the local council about proper waste disposal.
  • Ensure that all bulky items are covered during transportation.

FINAL WORD

It is incumbent for families to understand that absorption of low levels of lead into the blood have significant deleterious affects. At higher risk are our most vulnerable: infants, children and pregnant women.


Lifting Safety -Safety Talk

WHAT’S AT STAKE?

Lifting, handling, or carrying objects at work can result in musculoskeletal injuries (MSIs), including sprains and strains and other injuries. The risk of injury increases when bending, twisting, heavy loads, and awkward postures are involved. Effective ergonomic controls can reduce the risk and prevent injuries.

WHAT’S THE DANGER?

Injuries from lifting and handling of loads can occur in many occupations. Workers are exposed to risk when they lift, lower, or carry objects. Risk factors include:

  • The weight of the load
  • How close the load is to the body. A load lifted far from the body imposes more stress on the back than the same load lifted close to the body
  • The size and shape of the load
  • The distance the load has to be carried
  • The initial height of the load and the vertical distance lifted
  • Lifting in combination with twisting
  • How long the load has to be carried
  • The number and frequency of lifts performed

Workers Are Harmed

Workers are at risk from lifting and carrying injuries particularly when:

  • a load is too heavy, it’s difficult to grasp, or it’s too large
  • the physical effort is too strenuous
  • they are required to bend and twist when handling heavy loads

When a person reaches for items above shoulder height, their back becomes arched and their arms act as long levers. This makes the load difficult to control and significantly increases the risk of injury.

Injuries and Conditions can Include:

  • muscle sprains and strains
  • injuries to muscles, ligaments, intervertebral discs and other structures in the back
  • injuries to soft tissues such as nerves, ligaments and tendons in the wrists, arms, shoulders, neck or legs
  • abdominal hernias
  • chronic pain

Some of these conditions are known as repetitive strain injury (RSI), occupational overuse syndrome (OOS), cumulative trauma disorder (CTD) and work-related musculoskeletal disorder (WRMSD).

HOW TO PROTECT YOURSELF

MANUAL HANDLING LIFTS

To prevent manual handling injuries in the workplace, avoid such tasks as far as possible. However, where it is not possible to avoid handling a load, employers must look at the risks of that task and put sensible health and safety measures in place to prevent and avoid injury.

For any lifting activity

Always take into account:

  • individual capability
  • the nature of the load
  • environmental conditions
  • training
  • work organization

If You Need to Lift Something Manually

  • Reduce the amount of twisting, stooping and reaching
  • Avoid lifting from floor level or above shoulder height, especially heavy loads
  • Adjust storage areas to minimize the need to carry out such movements
  • Consider how you can minimize carrying distances
  • Assess the weight to be carried and whether the worker can move the load safely or needs any help – maybe the load can be broken down to smaller, lighter components

IF YOU NEED TO USE LIFTING EQUIPMENT

  • Consider whether you can use a lifting aid, such as a forklift truck, electric or hand-powered hoist, or a conveyor
  • Think about storage as part of the delivery process – maybe heavy items could be delivered directly, or closer, to the storage area
  • Reduce carrying distances where possible

FUNDAMENTALS OF LIFTING/HANDLING 

Think before lifting/handling. Plan the lift. Can handling aids be used? Where is the load going to be placed? Will help be needed with the load? Remove obstructions such as discarded wrapping materials. For a long lift, consider resting the load midway on a table or bench to change grip.

Adopt a stable position. The feet should be apart with one leg slightly forward to maintain balance (alongside the load, if it is on the ground). Be prepared to move your feet during the lift to maintain your stability. Avoid tight clothing or unsuitable footwear, which may make this difficult.

Get a good hold. Where possible, the load should be hugged as close as possible to the body. This may be better than gripping it tightly with hands only.

Start in a good posture. At the start of the lift, slight bending of the back, hips and knees is preferable to fully flexing the back (stooping) or fully flexing the hips and knees (squatting).

Don’t flex the back any further while lifting. This can happen if the legs begin to straighten before starting to raise the load.

Keep the load close to the waist. Keep the load close to the body for as long as possible while lifting. Keep the heaviest side of the load next to the body. If a close approach to the load is not possible, try to slide it towards the body before attempting to lift it.

Avoid twisting the back or leaning sideways, especially while the back is bent. Shoulders should be kept level and facing in the same direction as the hips. Turning by moving the feet is better than twisting and lifting at the same time.

Keep the head up when handling. Look ahead, not down at the load, once it has been held securely.

Move smoothly. The load should not be jerked or snatched as this can make it harder to keep control and can increase the risk of injury.

Don’t lift or handle more than can be easily managed. There is a difference between what people can lift and what they can safely lift. If in doubt, seek advice or get help.

Put down, then adjust. If precise positioning of the load is necessary, put it down first, then slide it into the desired position.

EMPLOYER RESPONSIBILITY

1. Engineering controls

Making physical modifications to facilities, equipment and processes can reduce exposure. Some questions to consider:

  • Can mechanical lifting ads such as hoists, pallet jacks, carts, or conveyors be used instead of manual material handling?
  • Can the load be lifted within the range of knee to waist height?
  • Can the vertical distance the load has to be lifted or lowered be shortened? Options include limiting shelf height, and raising the worker.
  • Can stooped or twisted positions be avoided by providing unrestricted work space, or arranging the workspace differently?
  • Can the size of the load be made smaller? Options include ordering smaller containers, or having workers make two trips with smaller loads rather than one trip with a heavy load.
  • Can carrying distance be shortened by changing the workflow?

2. Administrative controls

Changing work practices and work policies, and training workers in proper lifting and handling techniques, can limit risk of MSIs. Some questions to consider:

  • Can the task design be changed? For example, changing a carrying task to a pushing or pulling task.
  • Can workers be given time to rest or recover when lifting or handling loads?
  • Can work demands and work pace be balanced more effectively
  • Can the tasks be varied?

FINAL WORD

It is incumbent for joint-health and safety committees to conduct and assemble actual demonstrations with all employees in the employ of proper lifting, handling, or carrying objects in the course of workplace regimen.


Lockout-Tagout Awareness Toolbox Talk

WHAT’S AT STAKE?

Lockout/Tagout (LOTO) is a safety procedure used to ensure proper shut-off and prevent the inability to start up machines prior to completion of maintenance or repair work. It is a necessary part of working in industrial settings. These practices are required to protect everyone who works with and around potentially dangerous equipment. For that reason, it is important that training takes place for employees authorized to carry out LOTO procedures as well as employees who will be affected by the use of these practices.

WHAT’S THE DANGER?

Lockout/Tagout (LOTO) is the number one most-cited regulation by OSHA in manufacturing. Further, LOTO ranks among the top 10 for all industries. Almost 95 percent of citations involve improper training for LOTO. Workers injured due to improper LOTO procedures results in 24 days away from work on average.

About 3 million workers in the U.S. are employed to repair or service equipment and machinery. OSHA reports that the number of Lockout/Tagout (LOTO) deaths each year ranges from 150 to 200 people. Additionally, each year about 60,000 LOTO accidents occur. To prevent these accidents from happening, follow planned LOTO procedures.

Lockout Devices hold energy-isolation devices in a safe or “off” position. They provide protection by preventing machines or equipment from becoming energized because they are positive restraints that no one can remove without a key or other unlocking mechanism, or through extraordinary means, such as bolt cutters.

Tagout Devices by contrast, are prominent warning devices that an authorized employee fastens to energy-isolating devices to warn employees not to reenergize the machine while he or she services or maintains it. Tagout devices are easier to remove and, by themselves, provide employees with less protection than do lockout devices.

HARMFUL EFFECTS OF HAZARDOUS ENERGY

Workers servicing or maintaining machines or equipment may be seriously injured or killed if Hazardous Energy is not properly controlled. Injuries resulting from the failure to control hazardous energy during maintenance activities can be serious or fatal! Injuries may include electrocution, burns, crushing, cutting, lacerating, amputating, or fracturing body parts, and others.

  • A steam valve is automatically turned on burning workers who are repairing a downstream connection in the piping.
  • A jammed conveyor system suddenly releases, crushing a worker who is trying to clear the jam.
  • Internal wiring on a piece of factory equipment electrically shorts, shocking worker who is repairing the equipment.

Craft workers, electricians, machine operators, and laborers are among the millions of workers who service equipment routinely and face the greatest risk of injury.

HOW TO PROTECT YOURSELF

FIVE IMPORTANT CATEGORIES OF LOTO TRAINING

  1. Maintenance and Testing

While you are running through training, the team effort allows for all the relevant parties to assess any potential issues with the equipment. It is always a good idea to know what problems you are likely to face when working with machinery, so training can be a perfect time troubleshoot your technology while using the LOTO procedure. As LOTO is about reducing the risks of hazardous energy, it is helpful to know how equipment is working.

Going through the process of demonstrating a LOTO procedure makes you stop and focus. With a more meticulous training assessment where other people are looking on with authorized employees, it can be easier to identify issues. Even with proper shut off procedures, hazards can still crop up when equipment is malfunctioning. You could also have broken LOTO devices causing issues. Training directs focus, and with that, you can anticipate hazards from damaged or improperly functioning equipment.

  1. Increased Familiarity with Relevant Devices

It is easy to take it for granted that employees will know the right way to use LOTO devices, but when it comes to safety, you never want to rely on assumptions. The best way to know that everyone using the tags and locks correctly is to train everyone on the usage. Not only how things are meant to affix to equipment and machinery but also the mistakes that can be made.

Everyone who is trying to follow the rules thinks they are following the rules. Training allows everyone to check up on one another. This is also very important for getting workers familiar with common misconceptions about the devices. How tags can fall off and the devices that require group lockouts. There may also be certain equipment that is rarely used, so training might be the only opportunity to practice procedure with it before use becomes a necessity.

  1. Improved Issue Identification

With everyone trained on the expectations and usage of lockout/tagout practices, there will be more people that can tell when something’s not right. A team is only as strong as its weakest link, and sometimes that link can be higher up in the chain. Because daily operations will limit the use of LOTO procedures to authorized workers, training might be the only opportunity affected workers will get to become familiar with the protocols being used for their benefit.

Safety meetings can be significantly improved by having more employees be knowledgeable about the safety expectations of their peers and their superiors. More people can have something to say about the way procedures are being used and feel more involved and invested in these meetings. Training in this way creates safety nets for human error. Expecting perfection is a great way to keep yourself blind to problems. Anticipate the need for universal oversight, and if the authorized users never have an issue, you can have that fact corroborated throughout the chain of command.

  1. Make the Process Less Daunting

Anything can seem complicated if you have no experience with it. What training does is demystify the procedures. It allows for questions to be asked and mistakes to be made when they will not be harmful or lead to a tremendous disaster. But along with making those using the LOTO procedures comfortable with using them, it can also make supervisors or at ease about inspections and general safety.

LOTO inspections should take place once a year, and when training has not taken place effectively, everyone can be rather hesitant or stressed out about the processes. Instead of waiting for an assessment to tell you that mistakes have been made consistently or processes have been misunderstood, training can sort these issues out to avoid any type of post or pre-assessment unpleasantness.

  1. Safety Plan Refinement

Training with safety gets everyone thinking about safety. While training with LOTO procedures you might find that you are unwittingly violating an OSHA requirement. Going around to simulate a practice LOTO inspection can double as a general practice safety inspection. Practice serves as a great reminder of what is expected in terms of safety.

You can also use training to find out what types of issues crew members are having when they use LOTO devices or procedures. If there is an issue with keys breaking off in locks, slowing down padlock removal or generally creating the problem of constantly replacing lockout equipment, you can work out procedures for when existing procedures go awry. Tags could be falling off all the time and require the use of secondary securing. Whatever the issue is with the plans you have, you can find them by training.

LOCKOUT PROGRAM RESPONSIBILITIES

Management is responsible to:

  • Draft, periodically reviewing, and updating the written program.
  • Identify the employees, machines, equipment, and processes included in the program.
  • Provide the necessary protective equipment, hardware and appliances.
  • Monitor and measure conformance with the program.

Supervisors are responsible to:

  • Distribute protective equipment, hardware, and any appliance; and ensuring its proper use by employees.
  • Make sure that equipment-specific procedures are established for the machines, equipment and processes in their area.
  • Make sure that only properly trained employees perform service or maintenance that require lockout.
  • Make sure that employees under their supervision follow the established lockout procedures where required.

Authorized individuals are responsible to:

  • Follow the procedures that have been developed.
  • Report any problems associated with those procedures, the equipment, or the process of locking and tagging out.

FINAL WORD

The test for lockout – tagout procedures is to control hazardous energy while servicing or performing maintenance or machinery or other equipment. Types of hazardous energy included electrical, hydraulic, mechanical, pneumatic, gravitational, chemical and thermal.


Machine Guarding Toolbox Talk

WHAT’S AT STAKE?

Manufacturers design their machines to protect operators from coming into contact with hazardous parts. Despite this, machines cause more than 18,000 injuries—including amputations, lacerations, and crushing injuries—in the United States each year. Many of these injuries were caused by unsafe operation or improper maintenance. Machine guards, or barriers between the operator and dangerous parts, are one of the most common strategies that manufacturers use to make their tools safer.

WHAT’S THE DANGER?

Crushed hands and arms, severed fingers, blindness — the list of possible machinery-related injuries is as long as it is horrifying. There seem to be as many hazards created by moving machine parts as there are types of machines. Safeguards are essential for protecting workers from needless and preventable injuries.

A good rule to remember is: Any machine part, function, or process which may cause injury must be safeguarded. When the operation of a machine or accidental contact with it can injure the operator or others in the vicinity, the hazards must be either controlled or eliminated.

HAZARDOUS MECHANICAL MOTIONS AND ACTIONS

A wide variety of mechanical motions and actions may present hazards to the worker. These can include the movement of rotating members, reciprocating arms, moving belts, meshing gears, cutting teeth, and any parts that impact or shear. These different types of hazardous mechanical motions and actions are basic in varying combinations to nearly all machines, and recognizing them is the first step toward protecting workers from the danger they present.

The basic types of hazardous mechanical motions and actions are:

Motions

  • rotating (including in-running nip points)
  • reciprocating
  • transversing

Actions

  • cutting
  • punching
  • shearing
  • bending

Motions

Rotating motion can be dangerous; even smooth, slowly rotating shafts can grip clothing, and through mere skin contact force an arm or hand into a dangerous position. Injuries due to contact with rotating parts can be severe.

Collars, couplings, cams, clutches, flywheels, shaft ends, spindles, meshing gears, and horizontal or vertical shafting are some examples of common rotating mechanisms which may be hazardous. The danger increases when projections such as set screws, bolts, nicks, abrasions, and projecting keys or set screws are exposed on rotating parts.

NON – MECHANICAL HAZARDS

Non-mechanical hazards that can injure machine operators or personnel working in the vicinity of machinery. These hazards include flying splinters, chips or debris; splashes, sparks or sprays that are created when the machine is operating. These hazards can be prevented through the use of machine guarding and wearing/use of required personal protective equipment (PPE).

HOW TO PROTECT YOURSELF

MACHINE GUARDS

There are several different types of machine guards. Guards are materials that keep workers from having direct contact with moving parts and other dangerous areas of a machine. Some guards also protect workers from shavings, flying shards or metal sparks created by working machines. The Occupational Safety and Health Administration (OSHA) requires any machine part that could cause injury to be guarded. Guard design and material will vary from machine to machine and from tool to tool.

Fixed Guards

Fixed guards are permanently attached to the machine or tool, don’t have any moving parts, and can’t be moved while the machine is in use. They’re most often used to enclose the point of operation, or other hazards that the operator doesn’t need to interact with, like fan blades or flywheels. Because fixed guards are permanent features of the machine, they must be disassembled and removed to perform any kind of adjustment or maintenance.

Adjustable Guards

Adjustable guards, like fixed guards, are permanent, but they can be adjusted to allow the machine to handle different sizes of material. They must be manually adjusted and locked into place, so all employees who will operate adjustable guards must be trained on their use. If improperly adjusted or locked, adjustable guards can fail to prevent contact with moving parts, causing serious or even fatal injury.

Self-Adjusting Guards

Self-adjusting guards serve the same purpose as adjustable guards, but automatically adapt to the size of the material. When the machine is at rest, these guards sit all the way down. When the machine is in use, the operator feeds material into the machine, which opens the guard just enough to let the material in. These guards are commonly found on table saws and woodworking tools.

Interlocking Guards

Interlocking guards, also known as barrier guards, automatically shut off or disengage the power source when the guard is open or removed. These are particularly useful in situations where operators need to be able to open the guard or access the guarded parts of the machine, such as when clearing jams. These guards allow safe access to interior parts of the machine without requiring a total disassembly. However, they can be easy to open on accident and require careful adjustment and maintenance.

Requirements for Guards

  • Prevent contact

The guard must prevent hands, arms, and any other part of a operator’s body from making contact with dangerous moving parts.

  • Secure
    Operators should not be able to easily remove or tamper with the guard. Guards and safety devices should be made of durable material that will withstand the conditions of normal use. They must be firmly secured to the machine.
  • Protect from falling objects

The guard should ensure that no objects can fall into moving parts.

  • Create no new hazards

A guard cannot create a hazard such as a shear point, a jagged edge, or an unfinished surface that could cause a laceration.

  • Create no interference

Any guard that prevents the operator from performing the job quickly and comfortably might soon be overridden or disregarded.

  • Allow safe lubrication

If possible, operators should be able to lubricate the machine without removing the guards.

Training Requirements:

Instruction in the safe use and care of machines and supervised on-the-job training are essential in preventing injuries. Only trained employees/students should operate machinery.

Training should include:

  • Review of safety measures such as: knowing the hazards in the work area, including machine-specific hazards; machine operating procedures; lockout / tagout procedures; and safe work practices such as the buddy system.
  • The purpose and proper use of machine safeguards.
  • All procedures for responding to safeguarding problems such as immediately reporting unsafe conditions such as missing or damaged guards and violations of safe operating practices to supervisors.

FINAL WORD

Crushed hands and arms, severed fingers, blinders are just a few of terrifying machinery related injuries. The safety rule to remember: any part of the machine, function, or process which may cause injury must be safeguarded.


Means of Egress Toolbox Talk

WHAT’S AT STAKE?

MEANS OF EGRESS DEFINITION:

A continuous and clear path from any occupied portion of a building to a public way, such as an outdoor sidewalk. A means of egress consists of three parts:

  1. The exit access – path within the building that leads to an exit
  2. The exit – doors to the outside, enclosed exit stairways, and horizontal exits
  3. The exit discharge – the route from the exit to the public way

Part 1: The Exit Access

When the IBC talks about “accessible,” it  means that somebody in a wheelchair can use whatever thing they are referring to. Therefore, an “accessible space” means that a person in a wheelchair can enter and exit that space via an “accessible means of egress” (i.e. walkway, ramp, or elevator).

Accessible spaces must have two accessible means of egress, and they are typically required to be no less than 36″ wide.

For Non-accessible spaces, which are floors above or below the ground floor, the accessible pathway must lead to an exit stairway, elevator, or horizontal exit. These areas serve as an Area of Refuge where emergency responders will come to help people in wheelchairs.

Part 2: The Exit

The exit consists of an elevator with standby power or exit stairway and the exit door on the ground floor.

Part 3: The Exit Discharge

The exit discharge consists of either an accessible route, such as an ADA ramp or walkway, or a stair and platform with a refuge area.

Another commonly confused word is “egress.”

Egress is another word for “exit”, and is used in building code to refer to the means by which somebody can exit a building. For example, a fire escape is defined as a “means of egress” because that’s how somebody can get out of a building if there was an emergency. Most states and townships have building code that requires means of egress on each floor.

WHAT’S THE DANGER?

Slips, Trips and Falls

All roadways, paths, stairs, steps, etc. must be maintained in good condition and must not subject employees to risks to their health or safety.  They must be free from slipping and tripping hazards and suitable arrangements must be in place to prevent falls.

The most likely injury at places of access and egress to the site are those associated with slips and trips. The principal control is the provision and maintenance of suitable surfaces. For an entrance into an existing building undergoing refurbishment, barrier matting can prevent floors from getting wet and slippery. In wet conditions staff must either wipe their feet or the mat will need to be large enough to take approximately seven or eight paces to traverse. Every effort should be made to prevent movement of the matting so careful selection is essential.

HEIGHT

In the context of access and egress, Principal Hazards from working at height include:

  • items dropped or falling from buildings and scaffolds at the boundaries and entrances to a site
  • the placement of ladders and scaffolding blocking or impeding access.

HOW TO PROTECT YOURSELF

General Safety Regime

Interior: Buildings/Structures

Recommendations

The condition of all walkways, roadways, staircases, steps, etc. be checked regularly, with suitable records kept.  Such checks should form part of the active monitoring regime of the occupier of the premises.  Checks should include visual examination of the ground for defects, wear and slipping and tripping hazards as well as checks on the operation and adequacy of the lighting and the condition of handrails, warning notices, etc.  All defects must be report and effective repairs undertaken by a competent person.

Poor access/egress may lead to workplace accidents – Floors

About a third of all workplace accidents arise from slips, trips and falls.  Many of these accidents are due to poor housekeeping, but others arise from poor conditions, such as defects in the floor, poor lighting and spillages.  The Workplace, (Health, Safety and Welfare) Regulations 1992, require that every floor in a workplace shall be of a construction such that the floor is suitable for the purpose for which it is used.  They must also be of sound construction and should have adequate strength and stability taking account of the loads placed on them and the traffic passing over them.

Main Entrances

The main routes into and out of the premises may take many forms, such as: ordinary swing doors, powered revolving doors, push revolving doors, automatic opening doors, etc. Where revolving or automatic doors are provided, alternatives means of access and egress should also be considered.

Doors

Doors and gates must be suitably constructed, and where necessary fitted with appropriate safety devices. In particular, sliding doors and gates must be fitted with devices to prevent them from leaving their tracks, upward opening doors and gates must be fitted with devices to prevent them from falling back, powered doors and gates must have suitable and effective means to prevent trapping type injuries and must be able to be operated manually unless they open automatically during a power failure, and doors and gates which are capable of being opened from either direction (swing doors, etc) must provide a clear view of both sides when closed.

Staircases, Landings and Corridors

Staircases should be in good condition, ideally with handrails on both sides of the staircase. The staircases, landings and corridors should be well lit, free from obstructions and slipping and tripping hazards.

Where there are holes in the floor, suitable arrangements must be made taken against accidents (to prevent people from being injured as a consequence of the holes) until such time as they can be made good.

Ramped Pedestrian Access

Ramped pedestrian access (especially when provided for disabled persons) should provide safe and secure access and egress.

Lifts and Lift Motor Rooms

Passenger lifts should be tested and inspected by a competent person at least once every six months although this frequency may be reduced to once in every twelve months for goods lifts that are not used to transport people.

Suitable arrangements should be made for the servicing and maintenance of lifts and for the rescue of people trapped due to lift failure.  Lifts should be fitted with a suitable means of raising the alarm. Lift motor rooms should be clearly identified and should be kept locked and should only be accessed by competent persons (such as lift engineers).

Fixed Vertical Ladders, Etc

Fixed vertical ladders are not usually acceptable as a means of access to a work area, although there are several obvious exceptions.

Fixed ladders should not be provided as a means of access in circumstances where it would be practical to install a staircase.  Access between floors should not normally be by way of ladders (or steep stairs), although these may be used where a conventional staircase cannot be accommodated.  It should be noted that stairs are much safer than ladders; especially when loads are to be carried.

External Areas and Building Façade

The external areas of the premises should be inspected regularly, including checks on the condition of the building façade and all structure attached to the building, such as lights, aerials, CCTV cameras, flagpoles, etc. Similarly, checks should be carried out for all external areas, including car parking areas, roads and footpaths, fencing, lighting, etc. Any defects should be addressed and made safe.

Fire Escape Routes

Fire escape routes must be kept clear and in a good state of repair. In some instances, these may include external metal staircases and even over the roof escape routes that pass into or through other premises.

Active monitoring of premises

It is recommended that the premises are monitored regularly to ensure that all access routes and equipment are in good condition and are free from obstructions and tripping hazards.

FINAL WORD

“Means of Egress” under OSHA data nomenclature is changing to conform to plain understandable English. By so doing, employers, employees and others will better under the obligations of employers and safety and health protections for employees. “Means of egress” will be changed to Exit Routes.


Office Safety Toolbox Talk

WHAT’S AT STAKE?

Office safety is a duty and moral responsibility of every company. The Occupational Safety and Health Administration (OSHA) states office safety as an obligation and that employers must provide a workplace free from serious hazards. Ensuring office health and safety promotes the wellness of both employees and employers and avoids the likelihood of accidents that may result in property damage, injuries or, worse, loss of life.

WHAT’S THE DANGER?

FIVE OF THE COMMON OFFICE HAZARDS:

  1. Slips, Trips and Falls

Universal slip, trip and fall culprits include unattended spills, wet floors, exposed cords, unstable work surfaces, uneven floors, loose rugs and cluttered areas.

  1. Ergonomic Injuries

Office workers spend many hours a day seated at a desk, working on a computer, resulting in ergonomic strains and other injuries related to posture and repetitive movement. These types of hazards can be difficult to detect.

  1. Eye Strain

Spending a large portion of your workday at the computer can cause eyestrain, according to the Mayo Clinic. Eyes may become dry and irritated, and workers may begin having trouble focusing. Light levels should be suitable for the work task—for instance, manual detail work may require higher levels of lighting, but staring at a computer monitor does not, the NSC said.

  1. Fire Safety

According to the latest available data, fire departments responded to approximately 17,500 office fires in 2012, which resulted in $643 million in property damage, according to the National Fire Protection Association.

  1. Indoor Air Quality

The prevalence of poor indoor air quality has contributed to a rise in occupational asthma and other respiratory disorders, chemical sensitivity and allergies, according to the NSC. Some of the reasons for poor air quality are inadequate ventilation systems; office overcrowding; the presence of cleaning chemicals and pesticides; water damage and mold growth; cubicle design that blocks off air flow to work areas; too much or too little humidity; and poor housekeeping, which leads to dirty work environments.

HOW TO PROTECT YOURSELF

EVALUATE THE OFFICE FOR POTENTIAL HAZARDS

1. Ergonomics

Take a moment to pause and consider how you’re sitting. Is your back straight? Are your shoulders hunched over? Can your feet reach the floor? Is your computer monitor or mobile device screen too close or too far away? These inconveniences may seem small on a day-to-day basis, but if you sit hunched over or strain to see your monitor every day for ten years, you could cause serious damage to your body. This can lead to pain, numbness, tingling and even musculoskeletal disorders, or MSDs. MSDs include carpal tunnel, leg numbness, and chronic pain in the neck, back or shoulders.

To avoid MSDs, you should train your employees to set up their workplaces to provide neutral body positioning. To achieve neutral body positioning, adjust your chair and desk so that you hands, wrists and forearms are straight and parallel to the floor. Then, keep your head level and balanced, your shoulders relaxed and your elbows close to your body. Your knees should be at the same height as your hips and should be parallel to the floor. Your feet should be fully supported by the floor or by a footrest.

2. Physical Layout

A poor office layout can distract employees, decrease productivity and morale, and put employees at risk for trips, falls, bumps and other injuries. Desks should be placed at least three feet apart, and office equipment like computers and printers shouldn’t be placed on the edge of desks. Employees shouldn’t sit beneath an uncovered vent that dumps hot or cold air on them. Filing cabinets should be closed when not in use, and cords should be neatly organized where they don’t present tripping hazards and aren’t rolled over by desk chairs.

3. Lighting

Too much lighting can cause glare on computer screens, which can cause eye fatigue and strain. Employees should never sit with their backs to a window. Too-bright offices can be made dimmer by removing one of the rods in overhead fluorescent lighting. Too-dark offices can be made brighter with task lamps.

4. Air Quality

Poor air quality, caused by construction elsewhere in the building, mold and mildew, or unpleasant odors, can cause respiratory illness, dizziness, and more. You should keep all common areas, especially kitchens, clean and free from spoiled food. If you suspect that your office has mold or mildew problems, you can call a professional to measure the mold levels in each room.

5. Noise Levels

High noise levels can trigger headaches or migraines and distract your employees from their work. This is particularly common in open office environments. To combat this, you can move desks farther apart, turn down the ringers on all phones, require employees to use headphones when listening to audio at their computers, and move noisy office machines away from desks.

6. Storage

When storing boxes of files, papers or other flammable materials, you should be sure to never store them near an ignition source, like a water heater. Stack the heaviest objects or boxes on the bottom and the lightest objects on top. Consider securing storage racks to the wall with a wall anchor so they don’t tip over, and never store objects in walkways where they could present a tripping hazard.

7. Electrical Equipment

About 6,000 office fires are reporting every year in the United States. Many of these are caused by malfunctioning or improperly used electrical equipment. Office fires are particularly dangerous because most office equipment, like chairs and machinery, give off toxic fumes as they burn. Inspect all electrical equipment, like monitors, fax machines, and space heaters, for damaged cords and plugs. Make sure that your employees are not overloading electrical outlets with multiple power strips or plugging multiple extension cords into each other. Train your new and existing employees over what types of electrical equipment are and are not allowed in your workplace.

TOP SEVEN SAFETY TIPS FOR OFFICE WORKERS TO PREVENT WORKPLACE INJURIES

1. Make sure your desk setup is ergonomic

To maintain a neutral posture, your head should be centered over your neck and shoulders, wrists flat and elbows resting comfortably at your side. If your feet won’t touch the ground unless you lean forward, use a footrest.

2. Take regular breaks to get up and move around

Sitting all day puts office workers at risk for numerous health problems. Our warm up and stretching guide gives you easy exercises you can do at work.

3. When it’s slippery due to ice and snow, walk like a penguin when entering and leaving your office

Winter slips and falls in parking lots are extremely common. To avoid them, walk like a penguin by walking flat footed taking short, slow steps. It’s also important to wear sensible footwear and carry only what you can handle.

4. Use a headset for prolonged or frequent phone use

Cradling the phone between your shoulder and ear can cause neck and back pain.

5. Keep your workplace tidy

Clean up spills immediately, keep aisles free of clutter, and tie up or secure cords so they don’t pose a trip hazard.

6. Don’t let electrical cords create a fire risk

Avoid running electrical cords under carpet or through windows and doorways. Also, don’t fasten them with unapproved devices, such as staples.

7. Know your office emergency procedures

Make sure you know what to do in the event of a fire, storm, violent intruder, medical problem or other emergency.

FINAL WORD

Because of the general perception that construction or oilrig work is much more dangerous than office environment work, much more education is needed to dispel that perception. Along with fractures, dislocations, strains, sprains and contusions, in recent years illness has increased among the office worker population.