What is Your Why Meeting Kit

WHAT MOTIVATES EMPLOYEES TO COME HOME SAFE 

Most employees can produce a quick answer to the question: “Why do you work?”  The answer typically includes something that gets employees to show up to work on a regular basis, a paycheck for example.  When asked: “Why do you work safely?” the responses are a bit more labored or indecisive.  

What is an employee’s motivation for coming to work each day?  One approach to connecting with employees with a negative attitude towards safety is to ask what motivates them.  Why do they come to work?  Sure, a paycheck, but what do they do with that paycheck?  

Once you’ve identified motivating factors, ask how an injury could impact employee activities.  How would that make them feel?  Wouldn’t the effort to avoid that negative outcome be a motivator to work safely?  Getting employees to reflect on how their choices at work can influence their personal lives may evoke a “Damascus experience”. 

WHY WORKPLACE SAFETY IS SO IMPORTANT

Why is workplace safety so important?  There is more to this question than you think.  In a day and age where people still get injured on the job, you would think safety would be a banner held high by everyone, but unfortunately it isn’t.  

There are the obvious reasons why workplace safety should be top priority including:

  • Injury.
  • Death.  
  • Corporate financial loss
  • Property damage

It is in the best interest for both employee and employer to put safety first, minimize risk to life and therefore reduce financial loss and property damage.  

Why Do We Work Safe?  When a company puts their employees first and implements proper safety training and education and then enforces it, several positive results happen: 

  • Worker productivity increases
  • the Service or Quality of the product improves
  • Corporate reputation / public relations improve

HOW TO KEEP THE WORKPLACE SAFE 

  • Conduct an Office Safety Inspection

Start with using an office safety inspection checklist to identify workplace hazards and the measures currently being taken to prevent them. Identify areas and aspects of the workplace that are not compliant with organizational and regulatory workplace safety standards.

An effective office safety inspection should be thorough, but simple. Look out for environmental elements such as excessive noise, uneven temperature, and proper ventilation. Check equipment and materials to ensure that they’re in good condition and are unlikely to cause injury. Observe if proper training was implemented and evaluate employees if they comply with regulatory safety standards and protocols.

  • Establish Safety Guidelines

Aside from environmental elements, worker malpractice is another cause of preventable workplace injury. Establish clear safety guidelines that are easy to follow and post them in strategic areas within the office to keep workers informed. 

  • Do not stack office supplies on the walkways.
  • Always close doors after entering or leaving a room.
  • Use the handrails when going up or down the stairs.
  • Carry and store sharp objects with the tip pointing down.
  • Use appropriate tools and equipment.
  • Do not plug multiple cords into a single electrical outlet.
  • Use proper signage in case of machine maintenance.
  • Clean spilled items immediately.
  • Keep emergency exits accessible and unobstructed.
  • Ensure ergonomic workstations for employees.
  • Stand up and stretch for a few minutes for every hour spent on your workstation.
  •  Perform Regular Maintenance of Emergency Equipment

Schedule a regular review of your workplace’s safety measures, equipment, and tools to ensure that you can respond to emergency situations if necessary.

Perform monthly fire extinguisher inspections and check the pressure gauge to ensure that it’s at optimal levels. Conduct regular tests of sprinklers, fire alarms, and emergency lights to ensure its working condition. Check your office’s first-aid kit on a weekly basis and ensure that you always have an adequate supply of items such as gauze pads, roller bandages, adhesive tape, and hydrogen peroxide. Periodically inspect the office’s emergency generator to ensure alternative power supply is available in case of a power interruption or calamity.

  •  Report Incidents Immediately

The implementation of accident and near-miss reporting should be standard practice for both office and field workers:

Accident Reports are usually completed by supervisors to document the occurrence and cause of an injury. It includes details such as the injured person’s name, the nature and severity of the injury, factors that contributed to its occurrence, and recommended preventive measures.

Near-miss Reports are used to document potential hazards based on instances that almost resulted in actual injury. This helps you identify the cause of the near miss so preventive measures can be taken to prevent it.

FINAL WORD

The mentioned drivers for possibilities for your “why” are just the tip of the iceberg in the list of reasons why you should want to work safe. While working safely or following all the safety policies and procedures may not come natural for many of us, finding your “why” can make a huge difference in taking steps towards becoming a safer worker. 


What is Your Why Meeting Kit – Spanish

QUÉ ESTÁ EN RIESGO

QUÉ MOTIVA A LOS EMPLEADOS A VOLVER A CASA SEGUROS 

La mayoría de los empleados pueden dar una respuesta rápida a la pregunta “¿Por qué trabajas?”.  La respuesta suele incluir algo que hace que los empleados acudan al trabajo con regularidad, un sueldo, por ejemplo.  Cuando se les pregunta: “¿Por qué trabaja con seguridad?”, las respuestas son un poco más laboriosas o indecisas.  

¿Cuál es la motivación de un empleado para venir a trabajar cada día?  Un enfoque para conectar con los empleados con una actitud negativa hacia la seguridad es preguntarles qué les motiva.  ¿Por qué vienen a trabajar?  Claro, un sueldo, pero ¿qué hacen con ese sueldo?  

Una vez identificados los factores de motivación, pregunte cómo podría afectar una lesión a las actividades de los empleados.  ¿Cómo les haría sentir eso?  ¿No sería el esfuerzo por evitar ese resultado negativo un factor de motivación para trabajar con seguridad?  Hacer que los empleados reflexionen sobre cómo sus decisiones en el trabajo pueden influir en su vida personal puede evocar una “experiencia de Damasco”. 

CUÁL ES EL PELIGRO

POR QUÉ ES TAN IMPORTANTE LA SEGURIDAD EN EL TRABAJO

¿Por qué es tan importante la seguridad en el trabajo?  Esta pregunta es más importante de lo que se piensa.  En una época en la que la gente se sigue lesionando en el trabajo, se podría pensar que la seguridad es una bandera que todo el mundo lleva en alto, pero desgraciadamente no es así.  

Hay razones obvias por las que la seguridad en el lugar de trabajo debería ser una prioridad, entre ellas

  • Las lesiones.
  • La muerte.  
  • Pérdida financiera de la empresa
  • Daños a la propiedad

Tanto al empleado como al empresario les interesa anteponer la seguridad, minimizar el riesgo para la vida y, por tanto, reducir las pérdidas económicas y los daños materiales.  

¿Por qué trabajamos con seguridad?  Cuando una empresa pone a sus empleados en primer lugar y pone en práctica una capacitación y educación en materia de seguridad adecuada y luego la hace cumplir, se producen varios resultados positivos: 

  • La productividad de los trabajadores aumenta
  • el servicio o la calidad del producto mejora
  • La reputación corporativa / las relaciones públicas mejoran

COMO PROTEGERSE

CÓMO MANTENER LA SEGURIDAD EN EL LUGAR DE TRABAJO 

  • Realice una inspección de seguridad en la oficina

Comience por utilizar una lista de comprobación de la inspección de la seguridad en la oficina para identificar los riesgos del lugar de trabajo y las medidas que se están tomando actualmente para prevenirlos. Identifique las áreas y los aspectos del lugar de trabajo que no cumplen con las normas de seguridad laboral de la organización y la normativa.

Una inspección de seguridad en la oficina eficaz debe ser exhaustiva, pero sencilla. Busque elementos ambientales como el ruido excesivo, la temperatura desigual y la ventilación adecuada. Compruebe el equipo y los materiales para asegurarse de que están en buen estado y de que es improbable que causen lesiones. Observe si se ha impartido una capacitación adecuada y evalúe si los empleados cumplen las normas y protocolos de seguridad reglamentarios.

  • Establecer directrices de seguridad

Aparte de los elementos ambientales, la mala praxis de los trabajadores es otra causa de lesiones evitables en el lugar de trabajo. Establezca directrices de seguridad claras y fáciles de seguir y colóquelas en zonas estratégicas de la oficina para mantener a los trabajadores informados. 

  • No apile material de oficina en los pasillos.
  • Cierre siempre las puertas después de entrar o salir de una habitación.
  • Utilice los pasamanos al subir o bajar las escaleras.
  • Lleve y guarde los objetos afilados con la punta hacia abajo.
  • Utilice las herramientas y equipos adecuados.
  • No enchufe varios cables en una misma toma de corriente.
  • Utilice la señalización adecuada en caso de mantenimiento de las máquinas.
  • Limpie inmediatamente los objetos derramados.
  • Mantenga las salidas de emergencia accesibles y sin obstáculos.
  • Asegure puestos de trabajo ergonómicos para los empleados.
  • Levántese y estírese durante unos minutos por cada hora que pase en su puesto de trabajo.
  • Realice un mantenimiento regular de los equipos de emergencia

Programe una revisión periódica de las medidas de seguridad, los equipos y las herramientas de su lugar de trabajo para asegurarse de que puede responder a situaciones de emergencia en caso necesario.

Realice inspecciones mensuales de los extintores y compruebe el manómetro para asegurarse de que están en niveles óptimos. Realice pruebas periódicas de los rociadores, las alarmas contra incendios y las luces de emergencia para garantizar su estado de funcionamiento. Revise semanalmente el botiquín de su oficina y asegúrese de tener siempre un suministro adecuado de artículos como gasas, vendas en rollo, cinta adhesiva y peróxido de hidrógeno. Inspeccione periódicamente el generador de emergencia de la oficina para asegurarse de que se dispone de un suministro de energía alternativo en caso de interrupción del suministro eléctrico o calamidad.

  • Informar inmediatamente de los incidentes

La realización de informes sobre accidentes y cuasi accidentes debe ser una práctica habitual tanto para los trabajadores de oficina como para los de campo:

Los informes de accidentes suelen ser rellenados por los supervisores para documentar la ocurrencia y la causa de una lesión. Incluye detalles como el nombre de la persona lesionada, la naturaleza y la gravedad de la lesión, los factores que han contribuido a su ocurrencia y las medidas preventivas recomendadas.

Los informes de cuasi accidentes se utilizan para documentar los peligros potenciales a partir de los casos que estuvieron a punto de provocar una lesión real. Esto le ayuda a identificar la causa del cuasi accidente para poder tomar medidas preventivas para evitarlo.

CONCLUSIÓN

Los motivos mencionados para las posibilidades de su “por qué” son sólo la punta del iceberg en la lista de razones por las que debería querer trabajar de forma segura. Aunque trabajar de forma segura o seguir todas las políticas y procedimientos de seguridad puede no ser algo natural para muchos de nosotros, encontrar su “por qué” puede suponer una gran diferencia a la hora de tomar medidas para convertirse en un trabajador más seguro.


Quick Course – Eye Injuries and Prevention

Our eyes are one of our greatest assets. They are susceptible to all kinds of injuries in the workplace if they are not properly protected. This quick course will cover common hazards that can cause eye injuries and how to protect yourself.


Types of Respirators – Quick Tips

Many employers use different types of respirators to help reduce employee exposure to potentially damaging air contaminates as their first line of defense. However, the Occupational Safety and Health Administration (OSHA) states in 29 Code of Federal Regulations (CFR) 1910.134(a)(1), “In the control of those occupational diseases caused by breathing air contaminated with harmful dusts, fogs, fumes, mists, gases, smokes, sprays or vapors, the primary objective shall be to prevent atmospheric contamination. This shall be accomplished as far as feasible by accepted engineering control measures (for example, enclosure or confinement of the operation, general and local ventilation, and substitution of less toxic materials). When effective engineering controls are not feasible, or while they are being instituted, appropriate respirators shall be used pursuant to this section.”

Respirators are among the most important pieces of protective equipment when working in hazardous environments. Selecting the right respirator requires an assessment of all the workplace operations, processes and environments. The identity of the hazard and its airborne concentrations need to be determined before choosing a respirator. This assessment should be done by experienced safety personnel or by an industrial hygienist.

Three primary agencies are responsible for researching and establishing contaminant exposure limit levels for hazardous substances. The American Conference of Governmental Industrial Hygienists (ACGIH) is a voluntary organization of safety professionals that develops and reviews occupational exposure limits as threshold limit values (TLVs). The National Institute for Occupational Safety and Health (NIOSH) is a federal agency that conducts research on safety and health concerns. NIOSH is responsible for developing and revising recommended exposure limits (RELs) for hazardous substances. The recommendations must then be accepted via OSHA’s legislative process before any REL is enforced as an OSHA permissible exposure limit (PEL).

Types of Respirators

Once a workplace assessment has been completed and engineering controls have been ruled out, the respirator selection process can begin. Respirators protect users in two basic ways resulting in two primary categories of respirators. The first category of respirators functions by removing contaminates from the air. These are known as air-purifying respirators. They have filters, cartridges, canisters or a combination of filters and cartridges/canisters that remove contaminants from the air by passing the ambient air through the air-purifying element before it reaches the user. The second category of respirators supplies clean breathing air from another source. These are known as atmosphere-supplying respirators. Each category of respirators is further sub-divided into three types of respirators.

Air-Purifying Respirator Types:

  • Particulate
    1. Capture particles in the air, such as dusts, mists and fumes
    2. Do not protect against gases or vapors
    3. Generally become more effective as particles accumulate on the filter and plug spaces between the fibers
    4. Filters should be replaced when user finds it difficult to breathe
  • Gas and Vapor
    1. Are normally used when there are only hazardous gases and vapors in the air
    2. Use chemical cartridges or canisters to remove specific gases or vapors
    3. Do not protect against airborne particles
    4. Provide protection only as long as the filter’s absorbing capacity is not depleted
  • Combination
    1. Are normally used in atmospheres that contain hazards of both particulates and gases and vapors

Atmosphere-Supplying Respirator Types:

  • Air-Supplied (Airline)
    1. Make use of an airline hose to deliver clean, breathable air from an uncontaminated source
    2. Provide clean, breathable air for long periods of time and are lightweight
    3. Limit the range of user mobility and may fail due to hose damage
    4. Are normally used when there are extended work periods required in atmospheres that are not immediately dangerous to life and health (IDLH)
  • Combination
    1. Have an auxiliary self-contained air supply that can be used if the primary supply fails
    2. Auxiliary self-contained portion is generally small since it only needs to supply enough air for escape
    3. Can be used for entry into confined spaces
    4. Are normally used when there are extended work periods required in atmospheres that are or may be immediately dangerous to life and health (IDLH)
  • Self-Contained Breathing Apparatus (SCBA)
    1. Consist of a wearable, clean air supply pack
    2. Do not restrict movement with a hose connection
    3. The closed-circuit type can provide air up to four hours
    4. The open-circuit type only provides air for 30–75 minutes
    5. Are normally used when there is a short-time need to enter and escape from atmospheres which are or may be immediately dangerous to life and health (IDLH)

Material Types

Respirators can be made from a variety of materials. The most popular facepiece materials are silicone, neoprene and natural rubber. In general, natural rubber and neoprene are rigid, durable materials. Silicone is preferred for its comfort, flexibility and ease in cleaning. Full-face respirators are available with five- or six-strap harnesses or ratchet suspensions. The harness type can be worn with hard hats, while ratchet suspensions are generally easier to adjust, making donning and doffing easier.

Optional Features

Various features are available for full-face respirators to help customize respirators to suit your employees and the specific hazards they encounter. For example, nose cups reduce lens fogging and lens covers help protect the lens from paint, minor chemical splash and scratches. Spectacle kits are available for employees who require prescription eyewear. The frame mounts into the full-face mask and the wearer’s optometrist makes the prescription lenses. This allows the wearer to maintain a proper respirator fit and still wear prescription lenses.

Commonly Asked Questions

Q: What is a powered air-purifying respirator (PAPR)?

A: A PAPR has a powered blower that pulls air through attached filters and/or cartridges. The blower then pushes the filtered air into the facepiece, which can either be a loose-fitting or tight-fitting type.

Q: What is a tight-fitting respirator?

A: Tight-fitting respirators require a tight seal between the respirator and the wearer’s face in order to work properly. If the respirator’s seal leaks, contaminated air will be pulled into the facepiece and can be breathed in.

Q: What is a loose-fitting respirator?

A: Loose-fitting respirators do not depend on a tight seal with the face to provide protection. Typically it is a hood draped over the head and shoulders used in a PAPR or supplied-air configuration.

Sources

Respiratory Protection, 29 CFR 1910.134

Air Contaminants Standard, 29 CFR 1910.1000

ANSI/ASSE Z88.2-2015 American National Standard Practices for Respiratory Protection

Occupational Safety and Health Administration, Respiratory Protection eTool, OSHA

Occupational Safety and Health Administration, Respiratory Types, OSHA Respiratory Protection Video Series


The information contained in this article is intended for general information purposes only and is based on information available as of the initial date of publication. No representation is made that the information or references are complete or remain current. This article is not a substitute for review of current applicable government regulations, industry standards, or other standards specific to your business and/or activities and should not be construed as legal advice or opinion. Readers with specific questions should refer to the applicable standards or consult with an attorney.


SCBA Cylinder Hydrostatic Testing – Quick Tips

Cylinders that provide air for breathing are most commonly used in National Fire Protection Association (NFPA)-compliant and industrial self-contained breathing apparatus (SCBA). The Department of Transportation (DOT) requires periodic hydrostatic testing of these breathing air cylinders. The NFPA recognizes the DOT’s testing requirements in their standard on SCBA selection, care and maintenance (NFPA 1852). A hydrostatic test is a method to validate the structural integrity and safety of a cylinder throughout its service live. The material of the SCBA cylinder (i.e. steel, aluminum, composite) dictates both the required frequency of testing and the overall service life of the cylinder.

Under 49 Code of Federal Regulations (CFR) Part 180.205, the DOT addresses their re-testing, or “requalification,” requirements for SCBA cylinders as well as other cylinders used for the transportation of hazardous materials. While not referring to hydrostatic testing by name, Part 180.205 addresses both the performance and the frequency requirements for “pressure testing” steel and aluminum SCBA cylinders. A hydrostatic test is commonly used for testing the SCBA cylinders because it meets all of the DOT’s pressure test performance requirements.

During a hydrostatic test, an SCBA cylinder is examined to ensure it can safely hold its rated pressure. This regular testing is crucial because SCBA cylinders, or any compressed gas cylinder for that matter, can rupture if there’s degradation in structural integrity. A hydrostatic test consists of filling the cylinder with a nearly incompressible liquid, in most cases water, pressurizing the cylinder and examining it for leaks or permanent changes in shape.

In conjunction with the hydrostatic test, Part 180.205 also specifies that a visual inspection be performed each time a cylinder goes through the pressure testing process. It states the cylinder “must be given an internal and external inspection,” and references various Compressed Gas Association (CGA) pamphlets for the visual inspection performance guidelines. The CGA pamphlets that are referenced are unique to specific cylinder types.

An additional step to the requalification procedure is required for DOT-3AL cylinders that are manufactured from 6351-T6 aluminum alloy. Under 49 CFR Part 180.209, these cylinders are required to complete an “eddy current” test. An eddy current test uses electromagnetic induction to detect tiny cracks that may not be visible. Although it rarely occurs, under certain conditions, cylinders constructed from 6351-T6 aluminum alloy are prone to this type of cracking. Details of conducting the eddy current test are located within Appendix C 49 CFR Part 180.

Frequency of Requalification and Cylinder Service Life

When it comes to the frequency of hydrostatic testing and services lives for SCBA cylinders, not all of the answers are found within DOT’s 49 CFR guidelines. Under Part 180.205(c), it states, “Each cylinder bearing a DOT specification marking must be requalified and marked as specified in the Requalification Table in this subpart. Each cylinder bearing a DOT special permit number must be requalified and marked in conformance with this section and the terms of the applicable special permit.”

Steel and aluminum SCBA cylinders that are DOT specification cylinders are marked as “3AA” for steel and “3AL” for aluminum. For these cylinders, the DOT requires requalification every five years. Details on the periodic qualification of cylinders (cylinder specification, minimum test pressure and the requalification period) are given in 49 CFR 180.209. The DOT does not specify a service life for steel and aluminum cylinders, but the CGA allows for their reuse indefinitely as long as they continue to pass their hydrostatic and visual inspections every five years.

For other commonly used SCBA cylinder materials like fiberglass composites and carbon composites, the answers to requalification frequency and service life are linked to the “special permit number” referenced in Part 180.205(c). The special permit numbers were once known as “exemption numbers.” The special permit or exemption (terms are used interchangeably) contains the requalification and service life requirements for the respective cylinder in question. If the special permit/exemption documentation is not readily available, the manufacturer of the SCBA should be consulted for direction and to obtain the missing documentation.

According to Luxfer Gas Cylinders, one of the largest manufacturers of SCBA cylinders, some common requalification and service life periods for non-steel and non-aluminum cylinders are:

  • Hoop-wrapped cylinders should be tested every three years and have a 15-year service life.
  • Fully-wrapped fiberglass cylinders should be tested every three years and have a 15-year service life.
  • Fully-wrapped Kevlar® cylinders should be tested every three years and have a 15-year service life.
  • Fully-wrapped carbon fiber cylinders should be tested every five years and have a 15-year service life.

These are some of the most common requalification and service lifetime frames found on special permits. It’s the responsibility of the SCBA owner to follow the requirements specific to their cylinder’s special permit. To view official copies of current and, due to numerous inquiries, several expired special permits, visit the Pipeline and Hazardous Materials Safety Administration (PHMSA) Special Permits Search.

Commonly Asked Questions

Q: How do I know when the last time a hydrostatic test was performed on my cylinder?

A: According to 49 CFR 180.213 the cylinders should be clearly and permanently marked on the metal of the cylinder with the date the cylinder was manufactured and the date(s) of subsequent hydrostatic tests. Fully wrapped composite cylinders will have a label applied near the original test date marking. It is very important to check for valid re-test dates before refilling cylinders.

Q: Where can I get my SCBA cylinder requalified?

A: Two good resources for this are your local fire department or, if you have one locally, a SCUBA dive shop. If they cannot assist, they should be able to point you in the right direction. The manufacturer or supplier of the SCBA can help as well. A person must meet the requirements of 49 CFR Sections 107.805, 180.211, and 180.212 to be approved to inspect, test, certify, repair, or rebuild a cylinder in accordance with a DOT specification or under the terms of a special permit. The Cylinder Requalification Locator at https://portal.phmsa.dot.gov/rinlocator allows you to search for an approved cylinder requalifier. By entering a city/state or zip code, this tool will provide a list of approved cylinder requalifiers including address, contact information, and the authorized testing methods and cylinder specifications for the approved entity.

Sources

49 CFR 180.205

49 CFR 180.209

PHMSA Special Permits Search

PHMSA Cylinder Requalifiers

NFPA 1852: Standard on Selection, Care, and Maintenance of Open-Circuit Self-Contained Breathing Apparatus (SCBA)

NIOSH Respirator Use Notice

Luxfer Cylinder Care and Maintenance


The information contained in this article is intended for general information purposes only and is based on information available as of the initial date of publication. No representation is made that the information or references are complete or remain current. This article is not a substitute for review of current applicable government regulations, industry standards, or other standards specific to your business and/or activities and should not be construed as legal advice or opinion. Readers with specific questions should refer to the applicable standards or consult with an attorney.


Glutaraldehyde Overview – Quick Tips

What Is Glutaraldehyde Used For?

Glutaraldehyde has a variety of uses in many industries and occupations. It is most commonly found in the healthcare industry, used to disinfect medical equipment that cannot be heat sterilized. The main uses of glutaraldehyde include:

  • As a cross-linking and tanning agent
  • As a biocide in metalworking fluids and in oil and gas pipelines
  • As an antimicrobial in water-treatment systems
  • As a slimicide in paper manufacturing
  • As a preservative in cosmetics
  • As a sterilant in animal housing
  • As a tissue fixative in histology and pathology labs
  • As a hardening agent in the development of X-rays
  • In embalming solutions
  • In the preparation of grafts and bioprosthesis

Glutaraldehyde (C5H8O2) is most often used in a diluted form with solutions ranging from 0.1 to 50 percent glutaraldehyde in water. It is a colorless, oily liquid and sometimes has an odor of rotten apples. In a vapor state, glutaraldehyde has a pungent odor, with an odor threshold level of 0.04 parts per million (ppm).Trade names for glutaraldehyde-containing formulations include Cidex®, Sonacide®, Sporicidin®, Hospex®, Omnicide®, Metricide®, Rapicide® and Wavicide®.

Exposure Limits

OSHA has not established a permissible exposure limit (PEL) for glutaraldehyde. NIOSH has established a recommended exposure limit (REL) for glutaraldehyde of 0.2 ppm. This is a time-weighted average (TWA) exposure limit for up to a 10-hour workday during a 40-hour workweek. The American Conference of Governmental Industrial Hygienists (ACGIH) has set a ceiling Threshold Limit Value (TLV) of 0.05 ppm. This is the airborne concentration that should not be exceeded during any part of the work shift.

Does Glutaraldehyde Present a Health Hazard?

Glutaraldehyde is an irritant to the skin, eyes and respiratory system. Exposure symptoms might include burning sensation, dermatitis, headache, coughing, shortness of breath, nausea and vomiting. Continuous repeated exposure to glutaraldehyde might intensify the skin and respiratory irritant effects. Anyone with a history of skin or eye disorders might be at an increased risk from exposure.

First Aid

Eyes: If glutaraldehyde contacts the eyes, immediately flush the eyes with large amounts of water, occasionally lifting the lower and upper lids. Seek medical attention immediately. Contact lenses should not be worn when working with glutaraldehyde.

Skin: If glutaraldehyde contacts the skin, immediately flush the contaminated skin with water for at least 15 minutes. If glutaraldehyde penetrates clothing, immediately remove the clothing and flush the skin with water for at least 15 minutes. Promptly seek medical attention.

Inhalation: If large amounts of glutaraldehyde are inhaled, move the exposed person to fresh air at once. If breathing has stopped, immediately begin cardiopulmonary resuscitation (CPR). Keep the person warm and at rest. Get medical attention as soon as possible.

Ingestion: Get medical attention immediately.

What Type of Personal Protective Equipment Should Be Used with Glutaraldehyde?

Personal protective equipment (PPE) must be used with engineering and administrative controls to help prevent glutaraldehyde exposure.

Safety goggles should be considered where concentrated glutaraldehyde is used or where splashing may occur, it is best to use indirect-vented or non-vented goggles, and to avoid goggles with foam padding.

Protective clothing should be worn when handling glutaraldehyde. Polyethylene, polyvinyl chloride, Viton™, butyl rubber, natural rubber latex, neoprene and nitrile rubber provide adequate protection from glutaraldehyde solutions and are compatible materials for gloves and aprons.

Respiratory protection: Although an immediately dangerous to life and health (IDLH) exposure limit has not been established for glutaraldehyde, several respirator manufacturers have issued guidelines. 3M’s respirator selection guide can be found here and while MSA’s can be found here.

Air Monitoring

Personal monitors, passive-gas monitors and vapor meters can help determine workers’ exposure to glutaraldehyde.

Personal monitors operate on the diffusion principle and require analysis by an outside laboratory to verify exposure levels. NIOSH sampling method 2532 or OSHA method 64 are suggested for collecting samples.

Passive-gas monitors operate on the diffusion principle and are direct-read monitors. They provide immediate on-site results with easy-to-read color changes.

Vapor meters quickly measure airborne concentrations. A given quantity of air is sampled and the concentration is directly displayed.

Commonly Asked Questions

Q: What the difference between a disinfectant and a sterilant?

A: A disinfectant is a chemical or physical agent that is applied to inanimate objects to kill microorganisms. Bleach (sodium hypochlorite), phenolic compounds, and formaldehyde are examples of disinfectants. A sterilant is a chemical or physical process that is applied to inanimate objects to kill all microorganisms as well as spores. Glutaraldehyde and ethylene oxide are examples of sterilants.

Q: Where is exposure to glutaraldehyde most likely?

A: Exposure to glutaraldehyde is most likely in the healthcare industry. It is used in hospitals for cold sterilization of medical supplies and instruments, and also as a disinfectant in urology, endoscopy and dental departments. It is also used as a fixative in X-ray developing solutions.

Q: Is glutaraldehyde considered a fire hazard?

A: No, glutaraldehyde is a non-flammable liquid.

Q: What is the recommended protective clothing when handling glutaraldehyde?

A: Aprons and other protective clothing made from materials such as polyethylene, polyvinyl chloride, Viton™, butyl rubber, natural rubber latex, neoprene or nitrile rubber can offer protection when handling glutaraldehyde solutions.

Sources

OSHA Occupational Chemical Database for Glutaraldehyde

Krister Forsberg and S.Z. Mansdorf, “Quick Selection Guide to Chemical Protective Clothing,” Sixth Edition.

National Institute of Occupational Safety and Health, “NIOSH Pocket Guide to Chemical Hazards-Glutaraldehyde”

National Institute of Occupational Safety and Health, “Workplace Safety and Health Topics – Glutaraldehyde”


The information contained in this article is intended for general information purposes only and is based on information available as of the initial date of publication. No representation is made that the information or references are complete or remain current. This article is not a substitute for review of current applicable government regulations, industry standards, or other standards specific to your business and/or activities and should not be construed as legal advice or opinion. Readers with specific questions should refer to the applicable standards or consult with an attorney.


Distracted Driving – Quick Tips

Every year roadway incidents are the number one cause of fatal occupational injuries. The Bureau of Labor Statistics (BLS) indicates that in 2014, roadway incidents accounted for 24% of all the work-related fatalities. Distracted driving is a growing safety concern for both occupational and personal-use motorists.

What is distracted driving? The National Highway Traffic Safety Administration (NHTSA) defines distracted driving as a specific type of inattention that occurs when drivers divert their attention away from driving to focus on another activity. Distracted driving is divided into the following categories:

  • Visual distractions: Tasks that require the driver to look away from the roadway to visually obtain information.
  • Manual distractions: Tasks that require the driver to take a hand off the steering wheel and manipulate a device.
  • Cognitive distractions: Tasks that are defined as the mental workload associated with a task that involves thinking about something other than the driving task.

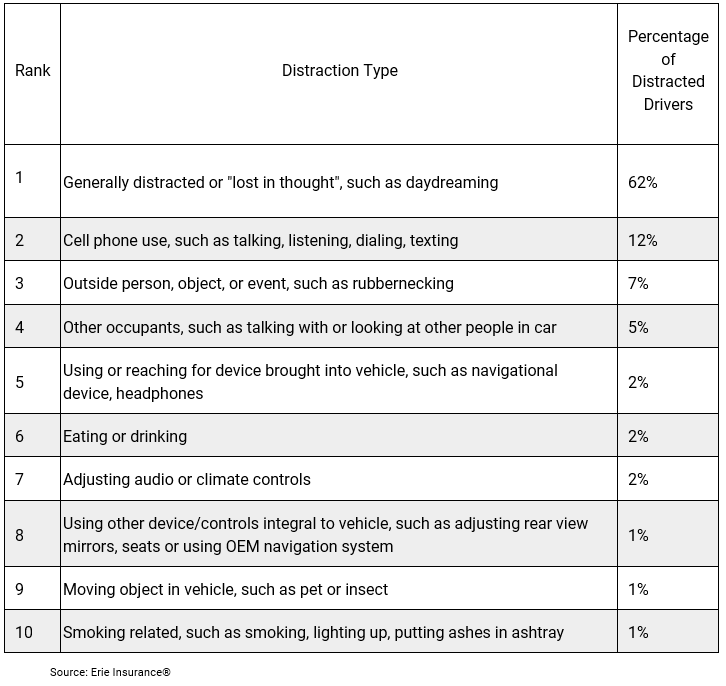
What are some of the most common types of distractions that prevent drivers from keeping their eyes on the road, hands on the steering wheel and minds on the task of driving? The Erie Insurance® Company conducted a study that analyzed two years’ worth of data from 2011 and 2012 that involved 65,000 people being killed in car accidents over that time span. The data was collected from NHTSA’s Fatality Analysis Reporting System (FARS), which is a national census of fatal motor vehicle traffic crashes. Information gathered from police reports indicated that one in 10 fatal crashes involved at least one distracted driver.

The following are the top 10 distractions from the FARS data:

Distracted Driving Initiative
Currently, the Occupational Safety and Health Administration (OSHA) does not have a standard that addresses distracted driving. However, OSHA does have a distracted driving initiative that partners with the Department of Transportation. OSHA’s message to companies that have employees who drive as part of their job is succinct: it’s the responsibility of employers to have a clear and enforced ban on texting while driving. OSHA’s General Duty Clause, Section 5(a)(1) of the OSH Act requires, “employers to provide their employees with a place of employment that is free from recognizable hazards that are causing or likely to cause death or serious harm to employees.” This is regardless of whether the workplace is on four or 18 wheels or a traditional brick and mortar facility. OSHA will investigate complaints where it’s alleged that an employer requires texting while driving or organizes work so that texting on the move is necessary. They will issue citations and penalties if they find the allegations are indeed true.

The Dangers of Cell Phones
The use of cell phones to make calls or send texts is a growing trend. Estimates from the Pew Research Center show that 90% of American adults own a cell phone. Approximately 9% of drivers are using hand-held or hands-free cell phones at any given moment according to the 2011 National Occupant Protection Use Survey (NOPUS) conducted by NHTSA. It’s not hard to identify drivers who are distracted by how they are driving. Some signs can be as obvious as a driver failing to brake at a stop sign, a vehicle drifting over the centerline, a driver making excessively wide turns or driving at speeds significantly slower or faster than the posted speed limit.

OSHA equates the delayed reaction time for a driver on a cell phone to a driver who is legally drunk. The National Safety Council (NSC) 2015 Injury Facts revealed from a review of 33 cell phone use and driving studies, that cell phone conversations while driving increases a driver’s reaction time by 0.25 seconds (on average). This coincides with the NSC findings that an estimated 26% of all traffic crashes are associated with drivers using cell phones and text messaging. According to OSHA, to send or receive text messages drivers must focus their attention away from the road for approximately 4.6 seconds. At 55 miles per hour (MPH), this is equivalent to driving the length of a football field blindfolded.

While most agree that holding a cell phone to the ear and speaking is more dangerous because of the added factor of only having one hand on the wheel, using a hands free device still has the driver’s attention focused on the conversation and not the task at hand. It’s safer, but still potentially deadly.

Company Policy
Every company should have a policy that prohibits the use of cell phones while driving. Just having a policy is not enough. The policy must be communicated to the affected employees, compliance must be monitored and violations enforced. The National Safety Council has a free cell phone policy kit that will help you develop your policy. There is information to assist with understanding the issue, obtaining buy-in from leadership and educating employees. There is also a sample cell phone policy to use as a blueprint for your organization. Not having a policy opens your organization to potential liability. There are severe consequences if one of your employees is involved in a fatal accident while on company business and they are found to be distracted because they were using a cell phone at the time of the accident, especially if your organization does not have an established cell phone policy. There have been numerous documented lawsuits with multi-million dollar settlements awarded by juries to the victims involving distracted drivers.

Distracted Driving Laws
In December, 2011, the National Transportation Safety Board (NTSB) recommended each state adopt complete use bans of all portable electronic devices for all drivers, including banning the use of hands-free devices.

According to the Governors Highway Safety Association, currently no state bans all cell phone use. Current State cell phone use restrictions include:

  • 38 states and D.C. ban all cell phone use by novice drivers
  • 20 states and D.C. ban all cell phone use by school bus drivers
  • 14 states and D.C. ban hand-held devices
  • 46 states and D.C. ban all drivers from text messaging

For specific distracted driving laws in your area please consult your state agency.

The federal government has been proactive in banning the use of cell phones for its employees. President Obama issued an executive order in 2009 prohibiting federal employees from texting while driving on government business. The Federal Railroad Administration prohibited cell phone and electronic device use by employees in 2010. Also in 2010, the Federal Motor Carrier Safety Administration (FMCSA) and the Pipeline and Hazardous Materials Safety Administration (PHMSA) published rules prohibiting interstate truck and bus drivers and drivers who transport placardable quantities of hazardous materials from texting or using hand-held mobile phones while operating their vehicles.

Prevention Strategies
Distracted driving is a complicated issue and must be approached through multiple channels. Enacting laws banning the use of cell phones and increasing the penalties for violators will deter some, but not all drivers. Continued driver education and awareness are vital tools in changing drivers’ behaviors. Distracted driving is a learned behavior. There have been surveys where young drivers cite instances of observing their parents using their cell phones while driving. Education is the key to breaking the chain of distracted driving for future generations of drivers, which will ultimately make American roadways safer.

Consider the following to minimize distractions while driving:

  • Adjust mirrors, temperature controls and entertainment console when you first get into the vehicle
  • Input your destination into your GPS before embarking on your trip
  • Stow cell phones in the trunk or glove compartments
  • Turn off cell phones and have a programmed message informing the caller that you are driving and you will call them after you arrive at your destination
  • If you must use your cell phone, pull off the road to a safe area before making the call
  • If you stop for food, eat it while your vehicle is stopped
  • Do not perform personal grooming while driving
  • Review and familiarize yourself with driving directions and maps before leaving
  • Purchase and install GPS mounts that allow drivers to keep their heads up

Technology Solution
Because technology is responsible for many distracted-driving hazards, many are turning to technology to fix the problem. Examples include self-braking technology sensors that detect a potential collision with another obstacle and apply the brakes without any driver input. Other technology driven solutions include self-driving vehicles to take control of the vehicle if the driver becomes distracted, designing cell phone blocking technology inside a vehicle, heads up displays (HUD) and requiring automakers to make hands-free kits standard equipment. Also, roadway design countermeasures that may help include center and edge line rumble strips, striping, guardrails and median barriers to help reduce the distracted driver’s vehicle from straying too far from their lane and causing an accident.

Resources:

http://www.ghsa.org/html/stateinfo/laws/cellphone_laws.html

https://www.erieinsurance.com/-/media/files/distracteddrivinginfographic

http://www.cdc.gov/motorvehiclesafety/distracted_driving

https://www.osha.gov/Publications/3416distracted-driving-flyer

http://www.bls.gov/iif/oshwc/cfoi/cfch0013.pdf

http://www.pewinternet.org/fact-sheets/mobile-technology-fact-sheet

http://www.nhtsa.gov/Research/Crash+Avoidance/Distraction

Driver Distraction Program – NHTSA 2010

National Safety Council Injury Facts® 2015 Edition

http://www-nrd.nhtsa.dot.gov/Pubs/811719.pdf

https://www.fmcsa.dot.gov/driver-safety/distracted-driving

https://www.federalregister.gov/articles/2011/02/28/2011-4273/hazardous-materials-limiting-the-use-of-electronic-devices-by-highway

http://www.distraction.gov/take-action/employers.html

(Rev. 5/2016)


The information contained in this article is intended for general information purposes only and is based on information available as of the initial date of publication. No representation is made that the information or references are complete or remain current. This article is not a substitute for review of current applicable government regulations, industry standards, or other standards specific to your business and/or activities and should not be construed as legal advice or opinion. Readers with specific questions should refer to the applicable standards or consult with an attorney.


Zika Virus Transmission Symptoms and Prevention – Quick Tips

The Centers for Disease Control and Prevention (CDC) describes the Zika virus as being spread to people primarily through the bite of infected mosquitos. The World Health Organization (WHO) traces the origins of Zika back to its discovery in Uganda in 1947. From the 1960s to the 1980s, human infections were found across Africa and Asia. These cases typically resulted in mild illnesses.

According to the WHO, the first widespread outbreak of Zika-related infections occurred in 2007 on the western Pacific island of Yap. In 2013 to 2014, there were Zika outbreaks in French Polynesia. In May 2015, Brazil reported its first case of Zika infection. As of March 2017, there were 5,158 reported cases of Zika infections in the United States, according to the CDC. Of these cases, 4,861 were individuals who were infected during travels outside the country. Of the remaining cases, 222 were linked to mosquito- borne transmission and 75 were traced to other routes of transmission (sexual, congenital, and laboratory).

The major concern regarding the Zika virus is its documented link to microcephaly and as well as its potential link to Guillain-Barré syndrome (GBS). After extensive research, in mid-April of 2016, the CDC confirmed that the Zika virus causes microcephaly (a serious birth defect in which a baby’s head is smaller than expected compared to babies of the same sex and age). Because of this link, as well concerns that the Zika virus can lead to other poor pregnancy outcomes in babies of infected mothers, the CDC recommends special precautions for women who are pregnant or trying to become pregnant.

The CDC describes GBS as a rare disorder in which a person’s own immune system damages the nerve cells, causing muscle weakness and sometimes paralysis. Symptoms can last a few weeks or several months. Most infected with GBS make a full recovery but some suffer permanent damage. In rare instances, people have died from GBS. The CDC is working with medical partners around the world to better understand the connection between the Zika virus and GBS, but at the present time they have not confirmed a link between the two.

TRANSMISSION

The CDC reports that the most common method for the spread of Zika virus is through the bite of an infected Aedes species mosquito. This is the same mosquito that spreads the dengue and chikungunya viruses. According to the CDC, these mosquitos typically lay eggs in and near standing water in things like buckets, bowls, animal dishes, flowerpots and vases. They prefer to bite people, and live both indoors and outdoors near people. While Aedes mosquitos are aggressive daytime biters, they are also active at night. A mosquito becomes infected when it feeds on a person who has the virus. Then the infected mosquito can spread the infection to the individuals it bites after becoming infected. Zika virus is also transferred through sexual contact and blood transfusions.

SYMPTOMS & TREATMENT

According to the CDC, many people infected with Zika virus won’t have symptoms or will only have mild symptoms. The most common symptoms of Zika infection are a fever, rash, joint pain and conjunctivitis (red eyes). Muscle pain and headaches are other common symptoms. These symptoms are generally very mild and can last from a couple days to a week. Those infected normally don’t become ill enough to go to the hospital. Deaths from Zika are rare. Currently, there’s no vaccine to prevent Zika infections nor are there specific medications for treatment. The CDC advises treating the symptoms of Zika infections. In addition to getting plenty of rest, the following actions are recommended:

  • Drink fluids to prevent dehydration.
  • Take medicine such as acetaminophen (Tylenol®) to relieve fever and pain.
  • Do not take aspirin and other non-steroidal anti-inflammatory drugs until dengue can be ruled out.
  • If taking medicine for another medical condition, talk to your healthcare provider before taking additional medication.

Also the CDC stresses the importance of mosquito bite prevention for those infected with Zika. Bite prevention helps prevent the transfer of Zika.

PREVENTION

For those who are in an area where the Zika virus is present, the CDC says:

  • Wear long-sleeved shirts and long pants.
  • Stay in places with air conditioning or ones that use window and door screens to keep mosquitos outside.
  • Sleep under a mosquito bed net if you are overseas or outside and are not able to protect yourself from mosquito bites.
  • Use Environmental Protection Agency (EPA)-registered insect repellents. When used as directed, EPA-registered insect repellents have been proven safe and effective, even for pregnant and breast- feeding women.
    • Always follow the product label instructions.
    • Reapply insect repellent as directed.
    • Do not spray repellent on the skin under clothing.
    • If you are also using sunscreen, apply sunscreen before applying insect repellent.
  • If you have a baby or child:
    • Do not use insect repellent on babies younger than two months of age.
    • Dress children in clothing that covers their arms and legs, or
    • Cover cribs, strollers and baby carriers with mosquito netting.
    • Do not apply insect repellent to a child’s hands, eyes, mouth and cut or irritated skin.
    • Adults: Spray insect repellent on your hands and then apply to a child’s face.
  • Treat clothing and gear with permethrin or purchase permethrin-treated items.
    • Treated clothing remains protective after multiple washings. See product information to learn how long the protection will last.
    • If treating items yourself, follow the product instructions carefully.
    • DO NOT use permethrin products directly on skin. They are intended to treat clothing.

In addition to recommending EPA-Registered insect repellants, the CDC provides additional guidance on mosquito repellants to aid in the selection process. They specifically call out products containing DEET, picaridin, IR3535 and some oil of lemon eucalyptus and para-menthane-diol as products that provide longer lasting protection. They also explain that the EPA registration means that EPA does not expect the product to cause adverse effects to human health or the environment when used according to the label. Also under prevention, the CDC makes reference to the importance of the elimination of mosquito breeding sites like containers and standing water. WHO addresses this important preventative measure by stating, “It is also important to empty, clean or cover containers that can hold even small amounts of water such as buckets, flowerpots or tires, so that places where mosquitoes can breed are removed.” The CDC’s Mosquito Control page contains additional guidance in this area.

OSHA/NIOSH GUIDANCE FOR PROTECTING WORKERS

In early May, 2016, the Occupational Safety and Health Administration (OSHA) and the National Institute for Occupational Safety and Health (NIOSH), released their Interim Guidance for Protecting Workers from Occupational Exposure to Zika Virus. It contains Zika prevention recommendations for the employers of outdoor workers. It also offers guidance for workers who may be at risk of Zika exposure, and provides direction on the selection and use of insect repellants.

CDC’S PREVENTION GUIDELINES FOR PREGNANCY

Currently, the CDC recommends that pregnant women in any trimester should consider postponing travel to any area where Zika virus is spreading. If travel cannot be postponed, officials advise individuals to consult with their healthcare provider and strictly follow the CDC’s steps to prevent mosquito bites during the trip. For women trying to become pregnant, the CDC recommends that both the women and their male partners talk with their healthcare provider before traveling to areas with Zika. Because sexual transmission is possible, both men and women should strictly follow the CDC’s steps to help prevent mosquito bites during the trip.

Commonly Asked Questions

Q: Where can I get more information on Zika virus?

A: Because this is an evolving situation, each subsection heading within this document is a link to the most current information on the respective subject matter. In addition, both the CDC and WHO have Zika virus landing pages where additional information and updates reside.

Q: How can I determine whether the country I’m traveling to poses a Zika virus concern?

A: The CDC is updating its Zika virus travel page. This is a good resource regarding the latest travel advisories and information.

References and Sources for More Information

CDC’s Zika virus resource center

WHO’s Zika virus resource center

CDC’s Mosquito Bite Prevention for Travelers

CDC’s Avoiding Bug Bites

CDC’s Insect Repellant Use & Safety

CDC’s Mosquito Control

OSHA/NIOSH Interim Guidance for Protecting Workers from Occupational Exposure to Zika Virus


The information contained in this article is intended for general information purposes only and is based on information available as of the initial date of publication. No representation is made that the information or references are complete or remain current. This article is not a substitute for review of current applicable government regulations, industry standards, or other standards specific to your business and/or activities and should not be construed as legal advice or opinion. Readers with specific questions should refer to the applicable standards or consult with an attorney.


Occupational Asthma – Quick Tips

Occupational asthma (OA) is an illness in which the breathing passages shrink, swell or become inflamed or congested as a result of exposure to irritants in the workplace. There are two types of occupational asthma: immunologic asthma and irritant-induced asthma.

Immunologic asthma develops after a variable period of time in which a person is exposed to an agent and has become sensitized. (An agent can be an animal protein, a plant protein, a polysaccharide or a chemical.)

Irritant-induced asthma occurs after an intense exposure to an irritating dust, mist, vapor or fume. According to the Occupational Safety and Health Administration, an estimated 11 million workers in various industries and occupations are potentially exposed to at least one of over 200 agents known to be associated with the development of occupational asthma.

Asthma, whether job-related or not, is characterized by wheezing, shortness of breath, chest tightness and coughing. Additional signs may include itching, burning, watery eyes, congestion, runny nose, scratchy throat, nausea, headache and fatigue. Work-related asthma symptoms do not always occur in the workplace. The following are several situations that may help diagnose occupational asthma:

  • You have no symptoms away from work, but shortly after arriving at work your symptoms begin
  • Your symptoms begin a few hours after coming home, and then are gone by the next morning
  • Your symptoms increase as you continue through the workweek
  • Your symptoms increase the longer you work at your present place of employment
  • You have no symptoms when on vacation

There are primarily three components to occupational asthma:

  • The substance itself, such as dust, fumes and vapors
  • The sensitivity of the individual—even though anyone can develop occupational asthma, people with pre-existing asthma and those with other allergies are at higher risk.
  • The amount of exposure to an agent that provokes occupational asthma

Once occupational asthma is suspected, the individual should seek medical help in diagnosing the condition. An allergist, an occupational medicine specialist or a doctor who treats lung disease can perform a thorough physical examination and do a medical history report that explores:

  • What kind of work the individual has done
  • What types of exposures the individual may have experienced
  • Which symptoms the individual has had
  • When, how often and how severely the symptoms have occurred

The physical exam may include a physical examination of the chest if the appointment is several hours after the exposure has taken place. Pulmonary function tests that are performed both before and after the work shift can show how job-related exposures have affected the airways. Laboratory tests on blood and sputum may also help in determining a diagnosis of occupational asthma. A challenge test, in which the individual is required to inhale suspected agents, may be necessary for an accurate diagnosis.

OSHA does not have a standard that specifically applies to occupational asthma; Occupational asthma is addressed in specific standards for recordkeeping and the general industry. The following standards can be used to address safety from occupational asthma causal agents:

  • OSHA Act of 1970, general duty clause 5(a)(1)
  • OSHA 29 CFR 1904, recording and reporting occupational injuries and illnesses
  • OSHA 29 CFR 1910.134, respiratory protection standard

Commonly Asked Questions

Q: How can occupational asthma be treated?

A: The most effective treatment for occupational asthma is to reduce or eliminate exposure to symptom-producing substances. Medication may be prescribed for workers who can’t prevent occasional exposure. In addition to medication, physical therapy and breathing aids may be needed to relieve symptoms of advanced occupational asthma that has caused airway damage.

Q: Once diagnosed with occupational asthma, will I always have it?

A: Occupational asthma is usually reversible; however, continued exposure to the causal agents can lead to permanent lung damage.

Q: Can occupational asthma be prevented?

A: In industries and environments that expose employees to causal agents, changes in the manufacturing process, use of engineering controls and changes in work practices can be used to reduce or eliminate the agent(s) or the exposure to the agent(s).

Sources

OSHA Quick Takes on Occupational Asthma

The American Academy of Allergy Asthma & Immunology
555 East Wells Street
Suite 1100
Milwaukee, WI 53202
Phone: (414) 272-6071
Patient Information and Physician Referral Line: 1-800-822-2762

The Occupational Safety and Health Administration

Asthma and Allergy Foundation of America
1233 20th Street NW Suite 402
Washington, D.C. 20036
Phone: (202) 466-7643 or (800) 727-8462 Fax: (202) 466-8940


The information contained in this article is intended for general information purposes only and is based on information available as of the initial date of publication. No representation is made that the information or references are complete or remain current. This article is not a substitute for review of current applicable government regulations, industry standards, or other standards specific to your business and/or activities and should not be construed as legal advice or opinion. Readers with specific questions should refer to the applicable standards or consult with an attorney.


Thermal Imaging Cameras Explained – Quick Tips

Thermal imaging cameras are devices that translate thermal energy (heat) into visible light in order to analyze a particular object or scene. The image produced is known as a thermogram and is analyzed through a process called thermography. Thermal imaging cameras are sophisticated devices that process the captured image and display it on a screen. These images can be used for immediate diagnosis or processed through specialized software for further evaluation, accuracy and report output. Thermal imaging cameras take measuring temperature to the next level; instead of getting a number for the temperature you get a picture showing the temperature differences of a surface.

What Do Thermal Imaging Cameras See?

Visible light is what we see around us every day. It is the only part of the electromagnetic spectrum that we can see. Visible light only takes up a small area in the electromagnetic spectrum and infrared radiation (IR) represents a larger percentage. If we want to see what’s going on in other parts of the spectrum we need specialized equipment.

All objects absorb, reflect and sometimes transmit energy at different levels. Different materials will give off heat or cold energy at different rates. It’s this energy that can be detected by infrared equipment and displayed as images.

Thermal Imaging Camera Applications and Uses

Originally developed for military use during the Korean War, thermal imaging cameras have migrated into other fields and have found many uses. Firefighters use them to see through smoke, find people and localize hotspots of fires. Law enforcement uses the technology to manage surveillance activities, locate and apprehend suspects, investigate crime scenes and conduct search and rescue operations. Power line maintenance technicians locate overheating joints and parts to eliminate potential failures. Where thermal insulation becomes faulty, building construction technicians can see heat leaks to improve the efficiencies of cooling or heating. Physiological activities, such as fever, in human beings and other warm-blooded animals can also be monitored with thermographic imaging. They are also common tools used by home inspectors.

Thermal Imaging Camera Features

Thermal imaging cameras can be purchased with the bare minimum of features that only read the temperature of the fixed center crosshairs on the display or with multiple features that allow the user to select multiple moveable crosshairs and draw comparisons between them to show the high, low and average temperatures on the display. Thermal imaging cameras have user-selectable multiple color palettes, such as black/white, iron or rainbow. The iron palette is most commonly used by home inspectors. The black/white palette helps identify details on an image, and the rainbow palette has the best thermal sensitivity for displaying the differences in temperature. See sample images below of some color palettes.

Iron palette of fuse bus bar

Black/white/gray palette

Rainbow palette


More sophisticated cameras may include:

A color alarm feature that allows the user to select a temperature. The camera will only display a color thermal image of anything that is either above or below the selected temperature.

A picture-in-picture feature that will display a color thermal image (which is a quarter of the size of the display) inside a standard digital image. Temperature readings are limited to the thermal portion of this feature.

A fusion or blending feature allows the user to blend either the maximum, minimum or average temperature of the thermal image with a standard digital image.


What to Look for in a Thermal Imaging Camera

There are a number of components that contribute to both the quality and the cost of a thermal imaging camera. The two most important factors are the detector resolution and the thermal sensitivity.

The detector resolution describes the number of pixels. The most common resolutions are 160 x 120, 320 x 240 and 640 x 480 pixels. A 320 x 240 detector produces an image composed of 76,800 pixels. Since each pixel has a temperature associated with it that is 76,800 temperature data points. Higher resolutions also produce visibly clearer images.

Thermal sensitivity is the smallest temperature difference the camera can detect. A sensitivity of 0.05° means the camera can distinguish between two surfaces with only a five-hundredths of a degree temperature difference.

Another important factor to consider is the thermal imaging camera’s temperature range. The range tells what the minimum and maximum temperatures are that the camera can measure (-4°F to 2200°F is typical).

To obtain the best thermal image to analyze, there are four adjustments that can be made to most cameras: focus, emissivity setting changes, reflective temperature setting changes and thermal tuning. Each of these adjustments must be considered when selecting a thermal imaging camera.

Just like a standard camera, the lens of the thermal imaging camera needs to be focused to enhance the clarity of the image. Most cameras can be focused by twisting the lens. More sophisticated cameras have a push-button focus.

Emissivity is the amount of radiation emitted from an object compared to that of a perfect emitter of radiation when both are at the same temperature. Adjusting the emissivity is important when taking temperature measurements or when comparing the temperatures of two different objects. Not all cameras allow the user to input reflective temperature.

The reflective temperature setting allows the user to compensate for surrounding objects’ temperature reflecting on an object. Just like emissivity, reflective temperature is important when taking temperature measurements or comparing two objects’ temperatures. Not all cameras allow the user to input reflective temperature.

Thermal tuning the camera involves adjusting the span or temperature range that the camera sees while in manual viewing mode. Manual mode allows the user to adjust the span to a desired range, and the camera will always display this temperature range. Using the manual mode is best when used to bring out temperature differences of the object being viewed.

Thermal Imaging Camera Limitations

Because thermal energy can be reflected off shiny surfaces, thermal imaging cameras cannot see through glass. Thermal imaging cameras can be used to gather information about the inside of a wall, but they cannot see through walls. It is also important to know that thermal imaging cameras should not be used as the only deciding factor that a problem exists. Using other instruments should always be used to confirm the problem.

Commonly Asked Questions

Q: What is the biggest difference between a $3000 and $10,000 camera?

A: The biggest difference is typically resolution. The higher the resolution, the better the picture clarity. This translates to a better picture at a greater distance as well, similar to the megapixels of a regular digital camera.

Q: Can thermal imaging cameras see through objects?

A: No. Thermal imaging cameras only detect heat; they will not “see” through solid objects, clothing, brick walls, etc. They see the heat coming off the surface of the object.

Q: Is there a difference between night vision and thermal imaging?

A: Yes. Night vision relies on at least a very low level of light (less than the human eye can detect) in order to amplify it so that it can produce a picture. Night vision will not work in complete darkness whereas thermal imaging will because it only “sees” heat.

Q: Can rain and heavy fog limit the range of thermal imaging cameras?

A: Yes. Rain and heavy fog can severely limit the range of thermal imaging cameras because light scatters off of droplets of water.

Sources

Thermal Imaging Guidebook for Industrial Applications

Flir/Extech Thermal Cameras

Fluke Cameras


The information contained in this article is intended for general information purposes only and is based on information available as of the initial date of publication. No representation is made that the information or references are complete or remain current. This article is not a substitute for review of current applicable government regulations, industry standards, or other standards specific to your business and/or activities and should not be construed as legal advice or opinion. Readers with specific questions should refer to the applicable standards or consult with an attorney.


Workplace Violence/Shooting Meeting Kit – Spanish

QUÉ ESTÁ EN RIESGO

La violencia en el lugar de trabajo se produce con demasiada frecuencia en Estados Unidos. La violencia laboral se define como cualquier amenaza, comportamiento perturbador, intimidación, agresión física o acto de violencia en el lugar de trabajo, incluido el homicidio. El homicidio en el lugar de trabajo es actualmente la cuarta causa de muerte en el trabajo. Los tiroteos en el lugar de trabajo son la primera causa de homicidios en el lugar de trabajo.

CUÁL ES EL PELIGRO

VIOLENCIA EN EL LUGAR DE TRABAJO – QUIÉN ESTÁ EN RIESGO

El sector sanitario es uno de los más susceptibles a la violencia laboral. Otros sectores vulnerables son la educación, el transporte y el comercio minorista.

Muchos factores de riesgo en el lugar de trabajo pueden aumentar la probabilidad de violencia en el trabajo. 

  • Intercambiar dinero con el público.
  • Trabajar con personas volátiles e inestables.
  • Trabajar solo, en un grupo pequeño o en una zona aislada.
  • Prestar servicios o cuidados.
  • Trabajar en un establecimiento que sirve alcohol.
  • Trabajar hasta altas horas de la noche o en una zona con un alto índice de delincuencia.
  • Trabajar como conductor de reparto o de taxi, profesional de la salud, representante de atención al cliente, trabajador de servicios públicos o agente de la ley.

COMO PROTEGERSE

CÓMO RESPONDER DURANTE UNA SITUACIÓN DE TIRADOR ACTIVO

Evacúe. Póngase a salvo lo antes posible. Conozca el camino que debe seguir para salir del edificio o de la zona y también una ruta alternativa. Deje sus pertenencias. Intente ayudar a los demás si puede, pero no espere a que nadie evacúe. Asegúrese de que sus manos están libres de cualquier objeto y siga las instrucciones de los agentes si alguno está respondiendo a la situación.

Escóndase. Si no puede escapar, busque un lugar para esconderse del tirador. El lugar donde se esconda no debe obstaculizar su movimiento si necesita escapar y debe protegerse si se producen disparos en su dirección. Permanezca en silencio. Cierre o bloquee las puertas cuando sea posible.

Actúe contra el tirador. Sólo cuando su vida esté en peligro inminente y no tenga otras opciones, el último recurso para interrumpir o incapacitar al tirador. Hágalo actuando de la forma más agresiva posible hacia él/ella, lance objetos en su dirección, grite y comprométase con sus acciones.

Tome siempre en serio cualquier amenaza o comportamiento extraño de un empleado o visitante en su lugar de trabajo. Informe de cualquier actividad sospechosa a un supervisor, a seguridad o llame a la policía. Sólo esto puede evitar una situación de tirador activo. Nadie quiere pensar en la posibilidad de que uno de estos sucesos ocurra en su lugar de trabajo, pero es importante tener un plan. Saber cómo responder aumentará en gran medida las posibilidades de sobrevivir a un tiroteo en el lugar de trabajo.

Un tirador activo/intruso hostil es un individuo que se dedica activamente a matar o a intentar matar a personas en un área confinada y poblada por cualquier medio, incluyendo, pero no limitándose a las armas de fuego (las más utilizadas), armas blancas, vehículos o cualquier herramienta que en la circunstancia en la que se utiliza constituye una fuerza física mortal. En la mayoría de los casos, no hay un patrón o método para su selección de víctimas. La mayoría de las situaciones de tiradores activos son imprevisibles, evolucionan rápidamente y terminan en cuestión de minutos.

HAGA QUE SUS PROGRAMAS DE PREVENCIÓN DE LA VIOLENCIA EN EL LUGAR DE TRABAJO FUNCIONEN

Siete pasos por seguir para asegurarse de que la capacitación en prevención de la violencia en el lugar de trabajo sea eficaz:

  1. Analice su lugar de trabajo
  2. Cree un entorno de apoyo
  3. Ofrezca capacitación en comunicación y empatía
  4. Establecer una política clara sobre la violencia en el lugar de trabajo
  5. Comprometerse con un lugar de trabajo no violento
  6. Capacitar a los empleados para que reconozcan las señales de advertencia
  7. Crear un plan de acción, compartirlo con los empleados y practicarlo

CONCLUSIÓN

Tome siempre en serio cualquier amenaza o comportamiento extraño de un empleado o visitante en su lugar de trabajo. Informe de cualquier actividad sospechosa a un supervisor, a seguridad o llame a la policía. Sólo esto puede evitar una situación de tirador activo. Nadie quiere pensar en la posibilidad de que uno de estos sucesos ocurra en su lugar de trabajo, pero es importante tener un plan. Saber cómo responder aumentará en gran medida las posibilidades de sobrevivir a un tiroteo en el lugar de trabajo.


Workplace Violence/Shooting Meeting Kit

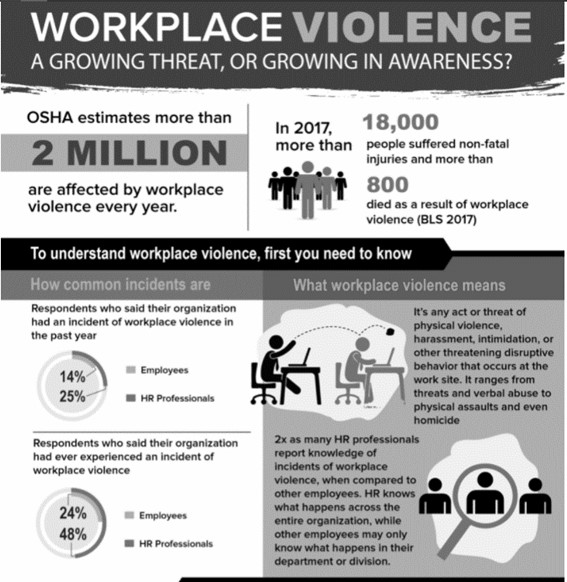
Workplace violence occurs all too often in the United States. Workplace violence is defined as any threat, disruptive behaviors, intimidation, physical aggression, or act of violence in the workplace including homicide. Homicide in the workplace is currently the fourth leading cause of death on the job. Workplace shootings are the number one cause of workplace homicides.

WORKPLACE VIOLENCE – WHO IS AT RISK

The health care industry is one of the most susceptible to workplace violence. Some of the other vulnerable industries include education, transportation and retail.

Many workplace risk factors can increase the likelihood of violence at work. 

  • Exchange money with the public.
  • Work with volatile, unstable people.
  • Work alone, in a small group or an isolated area.
  • Provide services or care.
  • Work in an establishment that serves alcohol.
  • Work late at night or in an area with a high crime rate.
  • Work as delivery or taxi drivers, health care professionals, customer service reps, public service workers or law enforcement officers.

HOW TO RESPOND DURING AN ACTIVE SHOOTER SITUATION

Evacuate. Get yourself to safety as quickly as possible. Know the path you need to take to exit the building or area and an alternative route as well. Leave your belongings behind. Try to help others if you can, but do not wait on anyone to evacuate. Make sure your hands are free of any objects and follow officers’ instructions if any are responding to the situation.

Hide out. If you cannot escape, find a place to hide from the shooter. The hiding spot should not hinder your movement if you need to escape and should protect you if shots are fired your way. Remain quiet. Lock or block doors when possible.

Take action against the shooter. Only when your life is in imminent danger and you have no other choices, the last resort to disrupt or incapacitate the shooter. Do so by acting aggressively as possible towards them, throw items in their direction, yell, and commit to your actions.

Always take any threat or odd behavior by an employee or visitor in your workplace seriously. Report any suspicious activity to a supervisor, security, or call the police. This alone can prevent an active shooter situation. No one wants to give thought to the possibility of one of these events occurring in their workplace, but it is important to have a plan. Knowing how to respond will greatly increase the chance to survive a workplace shooting.

An active shooter/ hostile intruder is an individual actively engaged in killing or attempting to kill people in a confined and populated area by any means including but not limited to firearms (most frequently used), bladed weapons, vehicles, or any tool that in the circumstance in which it is used constitutes deadly physical force. In most cases, there is no pattern or method to their selection of victims. Most active shooter situations are unpredictable, evolve quickly, and are over within minutes.

MAKE YOUR WORKPLACE VIOLENCE PREVENTION PROGRAMS WORK

Seven steps to take to make sure your workplace violent prevention training is effective:

  1. Analyze Your Workplace
  2. Create A Supportive Environment
  3. Offer Communication and Empathy Training
  4. Establish A Clear Workplace Violence Policy
  5. Commit to A Non-Violent Workplace
  6. Train employees to recognize warning signs
  7. Create an action plan, share it with employees, and practice

FINAL WORD

Always take any threat or odd behavior by an employee or visitor in your workplace seriously. Report any suspicious activity to a supervisor, security, or call the police. This alone can prevent an active shooter situation. No one wants to give thought to the possibility of one of these events occurring in their workplace, but it is important to have a plan. Knowing how to respond will greatly increase the chance to survive a workplace shooting.


Take 4 Seconds for Safety Meeting Kit

WHAT IS “FOUR SECONDS TO SAFETY”? 

Job Hazard Analysis can  be used to train employees in the hazards associated with a task and what control measures should be practiced. The same principle of these risk assessments can be done nearly anywhere. Simply take a four-second “reset.” Taking four seconds before starting a new a task has been shown to reduce the probability of an incident by more than 90% versus not taking the four seconds.

THE FOUR SECONDS 

Four seconds is all it takes. If you are taking chances or simply moving from job to job, you will eventually get injured. Get in the habit of taking four seconds and you will significantly reduce your chance of injury while greatly increasing your chances of an injury free day, week, month, and career.

It is usually not the task itself but some small thing you did not anticipate that causes the incident.

  • You did not notice the debris on the floor where you are standing.
  • You did not notice the machine switch is too close to your leg.
  • You did not realize how heavy your finished product might be, and how far you have to carry it.

It is easy to imagine the different tasks we do every day and how this applies. For example, getting on a forklift and scanning your surroundings. This is the “reset”.

THE DERIVATIVE 

Originally introduced on the Canadian National Railway project, this tool was part of a strategy to reduce the number of very serious incidents, including amputations. They found employees knew the rules and procedures to do the job without getting injured but simply weren’t focused. Even well-rested employees were getting caught up in daily routines and found themselves daydreaming or thinking about other things.

Take A Few Seconds and Try The Four-Second Reset. 

  • Stop long enough to think about what you are about to do.
  • Think about how you are going to do it. Is it the safest way? If not, how can you do it better?
  • Act in the safest way possible.
  • If you can get yourself and your coworkers to think for only a few seconds before doing anything, you can prevent a lot of injuries.

Example

When getting into a vehicle, take a quick look at your surroundings. Change your thinking from where you are going to focusing on the area, road conditions, and other vehicles around you. “Reset” your frame of mind, and by getting in this habit, you will significantly reduce your chances of injury.

Like the example illustrates, you may have completed a particular task thousands of times, and believe you can do it with your eyes closed. But usually, the task itself isn’t what causes an accident. It’s typically something you don’t anticipate. You may not see the debris in front of the tool you were going to use, notice that someone has placed an object on the part you were about to pick up, or realize how heavy a piece was that you were asked to carry.

Get in this habit of taking four seconds and you significantly reduce your chance of injury. If you get into the habit of taking chances or simply cruising from job to job, you will eventually be injured.

This four second “reset” as an excellent way to refocus on the job at hand. And we believe that this is one very effective method to prevent injury on and off the job.

APPLY STOP, THINK AND ACT: FOR SAFETY’S SAKE 

These steps take only moments to implement, but offer lifelong benefits:

  1. Start with yourself. Develop your own Stop, Think, Act habit so you are keeping yourself safe and constantly demonstrating the desired safe behavior.
  2. Build it into orientation training, so that everyone hears the message from the beginning.
  3. Reinforce it during your weekly or daily meetings. These meetings are an ideal opportunity for everyone to discuss hazards and how to stay safe.
  4. Coach workers one on one. Before someone starts a new task, work through the Stop, Think, Act process together. Watch for people acting impulsively, they may not take into account what could go wrong. They start at point “A” and don’t think of consequences that may occur at points “B” and “C”.

FINAL WORD

One of the best safety tools is the Field Level Risk Assessment (FLRA) or Job Hazard Analysis (JHA), which encourages people to stop and think about the risks associated with a task, greatly reducing frequency and severity of injuries. This tool of risk assessment is incorporated in the simple four second “reset”.


Take 4 Seconds for Safety Meeting Kit – Spanish

QUÉ ESTÁ EN RIESGO

¿QUÉ ES “CUATRO SEGUNDOS PARA LA SEGURIDAD”? 

El análisis de riesgos laborales puede utilizarse para formar a los empleados sobre los peligros asociados a una tarea y las medidas de control que deben practicarse. El mismo principio de estas evaluaciones de riesgos puede realizarse casi en cualquier lugar. Basta con tomarse cuatro segundos de “reinicio”. Se ha demostrado que tomarse cuatro segundos antes de comenzar una nueva tarea reduce la probabilidad de que se produzca un incidente en más de un 90% frente a no tomarse los cuatro segundos.

CUÁL ES EL PELIGRO

LOS CUATRO SEGUNDOS 

Cuatro segundos es todo lo que se necesita. Si se arriesga o simplemente va de un trabajo a otro, acabará lesionándose. Acostúmbrese a tomarse cuatro segundos y reducirá significativamente la posibilidad de lesionarse, al tiempo que aumentará en gran medida sus posibilidades de tener un día, una semana, un mes y una carrera sin lesiones.

Por lo general, no es la tarea en sí misma, sino algún pequeño detalle que no has previsto el que provoca el incidente.

  • No se ha dado cuenta de que hay residuos en el suelo donde está parado.
  • No se ha dado cuenta de que el interruptor de la máquina está demasiado cerca de su pierna.
  • No te diste cuenta de lo pesado que puede ser el producto terminado y de la distancia que tienes que cargar.

Es fácil imaginar las diferentes tareas que hacemos cada día y cómo se aplica esto. Por ejemplo, subirse a una carretilla elevadora y escudriñar su entorno. Esto es el “reset”.

COMO PROTEGERSE

EL DERIVADO 

Introducida originalmente en el proyecto Canadian National Railway, esta herramienta formaba parte de una estrategia para reducir el número de incidentes muy graves, incluidas las amputaciones. Descubrieron que los empleados conocían las normas y los procedimientos para hacer el trabajo sin lesionarse, pero simplemente no estaban concentrados. Incluso los empleados más descansados se dejaban llevar por la rutina diaria y se encontraban soñando despiertos o pensando en otras cosas.

Tómese unos segundos y pruebe el reinicio de cuatro segundos. 

  • Deténgase lo suficiente para pensar en lo que va a hacer.
  • Piense en cómo lo va a hacer. ¿Es la forma más segura? Si no lo es, ¿cómo puede hacerlo mejor?
  • Actúe de la manera más segura posible.
  • Si consigue que usted y sus compañeros de trabajo piense sólo unos segundos antes de hacer algo, podrás evitar muchas lesiones.

Ejemplo

Al subir a un vehículo, eche un vistazo rápido a su entorno. Cambie su pensamiento de hacia dónde va a centrarse en la zona, las condiciones de la carretera y los demás vehículos que le rodean. “Reinicie” su estado de ánimo y, si adquiere este hábito, reducirá significativamente las posibilidades de sufrir lesiones.

Como ilustra el ejemplo, es posible que hayas realizado una determinada tarea miles de veces y creas que puedes hacerla con los ojos cerrados. Pero, por lo general, la tarea en sí no es lo que provoca un accidente. Suele ser algo que no has previsto. Es posible que no veas los escombros que hay delante de la herramienta que ibas a utilizar, que te des cuenta de que alguien ha colocado un objeto sobre la pieza que ibas a recoger o que te des cuenta de lo pesada que era una pieza que tenías que cargar.

Si adquieres el hábito de tomarte cuatro segundos, reducirás significativamente las posibilidades de lesionarte. Si adquieres el hábito de arriesgarte o de ir simplemente de un trabajo a otro, acabarás lesionándote.

Este “reinicio” de cuatro segundos es una forma excelente de volver a centrarse en el trabajo que se está realizando. Y creemos que es un método muy eficaz para prevenir las lesiones dentro y fuera del trabajo.

APLICAR PARAR, PENSAR Y ACTUAR POR EL BIEN DE LA SEGURIDAD 

Estos pasos sólo requieren unos instantes de aplicación, pero ofrecen beneficios para toda la vida:

  1. Empiece por usted mismo. Desarrolle su propio hábito de parar, pensar y actuar para mantenerse seguro y demostrar constantemente el comportamiento seguro deseado.
  2. Inclúyalo en la formación de orientación, para que todo el mundo escuche el mensaje desde el principio.
  3. Reforzarlo durante las reuniones semanales o diarias. Estas reuniones son una oportunidad ideal para que todos hablen de los peligros y de cómo mantenerse seguros.
  4. Entrene a los trabajadores uno a uno. Antes de que alguien comience una nueva tarea, trabajen juntos en el proceso de parar, pensar y actuar. Vigile a las personas que actúan de forma impulsiva, ya que pueden no tener en cuenta lo que podría salir mal. Empiezan en el punto “A” y no piensan en las consecuencias que pueden producirse en los puntos “B” y “C”.

CONCLUSIÓN

Una de las mejores herramientas de seguridad es la Evaluación de Riesgos a Nivel de Campo (FLRA) o Análisis de Peligros del Trabajo (JHA), que anima a las personas a detenerse y pensar en los riesgos asociados a una tarea, reduciendo en gran medida la frecuencia y la gravedad de las lesiones. Esta herramienta de evaluación de riesgos está incorporada en el sencillo “reset” de cuatro segundos.


Take 4 Seconds for Safety Stats and Facts

FACTS

  1. In most industries people tend to look for “things” to blame when an accident happens, because it’s easier than looking for “root causes,”.
  2. Unsafe acts of employees are often known by management and that they are often allowed to proceed without remedial action. 
  3. Although employers are required by law to provide a safe and healthful workplace, it is up to employees to be aware of your work environment and follow safe work practices. 
  4. Most accidents and injuries emanating from workplaces are attributed to workers’ unsafe behaviors, which are also a reflection of system deficiency and hazardous work-environment.
  5. Incomplete incident investigations support the often quoted and misapplied information that incidents are overwhelmingly caused by unsafe acts.

STATS

  • A scientific approach indicated more than 80 years ago that 88 percent of accidents were caused by unsafe acts.
  • All total, on average 275 workers die each day due to job injuries and illnesses.
  • Unsafe acts account for approximately 80% of all industrial accidents. This is always dealt with after unsafe conditions as planning to train the employees on how to act safely is necessary. 
  • Even though it has been estimated that 80% of incidents or more result from workers’ actions or behaviors, at least 70% of these actions are likely caused by deficiencies not in humans but rather in management systems and work conditions.
  • Accident statistics from all industries have been compiled over the years by insurance companies and governmental agencies. The results of analyzing hundreds of thousands of accidents reveal 85 to 98 percent of all accident causes result from the unsafe acts of employees. 
  • Most work-related injuries are the result of unsafe acts of workers.
  • 80 out of every 100 accidents are the fault of the person involved in the incident. Unsafe acts cause four times as many accidents and injuries as unsafe conditions.
  • The act of re-focusing for a mere four seconds has been shown to reduce the probability of an injury or incident by more than 90%.


Take 4 Seconds for Safety Stats and Facts – Spanish

HECHOS

  1. En la mayoría de los sectores, la gente tiende a buscar “cosas” a las que culpar cuando se produce un accidente, porque es más fácil que buscar las “causas fundamentales”.
  2. Los actos inseguros de los empleados suelen ser conocidos por la dirección y a menudo se les permite seguir adelante sin tomar medidas correctivas. 
  3. Aunque los empleadores están obligados por ley a proporcionar un lugar de trabajo seguro y saludable, depende de los empleados ser conscientes de su entorno de trabajo y seguir las prácticas de trabajo seguras. 
  4. La mayoría de los accidentes y lesiones que se producen en los lugares de trabajo se atribuyen a los comportamientos inseguros de los trabajadores, que también son un reflejo de la deficiencia del sistema y del ambiente de trabajo peligroso.
  5. Las investigaciones incompletas de los incidentes corroboran la información, a menudo citada y mal aplicada, de que los incidentes están causados en su inmensa mayoría por actos inseguros.

ESTADÍSTICAS

  • Un enfoque científico indicó hace más de 80 años que el 88% de los accidentes estaban causados por actos inseguros.
  • En total, una media de 275 trabajadores muere cada día debido a lesiones y enfermedades laborales.
  • Los actos inseguros representan aproximadamente el 80% de todos los accidentes laborales. Esto se trata siempre después de las condiciones de inseguridad, ya que es necesario planificar la formación de los empleados sobre cómo actuar con seguridad. 
  • Aunque se calcula que el 80% de los incidentes o más se deben a las acciones o comportamientos de los trabajadores, es probable que al menos el 70% de estas acciones estén causadas por deficiencias no humanas, sino de los sistemas de gestión y las condiciones de trabajo.
  • Las estadísticas de accidentes de todos los sectores han sido recopiladas a lo largo de los años por las compañías de seguros y los organismos gubernamentales. Los resultados del análisis de cientos de miles de accidentes revelan que entre el 85 y el 98 % de todas las causas de accidentes son consecuencia de los actos inseguros de los empleados. 
  • La mayoría de las lesiones relacionadas con el trabajo son el resultado de actos inseguros de los trabajadores.
  • 80 de cada 100 accidentes son culpa de la persona implicada en el incidente. Los actos inseguros causan cuatro veces más accidentes y lesiones que las condiciones inseguras.
  • Se ha demostrado que el acto de volver a concentrarse durante apenas cuatro segundos reduce la probabilidad de que se produzca una lesión o un incidente en más de un 90%.


Take 4 Seconds for Safety Fatality File

Unsafe Procedures Resulted in Death of City Worker  

A joint report released by the Kansas Department of Labor, and the city of Manhattan, outlines the series of procedural mistakes which led to the death of 30-year-old William Wiske.

The accident occurred in February at a Manhattan City trench work site on Scenic Drive near Fossilridge Drive.  According to the reports Wiske and a coworker were working to clear a water pipe intersection when the east/southeast side of the trench collapsed burying Wiske.  Two other workers attempted to clear the debris to free Wiske for approximately five minutes, and then called 911.  Emergency personnel arrived on site, and completed extrication of the buried worker. Responding medical staff stated Wiske died from asphyxiation caused from the events at the accident.

The work site was deemed to be in violation of several procedural safety measures.  Among them were failure by the work crew to provide adequate egress avenues from the trench, improper trench construction,  and lack of proper oversight for the entire operation.  The KDL report indicates that the sides of the trench were too steep for the depth of the trench, and soil composition. Lights from a backhoe were used to work into the evening hours, and the equipment blocked one of the ramps needed to exit the work area at the time of the incident.

Pictures taken during the excavation operation show the concrete of the roadway covering the portion of the trench wall that eventually collapsed.  Officials say vibrations from the jackhammer, and other equipment could have caused cracks in the earthen wall which would have gone unnoticed due to the concrete overlay.  According to the reports no shoring equipment was utilized to properly stabilize the wall.  Water at the bottom of the trench is believed to have complicated the operation, and investigators point to two shut off valves which weren’t properly locked out and labeled by the work crew.  Manhattan work crews do not regularly work at the 9 foot depth of the trench, and more commonly work on sites of just a little over three feet.

The City of Manhattan immediate response includes the revocation of the current Competent Person certification for members of the crew on site.  The entire city work crew leaders will attend new Competent Person excavation training.  A new risk management sheet is now part of the procedure for working on site excavations.  Crews will now have cell phones with 911 on speed dial.  Enhanced classroom training procedures will be utilized to certify crews, and shall combine those traditional classes with “in the field training” on undermining driveways and other technical excavations.  Proper lighting, pumps, hand tools, safety gear and clothing, and excavation tools will be on hand at all times.  Supervisor visits will be constant throughout the work day.  All crews will now have knowledge of the location of the proper shoring equipment location at the local fire department.

The city of Manhattan paid for Wiske’s entire funeral expenses, and compensated the family with 150% of annual salary. 


Take 4 Seconds for Safety Fatality File – Spanish

Los procedimientos inseguros provocaron la muerte de un trabajador de la ciudad  

Un informe conjunto publicado por el Departamento de Trabajo de Kansas, y la ciudad de Manhattan, esboza la serie de errores de procedimiento que condujeron a la muerte de William Wiske, de 30 años.

El accidente ocurrió en febrero en una obra de zanja de la ciudad de Manhattan en Scenic Drive cerca de Fossil ridge Drive.  Según los informes, Wiske y un compañero de trabajo estaban trabajando para despejar una intersección de tuberías de agua cuando el lado este/sudeste de la zanja se derrumbó enterrando a Wiske.  Otros dos trabajadores intentaron despejar los escombros para liberar a Wiske durante aproximadamente cinco minutos, y luego llamaron al 911.  El personal de emergencia llegó al lugar y completó la extracción del trabajador enterrado. El personal médico que acudió al lugar declaró que Wiske murió por asfixia causada por los acontecimientos del accidente.

Se consideró que el lugar de trabajo infringía varias medidas de seguridad de procedimiento.  Entre ellas estaban el hecho de que el equipo de trabajo no proporcionara vías de salida adecuadas de la zanja, la construcción inadecuada de la zanja y la falta de supervisión adecuada de toda la operación.  El informe del KDL indica que los laterales de la zanja eran demasiado empinados para la profundidad de la zanja y la composición del suelo. Se utilizaron las luces de una retroexcavadora para trabajar hasta la noche, y el equipo bloqueó una de las rampas necesarias para salir de la zona de trabajo en el momento del incidente.

Las imágenes tomadas durante la operación de excavación muestran el hormigón de la calzada cubriendo la parte del muro de la zanja que finalmente se derrumbó.  Los funcionarios dicen que las vibraciones del martillo neumático y otros equipos podrían haber causado grietas en el muro de tierra que habrían pasado desapercibidas debido al recubrimiento de hormigón.  Según los informes, no se utilizó ningún equipo de apuntalamiento para estabilizar adecuadamente el muro.  Se cree que el agua en el fondo de la zanja complicó la operación, y los investigadores apuntan a dos válvulas de cierre que no estaban debidamente bloqueadas y etiquetadas por el equipo de trabajo.  Las cuadrillas de trabajo de Manhattan no suelen trabajar a los 9 pies de profundidad de la zanja, y es más común que trabajen en sitios de poco más de tres pies.

La respuesta inmediata de la ciudad de Manhattan incluye la revocación de la certificación de persona competente actual para los miembros de la cuadrilla en el sitio.  Todos los jefes de cuadrilla de trabajo de la ciudad asistirán a la nueva formación de Persona Competente en excavaciones.  Una nueva hoja de gestión de riesgos es ahora parte del procedimiento para trabajar en las excavaciones de la obra.  Las cuadrillas tendrán ahora teléfonos celulares con el 911 en marcación rápida.  Se utilizarán procedimientos mejorados de formación en el aula para certificar a las cuadrillas y se combinarán esas clases tradicionales con la “formación sobre el terreno” en materia de socavación de calzadas y otras excavaciones técnicas.  La iluminación, las bombas, las herramientas de mano, el equipo y la ropa de seguridad y las herramientas de excavación estarán disponibles en todo momento.  Las visitas de los supervisores serán constantes durante toda la jornada de trabajo.  Todas las cuadrillas tendrán ahora conocimiento de la ubicación del equipo de apuntalamiento adecuado en el departamento de bomberos local.

La ciudad de Manhattan pagó todos los gastos funerarios de Wiske e indemnizó a la familia con el 150% de su salario anual.


Take 4 Seconds for Safety Picture This


Take 4 Seconds for Safety Picture This – Spanish

Fuente: https://www.previntegral.com


Workplace Violence/Shooting Stats and Facts – Spanish

HECHOS

  1. Los tiroteos que acaban en homicidio son, con diferencia, los actos de violencia más mortíferos que pueden producirse en el lugar de trabajo.
  2. Los investigadores han llegado a la conclusión de que los problemas más comunes a los que se enfrentan los tiradores activos en sus vidas son problemas de salud mental y de estabilidad financiera.
  3. La mayoría de las agresiones se producen en empresas privadas. Los hombres tienen el doble de probabilidades de ser víctimas de delitos violentos en el trabajo en comparación con las mujeres.
  4. Cuatro de cada diez directivos de empresas no comprenden realmente la gravedad de esta situación. Muchos ni siquiera reconocen el hecho de que la violencia se produce en sus empresas por miedo a la mala reputación.
  5. Los tiradores activos tienen casi el doble de probabilidades de morir si el tiroteo se produce en una fábrica o almacén, en comparación con los entornos comerciales.
  6. Los sucesos de tiradores activos imitadores suelen ocurrir en grupos, y el riesgo de un tirador activo en el lugar de trabajo es máximo en las dos semanas siguientes a un incidente similar.
  7. El FBI informó de que el mayor número de relatos de violencia en el lugar de trabajo muestra que los grupos diversos fueron atacados principalmente durante sus descansos en el trabajo.

ESTADÍSTICAS

  • Alrededor de dos millones de trabajadores estadounidenses sufren violencia en el lugar de trabajo cada año.
  • Casi el 75% de las agresiones se producen en el sector sanitario.
  • El 44% de los maestros de escuela denuncian agresiones en el lugar de trabajo.
  • Cada año se producen 30.000 agresiones sexuales a mujeres en el lugar de trabajo.
  • Los compañeros de trabajo cometen el 21% de las agresiones que acaban en homicidio en el trabajo.
  • El 27% de los tiroteos masivos se han producido en el lugar de trabajo.
  • El 96% de los tiradores son hombres solos.
  • El 16% de todas las muertes en el lugar de trabajo se deben a la violencia laboral
  • Se calcula que el 25% de la violencia laboral no se denuncia


Workplace Violence/Shooting Stats and Facts

FACTS

  1. Shootings that result in homicides are by far the deadliest acts of violence that can occur in the workplace.
  2. The investigators have concluded that the most common problems active shooters face in their lives are issues with mental health and financial stability.
  3. The majority of assaults happen in private companies. Men are twice as likely to be the victims of violent crime at work compared to women.
  4. Four out of ten corporate executives do not truly understand the gravity of this situation. Many do not even acknowledge the fact that violence occurs in their companies out of fear of bad reputation.
  5. Active shooters are nearly twice as likely to die if the shooting occurs in a factory or warehouse, compared to commercial settings.
  6. Copycat active shooter events often happen in clusters, with the risk of an active shooter in the workplace at its highest in the two weeks following a similar incident.
  7. The FBI reported the highest number of accounts of workplace violence show that diverse groups were mostly targeted during their breaks at work.

STATS

  • Around two million US workers experience workplace violence each year.
  • Nearly 75% of all assaults happen in health care.
  • 44% of school teachers reported workplace assaults.
  • An 30,000 workplace sexual assaults happen to women each year.
  • Co-workers commit 21% of all assaults that end in homicide at work.
  • 27% of all mass shootings have occurred in the workplace.
  • 96% of all shooters are lone males.
  • 16% of all workplace fatalities are due to workplace violence
  • It is estimated that 25 percent of workplace violence goes unreported


Workplace Violence/Shooting Fatality File

‘Disgruntled employee’ kills 2 co-workers, wounds officer inside Mississippi Walmart 

A “disgruntled employee” killed two Walmart colleagues and wounded a responding police officer Tuesday in far northwest Mississippi, authorities said.

The deadly incident started at about 6:32 a.m. at the superstore before another responding officer eventually wounded the shooter, who was then taken into custody, a Southaven police dispatcher said.

Two employees were “senselessly murdered this morning in our city,” Southaven police Chief Macon Moore told reporters. Southaven is a suburb of Memphis, Tennessee, which is about 16 miles away.

“These people were doing the same thing that you and I do every day, showing up for work in an attempt to provide for their families, then became the victims of a senseless violent act,” Moore said.

The first 911 calls came in at 6:33 a.m. and officers arrived at 6:36 a.m., police said. Two officers exchanged fire with the suspect, whom they found in the store’s parking lot, Moore said.

The shooter is in custody and was identified by police as Martez Tarrell Abram, 39. Abram wounded one officer before the other brought him down, police said.

Authorities said Abrams was suspended from Walmart pending the outcome of an investigation, according to a statement from Southaven Police Department.

“One of our officers was shot at this time. He was saved by his vest,” Moore said. “At this point, the suspect was engaged by another officer. He was struck twice by gunfire from our officer. He was taken into custody.”

Just two weeks ago, Southaven police and firefighters conducted an active shooter simulation, according to Moore and Musselwhite.

“The training we did paid off today,” Musselwhite said.

Customer Phil Cox, 70, had just left that Walmart when he heard a gunshot near him in the parking lot, turned and saw a man, no more than 40 feet from him, sprinting into the store. That man was later identified as the gunman, according to the witness.


Workplace Violence/Shooting Fatality File – Spanish

Un “empleado descontento” mata a 2 compañeros de trabajo e hiere a un agente dentro de un Walmart de Misisipi 

Un “empleado descontento” mató a dos compañeros de Walmart e hirió a un agente de policía que respondió el martes en el extremo noroeste de Misisipi, según las autoridades.

El incidente mortal comenzó alrededor de las 6:32 a.m. en el supermercado antes de que otro oficial que respondió finalmente hiriera al tirador, que luego fue puesto bajo custodia, dijo un despachador de la policía de Southaven.

Dos empleados fueron “asesinados sin sentido esta mañana en nuestra ciudad”, dijo a la prensa el jefe de policía de Southaven, Macon Moore. Southaven es un suburbio de Memphis, Tennessee, que está a unos 16 kilómetros de distancia.

“Estas personas estaban haciendo lo mismo que ustedes y yo hacemos todos los días, presentarse a trabajar en un intento de mantener a sus familias, y luego se convirtieron en víctimas de un acto violento sin sentido”, dijo Moore.

Las primeras llamadas al 911 se produjeron a las 6:33 de la mañana y los agentes llegaron a las 6:36, según la policía. Dos agentes intercambiaron disparos con el sospechoso, al que encontraron en el aparcamiento de la tienda, dijo Moore.

El tirador está detenido y fue identificado por la policía como Martez Tarrell Abram, de 39 años. Abram hirió a un agente antes de que el otro lo abatiera, dijo la policía.

Las autoridades dijeron que Abrams fue suspendido de Walmart a la espera del resultado de una investigación, según un comunicado del Departamento de Policía de Southaven.

“Uno de nuestros oficiales recibió un disparo en este momento. Se salvó por su chaleco”, dijo Moore. “En ese momento, el sospechoso fue abordado por otro oficial. Fue alcanzado dos veces por los disparos de nuestro oficial. Fue puesto bajo custodia”.

Hace apenas dos semanas, la policía y los bomberos de Southaven realizaron un simulacro de tirador activo, según Moore y Musselwhite.

“La capacitación que hicimos dio sus frutos hoy”, dijo Musselwhite.

El cliente Phil Cox, de 70 años, acababa de salir de ese Walmart cuando oyó un disparo cerca de él en el aparcamiento, se giró y vio a un hombre, a no más de 12 metros de él, entrando, corriendo en la tienda. Ese hombre fue identificado más tarde como el pistolero, según el testigo.


Workplace Violence/Shooting Pictures This

Source: https://www.shrm.org