First Aid: Burns – Spanish

En este curso, aprenderá a evitar que se produzcan quemaduras en el trabajo, a reconocer el grado de una quemadura, a prestar primeros auxilios para diferentes grados de quemaduras y a prestar primeros auxilios para tipos especiales de quemaduras, incluidas las quemaduras eléctricas, las quemaduras por derrames químicos y las quemaduras térmicas (por calor).


Qualitative Fit Testing – Quick Tips

Specific requirements for qualitative fit testing are detailed in the Occupational Safety and Health Administration’s (OSHA’s) Respiratory Protection Standard, 29 Code of Federal Regulation (CFR) 1910.134 Appendix A – Fit Testing Procedures (Mandatory).

All respirators that rely on a mask-to-face seal must be fit tested to validate the seal is air-tight. This fit test must be performed:

  • prior to first issue,
  • when there’s a change in the model, style or size of respirator used,
  • when there’s a physical facial change in the person wearing the mask, and
  • at least annually

Qualitative fit testing is one of two broad categories of testing that OSHA recognizes. The other option is quantitative fit testing. The qualitative fit test procedures rely on the subjective sensory (taste, irritation, smell) response of the respirator wearer to a particular test agent, while the quantitative procedures measure actual face seal leakage. For more details on quantitative fit testing see Quick Tips #318: Quantitative Fit Testing.

Fit Test Agents

In the mandatory qualitative fit test protocols, OSHA recognizes four test agents:

  1. Isoamyl Acetate (Isopentyl Acetate or Banana Oil)This qualitative fit test agent uses a person’s response to fruit-like banana aroma to detect leakage into the respirator. A drawback to this agent is lack of a strong reaction in some fit test subjects to the banana odor. Another drawback is it can only be used with respirators equipped with organic vapor cartridges.
  2. Saccharin Solution This qualitative fit test agent uses a person’s response to a sweet taste to detect leakage into the respirator. The drawback to this agent is lack of a strong reaction in some test subjects to a sweet taste.
  3. Bitrix™ (Denatonium Benzoate)This qualitative fit test agent uses a person’s response to a bitter taste to detect leakage into the respirator. The advantage this agent has over Isoamyl Acetate and Saccharin is the bitter taste. Few enjoy a strong bitter taste so an unavoidable response by the test subject is readily noticed.
  4. Irritant Smoke (Stannic Chloride)This qualitative fit test agent uses a person’s response to the irritating chemicals released in the “smoke” produced by a stannic chloride smoke tube to detect leakage into the respirator. The stannic chloride reacts with humidity producing a white smoke with a pungent odor. The drawback to Irritant smoke is that it can be toxic. The smoke contains two compounds: hydrogen chloride (HCl) and tin (Sn). Hydrogen chloride is highly corrosive to human tissue. Inhalation of a relatively low concentration will cause irritation to the upper respiratory tract and eyes. This is why it’s such an effective chemical to use for respiratory fit testing.

Even though these qualitative fit testing agents can be used to fit test both half-mask and full-face respirators, it is important to note that qualitative fit tests only validate an assigned protection (APF) of 10. OSHA has established an APF of 50 for full facepiece respirators, but in order to use a full facepiece beyond 10 times the permissible exposure limit (PEL), a quantitative fit test must be performed.

Respirator Selection and User Seal Checks

Employees must be trained on how to properly don a respirator, how to position it on the face, how to adjust the strap tension, and how to determine an acceptable fit prior to selecting a respirator. The employee then picks the most acceptable respirator from a sufficient number of samples and wears it at least five minutes to assess the comfort (chin properly placed, adequate strap tension, fits across the nose bridge, spans the distance from the nose to chin and does not have a tendency to slip).

The test subject is then required to complete a user seal check as detailed in Appendix B-1 to 29 CFR 1910.134: User Seal Check Procedures (Mandatory).

  • Positive pressure check. Close off the exhalation valve and exhale gently into the facepiece. The fit is considered satisfactory if a slight positive pressure can be built up inside the facepiece without any evidence of outward leakage of air at the seal. For most respirators, this method of leak testing requires the wearer to first remove the exhalation valve cover before closing off the exhalation valve and then carefully replacing it after the test.
  • Negative pressure check. Close off the inlet opening of the canister or cartridge(s) by covering with the palm of the hand(s) or by replacing the filter seal(s), inhale gently so that the facepiece collapses slightly, and hold the breath for 10 seconds. Since the design of the inlet opening of some cartridges cannot be effectively covered with the palm of the hand, the test can be performed by covering the inlet opening of the cartridge with a thin latex or nitrile glove. If the facepiece remains in its slightly collapsed condition and no inward leakage of air is detected, the tightness of the respirator is considered satisfactory.
  • Manufacturer’s recommended user seal check procedures. The respirator manufacturer’s recommended procedures for performing a user seal check may be used instead of the positive and/or negative pressure check procedures provided that the employer demonstrates that the manufacturer’s procedures are equally as effective.

Fit Test Exercises

Before beginning the qualitative fit testing protocol, employees are given a description of the fit test and their responsibilities during the procedure. All four qualitative fit test protocols use these seven, 60-second exercises:

  1. Normal breathing: standing position without talking.
  2. Deep breathing: standing position without talking, breathing slowly and deeply.
  3. Turning head side-to-side: standing position, slowly turning head side-to side, holding at extreme point and inhaling.
  4. Moving head up and down: standing position, slowly moving head up and down and inhaling in the up position.
  5. Talking: talk out loud slowly and loud enough to be heard clearly; read from a prepared text (Rainbow Passage*); count backward from 100 or recite a memorized poem.
  6. Bending over/jogging in place: bend at the waist as if to touch toes. Jogging in place is substituted for testing done in a shroud that does not permit bending over at the waist.
  7. Normal breathing: standing position without talking.

*Rainbow Passage:
When the sunlight strikes raindrops in the air, they act like a prism and form a rainbow. The rainbow is a division of white light into many beautiful colors. These take the shape of a long, round arch with its path high about, and its two ends apparently beyond the horizon. There is, according to legend, a boiling pot of gold at one end. People look, but no one ever finds it. When a man looks for something beyond reach, his friends say he is looking for the pot of gold at the end of the rainbow.”

Fit Testing Protocols

Paragraph B of Appendix A to 29 CFR 1910.134: Fit Testing Procedures (Mandatory) describes the procedure to follow for each of the four test agents:

  1. Isoamyl Acetate – paragraph B2
  2. Saccharin Solution – paragraph B3
  3. Bitrix™ Solution – paragraph B4
  4. Irritant Smoke – paragraph B5

OSHA also provides a fit testing video that provides a brief overview and general information regarding fit testing requirements.

Commonly Asked Questions

Q: What types of respirators need to be fit tested and fit checked (user seal check)?

A: Any tight-fitting respirator in use unless being used on voluntary basis, whether it is disposable or reusable. This means respirators that contact the skin to form a seal must be fit tested and fit checked (user seal check).

Q: What is the difference between a fit test and a user seal check (fit check)?

A: Both check and verify that the seal between the mask and skin is maintained, however, the procedures, who administers the test and circumstances when each is used differ. The procedures are detailed earlier in this Quick Tip. The employer is responsible for administering the fit test, and it is done by someone other than the user of the respirator. The user of the respirator performs the user seal check (fit check). The circumstances for performing a fit test are defined by OSHA: prior to first issue of a respirator, when there’s a change in the model, style or size of respirator used, when there’s a physical facial change in the person wearing the mask, and at least annually. The user seal check (fit check) is done each time the mask is put on, even if this occurs several times per day.

Sources

OSHA’s Respirator Fit Testing Resource Page

29 CFR 1910.134 Respiratory Protection Standard Appendix A

29 CFR 1910.134 Respiratory Protection Standard Appendix B-1

OSHA Respiratory Protection etool


The information contained in this article is intended for general information purposes only and is based on information available as of the initial date of publication. No representation is made that the information or references are complete or remain current. This article is not a substitute for review of current applicable government regulations, industry standards, or other standards specific to your business and/or activities and should not be construed as legal advice or opinion. Readers with specific questions should refer to the applicable standards or consult with an attorney.

Source: Grainger Know How – https://www.grainger.com/know-how


Farm Safety Photo Tips for Media Meeting Kit – Spanish

QUÉ ESTÁ EN RIESGO

LAS EXPLOTACIONES AGRÍCOLAS Y LAS FOTOS 

Las explotaciones agrícolas utilizan las fotos no sólo para sus prácticas comerciales, sino también para comunicar las actividades agrícolas a través de las redes sociales, diversos métodos de publicidad en mercados y tiendas de agricultores, noticias y artículos de revistas, y mucho más.

EL CONTEXTO ES IMPORTANTE 

Es importante tener en cuenta el contenido de la foto y lo que hay de fondo antes de publicarla.  La luz del sol, las sombras, los animales, las personas, los objetos, el clima, los actos y condiciones inseguras y otras distracciones pueden restarle importancia a la foto.  

El mejor momento para hacer una foto al aire libre es por la mañana o al atardecer en un día nublado, utilizando el flash y un fondo libre de distracciones.

CUÁL ES EL PELIGRO

CUESTIONES A EVITAR 

  • Evite hacer fotos delante de estercoleros, tendederos, animales agresivos, tendidos eléctricos, etc.
  • Evite mostrar a trabajadores subiendo a silos o graneros sin llevar protección contra caídas o a trabajadores trabajando alrededor de equipos o maquinaria sin protección, como tomas de fuerza y sinfines.
  • Si quiere que los niños pequeños aparezcan en una foto, muéstrelos en zonas de juego supervisadas y valladas de la granja.
  • Evite mostrar a niños menores de 14 años conduciendo maquinaria agrícola, vehículos todoterreno o cortacéspedes.
  • Evite mostrar a adultos con niños montados en el regazo de los adultos en maquinaria agrícola, vehículos todoterreno o cortacéspedes.

COMO PROTEGERSE

10 CONSEJOS PRINCIPALES PARA TOMAR FOTOS 

  • Prepárese para el polvo y la suciedad: Póngase ropa vieja, ya que los perros saltarán y puede que tenga que arrodillarse y vadear el barro. Mantenga la tapa del lente -siempre debe tener una en el objetivo de la cámara- hasta el último momento si hay suciedad o polvo volando. Mantenga la correa de la cámara alrededor de su cuello.
  • Mire antes de disparar: Observe atentamente lo que más le interese de una granja en particular. ¿Es el ganado, los edificios, las máquinas o lo que está sucediendo? Piense detenidamente en lo que quiere fotografiar antes de precipitarse.
  • Encierre en un círculo tu objetivo: Sea lo que sea lo que haya decidido fotografiar, camine a su alrededor si puede, para ver qué ángulo ofrecerá la mejor composición. Puede que le sorprenda mucho lo diferentes que pueden parecer las cosas desde otro punto de vista y con la luz procedente de una dirección diferente.
  • Piense en el fondo: Los fondos pueden distraer mucho en una fotografía. Puede que haga una foto de un fabuloso tractor nuevo sólo para descubrir que los montones de sacos de abono del fondo arruinan por completo la fotografía y usted ni siquiera lo ha visto porque estaba demasiado ocupado mirando el tractor. 
  • La magia de los animales: Al fotografiar animales, sobre todo, busque un fondo liso y trate de evitar los “medio animales” al lado de la foto. Si intenta fotografiar ovejas, sobre todo en un campo en el que están muy bien dispuestas, muévase muy despacio hasta la posición y no establezca contacto visual con ellas. Mire hacia otro lado, observando por el rabillo del ojo hacia dónde se dirige; en el momento en que las mire directamente, huirán.
  • ¿Dónde está el sol? Los días soleados del verano no son un buen momento para hacer fotografías. El contraste entre las zonas claras y oscuras será muy difícil de manejar. Los días nublados brillantes suelen ser los mejores para la mayoría de las fotografías. 
  • Iluminación del paisaje: La fotografía de paisaje de los campos se realiza mejor cuando hay una buena iluminación direccional fuerte. Por ejemplo, es buena todo el invierno cuando el sol está bajo en el cielo y luego en verano por la mañana y por la tarde. La iluminación cruzada con el sol a su lado mostrará las texturas de la tierra arada y las hileras y surcos mucho mejor que si tienes el sol directamente detrás de usted. El tiempo inestable con cielos dramáticos y luz solar irregular puede hacer las fotografías más interesantes de los campos. 
  • Métase en el interior: Entre en el interior de los edificios, la iluminación será entonces lateral y no desde todas las direcciones.
  • Construya mejor: Intente encontrar edificios antiguos en una granja, suelen ser mejores fondos para las fotografías. Si es posible, traslade al animal que quiera fotografiar a algún lugar con un fondo liso. Conseguirá una imagen mucho mejor que llenando el fondo con el desorden de la granja. Los edificios modernos, con sus fuertes líneas gráficas, también pueden ofrecer composiciones interesantes.
  • Trabajo manual: Intente dejar de utilizar el ajuste “automático” de su cámara, pase al manual y experimente hasta que vea la diferencia que pueden suponer la apertura y la velocidad de obturación en sus fotos cuando usted tiene el control y no la cámara. 

Lo que debe hacer:

Muestre tractores y otros equipos agrícolas mantenidos y operados de forma segura, incluyendo sistemas de protección contra vuelcos (ROPS), protecciones en su sitio, cadenas de seguridad colocadas, etc.

Muestre a los niños realizando tareas supervisadas y adecuadas a su edad.

Muestre a los trabajadores llevando el equipo de protección personal adecuado para la tarea que están realizando.

Lo que no debe hacer:

NO ponga a los niños en situaciones inseguras: a veces lo “bonito” es inseguro. Por ejemplo, mostrar a un niño de cinco años guiando un gran caballo de tiro puede ser bonito, pero es muy inseguro y nunca debe representarse como una actividad segura, divertida o aceptable.

NO fotografíe a los niños en lugares de trabajo agrícola; muéstrelos más bien en una zona de juego vallada en la que estén debidamente supervisados. La mayoría de los incidentes infantiles relacionados con las granjas ocurren cuando los niños están jugando o haciendo tareas con sus padres en una zona de trabajo agrícola.

NO permita ni muestre a personas que tengan un comportamiento inseguro, como jinetes adicionales, subir a alturas sin protección contra caídas, trabajar con cuchillas o piezas móviles sin protección, etc.

NO permita ni muestre a niños menores de 14 años conduciendo vehículos o maquinaria agrícola.

NO permita ni muestres a niños montando en el regazo de adultos en tractores/maquinaria, vehículos todoterreno o cortacéspedes.

NO permita ni muestre a los niños cerca de animales grandes a menos que haya barreras apropiadas.

CONCLUSIÓN

Una imagen vale más que mil palabras sólo si quien la toma conoce, entiende y es capaz de incorporar prácticas agrícolas seguras en la toma de fotografías.


Farm Safety Photo Tips for Media Meeting Kit

FARMS AND PHOTOS 

Farms use photos not just for business practices but also to communicate farming activities through social media, various methods of advertising in farmers markets and stores, news and magazine articles, and much more.

CONTEXT MATTERS 

The content of the photo and what is in the background is important to keep in mind before posting photos.  Sunlight, shadows, animals, people, objects, weather, unsafe acts and conditions and other distractions can take away from the intent of the picture.  

The best time to take a photo outdoors is in the morning or evening on a cloudy day using flash and a background free of distractions.

AVOIDANCE ISSUES 

  • Avoid taking pictures in front of manure pits, clotheslines, aggressive animals, powerlines, etc.
  • Avoid showing workers climbing Silo’s or grain bins without wearing fall protection or workers working around unguarded equipment or machinery such as PTO and augers.
  • If you want young children in a photo, show them in supervised fenced play areas on the farm.
  • Avoid showing children under the age of 14 driving farm machinery, riding ATVs, or ride-on lawn mowers.
  • Avoid showing adults with children riding in the adults’ laps on farm machinery, ATV’s, or lawn mowers.

10 MAJOR TIPS FOR TAKING PHOTOS 

  1. Prepare for dust and dirt: Wear old clothes as dogs will jump up and you may have to kneel down and wade through mud. Keep the lens cap on – you should always have one on a camera lens – until the last moment if there is muck or dust flying about. Keep the camera strap around your neck.
  2. Look before you shoot: Look around carefully for what is most interesting about a particular farm. Is it the stock, the buildings, the machines or what is actually going on? Think carefully about what you want to take pictures of before rushing in.
  3. Circle your target: Whatever it is you have decided to take a picture of, walk all around it if you can, to see which angle will offer the best composition. You may be very surprised how different things can look from another viewpoint and with the light coming from a different direction.
  4. Think background: Backgrounds can be very distracting in a photograph. You may take a picture of a fabulous new tractor only to find that piles of fertiliser bags in the background completely ruins the photograph and you didn’t even see them because you were too busy looking at the tractor. 
  5. Animal magic: When photographing animals especially, look for a plain background and try to avoid ‘half-animals’ at the side of the picture. If you are trying to photograph sheep, particularly in a field where they are all nicely arranged, move very slowly into position and don’t get eye contact with them. Look away, just watching where you are going out of the corner of your eye; the second you look at them directly they will run away.
  6. Where’s the sun? The bright sunny days of summer are not a good time to take photographs. The contrast between the light and dark areas will be very hard to handle. Bright overcast days are usually the best for most photography. 
  7. Lighting the landscape: Landscape photography of fields is best done when there is good strong directional lighting. For example, it’s good all winter when the sun is low in the sky and then in summer in the morning and the evening. Cross-lighting with the sun at your side will show up textures in ploughed land and rows and furrows much better than if you have the sun directly behind you. Unsettled weather with dramatic skies and patchy sunlight can make the most interesting photographs of fields. 
  8. Get inside: Go inside buildings, the lighting will then be from the side, rather than from all directions.
  9. Better building: Try to find old buildings on a farm, they tend to make much better backdrops to photographs. If it is possible, move an animal that you want to photograph to somewhere with a plain background. You will get a much better picture than filling the background with farmyard clutter. Modern buildings with their strong graphic lines can also offer interesting compositions.
  10. Manual work: Try to move away from using the “auto” setting on your camera, go on to manual and experiment until you see what a difference aperture and shutter speed can make to your pictures when you are in control and not the camera.

DOs:

DO show tractors and other farm equipment being maintained and operated safely, including rollover protective systems (ROPS), guards in place, safety chains attached, etc.

DO show children doing supervised age-appropriate chores.

DO show workers wearing proper fitting personal protective equipment appropriate for the task they are performing.

DONTS:

DON’T put children in unsafe situations – sometimes “cute” is unsafe. For example, showing a five-year-old child leading a large draft horse may be cute, however it is very unsafe and should never be depicted as a safe, fun or acceptable activity.

DON’T photograph children in agricultural work sites; rather show them in a fenced-in play area where they are being properly supervised. Most farm-related childhood incidents happen when children are playing or doing chores with their parents in a farm work area.

DON’T allow or show people engaging in unsafe behavior such as extra riders, climbing heights without fall protection, working with unguarded blades or moving parts, and so on.

DON’T allow or show children under 14 driving farm vehicles or machinery.

DON’T allow or show children riding on adults’ laps on tractors/machinery, ATVs or riding mowers.

DON’T allow or show children near large animals unless appropriate barriers are evident.

FINAL WORD

A picture is worth a thousand words only if the taker of the picture knows, understands and is able to incorporate safe farm practices in picture taking. 


Respirator Selection Requirement of Substance Specific Requirements – Quick Tips

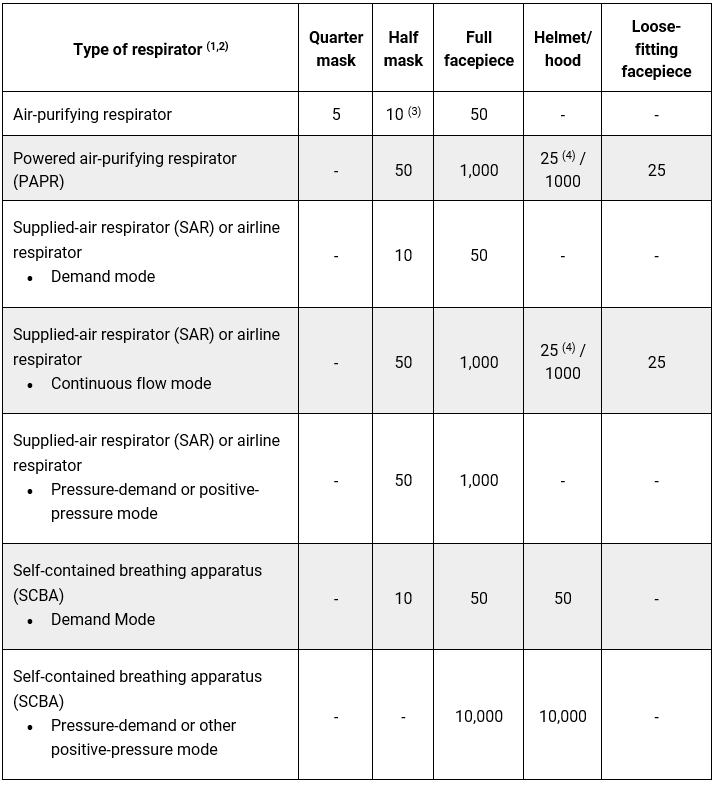
The Occupational Safety and Health Administration (OSHA) issued its final rule for assigned protection factors (APFs) and maximum use concentrations (MUCs) in the Federal Register on August 24, 2006. This document focuses on the mandatory selection provisions of APFs, MUCs and the APF Table, and their roles in the Substance Specific standards

The APF is the workplace level of respiratory protection that a respirator or class of respirators is expected to provide to employees when the employer implements a continuing, effective respiratory protection program.

MUC is the maximum atmospheric concentration of a hazardous substance from which an employee can be expected to be protected when wearing a respirator, and is determined by the assigned protection factor of the respirator or class of respirators and the exposure limit of the hazardous substance. The MUC is the upper limit at which the class of respirator is expected to provide protection. Whenever exposures approach the MUC, the next higher class of respirators should be selected. Employers must not apply MUCs to conditions that are immediately dangerous to life or health (IDLH).

The MUC for respirators can be determined by multiplying the APF specified for the respirator by the OSHA permissible exposure limit (PEL), short-term exposure limit (STEL) or ceiling limit. When no OSHA exposure limit is available for a hazardous substance, the MUC must be determined on the basis of relevant available information and informed professional judgment.

Employers must use the APFs and MUCs to select the appropriate type of respirator that meets or exceeds the required level of employee protection. Selection is based on the airborne contaminant level found in the workplace and the maximum concentration of the contaminant in which a particular type of respirator can be used.

29 Code of Federal Regulations (CFR) 1910.134(d)(3)(i)(A)

Table 1 Assigned Protection Factors (5)

Notes:
1 Employers may select respirators assigned for use in higher workplace concentrations of a hazardous substance for use at lower concentrations of that substance, or when required respirator use is independent of concentration.
2 The assigned protection factors in Table 1 are only effective when the employer implements a continuing, effective respirator program as required by this section ( 29 CFR 1910.134 ), including training, fit testing, maintenance and use requirements.
3 This APF category includes filtering facepieces, and half masks with elastomeric facepieces.
4 The employer must have evidence provided by the respirator manufacturer that testing of these respirators demonstrates performance at a level of protection of 1,000 or greater to receive an APF of 1,000. This level of performance can best be demonstrated by performing a workplace protection factor (WPF) or simulated workplace protection factor (SWPF) study or equivalent testing. Absent such testing, all other PAPRs and SARs with helmets/hoods are to be treated as loose-fitting facepiece respirators and receive an APF of 25.
5 These APFs do not apply to respirators used solely for escape. For escape respirators used in association with specific substances covered by 29 CFR 1910 subpart Z, employers must refer to the appropriate substance-specific standards in that subpart. Escape respirators for other IDLH atmospheres are specified by 29 CFR 1910.134 (d)(2)(ii).

Common Subpart Z Toxic and Hazardous Substances:

Commonly Asked Questions

Q: What is IDLH?

A: Immediately dangerous to life or health (IDLH) is an atmosphere that poses an immediate threat to life, would cause irreversible adverse health effects, or would impair an individual’s ability to escape from a dangerous atmosphere.

Q: How are cartridge/canister change out schedules calculated?

A: In the absence of an end of service life indicator (ESLI), a cartridge/canister change out schedule is required for gas-and vapor-removing respirators and should be based on objective information or data that will ensure that the canisters and cartridges are changed before the end of their service life. Usually, manufacturers have software to estimate a change out schedule for their cartridges or canisters. Change out schedules are not the same from one manufacturer’s cartridges or canisters to that of another manufacturer. This is because the volume and type of adsorbent varies between manufacturers. Additionally, OSHA has mandatory change out schedules for cartridges for certain substances.

Q: Are arrows required in addition to marking pipes?

A: Yes. ASME A13.1-2015 states that arrows shall be used on either end or both ends of the label to show the direction of flow. Arrows should be placed every 50 feet on straight runs, on both sides of wall, floor or ceiling penetrations, and near valves, flanges and changes in pipe direction, and at any line entry or re-entry point.


The information contained in this article is intended for general information purposes only and is based on information available as of the initial date of publication. No representation is made that the information or references are complete or remain current. This article is not a substitute for review of current applicable government regulations, industry standards, or other standards specific to your business and/or activities and should not be construed as legal advice or opinion. Readers with specific questions should refer to the applicable standards or consult with an attorney.

Source: Grainger Know How – https://www.grainger.com/know-how


Crystalline Silica and Silica Exposure – Quick Tips

Reduce crystalline silica exposure and learn about silicon dioxide hazards

The term “silica” broadly refers to the mineral compound silicon dioxide (SiO2). Although silica can be crystalline or amorphous in form, crystalline silica is more hazardous to employees and is the focus of this document. Crystalline silica is a basic component of the Earth’s crust and can be detected in soil, sand, granite and many other minerals. While most commonly found in the form of quartz, it is also found in substances such as cristobalite, tridymite and tripoli. Breathing crystalline silica dust poses an occupational health hazard and can lead to severe health problems and even death.

Respirable crystalline silica dust particles, or particles that are less than 10 micrograms ( m) in diameter, pose the greatest threat to employees working with or near crystalline silica. These dust particles occur when workers chip, cut, drill or grind objects that contain crystalline silica. About 2.3 million workers are exposed to respirable crystalline silica in U.S. workplaces. This includes 2 million construction workers who drill, cut, crush or grind crystalline silica-containing materials such as concrete and stone. It also includes 300,000 workers in general industry operations such as brick manufacturing, foundries and hydraulic fracturing, also known as fracking.

In March 2016, the Occupational Safety and Health Administration (OSHA) issued a final rule to control exposure to respirable crystalline silica. The rule is comprised of two standards: one for Construction (29 CFR 1926.1153) and the other for General Industry (29 CFR 1910.1053) and Maritime (29 CFR 1915.1053). The Maritime and General Industry standards are exactly the same but differ from the Construction standard. The key difference lies in qualifying the level of crystalline silica workers are exposed to. The General Industry/Maritime Standard requires the employer to perform air monitoring to determine the eight-hour average exposure level for each affected job task. Employers governed by the Construction standard can either use a control method spelled out for common construction work tasks or perform air monitoring as detailed in the General Industry/Maritime standard.

Compliance Deadlines

Both the General Industry/Maritime and Construction standards are effective June 23, 2016, and industries have one to five years to comply with most requirements, based on the following schedule:

  • Construction: September 23, 2017
  • General Industry/Maritime: June 23, 2018, two years after the effective date.
  • Hydraulic Fracturing: June 23, 2018, two years after the effective date for all provisions except Engineering Controls, which have a compliance date of June 23, 2021.

Health Effects of Silicosis 

Crystalline silica exposure has been linked through epidemiologic studies to chronic obstructive pulmonary disease such as bronchitis and emphysema. It has also been linked to immunologic disorders such as scleroderma, rheumatoid arthritis and lupus in addition to renal disease and stomach or gastric cancer. However, the most prominent disease linked to crystalline silica dust exposure is silicosis.

Silicosis is one of the world’s oldest known occupational diseases, with reports of employees contracting the disease dating back to ancient Greece. By the 1800s, common names for silicosis included grinders’ asthma, grinders’ rot, masons’ disease, miners’ asthma, miners’ phthisis, potters’ rot, sewer disease, sandblasting disease and stonemasons’ disease.

Silicosis is a preventable yet incurable disease that causes scar tissue to build up in the lungs, leading to a reduction in the ability to take in oxygen. Respirable crystalline silica dust particles pass through the tracheobronchial tree of the lung and collect in the deepest recesses of the lung, called the alveolar structures. This accumulation leads to a significant decrease in lung function. There are three types of silicosis:

  1. Chronic or classic silicosis: Results from 15-20 years of low-to-moderate crystalline silica exposure. Chronic silicosis causes shortness of breath and clinical signs of poor oxygen/carbon dioxide exchange in the early stages. In the late stages of chronic silicosis, sufferers will experience extreme shortness of breath and fatigue, as well as chest pain and respiratory failure.
  2. Accelerated silicosis: Results from 5-10 years of high exposure. Accelerated silicosis results in severe shortness of breath, weakness and weight loss.
  3. Acute silicosis: This most dangerous form of silicosis also causes severe shortness of breath, weakness and weight loss. Acute silicosis arises anywhere from a few months to two years after exposure to extremely high concentrations of crystalline silica dust. Acute silicosis is often fatal.

Because of the severe side effects resulting from crystalline silica exposure, OSHA has significantly reduced the permissible exposure limit (PEL) to 50 micrograms per cubic meter of air ( g/m_) averaged over an eight-hour day and introduced a new action limit of 25 g/m_ in the standard.

OSHA’s Three Lines of Defense

To help control the risk of respirable crystalline silica exposure, OSHA’s “three lines of defense” philosophy is suggested. The first line of defense is to eliminate and/or engineer the crystalline silica exposure hazard out. Examples of engineering/elimination controls are:

  • Isolating workers from exposure with enclosures or barriers
  • Installing local exhaust ventilation systems
  • Using wet methods for cutting, chipping, drilling, sawing, grinding, etc.
  • Using HEPA-equipped vacuums or wet sweeping for cleaning applications
  • NOT using compressed air for cleaning applications
  • Substituting non-crystalline silica material when possible
  • Using tools with dust collection systems

When engineering/elimination controls are not feasible or practical, the second and third lines of defense can be used to help control the crystalline silica exposure hazard. The second line of defense is administrative controls, such as employee training, awareness (signage), ensuring that employees work in an area where they will not be exposed to crystalline silica, or written programs and policies. The third and last line of defense to be considered is personal protective equipment (PPE). Some examples of PPE are air-purifying respirators and filters, supplied-air respirators and accessories, and protective clothing.

OSHA states that it is important to consult a competent industrial hygienist or other technically qualified person when determining the engineering controls to be used or when collecting air samples to quantify worker exposure. Methods for collecting air samples are outlined in the new crystalline silica rule, 29 CFR 1910.1053 Appendix A.

OSHA has provided an overview of all the requirements of the new crystalline silica rule for General Industry and Maritime in OSHA Fact Sheet 3682 (PDF) and for Construction OSHA Fact Sheet 3681 (PDF).

Commonly Asked Questions

Q: Why is OSHA issuing a new crystalline silica rule?

A: OSHA’s previous PELs for crystalline silica were outdated, inconsistent and did not adequately protect workers’ health. The previous PELs were based on studies from the 1960s and earlier that did not reflect more recent scientific evidence showing that low-level exposures to crystalline silica cause serious health effects, including lung cancer. In the 45 years since the previous PELs were established, several agencies including OSHA identified respirable crystalline silica as a human carcinogen. Previous construction and shipyard PELs were based on an old method of measuring worker exposures to crystalline silica that is not used today. Those previous limits are inconsistent, allowing permissible levels for construction and shipyards to be more than twice as high as levels in general industry. The revised rule will reduce the risk of disease among workers who may inhale respirable crystalline silica and provide the same protection for all workers covered.

Q: What type of air monitors are used to measure crystalline silica exposure and at what level of crystalline silica exposure should a respirator protection program be enforced?

A: The type of air monitor used to measure crystalline silica exposure and the level of crystalline silica exposure requiring respiratory protection is dependent on the size of the crystalline silica particles being generated. The parameters of determining how to monitor for crystalline silica exposure can be found in in 29 CFR 1910.1053 Appendix A.

Q: Can I use a disposable respirator for protection during abrasive blasting?

A: Disposable filtering facepiece respirators (dust masks) will not protect the worker from crystalline silica exposure during sandblasting. Effective engineering controls such as substitution, automation, enclosed systems, local exhaust ventilation and wet methods should be used. In addition, a properly operated and maintained approved abrasive blasting respirator may provide adequate protection to the wearer.


Sources

Occupational Safety and Health Administration (OSHA) Silica Worker Page, 2016

(Rev. 4/2017)


The information contained in this article is intended for general information purposes only and is based on information available as of the initial date of publication. No representation is made that the information or references are complete or remain current. This article is not a substitute for review of current applicable government regulations, industry standards, or other standards specific to your business and/or activities and should not be construed as legal advice or opinion. Readers with specific questions should refer to the applicable standards or consult with an attorney.

Source: Grainger Know How – https://www.grainger.com/know-how


Safety and OSHA Inspection Checklists – Quick Tips

The most widely accepted means to identify workplace hazards is to conduct safety and health audits. One way to help understand a given situation is to look at it on a periodic basis. A survey conducted by the Occupational Safety and Health Administration (OSHA) in the late 1990s revealed that self-audits are performed for a number of reasons, with the three most common being:

  • Careful inspections can reduce injury and illness rates within the workplace by identifying present hazards
  • Staying on top of potential hazards is considered the right thing to do by many employers
  • Performing self-audits and acting upon any findings helps sustain compliance with OSHA regulations.

Routine self-audits are a cost-effective method of not only identifying safety hazards that need to be corrected, but also for helping ensure compliance with OSHA regulations. Costs associated with occupational safety and health hazards, beyond potential fines, can be reduced if hazards are corrected. Man-hours lost through workers’ compensation and sick leave can be reduced and productivity can remain high. Some insurance carriers in partnership with OSHA offer reduced premiums to employers who perform self-audits.

The most thorough means for performing a self-audit is to use a checklist for each work area. The size and diversity of the business dictates how many checklists are required and how much detail should be in each. While there is no standard checklist format, several key features should be included:

  • Name of auditor and date inspected
  • Description and specific regulatory citation for all pertinent regulations with a space to note deficiencies
  • A feasible completion date for deficiencies found
  • Initials and/or date when all corrections have been completed

Workplace Checklist

The following is an example of what a portion of a workplace OSHA checklist could look like for a flammable storage area. Appropriate components depend on individual situations.

INSPECTION REPORT FOR FLAMMABLE STORAGE AREA

Location:
Inspected By:
Date of Inspection:

(Circle all numbers with deficiencies)

Containers

  • Are approved containers and portable tanks used for the handling and storage of flammable liquids? 29 CFR 1910.106(d)(2)(i)
  • Are portable tanks equipped with sufficient emergency venting to relieve internal pressure under fire conditions? 29 CFR 1910.106(d)(2)(ii)
  • Are Table H-2 compliant sized flammable liquid containers in use? 29 CFR 1910.106(d)(2)(iii)
  • Are not more than 60 gallons of Category 1, 2, or 3 flammable liquids, or more than 120 gallons of Category 4 flammable liquids stored in a storage cabinet? 29 CFR 1910.106(d)(3)(i)
  • Do flammable liquid storage cabinets meet applicable design and construction requirements? 29 CFR 1910.106(d)(3)(ii)-(d)(3)(ii)(b)
  • Is the use and handling of flammable liquids only incidental to the principal business? 29 CFR 1910.106(e)(2)(i)
  • Are all flammable liquids stored in tanks or closed containers? 29 CFR 1910.106(e)(2)(ii)
  • Do the quantities of flammable liquids stored outside an inside storage room or storage cabinet in a building or in any one fire area of a building exceed the maximums allowed (25 gallons of Category 1 in containers; 120 gallons of Category 2, 3, or 4 in containers; or 660 gallons of Category 2, 3 or 4 in portable tanks)? 29 CFR 1910.106(e)(2)(ii)(b)-(e)(2)(ii)(b)(3)
  • Are adequate precautions taken to prevent the ignition of flammable vapors? 29 CFR 1910.106(e)(6)(i)
  • Are containers of Category 1, 2 and 3 flammable liquids with a flash point of less than 100 °F (37.8 °C) grounded and bonded to containers during dispensing? 29 CFR 1910.106(e)(6)(ii)

Fire Extinguishers

  • Are approved fire extinguishers mounted, located and identified so that they are readily accessible to employees? 29 CFR 1910.157(c)(1)-(c)(2)
  • Are all fire extinguishers maintained in a fully charged and operable condition and kept in their designated places at all times except during use? 29 CFR 1910.157(c)(4)
  • Are all fire extinguishers inspected and recharged regularly, and marked on inspection tags? 29 CFR 1910.157(e)
  • Are the portable fire extinguishers provided for employee use, selected and distributed based on the classes of anticipated workplace fires? 29 CFR 1910.157(d)(1)-(d)(6)
  • Are all portable fire extinguishers properly inspected, maintained and tested? 29 CFR 1910.157(e)-(f)(16)
  • Upon initial employment and at least annually thereafter, have employees been provided training on the general principles of fire extinguisher use and the hazards involved with incipient stage firefighting? 29 CFR 1910.157(g)-(g)(4)

Exits

  • Are exit routes and safeguards properly designed and maintained to minimize the danger to employees? 29 CFR 1910.37(a)-(a)(1)-(a)(4)
  • Are exit routes adequately lighted and marked? 29 CFR 1910.37(b) – (b)(7)
  • Are exit routes maintained during construction, repairs or alterations? 29 CFR 1910.37(d) – (d)(3)

Correction completion date:
Corrections have been completed (initials and date):
Supervisor:
Date:

Regulations and Record Keeping Standards

Below are two lists. The first highlights major General Industry regulations that are relevant to most work areas. The second details standards that require a written plan or program to be in place when applicable. These lists may not be all-inclusive and may not apply to all work areas.

Work Areas

All work areas should be identified and the applicability of each section of the OSHA standards from Title 29 of the Code of Federal Regulations (CFR) should be considered:

  • Walking-working surfaces
    see 1910.21 to 1910.30
  • Exit routes and emergency planning
    see 1910.33 to 1910.39
  • Powered platforms, manlifts and vehicle-mounted work platforms
    see 1910.66 to 1910.68
  • Occupational health and environmental control – ventilation, noise and radiation
    see 1910.94 to 1910.98
  • Storing and handling of hazardous materials
    see 1910.101 to 1910.126
  • Personal protective equipment (PPE)
    see 1910.132 to 1910.140
  • General environmental controls – sanitation, marking physical hazards, permit-required confined spaces and lockout/tagout
    see 1910.141 to 1910.147
  • Medical services and first aid
    see 1910.151 to 1910.152
  • Fire protection
    see 1910.155 to 1910.165
  • Compressed gas and compressed air equipment
    see 1910.166 to 1910.169
  • Material handling and storage – use and care of forklifts, cranes, derricks, helicopters and slings
    see 1910.176 to 1910.184
  • Machinery and machine guarding
    see 1910.211 to 1910.219
  • Hand ad portable powered tools and other hand-held equipment
    see 1910.241 to 1910.244
  • Welding, cutting and brazing
    see 1910.251 to 1910.255
  • Special industries
    see 1910.261 to 1910.272
  • Electrical systems standard design, safety-related work practices and maintenance requirements
    see 1910.301 to 1910.399
  • Commercial diving operations
  • see 1910.401 to 1910.430Toxic and hazardous substances
    see 1910.1000 to 1910.1499

Record Keeping

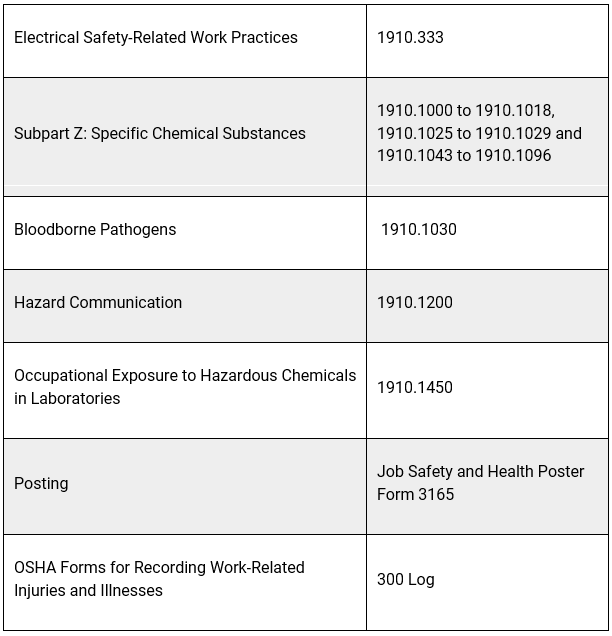
In addition to a work area checklist, written programs, plans and procedures are often required by OSHA. The following standards require a written plan or program to be in place where applicable:

Creating and maintaining a checklist for General Industry operations is by no means the final step. When beginning a safety audit program, several ideas should be kept in mind. A team approach to safety is most effective; rotating people on and off the team will keep ideas fresh and enhance perspective. Inspect thoroughly and frequently; any area, regardless of size, can pose hazards that can crop up seemingly overnight. Once hazards are identified, have a system in place for correction.

Q: Are self-inspections necessary?

A: Yes. Self-inspections are an essential and recognized means to identify potential workplace hazards. The only way to be certain of an actual situation is to look at it directly from time to time. Organizations must know where potential hazards exist and whether they are under control.


Sources

29 CFR 1910

OSHA Small Business Handbook / Small Business Safety and Health Management Series / OSHA 2209-02R 2005

(Rev 11/18)


The information contained in this article is intended for general information purposes only and is based on information available as of the initial date of publication. No representation is made that the information or references are complete or remain current. This article is not a substitute for review of current applicable government regulations, industry standards, or other standards specific to your business and/or activities and should not be construed as legal advice or opinion. Readers with specific questions should refer to the applicable standards or consult with an attorney.


Source: Grainger Know How – https://www.grainger.com/know-how


Hazardous Locations – Classes, Divisions and Groups – Quick Tips

A major safety concern in all workplaces is the occurrence of fires and explosions. No other aspect of safety receives more attention in the form of codes and standards. Electrical equipment can and does cause fires and/or explosions in certain atmospheres. To minimize the risk of these fires or explosions, electrical/electronic equipment must be designed, tested and labeled as being acceptable for use in the areas in which it is installed.

Hazardous classified locations are areas where the possibility of fire or explosion hazards may exist under normal or abnormal conditions because of the presence of flammable, combustible or ignitable gases, vapors, liquids, dust, or fibers/flyings. These areas are classified solely for the purpose of ensuring the safe and proper specification and installation of electrical/electronic equipment.

Standards for electrical installations have been established and are governed by a variety of organizations throughout the world to ensure safe electrical systems in hazardous locations.

In the United States, the hazardous location classification system is defined by the National Fire Protection Association (NFPA) 70®, National Electric Code® (NEC). NFPA 70 NEC uses the familiar Class/Division system and has added an Americanized version of the International Electrochemical Commission’s (IEC) IEC Zone system which maintains the NEC wiring methods and protection techniques.

NFPA 70 NEC Articles 500 through 503 cover the requirements for electrical/electronic equipment and wiring for all voltages in Class I, Divisions 1 and 2; Class II, Divisions 1 and 2; and Class III, Divisions 1 and 2 locations.

NFPA 70 NEC Articles 505 and 506 cover the requirements for the Americanized Zone classification system as an alternative to the Class and Division classification system.

NFPA 70 NEC Classes, Divisions and Groups

NFPA 70 NEC establishes area classifications based on Classes, Divisions and Groups that when combined delineate the hazardous conditions of a specific area. This classification method provides a description of the hazardous material that may be present, and the probability that it is present, so that the appropriate equipment may be selected, and safe installation practices followed.

The Occupational Safety and Health Administration (OSHA) has adopted these hazardous classifications and all except “Groups” are defined in 29 Code of Federal Register (CFR) 1910.399. In 29 CFR 1910.307(c)(2)(ii), OSHA requires all equipment used in a hazardous location to be marked with the class, group and operating temperature or temperature range for which it is approved. Although OSHA does not provide a definition of group classifications in 29 CFR 1910.307 or 399 they do provide a note under 29 CFR 1910.307(c)(1) that states: “NFPA 70, the National Electrical Code, lists or defines hazardous gases, vapors, and dusts by “Groups” characterized by their ignitable or combustible properties.” To meet OSHA’s marking requirement, the marking must include the hazardous group the equipment is approved to operate in.

Class defines the type of explosive or ignitable substances which are present in the atmosphere. Division defines the likelihood of the hazardous material being present in an explosive or ignitable concentration. Class I flammable gases and vapors are grouped into one of four groups (Groups A, B, C or D) based on their physical properties and the ease in which they can be ignited. Class II combustible dusts are grouped into one of three (3) groups: E combustible metal dusts, F combustible carbonaceous dusts or G other combustible dusts.

NFPA 70 NEC Zone Classification System

The Zone Classification System is offered as an alternative to the Class and Division system. It is an Americanized version of the International Electrochemical Commission’s (IEC) Zone system which maintains the NEC wiring methods and protection techniques. Zone defines the general nature – if it is a gas or dust – and the probability of hazardous material being present in an ignitable concentration in the surrounding atmosphere. The Zones are based on how often the hazard is present rather than upon normal versus abnormal conditions.

Group defines the type of hazardous material and partly the location of the surrounding atmosphere .

Conclusion

Determining the Class, Division and Group or Zone and Group is critical to correctly applying the requirements for a given hazardous location. Comparisons between the two systems are not easily accomplished. Which system is preferred depends on the user’s preference, how the areas are classified, and the wiring system used. The Zone system has wider use in the chemical and petrochemical industries. Shown below is a summary of the applicable NEC Articles to reference to ensure the proper requirements are applied.

Commonly Asked Questions

Q: Can I use a piece of equipment approved for use in a Division 1 hazardous location in a Division 2 hazardous location?

A: Yes. If equipment has been approved for use in a Division 1 hazardous location, it can be used in a Division 2 hazardous location, providing it is in the same class and group.

Q: Can equipment approved for a Class I hazardous location be used in a Class II hazardous location?

A: No. Equipment approved for use in Class I hazardous locations cannot be used in Class II hazardous locations.

Q: Are Divisions and Zones equivalent to one another?

A: When comparing Divisions and Zones, Division 2 is equivalent to Zone 2, but Division 1 is equivalent to either Zone 0 or 1.

Sources
29 CFR 1910.307 – Hazardous (classified) Locations
29 CFR 1910.399 – Definitions Applicable to Subpart S
National Electric Code 2020 edition – National Fire Protection Association


The information contained in this article is intended for general information purposes only and is based on information available as of the initial date of publication. No representation is made that the information or references are complete or remain current. This article is not a substitute for review of current applicable government regulations, industry standards, or other standards specific to your business and/or activities and should not be construed as legal advice or opinion. Readers with specific questions should refer to the applicable standards or consult with an attorney.

Source: Grainger Know How – https://www.grainger.com/know-how


Farm Safety Photo Tips for Media Fallen Phrases – Spanish

Respuesta:
Hacer fotos atractivas al aire libre en la granja no es para los débiles de corazón. La luz solar intensa, los animales que roban la toma, los fondos sucios, el clima y las distracciones focales pueden hacer fracasar una foto. No permita ni muestre a los niños cerca de los animales grandes a menos que sean evidentes las barreras apropiadas.


Farm Safety Photo Tips for Media Fallen Phrases

Answer:
Taking attractive outdoor photos on the farm is not for the faint and heart. Harsh sunlight, animal that steal the shot, grungy backgrounds, the weather, and focal distractions can make a photo fail. Don’t allow or show children near large animals unless appropriate barriers are evident.


Quick Course – If the Safety Shoe Fits the Hazard Wear It

Choosing the right footwear carefully is important, because in certain instances, the right protective footwear can save your life. This quick course covers types of hazards to the feet and how to protect yourself.


Quick Course – Drunk Driving

Being involved in an accident like drink driving, affects more than just yourself. It affects your family emotionally as well as financially. This quick course covers the risks of drunk driving and how to reduce your risk.


Quick Course – Costs of Drugs on the Job

Individuals who come to work under the influence of drugs and alcohol are a big concern for many employers across the world. This quick course covers issues arising with drugs in the workplace and ways to avoid some of these issues.


Quick Course – Moving Materials Pain Free

Construction workers carry materials of all shapes and sizes. This quick course covers how to move them without hurting yourself or others.


Quick Course – Heavy Work Means Strains and Sprains

In this quick course we’ll learn about the difference between strains and sprains, discover the risk factors that increase the likelihood of a strain or sprain, and discuss how these injuries can be prevented.


Quick Course – Five Reasons to Work Safe Today

This quick course will cover why it’s important to work safe including five main reasons and the dangers associated with not working safely.


Quick Course – Good Footwear Beats Sore Feet

It is important to select footwear that is comfortable, safe and sturdy. Choose poorly and you suffer from discomfort, pain, fatigue and a range of foot problems including calluses, ingrown toenails and tired feet. This quick course covers the importance of choosing the right footwear.


Quick Course – Concrete Burns

A common hazard that needs to be discussed and addressed when working with concrete is concrete burns (also called cement burns). This quick course covers the hazards associated with working with concrete and how to protect yourself.


What is Your Why Word Search – Spanish

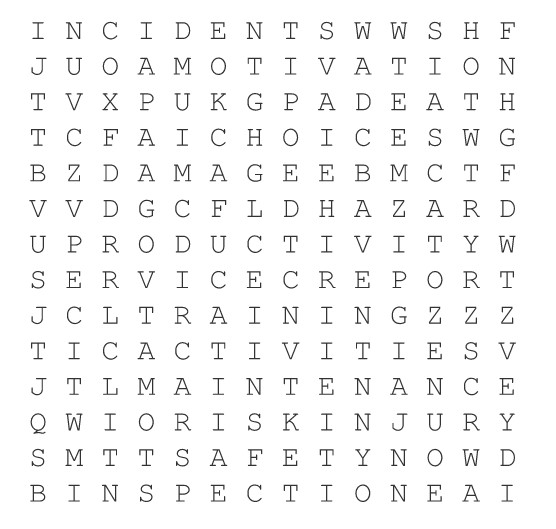
Pistas:

Actividades, Opciones, Daño, Muerte, Peligro, Incidentes, Lesiones, Motivación, Productividad, Informe, Riesgo, SafetyNow, Servicio


What is Your Why Word Search

Clues:

Activities, Choices, Damage, Death, Hazard, Incidents, Injury, Inspection, Motivation, Productivity, Report, Risk, SafetyNow, Service, Training


What is Your Why Fatality File

Worker Suffers Serious Injury After Arm Caught in Machine 

Less than a year after federal inspectors cited an Ohio rubber-hose manufacturer for 11 machine safety violations, the company now faces an additional $70,000 in fines after safety lapses led a 27-year-old male worker to suffer severe injuries at its Bellefontaine, Ohio, plant.

Inspectors from OSHA investigating the February 16, 2016, injury at HBD/Thermoid, Inc., found an improperly guarded drive belt caught the worker’s left arm and caused lacerations and fractures. The agency issued one willful citation to the company on June 9.

“HBD/Thermoid is a repeat violator that continues to put workers at risk of amputations and serious injuries by ignoring safety rules for industrial machines used by workers who manufacturer rubber hoses at the company’s six facilities across the country,” said Kim Nelson, area director of OSHA’s Toledo office. “The company needs to take immediate action and fix these safety issues at its facilities. Employees and their families pay the painful price when companies don’t follow standards to reduce injuries.”

In May 2015, OSHA cited the Bellefontaine facility, for one willful and 10 serious safety violations and levied penalties of $134,000. The agency initiated the 2015 inspection after receiving a referral from the North Carolina Occupational Safety and Health Division after an employee died after being caught in an industrial machine at the company’s Salisbury facility.


What is Your Why Fatality File – Spanish

Un trabajador sufre lesiones graves al quedar atrapado su brazo en una máquina 

Menos de un año después de que los inspectores federales citaran a un fabricante de mangueras de caucho de Ohio por 11 violaciones de la seguridad de las máquinas, la empresa se enfrenta ahora a una multa adicional de 70.000 dólares después de que los fallos de seguridad llevaran a un trabajador de 27 años a sufrir graves lesiones en su planta de Bellefontaine, Ohio.

Los inspectores de la OSHA que investigaron la lesión del 16 de febrero de 2016 en HBD/Thermoid, Inc. encontraron que una correa de transmisión mal protegida atrapó el brazo izquierdo del trabajador y le causó laceraciones y fracturas. La agencia emitió una citación intencional a la empresa el 9 de junio.

“HBD/Thermoid es un infractor reincidente que sigue poniendo a los trabajadores en riesgo de sufrir amputaciones y lesiones graves al ignorar las normas de seguridad de las máquinas industriales utilizadas por los trabajadores que fabrican mangueras de caucho en las seis instalaciones de la empresa en todo el país”, dijo Kim Nelson, directora de zona de la oficina de OSHA en Toledo. “La empresa debe tomar medidas inmediatas y solucionar estos problemas de seguridad en sus instalaciones. Los empleados y sus familias pagan el doloroso precio cuando las empresas no siguen las normas para reducir las lesiones.”

En mayo de 2015, la OSHA citó a las instalaciones de Bellefontaine, por una infracción intencionada y 10 infracciones graves de seguridad, e impuso sanciones por valor de 134.000 dólares. La agencia inició la inspección de 2015 tras recibir una remisión de la División de Seguridad y Salud Ocupacional de Carolina del Norte después de que un empleado muriera tras quedar atrapado en una máquina industrial en las instalaciones de la empresa en Salisbury.


What is Your Why Picture This

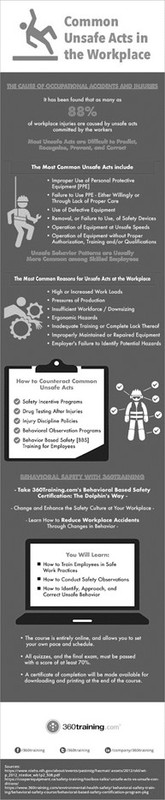
Source: https://www.360training.com/blog/common-unsafe-acts-in-the-workplace


What is Your Why Picture This – Spanish

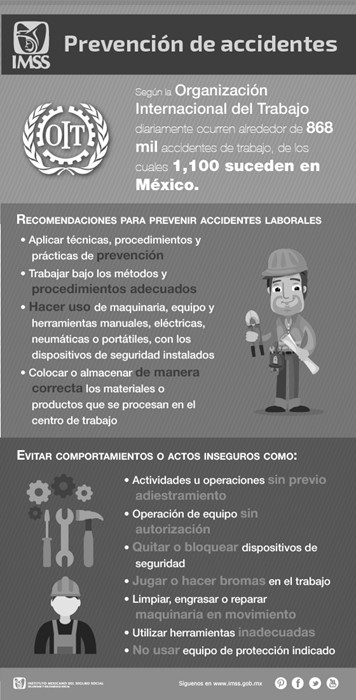
Source: http://www.imss.gob 


Preventing Injuries From Slips, Trips and Falls Meeting Kit

COMMON SLIPS, TRIPS, AND FALLS INCIDENTS 

Slips, trips, and falls are one of the leading causes of injuries and fatalities in the workplace. According to OSHA, slip, trip, and fall incidents cause 15% of all accidental deaths, and are second only to motor vehicle incidents as a cause of fatalities on the job. 

SLIPS, TRIPS/FALLS DEFINITIONS 

Slips happen when there’s not enough friction or traction between your feet (shoes) and the surface you’re walking or working on.

Trips happen when your foot or lower leg hits an object and your upper body keeps on going, causing you to lose balance.

Falls happen when you slip, or trip and you’re thrown too far off balance.

Falls are among the leading causes of death in the workplace and a fall at work can put you out of commission. Weeks in pain, months in a cast or years in a wheelchair can be the result of a simple slip, trip or fall. Even a fall from the same level – instead of a fall from a height – can cause a fatal or crippling injury.

GUIDELINES FOR PREVENTION 

Create Good Housekeeping Practices. There are three steps to get started

  • Plan ahead– Know what needs to be done, who’s going to do it and what the particular work area should look like when you are done.
  • Assign responsibilities– It may be necessary to assign a specific person or group of workers to clean up.
  • Implement a program– Establish housekeeping procedures as a part of the daily routine.

Reduce Wet or Slippery Surfaces

  • Keep parking lots and sidewalks clean and in good repair condition.
  • When snow and ice are present, remove or treat these elements. In some extreme cases, it may be necessary to suspend use of the area.
  • Use adhesive striping material or anti-skid paint whenever possible.
  • Use moisture-absorbent mats with beveled edges in entrance areas. Make sure they have backing material that will not slide on the floor.
  • Display “Wet Floor” signs as needed.
  • Use anti-skid adhesive tape in troublesome areas.
  • Clean up spills immediately. Create a procedure for taking the appropriate action when someone causes or comes across a food or drink spill.

Avoid Creating Obstacles in Aisles and Walkways

Injuries can also result in trips caused by obstacles, clutter, materials and equipment in aisles, corridors, entranceways and stairwells. Proper housekeeping in work and traffic areas is still the most effective control measure in avoiding these types of hazards. 

  • Keep all work areas, passageways, storerooms and service areas clean and orderly.
  • Avoid stringing cords, cables or air hoses across hallways or in any designated aisle.
  • In office areas, avoid leaving boxes, files or briefcases in the aisles.
  • Encourage safe work practices such as closing file cabinet drawers after use and picking up loose items from the floor.
  • Conduct periodic inspections for slip and trip hazards.

Create and Maintain Proper Lighting

  • Use proper illumination in walkways, staircases, ramps, hallways, basements, construction areas and dock areas.
  • Keep work areas well lit and clean.
  • Upon entering a darkened room, always turn on the light first.
  • Keep poorly lit walkways clear of clutter and obstructions.
  • Keep areas around light switches clear and accessible.
  • Repair fixtures, switches and cords immediately if they malfunction.

Wear Proper Shoes

The shoes we wear can play a big part in preventing falls. The slickness of the soles and the type of heels worn need to be evaluated to avoid slips, trips and falls. Whenever a fall-related injury is investigated, the footwear needs to be evaluated to see if it contributed to the incident. 

Control Individual Behavior

This condition is the toughest to control. It is human nature to let our guard down for two seconds and be distracted by random thoughts or doing multiple activities. Taking shortcuts, not watching where one is going, using a cell phone, carrying materials which obstructs the vision, wearing sunglasses in low-light areas, not using designated walkways and speed are common elements in many on-the-job injuries.

FINAL WORD

Slips, Trips, and Falls are a leading causes of workplace injury and death. They also cause a great deal of pain and suffering. Take slip, trip and fall hazards seriously, and don’t let them trip you up.