Quick Course – An Injury Free Office
An injury-free office helps your workplace run smoothly. This quick course will cover some common hazards in office settings and how to avoid them.
An injury-free office helps your workplace run smoothly. This quick course will cover some common hazards in office settings and how to avoid them.
Electric and magnetic fields (EMF) are invisible lines of force that surround any electrical device. Electrical wiring, electrical equipment and power lines all produce electric and magnetic fields. Electrical fields and magnetic fields can be characterized by their wavelength, frequency and amplitude (strength). The wavelength describes the distance between the peak of one wave to the peak of the next wave. Frequency is the number of wave cycles per second measured in Hertz (Hz). Electricity in the United States alternates or changes direction at 60 cycles per second or 60 Hz. In many other parts of the world the frequency of electric power is 50 Hz. If equipment uses batteries, the current flows in only one direction and is referred to as direct current. Direct current produces a static or stationary magnetic field which would be 0 Hz.
The term EMF can describe electromagnetic fields with high or low frequencies. In general, when you see EMF, it usually refers to electric and magnetic fields at extremely low frequencies (ELF) such as those associated with the use of electrical power. This focuses primarily with electric and magnetic fields in the low frequency range, primarily 50 or 60 Hz which is produced by the generation, transmission and use of electricity.
Electric Fields
Electric fields are produced by voltage and increase as the voltage increases. The strength of the electric field is measured in units of volts per meter (V/m). Electric fields often are present even if the equipment is turned off, as long as it remains connected to the power source. Electric fields decrease rapidly the further you get from the source. They are also shielded or weakened as they pass through buildings, trees, clothes etc.
Magnetic Fields
The magnetic fields result from the flow of current through wires or electrical devices and increase in strength as the current increases. Magnetic fields are measured in units of Gauss (G) or Tesla (T). Gauss is most commonly used in the United States and Telsa is the internationally accepted term. Unlike an electric field, a magnetic field is only produced when the current is flowing. Magnetic fields also decrease rapidly the further you get from the source but are not as easily shielded as electrical fields; magnetic fields tend to pass through most materials which is why they tend to be more of a concern.
Health Effects of Electric and Magnetic Fields
Reported symptoms from the general public to electric and magnetic field exposure include headaches, anxiety, depression, nausea and fatigue. To date, scientific evidence does not support a link between these symptoms and exposure to electric and magnetic fields. The most recent research has been focused on magnetic fields because some epidemiological studies have suggested an increased risk of cancer with exposure to magnetic fields while no similar associations have been reported for electric fields. Although there is some weak scientific evidence to suggest a link between electric and magnetic fields and cancer, at this time, there have been no confirmed links between EMF exposure and an increase risk of cancer, leukemia or other non-cancer related disease.
Electric and Magnetic Field Exposure Standards
Currently there are no federal standards that limit occupational or residential exposure to 60 Hz EMF. Several states have standards for electric fields on transmission lines and a few have standards for magnetic fields. Some states further limit electric field strength at road crossing to ensure that electric current induced into large metal object like trucks and buses does not represent an electric shock hazard. Personal exposure limits as low as 1–3mG have been suggested by manufacturers of electric and magnetic field meters and different organizations have developed their own exposure guidelines which are 10 Gauss or higher. Since there isn’t consistency in recommended exposure levels, common sense would dictate that a practice of minimal exposure be exercised whenever possible.
Measuring Electric and Magnetic Fields
Many manufacturers make instruments for measuring electric and magnetic fields. Most of the instruments that are called EMF meters may only be capable of measuring magnetic fields and not electrical fields; this is because most of the health concerns seem to come from the magnetic fields. Check the measuring ranges to see what frequencies the instrument is capable of measuring. The entry level meters that measure magnetic fields are usually single axis meters. Since magnetic fields are oriented in space, a single axis meter only has one sensor and will need to be rotated in space until you get the highest reading. A triple axis meter has 3 sensors at right angles. This type of meter does not require rotation to get the correct readings.
Frequently Asked Questions
Q: Do electric and magnetic fields affect pacemakers?
A: According to the U.S. FDA, interference from electric and magnetic fields can affect various medical devices including cardiac pacemakers and implantable defibrillators. Check with the manufacturer of these specific devices for their limitations.
Q: Are cell phones and towers sources of electric and magnetic field exposure?
A: These items involve radio-frequency and microwave-frequency electromagnetic fields. These are a much higher frequency than power generation electric and magnetic fields. At radio and microwave frequencies, electric and magnetic fields are considered together as the two components of an electromagnetic wave. Power density, measured in watts per square meter (W/m2), describes the intensity of these fields. These items are regulated by the Federal Communications Commission (FCC) to ensure compliance with exposure standards. These types of items cannot be measured by most EMF meters because they are outside of the frequency range of the meters. There are EMF meters available for this application just make sure to check the application and frequency range of the instrument before you purchase.
Q: How do I convert between Gauss and Tesla?
A: 1 Tesla = 10,000 Gauss
1 Milligauss is 1/1000 of a Gauss
1 Microtesla is 1/1,000,000 of a Tesla
To convert from Microtesla to Milligauss, multiply by 10
1 Microtesla = 10 Milligauss and 0.1 Microtesla = 1 Milligauss
Q: How are EMF meters used in paranormal research?
A: There are many websites that specialize in these types of applications where you can obtain information, but generally for this application, EMF Meters are used to seek out unexplainable levels or changes in the natural magnetic field, hopefully providing credible evidence of paranormal activity.
Sources
www.lessemf.com
World Health Organization
NIOSH
The information contained in this article is intended for general information purposes only and is based on information available as of the initial date of publication. No representation is made that the information or references are complete or remain current. This article is not a substitute for review of current applicable government regulations, industry standards, or other standards specific to your business and/or activities and should not be construed as legal advice or opinion. Readers with specific questions should refer to the applicable standards or consult with an attorney.
Source: Grainger Know How – https://www.grainger.com/know-how
The Occupational Safety and Health Administration (OSHA) has two different types of regulations that address emergency shower and eyewash and eye/face wash station equipment needs. The first is a general requirement applicable to all facilities that require the installation of emergency shower or eye wash station equipment as a form of first aid [29 Code of Federal Regulations (CFR) 1910.151(c)]. The second type is specific to certain industries.
29 CFR 1910.151(c) states “Where the eyes or body of any person may be exposed to injurious corrosive materials, suitable facilities for quick drenching or flushing of the eyes and body shall be provided within the work area for immediate emergency use.”
The industries referenced in the second type of OSHA regulations include: Activities Utilizing an Open Surface Tank; Storage and Handling of Anhydrous Ammonia; Powered Industrial Trucks; Pulp, Paper and Paperboard Manufacturing; Telecommunications; Formaldehyde Handling; Hazardous Materials; and Construction Industry.
Both regulation types specify where and when emergency eye wash and shower equipment must be available. Neither, however, specifies minimum selection, installation, operation or maintenance requirements. OSHA refers employers to the American National Standards Institute (ANSI) and the International Safety Equipment Association (ISEA) ANSI/ISEA Z358.1 American National Standard for Emergency Eyewash and Shower Equipment standard as a recognized source for such guidance.
ANSI/ISEA Z358.1 is a national consensus standard that helps users select, install, operate and maintain emergency eyewash, eye/face wash and shower equipment. It was issued in 1981 and revised in 1990, 1998, 2004, 2009, and again in 2014. This Standard is part of the building code in locations which have adopted the International Plumbing Code (IPC). The IPC is in use or adopted in 35 states, the District of Columbia, Guam and Puerto Rico.
Emergency Eyewash, Eye/Face Wash and Shower General Requirements
Installation / Location:
Temperature
Maintenance and Inspection
Training
Shower Requirements
There are two types of emergency showers:
Key emergency shower features and specifications include:
Eyewash and Eye/Face Wash Station Requirements
There are two types of eyewash and eye/face wash stations:
Key eyewash and eye/face wash station features and specifications include:
Personal Eye Wash Requirements
A Personal Eye Wash is a supplementary eye wash that supports plumbed units, gravity-fed units or both by delivering immediate flushing fluid.
NOTE: Personal eye wash units do not meet the requirements of plumbed or self-contained eye wash equipment. Personal eye wash units can support plumbed or gravity-fed eye wash units but cannot be a substitute.
Drench Hose Requirements
A drench hose is a supplemental device consisting of a flexible hose connected to a flushing fluid that’s used to irrigate and flush eyes, face and body areas. Plumbed and self-contained options are available. NOTE: Drench hoses may be considered an eye wash or eye/face wash if the device meets the performance requirements discussed previously.
Commonly Asked Questions
Q: What water temperature is required?
A: According to ANSI/ISEA Z358.1-2014, tepid is defined as a “flushing fluid temperature conducive to promoting a minimum 15-minute irrigation period. A suitable range is 60 to 100 °F.” Medical recommendations suggest flushing fluid at tepid temperatures be delivered to affected chemically injured tissue. Temperatures in excess of 100 °F have proven to be harmful to the eyes. Cold flushing fluid does provide immediate cooling after chemical contact, but prolonged exposure to cold fluids can affect the ability to maintain adequate body temperature. Information indicates that a temperature of 60 °F is suitable for the lower parameter for tepid flushing fluid without causing hypothermia to the user.
Q: Why is weekly activation for plumbed emergency eyewash and shower equipment suggested?
A: The intent of weekly activation is to ensure that there is flushing fluid supply at the head of the device, to clear the supply line of any sediment build-up that could prevent the flushing fluid from being delivered to the head of the device, and to minimize microbial contamination due to stagnant water. The activation duration depends on the volume of water contained in the unit itself and all sections of pipework that do not form part of a constant circulation system (i.e. “dead leg” portions). Water in these sections is stagnant until a flow is activated by opening a valve. The goal is to flush out stagnant water in the dead leg completely. Where mixing valves are used, both the hot water and cold water supplies to the valve must be considered.
Sources
29 CFR 1910.151(c)
ANSI/ISEA Z358.1-2014
International Plumbing Code
29 CFR 1910.1000 to end
The information contained in this article is intended for general information purposes only and is based on information available as of the initial date of publication. No representation is made that the information or references are complete or remain current. This article is not a substitute for review of current applicable government regulations, industry standards, or other standards specific to your business and/or activities and should not be construed as legal advice or opinion. Readers with specific questions should refer to the applicable standards or consult with an attorney.
Source: Grainger Know How – https://www.grainger.com/know-how
Spills of hazardous substances must be absorbed, neutralized or controlled at the time of the incident in order to maintain workplace safety. Acid and base neutralization helps make spilled materials safer to handle and helps decrease the cost of disposal.
How Do You Know If a Solution Is Acidic or Basic?
The best way to determine if a material is acidic or basic is to measure its pH. This can be accomplished with pH paper, chemical indicators or pH meters. The pH scale measures from 0 to 14. Chemicals with a pH of 0 to 3 are considered strong acids. Chemicals with a pH of 12 to 14 are considered strong bases. To be considered neutral, a chemical must have a pH of 7.
Acids typically will have a sour taste and a pH of less than 7. There are two types of acids: mineral (inorganic) acids such as sulfuric, hydrochloric or nitric and carboxylic (organic) acids such as formic or acetic. To neutralize acids, a weak base is used.
Bases have a bitter or astringent taste and a pH greater than 7. Common bases are sodium hydroxide, potassium hydroxide and ammonium hydroxide. Bases are neutralized by using a weak acid.
Products for Acid and Base Neutralization
There are many different products available that aid in the neutralization of acids and bases. They can be as simple as a bag of citric acid or sodium bicarbonate (baking soda), or as complex as a solidifier and a neutralizer combined. Some of the major considerations in selecting the best method of neutralization are safety (mixing chemicals is always a potentially dangerous process), cost and convenience.
When neutralization occurs, the acid and base react, forming water, salt and heat. If the acid and base are both very strong (such as concentrated hydrochloric acid and concentrated sodium hydroxide), a violent reaction will occur. This is why most neutralizers are very weak — to help keep the reaction at a slow pace and lessen the evolution of heat and gas.
Most neutralizer manufacturers provide an estimated volume of acid/base that their product will neutralize. It can take a large amount of the product to neutralize an acid or base, especially if it is concentrated. Some acid and base neutralizers have a built-in color indicator to let you know when the spill is neutralized. Other neutralizers require you to check the pH with pH paper or a pH meter to monitor the neutralization process. Some neutralizers also solidify the spill as they neutralize, to help make the spill easier to clean up. See the comparison charts below for examples of treatment ratios for some common neutralizers for acids and bases.
Chart A
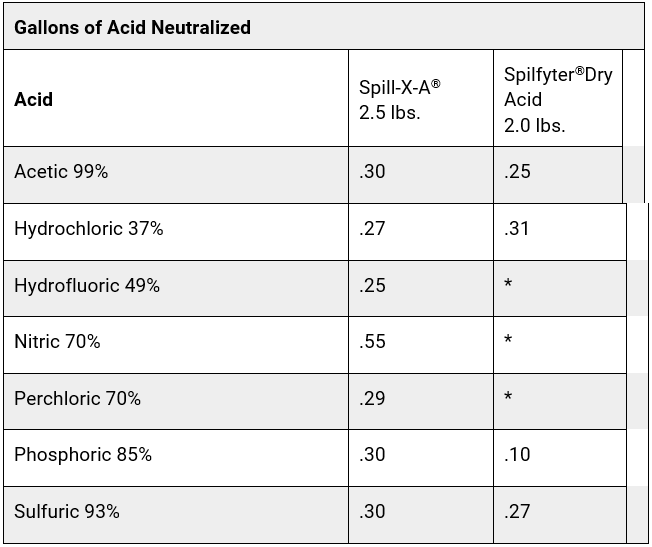
*Not Applicable
Chart B

Sources
ANSUL Spill X
NPS Corporation
Source: Grainger Know How – https://www.grainger.com/know-how
Get the NIST and ISO information you need here. Get an overview of these organizations to ensure you’re in the know when it comes to standards.
The National Institute of Standards and Technology (NIST) is a non-regulatory federal agency under the Department of Commerce. NIST is the United States National Measurement Institute. Their mission is to develop and promote measurement, standards and technology to enhance productivity, facilitate trade and improve the quality of life.
As part of their main mission, NIST certifies and provides standard reference materials (SRM). SRMs are used to perform instrument calibrations, verify accuracy of specific measurements and to support development of new measurement methods. SRMs are also used to support measurement traceability in the United States. NIST provides a Certificate of Analysis and a Material Safety Data Sheet (if applicable) with every SRM.
NIST certification means a product has been tested against an NIST SRM and meets the exacting requirements for that product. Some common NIST certified products include timers, calibration weights, sound level meters, tachometers, electrical multi-meters, thermometers, clocks, pressure gauges, anemometers, pH meters, micrometers and light meters, just to name a small selection. Basically, most products that measure for something have an equivalent NIST SRM that a manufacturer can compare the product against to ensure it is working within the acceptable parameters. Once the item has been tested it is sold with an NIST certificate with an expiration date on it to let the end user know when the item needs to be recalibrated or retested.
An NIST certification can be a NIST Certificate of Calibration, meaning that the item was tested to be within its stated tolerance of accuracy and if it was not, the unit is adjusted to be within that tolerance. Another type of NIST certification is an NIST Certificate of Compliance. A certificate of compliance means that the unit was tested to be within its stated tolerance and did fall into that tolerance, but no adjustment is possible on the item. Certificates of compliance would be applicable for products such as glass tube thermometers or hydrometers.
NIST Traceable Certificates means that the item in question would not have been tested against an NIST SRM but has been tested against an item that has a paper trail leading back to an NIST SRM. An NIST SRM thermometer might test a second thermometer. If all the appropriate paper work listing all stated uncertainties is filled out properly, that 2nd thermometer would have a certificate of compliance traceable to NIST Standards. Traceability requires the establishment of an unbroken chain of comparisons to stated references. NIST states that it is the responsibility of the provider of the NIST traceable item to support the claim of traceability, but it is the responsibility of the user to assess the validity of the claim.
NIST certification does not imply or indicate any approval, recommendation or endorsement of any product, supplier, manufacturer or user of any NIST certified equipment.
Why get NIST certification or calibration?
NIST certification can be expensive, adding as much as several hundred dollars to the price of the same item without the certification. However, there are several benefits to getting a certified product. NIST certification will prove that the product you receive has been specifically tested before you receive it to ensure it is accurate. The service of calibration is specifically designed by the NIST to help the makers and users of precision instruments achieve the highest possible levels of measurement quality and productivity.
There are some industries that require International Organization for Standardization (ISO) compliance. Also, there are some organizations that voluntarily strive to meet the ISO requirements so they can advertise as ISO compliant. This compliance is often seen as an indicator of a company’s excellent service or product quality. ISO requirements often call for all testing instrumentation to have NIST certification for documentation purposes.
What is ISO?
The International Organization for Standardization (ISO) is a non-governmental organization that is the world’s largest developer of standards. Their goal is to create international standards that help facilitate trade, lead to similar levels of workmanship, increase product quality, make the world safer, create more reliable products and services, and increase interchangeability of products and services. Because ISO is non-governmental, their standards are voluntary. They have no authority to enforce their standards. Regulatory agencies may choose to adopt ISO standards and then use their regulatory powers for enforcement.
A common ground for international companies and products make trade easier and more fair. For instance, ISO has a standard regarding the size and configuration of bank cards. That allows international banks to follow one format for automated teller machines (ATM) and credit card swiping machines. It also allows consumers to cross international borders and still use their same cards. Standardization such as this makes life easier for both consumers and manufacturers.
Standards are developed by ISO based on a need that is felt by an industry or business sector which then passes that need on to ISO. A technical committee is then set up which consists of experts in the field from the industry or business sector requesting the standard. The committee meets to discuss, debate and argue to come up with a draft agreement. The draft is circulated for more discussion and balloting. After accounting for feedback, the draft is circulated again as a final draft for a final vote. If that vote is positive, the standard is published as an International Standard.
ISO’s most popular and far reaching standards are their generic standards. Generic standards can be applied to any organization regardless of the size of the operation. Generic standards can apply to both product producers and service providers. ISOs most far reaching generic standards are the ISO 9000 and ISO 14000 families.
ISO 9000 is a family of standards which deals primarily with quality management. Companies striving to meet ISO 9000 requirements are trying to increase customer satisfaction, meet all regulatory requirements, meet customer quality demands and continue to improve their performance in order to meet such objectives.
The ISO 14000 family of standards covers environmental management. Organizations meeting these standards are expected to minimize harmful effects to the environment caused by its activities and to achieve continual improvement of its environmental performance. The main goals of these standards are to reduce the use of raw materials, reduce energy consumption, improve process efficiency, reduce waste generation and disposal costs, and to utilize recoverable resources.
Commonly Asked Questions
Q: Do I need to buy an NIST certified instrument for my application?
A: That is a question that only the end user can answer. There is no difference whatsoever from an instrument without NIST certification and an instrument with NIST certification. The difference is in the paperwork that accompanies the instrument. If, for your application, you need documentation that the instrument you receive has been tested prior to shipment, then NIST certification is the only way to get that proof. Also, companies that are trying to meet ISO standards need to get the NIST certification.
Q: Can I buy the meter now and then ask for and buy the certification letter at a later time?
A: No. All certifications must be directly linked to their products. You are not only purchasing a letter of certification. That letter is a certification that the exact product you buy has been compared and/or calibrated to NIST standards.
The information contained in this article is intended for general information purposes only and is based on information available as of the initial date of publication. No representation is made that the information or references are complete or remain current. This article is not a substitute for review of current applicable government regulations, industry standards, or other standards specific to your business and/or activities and should not be construed as legal advice or opinion. Readers with specific questions should refer to the applicable standards or consult with an attorney.
Source: Grainger Know How – https://www.grainger.com/know-how
Una comunicación eficaz y oportuna es imprescindible antes, durante y después de las catástrofes y emergencias. En caso de incidente, el primer empleado en el lugar de los hechos debe ponerse en contacto con alguien con capacidad de supervisión después de ponerse en contacto con las autoridades (si es necesario) o tomar otras medidas para hacer frente a la emergencia en cuestión. Si no consigue contactar inmediatamente con un supervisor, siga intentándolo.
COMUNICACIÓN CON LOS EMPLEADOS
En situaciones de emergencia, es importante que todos los empleados estén localizados y que comprendan el papel fundamental que desempeñan en el control del flujo de información.
Una lista de contactos debe tener el número de teléfono móvil de cada empleado, su dirección de correo electrónico y un contacto de emergencia. Las propiedades pueden considerar tener un “árbol de llamadas” para que todos los empleados puedan ser localizados y notificados rápidamente. En algunos casos, como una catástrofe natural, el servicio de telefonía móvil puede estar interrumpido y puede ser más fácil comunicarse por correo electrónico. Los mensajes que se transmitan a los empleados deben ser claros y concisos para garantizar una transmisión coherente.
COMUNICACIÓN EN LA LÍNEA INFERIOR
En cualquier comunicación, es importante ser muy específico sobre el incidente para que no se intensifiquen las exageraciones al comunicarlo. Limítese a los hechos y no especule.
MEJORES PRÁCTICAS DE LOS EMPLEADOS PARA TODAS LAS EMERGENCIAS
Conozca a la persona designada por su empresa durante una catástrofe o emergencia.
Seguir estas buenas prácticas puede ayudarle a responder y recuperarse más rápidamente en caso de desastre o emergencia:
SUMINISTROS SUGERIDOS PARA CATÁSTROFES
Todas las comunicaciones en una catástrofe deben repetir y transmitir sólo los hechos sobre la catástrofe inminente y no especular ni exagerar lo que se informa. Claro, conciso y correcto es el mantra de la comunicación.
What do Dr. Ignaz Semmelweis and mothers everywhere have in common? The knowledge that proper handwashing is an important means of preventing the spread of disease-causing germs. Dr. Semmelweis was a Hungarian physician who, in the 1840s, demonstrated that the mortality rate among mothers who delivered in the First Obstetrics Clinic at the General Hospital of Vienna was significantly lower when hospital staff cleaned their hands with an antiseptic agent prior to patient contact.
This was the beginning of the concept of infection control, not just in hospital settings, but in public health in general. Today the value of proper handwashing is recognized not only in healthcare settings, but also in schools, child care settings and eating establishments, as well as throughout the general community.
Handwashing
The Centers for Disease Control and Prevention (CDC) recommends cleaning hands in a specific way to avoid getting sick and spreading germs to others:
In the event handwashing facilities are not available, an alcohol-based hand sanitizer can be used. The CDC suggests using a sanitizer with an alcohol concentration of 60% or greater. It is important to note that hand sanitizers are effective against common diseases but are ineffective against certain organisms such as bacterial spores. Also, hand sanitizers are less effective if your hands are soiled. Removing any dirt or debris before using the sanitizer will increase the effectiveness.
To use hand sanitizers, apply the product to the palm of one hand, rub hands together and then rub the product over all surfaces of the hands and fingers until hands are dry.
Hand sanitizer should not be used in place of soap and water all of the time due to decreased effectiveness. The reason for decreased effectiveness is alcohol in sanitizers can remove natural oils from your hands, which will cause your hands to dry out and crack. Germs can remain trapped within the cracks of your hands.
Foodborne Illnesses
The Food and Drug Administration (FDA) and CDC work together to control the transmission of pathogens that can result in foodborne illnesses. Transmission of pathogenic bacteria, viruses and parasites from raw food, or from infected workers to food by way of improperly washed hands, continues to be one of the major factors in the spread of foodborne illnesses.
The FDA’s Food Code contains federal recommendations for the prevention of foodborne illnesses in restaurants, grocery stores, institutions and vending locations. This code is used by local, state and federal regulators as a model for their own safety rules. The Food Code contains specific hand hygiene guidelines for retail and food service workers, describing where, when and how to wash and sanitize hands. OSHA’s Bloodborne Pathogen standard (29 CFR 1910.1030) mandates that institutions require proper handwashing facilities. If they are not feasible, antiseptic cleansers or antiseptic towelettes must be made available.
Commonly Asked Questions
Q: What is hand hygiene?
A: Hand hygiene is a general term that applies to routine handwashing, antiseptic hand wash, antiseptic hand rub or surgical antisepsis.
Q: Are alcohol-based hand gels accepted in place of washing with soap and water in a retail or food service setting?
A: Retail food and food service work involves a high potential for wet hands, and scientific research questions the efficacy of alcohol on moist hands. Alcohols do not adequately reduce important foodborne pathogens on the preparer’s hands, thus the ingredients in alcohol-based gels for retail or food service must be approved food additives and approved under the FDA monograph or as a New Drug Application. Proper handwashing with soap and water is still the preferred method.
Q: Should disinfectants be used for washing hands?
A: No, disinfectants are designed for objects and surfaces and may be too harsh for use on skin tissue. Antimicrobial soaps and alcohol-based soaps are best for proper handwashing.
Sources
FDA’s Retail Food Protection: Employee Health and Personal Hygiene Handbook
The information contained in this article is intended for general information purposes only and is based on information available as of the initial date of publication. No representation is made that the information or references are complete or remain current. This article is not a substitute for review of current applicable government regulations, industry standards, or other standards specific to your business and/or activities and should not be construed as legal advice or opinion. Readers with specific questions should refer to the applicable standards or consult with an attorney.
Source: Grainger Know How – https://www.grainger.com/know-how
Ebola is a viral disease often referred to as Ebola Hemorrhagic Fever. Ebola was first diagnosed in 1976 during two simultaneous outbreaks in Africa. The outbreak of 2014 is the largest outbreak in history affecting multiple countries of West Africa with the potential to spread globally. There are currently five species of Ebola that have been identified. Each Ebola species is associated with a specific mortality rate. According to the U.S. Navy’s Emerging Infections Department the mortality rate during the 2014 Ebola outbreak in Africa has been between 50 to 75%. Some species, such as the Zaire Ebola virus have been up to 90% fatal. The natural host to the Ebola virus is unknown but antibody testing has shown that fruit bats in Africa may be a reservoir for the disease.
Transmission and Risk
Ebola is spread by direct contact with the virus through broken skin or via mucous membranes (eyes, mouth, and nose). The virus can be found in bodily fluids such as blood, stool, urine, saliva, vomit, mucus, sweat, tears, breast milk and semen. Ebola also can be transmitted from items an infected person has come into contact with such as soiled clothing, bed linens or needles. The people most at risk for contracting Ebola are people who work directly with a patient while he/she is exhibiting symptoms. These include healthcare workers, family members or even mourners and workers who come into contact with the bodies as part of burial rituals. Once exposure to the virus occurs, individuals can become symptomatic within 2-21 days but the average time is between 8-10 days. Once symptoms appear individuals are contagious and able to spread the virus. Anyone who feels they have been exposed to Ebola should monitor his or her symptoms for 21 days and seek medical care immediately if symptoms emerge.
Symptoms
Early common symptoms for Ebola include symptoms similar to many other viral infections. They include fever (greater than 101.5°F), fatigue, muscle pain, abdominal pain, headache and sore throat. As the illness progresses, patients can have nausea, vomiting, diarrhea, impaired organ function as well as blood count changes. Some patients experience rashes, bruising, internal and/or external bleeding from skin, eyes, or gums, which was why Ebola was originally named a hemorrhagic fever. Ebola patients may die from diffuse bleeding and shock.
Anyone showing the symptoms of Ebola after being in direct contact with someone known to have the disease or having been in an area known to have Ebola should seek medical care immediately and limit exposure to the public. Once the healthcare facility has been informed of the risk of Ebola infection they can perform a blood test to confirm Ebola infection and help minimize the risk to the public with infection control measures.
Infection Control
The Centers for Disease Control and Prevention (CDC) has consolidated a list of Guidelines and Informational sheets to help protect healthcare workers from exposure to Ebola. New guidelines released on October 20, 2014 provide detailed instructions regarding training, demonstration of competency, oversight, and supervision including trained observers during donning and doffing steps. According to the CDC, healthcare workers coming into contact with Ebola or Ebola patients should wear personal protective equipment (PPE) to ensure no skin is exposed. That PPE must be donned correctly and not modified while in the patient care area. The CDC recommended list of PPE includes:
**With the updated guidance, goggles are no longer recommended as they may not provide complete skin coverage in comparison to a single-use disposable full face shield. Additionally, goggles are not disposable and may fog after extended use leading workers to be tempted to adjust them with contaminated gloved hands.
Hand Hygiene is a critical tool to help prevent the spread of infection. The World Health Organization (WHO) has created a simple infographic for hand hygiene. Hands should be washed before donning and wearing PPE, before performing any clean or aseptic procedures on a patient, after any exposure risk or exposure to a patient’s blood or body fluids, after touching potentially contaminated surfaces in the patient’s surroundings and after working with a patient with Ebola and removing contaminated PPE. Hands should be washed with hand soap and water and dried on single-use towels. Alcohol-based hand sanitizers/alcohol-based hand rubs (ABHR) can be used in place of hand washing unless the hands are visibly soiled and then soap and water should be utilized.
Other ways to help control infection include the proper disposal of all sharps, such as needles, in sharps disposal containers and regular and rigorous environmental cleaning including the decontamination of surfaces and equipment using an U.S. Environmental Protection Agency (EPA)-registered hospital disinfectant with a label claim of potency at least equivalent to that for a non-enveloped virus (e.g., norovirus, rotavirus, adenovirus, poliovirus). For more information the CDC has published a document on Interim Guidance for Environmental Infection Control in Hospitals for Ebola Virus.
Treatment and Prevention
There are currently no specific vaccines or medicines proven to be effective against Ebola. Best practices for treatment involve treating the symptoms. That includes providing intravenous fluids and balancing electrolytes, maintaining oxygen status and blood pressure and treating any subsequent infections if they occur. Some experimental treatments developed for Ebola have been tested in animals but have not yet been tested in randomized trials in humans. Recovery from Ebola is dependent on the immune response of the patient. However, survivors of Ebola typically develop antibodies that can last 10 years or more to protect them from subsequent infections.
The best ways to prevent an Ebola infection include:
Commonly Asked Questions
References and Sources for More Information
World Health Organization (WHO) FAQ on Ebola
WHO Ebola Topic Page
WHO Steps for donning and removing PPE
OSHA Ebola Topic Page
OSHA Fact Sheet: Protecting Workers during a Pandemic
CDC Ebola Factsheet
CDC Facts about Ebola in the US Infographic
CDC Guidelines for Patient Management in US Hospitals
CDC Ebola Guidance for Airlines
CDC Guidance on Personal Protective Equipment To Be Used by Healthcare Workers During Management of Patients with Ebola Virus Disease in U.S. Hospitals, Including Procedures for Putting On (Donning) and Removing (Doffing)
CDC Fact Sheet on Tightened Guidance for U.S. Healthcare Workers on Personal Protective Equipment for Ebola
DuPont Technical Bulletin for Protective Clothing for Ebola Virus Disease
3M FAQ on Personal Protective Equipment (PPE) for Ebola virus disease
The information contained in this article is intended for general information purposes only and is based on information available as of the initial date of publication. No representation is made that the information or references are complete or remain current. This article is not a substitute for review of current applicable government regulations, industry standards, or other standards specific to your business and/or activities and should not be construed as legal advice or opinion. Readers with specific questions should refer to the applicable standards or consult with an attorney.
Source: Grainger Know How – https://www.grainger.com/know-how
Safely storing hazardous materials and wastes is a necessity for many companies. Outdoor Chemical Storage Buildings provide an effective solution to fulfill this need. The National Fire Protection Association (NFPA) defines an outdoor chemical storage building as “a prefabricated structure, manufactured primarily at a site other than the final location of the structure, and transported completely assembled or in a ready-to-assemble package to the final location.” These buildings provide an economical means of storage and secondary containment because they eliminate the expense of constructing permanent structures. They also offer the additional benefit of being portable, allowing the buildings to be relocated should the need arise.
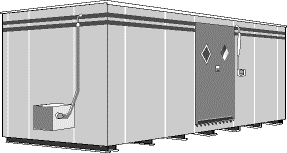
When selecting outdoor chemical storage buildings your choice will depend on the materials to be stored, how the building will be used, the volume of the materials being stored and the location of the building and design requirements.
Type of Material to Be Stored
If the materials to be stored are either flammable or combustible, you will need a building that meets the NFPA Code 30, Uniform Fire Code (UFC) Articles 79 and 80, or an equivalent local code. Check with the authority having jurisdiction (AHJ) to determine which code is locally enforced.
The class of the flammable-combustible material (refer to NFPA Code 30) can also dictate what type of building construction is required. Class I, II, or III flammable and combustible liquids will require either a non-combustible building or a fire-rated building. Non-combustible buildings are constructed of non-combustible material (such as steel), whereas a fire-rated building is constructed of non-combustible materials and includes fire resistant insulation in the walls. Fire-rated buildings are further divided into categories based on the fire resistance of the walls, roof and openings (doors and vents).
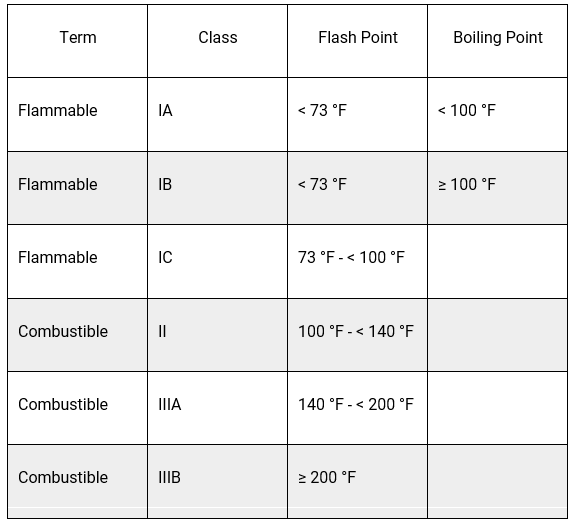
With the 2012 revision to the Occupational Safety and Health Administration’s (OSHA’s) Hazard Communication standard and the adoption of portions of the Globally Harmonized System of Classification and Labeling of Chemicals, flammable liquids are now either Category 1, 2, 3, or 4 flammable liquids. The NFPA fire codes still identify liquids as flammable IA, IB, IC or combustible II, IIIA and IIIB liquids. Information regarding the flammability of the chemical you are storing is located in Section 9 of the Safety Data Sheet (SDS).
OSHA’s Flammable Liquid Categories (29 Code of Federal Regulations 1910.106)

NFPA Flammable and Combustible Liquid Classifications
When storing non-flammable liquids, a non-combustible building may be sufficient, but you should check with the AHJ for specific requirements.
Storage vs. Dispensing
The design of the building will also be affected by whether or not you will be dispensing from containers stored in the building. Explosion relief panels are required for buildings that store and dispense Class IA liquids and that dispense Class IB liquids. Otherwise, an explosion relief panel is not required.
Amount of Material to Be Stored
The interior of the building should accommodate the number of containers required in a single layer and have adequate sump capacity to comply with the Environmental Protection Agency (EPA) Secondary Containment Requirements (40 CFR 264). To meet this regulation, the sump containment should be large enough to hold 100% of the volume of the largest container stored in the building or 10% of the total volume of all containers stored in the building, whichever is larger.
Location
The type of building you select will also have a bearing on the chosen location. Factory Mutual (FM), an insurance and testing agency, no longer specifies minimum distances between the storage building and any other main (occupied) building on the site and the property line of the facility. FM leaves the setback distances up to the AHJ.
Compliance and Approvals
Construction of outdoor chemical storage buildings must comply with a number of regulations including EPA 40 CFR 264, OSHA 29 CFR 1910.106, NFPA Codes 30 and 70, and UFC Article 79 and 80. In addition to the construction requirements, certain approvals may also be required for these buildings. These approvals include UL (Underwriters Laboratories) Classification and FM Approval. Additionally, certain states require that a Professional Engineer apply a Seal of Approval to the building, indicating that it meets all state regulations. Contact the AHJ for more details on the State Seal Program and to verify if your state requires an approval seal.
Options
A variety of options are available for outdoor chemical storage buildings. The options allow you to meet both your regulatory requirements and your custom design needs. Available options include electrical service, heating and cooling systems, fire suppression systems, exterior and interior lighting, shelving, ramps, insulation, emergency eyewash and shower and explosion-resistant features. .
More Assistance
If you have further questions regarding outdoor chemical storage buildings or if you would like help selecting and designing a building to meet your needs, contact your local Grainger Account Manager.
Commonly Asked Questions
Q: Can outdoor chemical storage buildings be moved from one location to another?
A: Yes. Outdoor chemical storage buildings are designed to be portable. When moving a building to a new location, be sure to confirm that the new location meets all required local codes. A building can also be moved indoors if needed. Buildings for flammable liquid storage being relocated indoors should have a continuous ventilation system that is exhausted to the outdoors, a four-hour fire rating, a fire suppression system and explosion relief panels directed towards a safe exterior location. Also, in most cases when storage is indoors and a sprinkler system is installed, the containment sump is required to be large enough to hold 100% of the volume of the largest container stored or 10% of the combined total volume of all of the stored containers, whichever is larger, plus the additional volume of the water discharged by the sprinkler system in 20 minutes. Again, be sure to consult your local Authority Having Jurisdiction (AHJ) to insure compliance with all local and/or state codes.
Q: Is there a difference between a chemical storage building and a chemical storage locker?
A: Yes. A chemical storage locker is usually smaller in size and generally doesn’t allow workers to enter the structure. Approval of storage lockers is limited to outdoor use only.
Q: Is there a difference between a chemical storage building and a chemical storage locker?
A: Yes. A chemical storage locker is usually smaller in size and generally doesn’t allow workers to enter the structure. Approval of storage lockers is limited to outdoor use only.
Q: Do chemical storage buildings need to be grounded?
A: Yes. According to the FM Approvals LLC, Approval Standard for Storage Buildings and Lockers Class Number 6049 General Design Requirements December 2013, a suitable means of grounding the building and individual containers must be provided. Grounding should meet the NFPA 70 requirements.
Sources
29 CFR 1910.106 Flammable Liquids
40 CFR 264 Standards for Owners and Operators of Hazardous Waste Treatment, Storage and Disposal Facilities
National Fire Protection Association Code 30 Flammables and Combustible Liquid Codes 2015 Edition
www.nfpa.org
Factory Mutual
Norwood, MA
www.fmglobal.com
The information contained in this article is intended for general information purposes only and is based on information available as of the initial date of publication. No representation is made that the information or references are complete or remain current. This article is not a substitute for review of current applicable government regulations, industry standards, or other standards specific to your business and/or activities and should not be construed as legal advice or opinion. Readers with specific questions should refer to the applicable standards or consult with an attorney.
Source: Grainger Know How – https://www.grainger.com/know-how
Las autoridades de Nevada afirman que un terremoto puede ser la causa de la muerte de un hombre que apareció atrapado bajo un vehículo
Al parecer, el hombre estaba trabajando en el vehículo cuando le cayó encima, y el accidente puede haber sido causado por un terremoto de 6,4 grados de magnitud del 4 de julio.
Un hombre de 56 años fue encontrado muerto debajo de un vehículo el martes en Nevada, y las autoridades dicen que un terremoto puede ser el culpable.
El hombre fue visto por última vez en una gasolinera el 3 de julio y probablemente murió mientras trabajaba en su vehículo al día siguiente, dijo el sargento del sheriff del condado de Nye (Nevada), Adam Tippetts, en un comunicado en vídeo.
“Esta muerte puede ser el resultado de la caída del vehículo de los gatos el 4 de julio durante el terremoto”, dijo Tippetts en el comunicado.
This quick course covers the hazards of lulls in your alertness levels including the danger of microsleep and how to protect yourself and stay alert during your work shift.
The potential for dangerous noise levels and harmful light levels exists in many day-to-day personal and workplace activities. The following information provides a better understanding of the comparative noise and light levels to a number of locations and applications.
Noise Levels
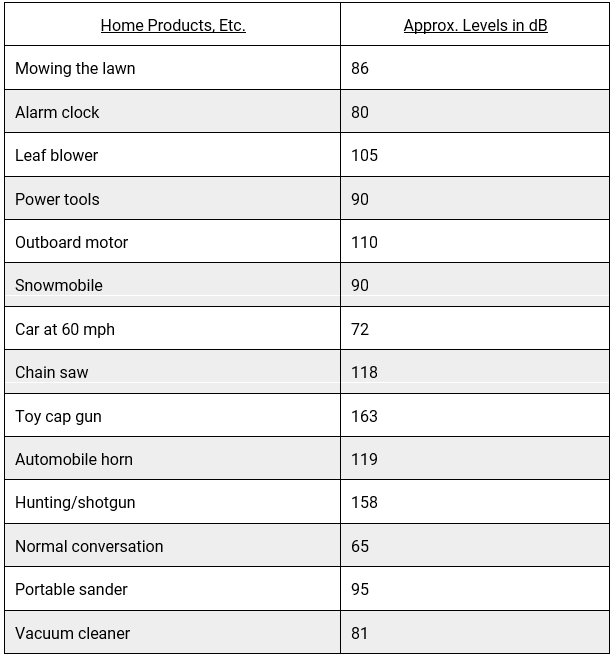
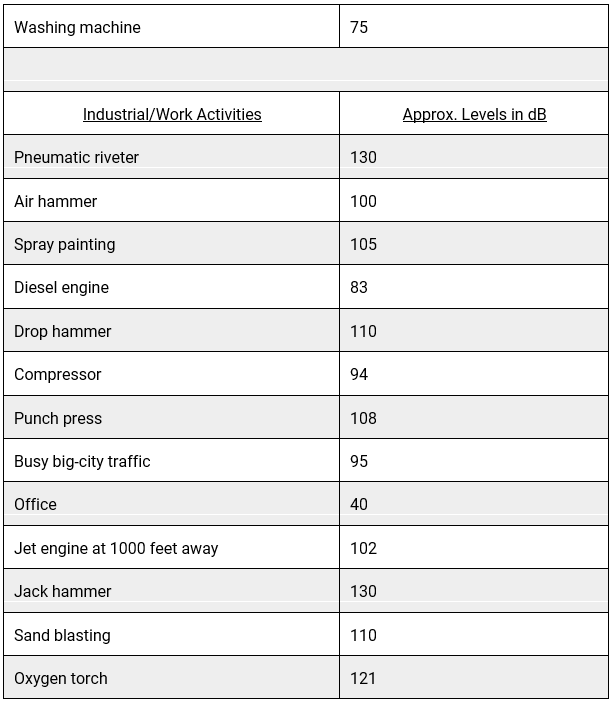
Hearing loss (recordable or reportable) is addressed under OSHA in 29 CFR 1904. According to the OSHA regulation, hearing protectors must be made available to workers exposed at or above the action level of 85 dB. OSHA requires that hearing protectors be provided and worn by employees when:
Light Levels
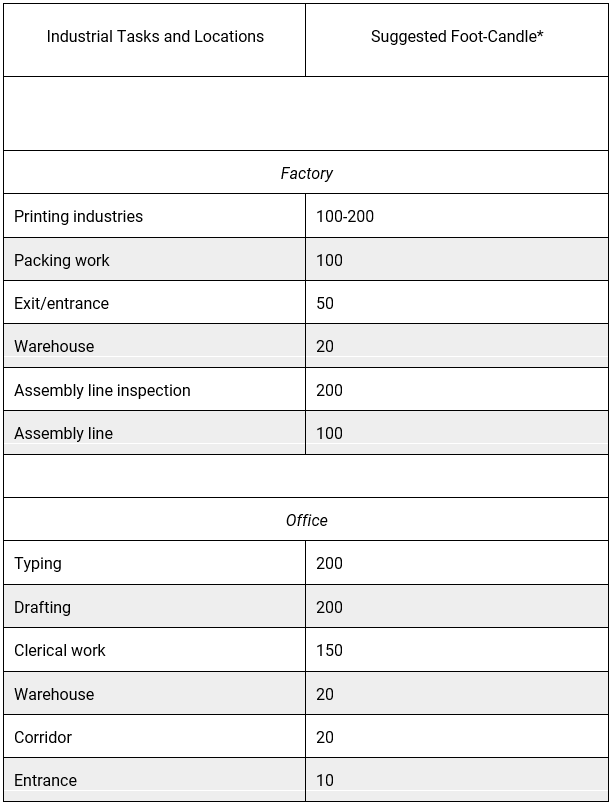
* Illumination levels are suggested and intended to be a minimum on the task referenced. To assure these values at all times, higher initial levels should be provided as required per task.
Commonly Asked Questions
Q: What are three indicators that I might be exposed to too much noise?
A: Three indicators of excessive noise exposure:
Q: When can a person begin experiencing hearing pain?
A: Depending on an individual’s hearing sensitivity, a person can begin experiencing hearing pain between 125 and 160 dB.
Q: When does OSHA require employers to implement a hearing conservation program?
A: In the United States, whenever employee noise exposures equal or exceed an eight-hour time-weighted average sound level of 85 dB. For more information, see Quick Tips #260: Effective Hearing Conservation Program Elements.
Q: What are three forms of hearing protection?
A: Earplugs, earmuffs and hearing bands.
Sources
Pattys Industrial Hygiene & Toxicology, Third Revised Edition, 1978.
Safety Technicians Handbook, Webber Publishing, 1996.
Lab Safety Supply Insights, May 1992 Volume 1, Issue 1.
Plant Engineering, July 18, 1991.
The information contained in this article is intended for general information purposes only and is based on information available as of the initial date of publication. No representation is made that the information or references are complete or remain current. This article is not a substitute for review of current applicable government regulations, industry standards, or other standards specific to your business and/or activities and should not be construed as legal advice or opinion. Readers with specific questions should refer to the applicable standards or consult with an attorney.
Source: Grainger Know How – https://www.grainger.com/know-how
Wastewater treatment facilities are dangerous workplaces. Slips, trips and falls; permit-required confined spaces; mechanical equipment; pathogenic bacteria; and hazardous chemicals are just a few of the hazards faced. Identifying these hazards, assessing the risks and following the hierarchy of controls to either eliminate or reduce exposure to these hazards is a must.
Slips, Trips and Falls
The potential for slips, trips and falls exists in every wastewater treatment facility. Steps needed to ensure your safety include identifying areas that are prone to excessive water and puddling, fixing leaks promptly, practicing good housekeeping, using non-slip surfaces and wearing slip-resistant footwear.
Permit-Required Confined Spaces
In wastewater treatment confined-space hazard awareness can mean the difference between life and death. Aeration basins, digesters, storage tanks, sample vaults, and manholes are all potential permit-required confined spaces.
The Occupational Safety and Health Administration (OSHA) defines a confined space as an area that:
A permit-required confined space is defined as a confined space that:
There are several steps that you should follow when developing a confined space program. The first is to evaluate the workplace and determine whether it contains permit-required confined spaces. If it is determined that there are permit-required confined spaces, then employees must be informed of the dangers by posting signs or some other equally effective means.
The next decision that must be made is whether or not the confined space should be entered:
Please refer to Quick Tips #115: Confined Spaces, 29 CFR 1910.146, which provides additional details on confined spaces and has a permit-required, confined-space decision flow reference chart.
Lockout/Tagout
Routine maintenance, inspections, repairs and testing take on another important area of safety known as lockout/tagout. Nearly 90 percent of the activities that require lockout/tagout are applications that require de-energizing an electrical source that provides power to a system or equipment components within the system. These might include pumps, electrical motors, valves and mixing systems. The remaining activities include lockout/tagout of pipelines and systems, and valves in which the energized source of potential danger could be water under pressure, air pressure and/or steam. All of these hazardous energy sources are present in wastewater treatment facilities.
Pathogenic Bacteria and Hazardous Chemicals
Wastewater contains bacteria, funguses, parasites and viruses that can cause intestinal, lung and other infections. Operators who are not protected from exposure can get sick.
All employees must understand the importance of making good personal hygiene a habit. Frequent hand washing with an anti-bacterial soap is a good place to start. Any open cuts or skin abrasions must be properly covered and protected. Providing a location for employees to change after their shift is highly recommended – work clothes should not be worn home.
Chlorine (gas), sodium hypochlorite, lime, aluminum sulfate, ferric chloride, various polymers, and a variety of acids and bases are commonly used to treat wastewater. Being aware of the chemicals, the physical state (liquid, solid or gas) and the physiological effects that are caused by exposure is paramount. Proper and safe chemical management should be part of your wastewater treatment facility’s culture and is everyone’s responsibility.
Chemicals and biological hazards abound in wastewater treatment. Safety data sheets (SDS) help you understand the properties, exposure limits, suggested personal protective equipment (PPE), and emergency actions for the treatment chemicals in use and must be maintained.
Hierarchy of Controls
Controlling exposures to occupational hazards is the fundamental method of protecting workers. Traditionally, a hierarchy of controls has been used as a means of determining how to implement feasible and effective control solutions.
One representation of this hierarchy is shown below:
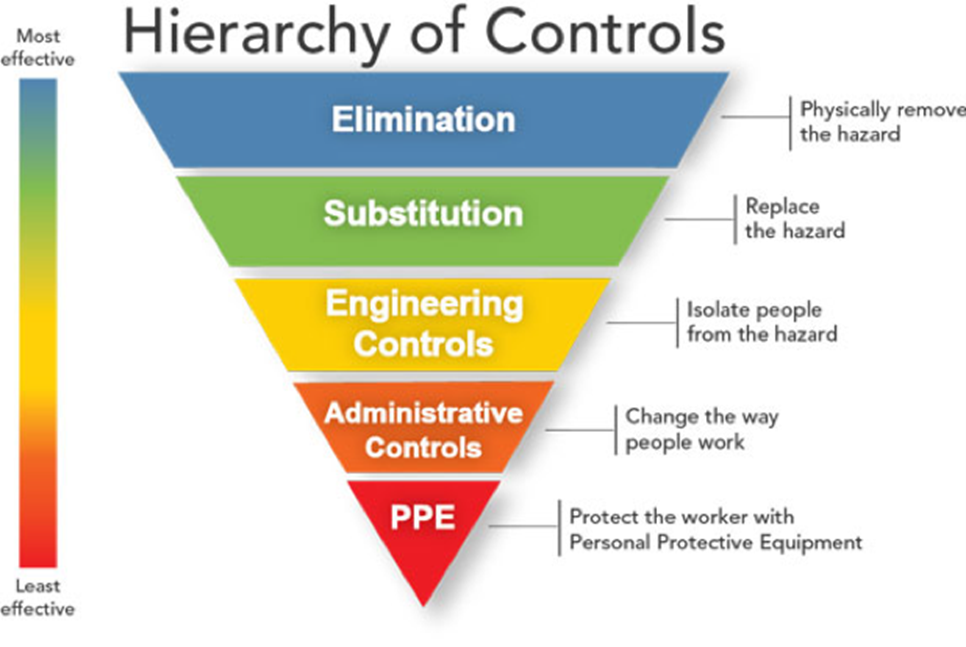
The idea behind this hierarchy is that the control methods at the top are more effective and protective than those at the bottom and should be implemented first if possible. Following the hierarchy of controls normally leads to the implementation of inherently safer systems, where the risk of illness or injury is substantially reduced.
Personal Protective Equipment (PPE)
As a last line of defense employees may depend on PPE to protect themselves from the hazards encountered in wastewater treatment facilities. PPE includes head, eye and face, hearing, respiratory, body, hand, and foot protection as well as fall protection equipment. Please visit Grainger’s Safety Resource Center for PPE to view a variety of related products, services and resources, To determine what PPE employees may need employers are required to perform a PPE hazard assessment of each work area. The purpose of the assessment is to identify any hazards that may be present and what PPE may be appropriate.
Conclusion
Wastewater treatment operations fall under many regulations. Developing written wastewater treatment facility safety guidelines that are specific to the worksite is critical. Regardless of the many safety issues that pertain to wastewater treatment workplaces, enforcing the safety procedures and processes are critical to promoting employee safety.
Commonly Asked Questions
Within the hierarchy of controls, why are engineering controls preferred over administrative and PPE controls?
Engineering controls are preferred over administrative and PPE controls because they are designed to remove the hazard at the source, before it comes in contact with the worker.
Are there specific regulations governing chemical handling and safety at wastewater treatment facilities?
Depending on which chemicals you have at your facility and the amount you store, the following regulations may apply:
The information contained in this article is intended for general information purposes only and is based on information available as of the initial date of publication. No representation is made that the information or references are complete or remain current. This article is not a substitute for review of current applicable government regulations, industry standards, or other standards specific to your business and/or activities and should not be construed as legal advice or opinion. Readers with specific questions should refer to the applicable standards or consult with an attorney.
Source: Grainger Know How – https://www.grainger.com/know-how
On blustery winter days, it’s not uncommon to see two temperature readings on your local weather report. That’s because the air temperature taken alone doesn’t always tell the whole story. Some seemingly moderate days will feel much colder simply because the wind is blowing. This effect is known as the wind chill factor. The wind chill index is a method that compensates for the wind chill factor using wind speed to calculate a measurement called the wind chill temperature (WCT). The wind chill temperature measurement is a more realistic number in terms of how the cold feels to human skin. This is essential information for anyone gearing up to work or play outdoors. For additional safety, the method also includes a frostbite danger index.
The wind chill index used in the U.S. and Canada was developed using advances in science, computer modeling and technology. The index is based on:
Referring to the chart below, we see that a temperature of 10°F with a wind speed of 20 mph results in a wind chill temperature of -9°F. This variation could make a big difference in the type of clothing you’d choose to wear when spending time outdoors.
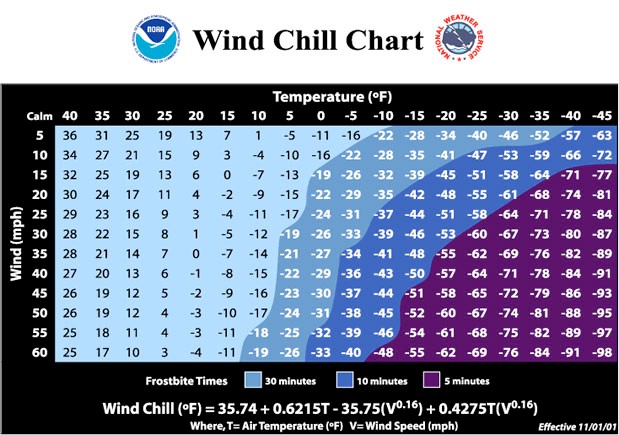
If you know the air temperature and wind speed, the wind chill temperature and frostbite risk can easily be determined using this reference chart. For more information on the chart and other winter related resources, please click on this National Weather Service Wind Chill Chart and Winter Resources link.
Commonly Asked Questions
Q: What is the wind chill temperature?
A: Wind chill temperature is the temperature it feels like outside to people and animals. Wind chill is based on the rate of heat loss from exposed skin caused by the combined effects of wind and cold.
Q: What is frostbite?
A: Frostbite is the result of the body tissue freezing and most frequently affects the extremities such as fingers, nose and toes. Symptoms include a pale white appearance and loss of feeling in these extremities.
Q: What is an anemometer?
A: An anemometer is a device for measuring wind speed.
Q: What is hypothermia?
A: Hypothermia occurs when the body temperature falls below 95°F. Hypothermia is caused by exposure to cold and is aggravated by wet conditions, wind and exhaustion. Warning signs include uncontrollable shivering, disorientation, memory loss, slurred speech, incoherence, drowsiness and exhaustion.
Q: Is frostbite possible when the temperature is above freezing but the wind chill is below freezing?
A: The air temperature has to be below freezing in order for frostbite to develop on exposed skin. Wind chill cannot bring the temperature to below freezing for humans and animals when the thermometer shows it is above freezing, so you will not get frostbite; however, you might get hypothermia from exposure to cold. You can only get frostbite if the actual air temperature, not the wind chill temperature, near your skin is below freezing.
Additional information on cold weather safety:
https://www.osha.gov/dts/weather/winter_weather/index.html
Source
NOAA-National Oceanic and Atmospheric Administration
The information contained in this article is intended for general information purposes only and is based on information available as of the initial date of publication. No representation is made that the information or references are complete or remain current. This article is not a substitute for review of current applicable government regulations, industry standards, or other standards specific to your business and/or activities and should not be construed as legal advice or opinion. Readers with specific questions should refer to the applicable standards or consult with an attorney.
Source: Grainger Know How – https://www.grainger.com/know-how
Abrasive blasting uses compressed air or water to direct a high velocity stream of an abrasive material to clean an object or surface, remove burrs, apply a texture or prepare a surface for painting. Abrasive blasting is more commonly known as sandblasting since silica sand is commonly used as the abrasive, although not the only one always used. Industries that rely on sandblasting on a daily basis include painters who work on large structures like bridges, granite monument makers, foundries and shipbuilders.
The term “silica” broadly refers to the mineral compound silicon dioxide (SiO2). Although silica can be crystalline or amorphous in form, crystalline silica is more hazardous to employees. It is most commonly found in the form of quartz, but it is also found in substances such as cristobalite, tridymite and tripoli. Breathing crystalline silica dust poses an industrial hazard and can lead to severe health problems and even death.
Exposure to silica or crystalline silica can cause silicosis and a host of other illnesses. Silicosis is one of the world’s oldest known occupational diseases, with reports of employees contracting the disease dating back to ancient Greece.
In March, 2016 the Occupational Safety and Health Administration (OSHA) issued a final rule to control exposure to respirable crystalline silica. The rule is comprised of two standards: one for Construction (29 Code of Federal Regulations (CFR) 1926.1153) and the other for General Industry (29 CFR 1910.1053) and Maritime (29 CFR 1915.1053). The Maritime and General Industry standards are exactly the same but differ from the Construction standard. The key difference lies in qualifying the worker exposure level to crystalline silica. The General Industry/Maritime Standard requires the employer to perform air monitoring to determine the eight-hour average exposure level for each affected job task. Employers governed by the Construction standard can either use a control method spelled out for common construction work tasks or perform air monitoring as detailed in the General Industry/Maritime standard.
Air Monitoring
When using silica in the workplace, the first action that needs to be completed is to see what, if any, protective measures need to be taken. To make this determination, collecting and measuring the concentration of silica in the air will need to be done. Once collected, the sample is sent to a laboratory for analysis. The results of this analysis will determine if better ventilation and/or a change in work practices or respiratory protection is needed. Typically, air monitoring is done by an Industrial Hygienist. If there is not an Industrial Hygienist or safety professional available on your worksite, contact Grainger for assistance. Grainger provides several safety based services such as collecting silica exposure samples.
The new action limit and permissible exposure limit (PEL) for crystalline silica for General Industry, Construction and Maritime are all the same and can be found in Construction (29 CFR 1926.1153), General Industry (29 CFR 1910.1053) or Maritime (29 CFR 1915.1053). The action limit is established at 25 micrograms per meter cubed (ug/m3) and the PEL is established at 50 ug/m3.
To help control the risk of respirable crystalline silica exposure, OSHA’s “three lines of defense” philosophy is suggested. The first line of defense is to eliminate and/or engineer the crystalline silica exposure hazard out. When engineering/elimination controls are not feasible or practical, the second and third lines of defense can be used to help control the crystalline silica exposure hazard. The second line of defense is administrative controls, and the last line of defense to be considered is personal protective equipment (PPE).
Three Lines of Defense
OSHA suggests the first engineering control to consider is substitution. OSHA suggests using a less toxic abrasive blasting media that can be delivered with water to reduce dust generation. Some of the possible substitutes are:
The advantages of using a silica substitute outweigh using silica in abrasive sandblasting. Any health issues and healthcare costs related to silica would be greatly reduced or eliminated. The time and cost of implementing and maintaining engineering controls would also be eliminated. The disadvantages are that the substitutes may not be as hard as a silica product; therefore, more of the substitute may need to be used to achieve the same result. It may also be more expensive. However, with several substitute types available, there should be one product that will get your needed job done.
OSHA suggests if substitution is not feasible then isolation and containment is the next best engineering control method for controlling silica exposure in the workplace. Some examples of isolation and containment include:
A blasting room is an enclosed room where the operator works inside the area, moving around freely with respiratory protection equipment such as an accepted blasting helmet supplied air system. Sandblasting in a blasting room ( Figure 1 below), is generally performed where larger pieces need to be sand blasted. Cabinet sandblasting (Figure 2 below), another common application, is generally performed in an enclosed cabinet where the operator stands outside the cabinet and operates a sand blast nozzle through openings in the cabinet wall. Gloves usually extend into the cabinet and the silica dust is evacuated to a dust collection and ventilation system. Where a room or cabinet enclosure is not feasible, due to size or logistics, abrasive sandblasting is done in an outdoor location. The ventilation needed is dependent on each situation. OSHA standard 1910.94 (a)(4)(i) gives the requirements on the construction, installation and inspection requirements for abrasive blasting ventilation as set forth by the American National Standard Institute (ANSI) which is specified by OSHA.
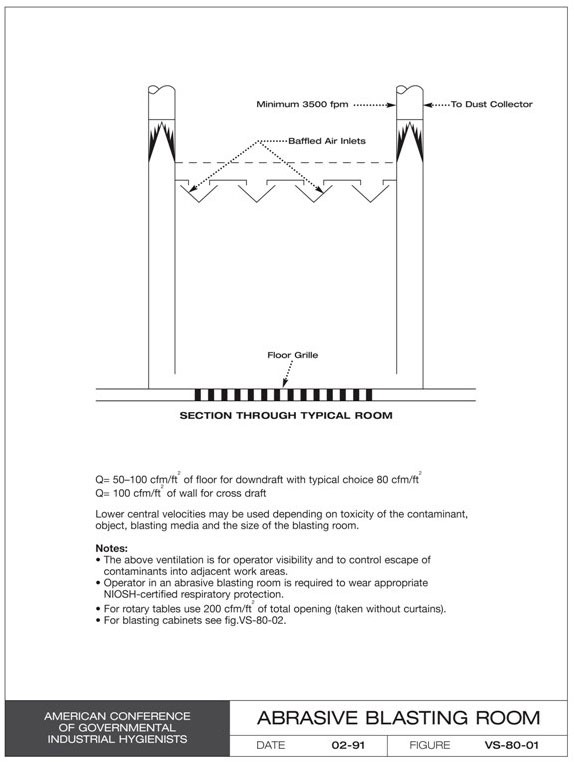
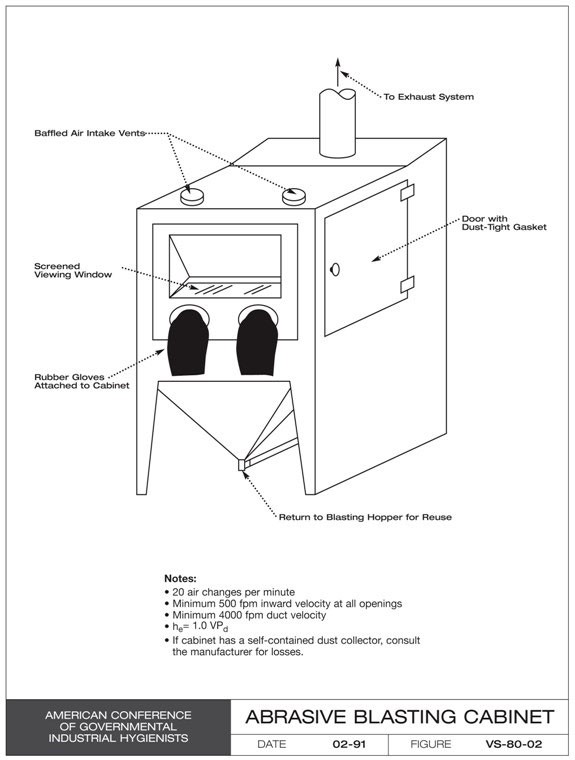
Fig.2
The next line of engineering controls OSHA suggests to use is ventilation. OSHA regulation 1910.94(a)(1)(viii) requires mechanical ventilation for the removal of contaminated air where abrasive sandblasting and silica use takes place. In protecting employees from contaminated air, engineering controls such as ventilation should be the first choice, after sourcing silica substitutes. This can be accomplished through a number of options. OSHA describes a ventilation system in 1910.94(a)(1)(viii) as “A system for removing contaminated air from a space, comprising two or more of the following elements (a) enclosure or hood, (b) duct work, (c) dust collecting equipment, (d) exhauster and (e) discharge stack.”
If all engineering controls prove to be infeasible then administrative controls can be used. Perform routine cleanup using wet methods or high efficiency particulate air/absolute (HEPA) filtered vacuuming to minimize the accumulation of toxic dusts. Other suggested activities to consider include:
Personal Hygiene Practices
The last line of defense controls to be used when all engineering and administrative controls prove to be infeasible is PPE.
Respiratory Protection
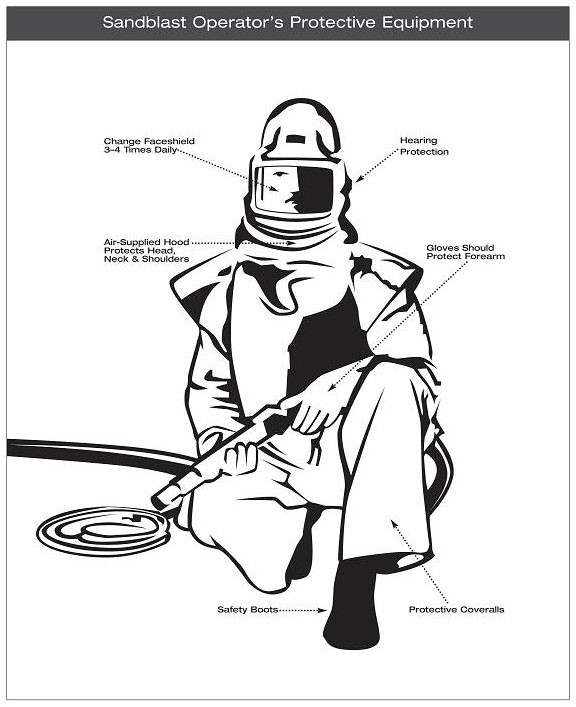
An abrasive-blasting respirator must cover the wearer’s head, neck and shoulders to protect the wearer from rebounding abrasive. Workers must use only respirators approved by the National Institute for Occupational Safety and Health (NIOSH) to provide protection from dusts produced during abrasive-blasting operations:
Air purifying respirators and powered air purifying respirators (PAPR’s) are not recommended for abrasive blasting operations but they may be suitable for auxiliary work, such as clean-up operations. In very limited situations, the 1910.94(a)(5)(ii)(b) interpretation only provides for limited deviation, such as a breakdown in the air supply or when the abrasive blasting respirator is temporarily unavailable. Only then can a dust filter respirator can be used as interim protection. If it does not provide additional face and eye protection supplementary equipment will be needed. This is in accordance with the OSHA standard 1910.94 (a)(5)(v)(b).
Other Personal Protective Equipment
Whether it be General Industry 29 CFR1910, Construction 29 CFR 1926 or Shipyard 29 CFR 1915 standards, all these OSHA standards have PPE requirements that need to be followed. The requirements may also intertwine with each other such as the shipyard PPE standard 1915 referring to the 1910 standard for respiratory protection. All three industry standards are similar in their PPE requirements. The following is an example of the requirements from the shipbuilding 1915 standard for PPE.
Workers performing abrasive blasting should wear:
An example of typical PPE worn by a worker when performing abrasive blasting is shown in Figure 3.
Conclusion
Abrasive blasting can create a host of safety issues, considerations and necessary protections when it comes to employees in any industry in which it is performed. To help keep employees who are performing abrasive blasting and those in the areas around them safe, follow the suggestions found in OSHA’s fact sheet on protecting workers from the hazards of abrasive blasting materials.
For more on silica exposure and silicosis see our Crystalline Silicon Exposure.
Sources for Information:
Occupational Safety and Health Administration(OSHA) Fact Sheet 3697, “Protecting Workers from Hazards of Abrasive Blasting Materials”, November 2013
Occupational Safety and Health Administration(OSHA) Guidance Document, “Abrasive Blasting Hazards in Shipyard Employment”. December 2006.
The information contained in this article is intended for general information purposes only and is based on information available as of the initial date of publication. No representation is made that the information or references are complete or remain current. This article is not a substitute for review of current applicable government regulations, industry standards, or other standards specific to your business and/or activities and should not be construed as legal advice or opinion. Readers with specific questions should refer to the applicable standards or consult with an attorney.
Source: Grainger Know How – https://www.grainger.com/know-how
History
In 1946, the Communicable Disease Center (CDC) was opened in the old Office of Malaria Control in War Areas in downtown Atlanta, Georgia. Its mission at the time was to work with state and local health officials in the fight against malaria, typhus and other communicable diseases. Through the 1960s, the CDC started to broaden its focus to include polio and then smallpox. Over time the CDC established closer working ties with the states throughout the U.S.
The 1970s saw the name of the CDC change to the Center for Disease Control to better reflect its broader mission in preventive health. In 1973, the National Institute for Occupational Safety and Health (NIOSH) became part of the CDC.
In the 1980s, the agency was again renamed, this time to the Centers for Disease Control to reflect a change in its organizational structure. The 1980s also saw the CDC becoming much more diversified. It established the Violence Epidemiology Branch and the Center for Chronic Disease Prevention and Health Promotion. Also, the Office of Smoking and Health was incorporated into the CDC.
In the 1990s, the CDC once again changed its name, this time to include “Prevention” but retained the initials CDC.
The CDC’s Current Role in Protecting Health and Safety
The mission of the CDC is to promote health and quality of life by preventing and controlling disease, injury and disability. It works to accomplish this goal with the help of partners throughout the nation and world to monitor health, detect and investigate health problems, conduct research to enhance prevention, develop and advocate sound public health policies, implement prevention strategies, promote healthy behaviors, foster safe and healthful environments and provide leadership and training.
In 1981, with the California Department of Health, the CDC reported the first cases of an illness that would later be called acquired immunodeficiency syndrome (AIDS). In 1987, the CDC reported a strong association between Reye Syndrome and aspirin, noting that 90 percent of cases could be preventable by reducing aspirin treatment for children. In May of 1993, an outbreak of an unexplained pulmonary illness occurred in southwestern United States. Virologists used new methods to pinpoint virus genes at the molecular level. The new disease caused by the virus is called hantavirus pulmonary syndrome, or HPS.
New diseases have the potential ability to spread across the globe in just days. The CDC plays a critical role in controlling these diseases and travels at a moment’s notice to investigate outbreaks at home and abroad.
CDCs Current Role in Providing Credible Information to Enhance Health Decisions
The CDC works with public health and grassroots partners, the media and the Internet to make sure the best health and safety information is available to the communities and people that need it. Some examples of actions the CDC takes to communicate information include the following:
The CDC continues to work with both foreign and domestic agencies to inform all people of current global health issues. Some of the new issues the CDC is dealing with include:
Source
The information contained in this article is intended for general information purposes only and is based on information available as of the initial date of publication. No representation is made that the information or references are complete or remain current. This article is not a substitute for review of current applicable government regulations, industry standards, or other standards specific to your business and/or activities and should not be construed as legal advice or opinion. Readers with specific questions should refer to the applicable standards or consult with an attorney.
Source: Grainger Know How – https://www.grainger.com/know-how
West Nile Virus first made headlines in the United States after the first case was identified in New York City, nearly two decades ago. And while it was new to this country at the time, West Nile Virus had been on the radar of healthcare officials for years. According to the World Health Organization (WHO), West Nile Virus was first identified in 1937 in the West Nile District of Uganda, and the first appearance in North America was in 1999.
How is West Nile Virus Spread?
Infected mosquitoes spread West Nile Virus. Mosquitoes most commonly pick up the disease from infected birds and go on to infect other animals while feeding on their blood. In a mosquito, the virus is found in the salivary glands which mosquitoes use to anesthetize the skin of the animal on which they are feeding.
West Nile Virus in Humans
According to the Centers for Disease Control and Prevention (CDC), anyone can get infected with West Nile Virus, although some people are at higher risk for infection of the brain or spinal cord. For example, people over the age of 50 are at higher risk for experiencing encephalitis (swelling of the brain) as a result of West Nile Virus exposure.
In terms of the symptoms of West Nile Virus, the CDC says most people (70-80%) who become infected with West Nile Virus do not have any symptoms. About one in five people who are infected will develop a fever with other symptoms such as headache, body aches, joint pains, vomiting, diarrhea, or rash. Most people with this type of West Nile Virus recover completely, but feeling tired and weak can last for weeks or months, according to the CDC.
While the vast majority of those infected with West Nile will have minor symptoms or no symptoms at all, for the unfortunate few it can have serious health consequences. The CDC says that less than 1% of people who are infected will develop a serious neurologic illness such as encephalitis or meningitis (inflammation of the lining of the brain and spinal cord). The symptoms of neurologic illness can include headache, high fever, neck stiffness, disorientation, coma, tremors, seizures, or paralysis. The CDC also reports that since West Nile Virus was first identified in the U.S. in 1999, more than 1,900 (as of spring 2017) people have died from complications caused by West Nile Virus.
Prevention
Presently, there’s no West Nile Virus vaccine. According to the CDC, the best way to prevent diseases spread by mosquitoes is to protect yourself and your family from mosquito bites. They recommend the following:
Specifically addressing the EPA registered mosquito repellants, the CDC says that those containing DEET, picaridin, IR3535, and some oil of lemon eucalyptus and para-menthane-diol products provide longer-lasting protection. The EPA registration number means that the insect repellent manufacturer has provided the EPA with technical information on the safety of the product and its effectiveness against mosquitoes. The EPA does not expect the product to cause adverse effects to human health or the environment when used according to the label.
When considering using repellants around children, the CDC offers the following directions:
Mosquito Control
In its’ West Nile Virus in the United States: Guidelines for Surveillance, Prevention, and Control resource, the CDC says an effective mosquito control program must address both adult mosquitos and mosquito larva. The use of pesticides is an important tool in a comprehensive mosquito control program. And the EPA offers guidance and direction for pesticide use to combat both adult and larval mosquito control.
Source control is another piece of a comprehensive mosquito control plan. Mosquitos need access to water to reproduce so eliminating standing water, even tiny amounts, can have a huge impact on mosquito populations. The CDC says that source reduction can range from draining roadside ditches to properly disposing of discarded tires and other trash containers. Even standing water in a bottle cap can become a mosquito breeding ground according to the EPA.
OSHA
The Occupational Safety and Health Administration (OSHA) created its Workplace Precautions Against West Nile Virus as a resource for employers who have workers that could be exposed to West Nile Virus. OSHA says that workers primarily working outside are at risk, particularly in warmer weather (when mosquitoes are more likely to be present). In regions of the U.S. with warm climates, workers are at risk for a longer period. At risk occupations include farm workers, loggers, landscapers/groundskeepers, construction workers, painters, summer camp workers, pavers and other outdoor workers.
In addition, OSHA says that in at least two cases, laboratory workers handling West Nile Virus-infected fluids or tissues have become infected; therefore, these workers should also take precautions against West Nile Virus infection. An exposure may occur due to a needlestick, an accidental cut, or an existing open wound that comes in contact with infectious fluid or tissues. Laboratory workers who work with West Nile Virus- infected animals or who handle other tissue, fluid or other West Nile Virus-infected material should report to their supervisors if they believe they may have had an exposure that could result in infection. Laboratory workers handling human blood or other potentially infectious materials require protection as described in OSHA’s Bloodborne Pathogens Standard, 29 Code of Federal Regulations (CFR) 1910.1030.
Commonly Asked Questions
A: Both the CDC and the WHO have West Nile Virus landing pages where additional information and updates reside.
A: These are two separate viruses that pass to humans primarily through mosquito bites. For information on the Zika Virus see Quick Tips #395.
The information contained in this article is intended for general information purposes only and is based on information available as of the initial date of publication. No representation is made that the information or references are complete or remain current. This article is not a substitute for review of current applicable government regulations, industry standards, or other standards specific to your business and/or activities and should not be construed as legal advice or opinion. Readers with specific questions should refer to the applicable standards or consult with an attorney.
Source: Grainger Know How – https://www.grainger.com/know-how
What Is Bird Flu?
Bird flu is the disease caused by the viral infection with avian (bird) influenza (flu) viruses. These viruses occur naturally among wild aquatic birds worldwide. They carry the viruses in their intestines and respiratory tract and usually do not get sick from them. However, bird flu is very contagious among birds and can possibly sicken or kill domesticated birds such as chickens, ducks and turkeys.
Which Virus Causes Bird Flu?
There are four types of influenza virus: A, B, C and D. The virus that causes bird flu is influenza A. These viruses are categorized based on their genetic makeup, impact on bird health and other factors. AI viruses are classified by a combination of two groups of proteins: the hemagglutinin or H proteins, of which there are 18 (H1–H18), and neuraminidase or N proteins, of which there are 11 (N1–N11). Some of these are worse or more severe than others.
How Does the Bird Flu Affect Birds?
Most often there are no signs a bird is infected. But in some cases, the viruses are highly pathogenic, meaning they kill and spread quickly. A1 strains are divided into two groups based on the ability of the virus to produce disease in domestic poultry: low pathogenic avian influenza (LPAI) and highly pathogenic avian influenza (HPAI). In the late 1990s, a new strain of bird flu arose that was remarkable for its ability to cause severe disease and death, especially in domesticated birds. As a result, this strain was called highly pathogenic avian influenza and termed H5N1.
From December 2014 to June 2015, the U.S. endured its largest animal health emergency with more than 200 cases of highly pathogenic avian influenza found in commercial and backyard poultry, as well as wild birds. Additional cases were confirmed in 2016, 2017, 2018 and early 2019.
Is Bird Flu Contagious to Humans?
At first, bird flu was thought only to infect wild and domestic bird populations, and not humans. However, some of the strains, such as H5N1 and H7N9, have caused serious infections in people. These cases have been largely confined to Southeast Asia, Africa, the Pacific, the Middle East and parts of Europe. One of the more common means of contracting the virus is through the inhalation of dried/pulverized fecal matter from an infected bird.
There is no evidence that the virus can spread from one human to another. However, the World Health Organization (WHO) and other experts warn that if it ever spreads person to person, it could cause a worldwide pandemic. Unlike an annual flu that people typically encounter, a pandemic flu occurs three or four times a century and can occur in any season. A pandemic infection rate can affect anywhere from 25 percent to 50 percent of the population and is usually associated with more severe illness and a high risk of death.
What Are the Symptoms of Bird Flu in Humans?
For people who might have had contact with the H5N1 virus, the infectious period is seven days after resolution of fever in adults and 21 days after onset of illness in children. The median time between exposure and onset of illness is three days and can range from two to four days. Avian flu symptoms are like other flu types and include fever, malaise, sore throat and cough. In certain cases, victims also might develop conjunctivitis.
How Can I Prevent the Spread of Bird Flu?
Decontamination and isolation techniques are suggested for people culling, transporting or disposing of infected birds, as well as for people in the healthcare industry who might have contact with the virus. People should choose and use the appropriate level of personal protective equipment (PPE), which might include dust- and fluid-resistant protective garments/clothing, gloves, overshoes that can be disinfected or disposed of, goggles and respiratory protection. The minimum form of respiratory protection that OSHA suggests is an N95, N99 or N100 NIOSH-approved disposable particulate respirator.
The most basic method to control the spread of infection is proper hand hygiene practices, such as washing hands thoroughly with soap and clean running water for 15 to 20 seconds. If handwashing facilities are not readily available, use of alcohol-based hand sanitizers that contain at last 60 percent alcohol is suggested.
Research on vaccines against avian influenza viruses is ongoing. Antiviral drugs are being produced and stockpiled to help limit the symptoms and potentially reduce the disease’s opportunity to spread.
As a general precaution, people should avoid wild birds and observe them only from a distance. They should also avoid contact with domestic birds (poultry) that appear ill or have died, and avoid contact with surfaces that appear to be contaminated with feces from wild or domestic birds.
Commonly Asked Questions
Q: What are bird flu symptoms?
A: Reported symptoms of avian influenza in humans have ranged from normal influenza-like symptoms (cough, sore throat, fever and muscle aches) to eye infections, acute respiratory distress, pneumonia, viral pneumonia and other severe, life-threatening complications.
Q: What are the antiviral agents for bird flu?
A: Some antiviral drugs that could potentially treat or prevent bird flu are clinically effective against uncomplicated influenza A infection, but they might have limitations. In addition, these drugs are expensive and supplies are limited. Authorities have stockpiled the antiviral drug Tamiflu, which seems to be an effective antiviral agent against bird flu. Studies are under way to prove its effectiveness and the effectiveness of other antiviral agents such as Oseltamavir, Zanamavir and Relenza.
Q: What is used to clean/disinfect surfaces within the healthcare industry that have been exposed to the virus?
A: According to the World Health Organization’s interim infection-control guidelines for healthcare facilities, the virus is inactivated by 70 percent alcohol and by chlorine. Therefore, cleaning environmental surfaces with a neutral detergent followed by a disinfectant solution is recommended.
Sources
World Health Organization – Avian Influenza
United States Department of Agriculture – Avian Influenza
United States Department of Agriculture Animal and Plant Health Inspection Service
Centers for Disease Control Prevention Influenza Type A Viruses
The information contained in this article is intended for general information purposes only and is based on information available as of the initial date of publication. No representation is made that the information or references are complete or remain current. This article is not a substitute for review of current applicable government regulations, industry standards, or other standards specific to your business and/or activities and should not be construed as legal advice or opinion. Readers with specific questions should refer to the applicable standards or consult with an attorney.
Source: Grainger Know How – https://www.grainger.com/know-how
History
According to the Centers for Disease Control and Prevention (CDC), hantaviruses are a group of viruses that may be carried by some rodents. Some hantaviruses can cause a rare but deadly disease called Hantavirus Pulmonary Syndrome. The disease is commonly called “HPS” for short. Hantavirus and HPS first appeared on the radar of healthcare professionals in 1993 after a cluster of mysterious respiratory related deaths occurred in the Four Corners (the borders of Arizona, Colorado, New Mexico and Utah) region of the U.S.
Within six months of these reports, area medical investigators and virologists were able to link the deaths to a virus that was carried by rodents. Researchers then began to examine stored lung tissue from people in the area who died from unexplained lung diseases. They found evidence of infection from the hantavirus as early as 1959 indicating the virus existed, unrecognized, for several decades.
The CDC believes that the initial outbreak in the Four Corner region was caused by a 1993 increase of rainfall in the area. The resulting spike in crop production meant more food for rodents. The CDC estimates the rodent population increased by 100% over the prior year. This spike in population led to increased rodent contact with people.
How the Virus is Transmitted
According to the CDC, the deer mouse, white-footed mouse, cotton rat and rice rat are the known transmitters of hantaviruses in the U.S. But in the interest of safety, the CDC recommends avoiding contact with all rodents.
Transmission occurs, according to the CDC, when rodents shed the virus in their urine, droppings and saliva. The virus is mainly transmitted to people when they breathe in air contaminated with the virus.
The CDC describes the most common transmission method and less common methods this way:
The most common reason is when fresh rodent urine, droppings, or nesting materials are stirred up, tiny droplets containing the virus get into the air. This process is known as “airborne transmission.”
Less common methods rodents may spread hantavirus to people include:
According to the Mayo Clinic, the North American strain of HPS isn’t transmitted via person-to-person contact. They state, “People who become infected with the North American strain of hantavirus pulmonary syndrome aren’t contagious to other people. However, certain outbreaks in South America have shown evidence of being transmitted from person-to-person, which illustrates variation across strains in different regions.” The CDC’s hantavirus resource page also states that HPS cannot be transferred person-to-person via blood transfusion.
The CDC flags occupations such as construction, utility and pest-control as being most at risk for hantavirus exposure. However, anyone who comes in contact with a rodent is at risk.
The CDC also identifies activities that place individuals at risk for hantavirus exposure as:
Through January of 2016, there were 692 confirmed cases of the HPS in the U.S. This map from the CDC shows the breakdown for each state (map current as of January 8, 2016):
Hantavirus Pulmonary Syndrome (HPS) Cases, by State of Residence
Symptoms and Treatment
According to the CDC, “due to the small number of HPS cases, the “incubation time” is not positively known. However, on the basis of limited information, it appears that symptoms may develop between one and eight weeks after exposure to fresh urine, droppings, or saliva of infected rodents.” The CDC breaks symptoms down into early and late. Early symptoms include fatigue, fever and muscle aches, especially in the large muscle groups—thighs, hips, back, and sometimes shoulders. These symptoms are universal. There may also be headaches, dizziness, chills and abdominal problems, such as nausea, vomiting, diarrhea, and abdominal pain. About one-half of all HPS patients experience these symptoms.
Four to 10 days after the initial phase of illness, the late symptoms of HPS appear. According to CDC resources, “these include coughing and shortness of breath, with the sensation of, as one survivor put it, a “…tight band around my chest and a pillow over my face” as the lungs fill with fluid.” The CDC reports that HPS has a mortality rate of 38%.
There are limited treatment options for HPS, and both the CDC and Mayo Clinic state that because of this, the earlier the victim receives medical attention the better the long term prognosis. The Mayo Clinic offers the following overview of treatment protocols:
Specific treatment options for hantavirus pulmonary syndrome are limited. But the prognosis improves with early recognition, immediate hospitalization and adequate support for breathing.
Supportive therapy
People with severe cases need immediate treatment in an intensive care unit. Intubation and mechanical ventilation may be needed to support breathing and to help manage fluid in the lungs (pulmonary edema). Intubation involves placing a breathing tube through your nose or mouth into the windpipe (trachea) to help keep your airways open and functioning.
Blood oxygenation
In extremely severe cases of pulmonary distress, you’ll need a method called extracorporeal membrane oxygenation to help ensure you retain a sufficient supply of oxygen. This involves continuously pumping your blood through a machine that removes carbon dioxide and adds oxygen. The oxygenated blood is then returned to your body.
Prevention, Personal Protection and Cleaning
Back in 1993, during the peak of the hantavirus outbreak, the CDC published their Interim guidelines for hantavirus risk reduction. There have been no updates to this document since its original publication. The guidelines offer direction for those looking to safely eradicate rodent infestations and those looking to reduce exposure risk when rodent contact is a possibility. Detailed cleaning procedures as well as appropriate personal protective equipment (PPE) are discussed. For those seeking direction in this area, please refer to the CDC’s guidelines.
Commonly Asked Questions
Q: What PPE should I use if I’m cleaning up rodent contaminants that may contain hantavirus?
A: The best answer to this is currently found in the CDC’s Hantavirus Infection — Southwestern United States: Interim Recommendations for Risk Reduction. It states the following, “Persons involved in the clean-up should wear coveralls (disposable if possible), rubber boots or disposable shoe covers, rubber or plastic gloves, protective goggles, and an appropriate respiratory protection device, such as a half-mask air-purifying (or negative-pressure) respirator with a high-efficiency particulate air (HEPA) filter or a powered air-purifying respirator (PAPR) with HEPA filters. Respirators (including positive-pressure types) are not considered protective if facial hair interferes with the face seal, since proper fit cannot be assured. Respirator practices should follow a comprehensive user program and be supervised by a knowledgeable person.” Since 1993, the approval designations for negative-pressure, air-purifying respirators has changed. The current equivalent to a HEPA filter is a P100 filter.
Sources
CDC’s Hantavirus Resource Page
Mayo Clinic’s Hantavirus Resource Page
OSHA’s Hantavirus Resource Page
CDC’s Hantavirus Infection — Southwestern United States: Interim Recommendations for Risk Reduction
The information contained in this article is intended for general information purposes only and is based on information available as of the initial date of publication. No representation is made that the information or references are complete or remain current. This article is not a substitute for review of current applicable government regulations, industry standards, or other standards specific to your business and/or activities and should not be construed as legal advice or opinion. Readers with specific questions should refer to the applicable standards or consult with an attorney.
Source: Grainger Know How – https://www.grainger.com/know-how
When working with biological contaminants, protecting just the worker is oftentimes not enough. Systems must also be in place to protect the environment and the facility from possible contamination. Depending on the type of potentially infectious biological microorganism or laboratory animal, specific containment and safety procedures must be followed.
The Centers for Disease Control and Prevention (CDC) in conjunction with the National Institutes of Health (NIH) have defined four biosafety levels, BSL-1 through BSL-4. Within each level, laboratory practices and techniques; laboratory facilities; and engineering controls have been recommended for the handling of hazards posed by the infectious organisms within each biosafety level. The following is a summary of recommended biosafety levels for infectious agents.

Biosafety Level 1 (BSL-1)
Classification:
Biosafety Level 1 (BSL-1) laboratories are working with well-characterized agents that are not known for causing disease in healthy adult humans and are of minimal potential hazard to laboratory personnel and the environment.
Standard practices:
Special practices:
None.
Safety equipment (primary barriers):
Biological safety cabinets (BSC) are generally not used with this level of agent. Employees are encouraged to wear lab coats, gowns or uniforms to help prevent contamination of street clothes. Gloves should be worn if skin is broken or a rash is present. Appropriate eyewear should be worn for procedures where splash of microorganisms or hazardous materials is anticipated.
Laboratory facilities (secondary barriers):
Biosafety Level 2 (BSL-2)
Classification:
BSL-2 laboratories are working with agents of moderate potential hazard to personnel and the environment. Laboratory personnel have specific training in handling pathogenic agents.
Standard practices:
Same as BSL-1.
Special practices:
Safety equipment (primary barriers):
Laboratory facilities (secondary barriers):
Same as BSL -1 plus:
Biosafety Level 3 (BSL-3)
Classification:
Laboratories that fall under this category include clinical, diagnostic, teaching, research or production facilities working with indigenous or exotic agents that may cause serious or potentially lethal diseases as a result of exposure by inhalation.
Standard practices:
Same as BSL-1 and BSL-2.
Special practices:
Same as BSL-2 plus:
Safety equipment (primary barriers):
Laboratory facilities (secondary barriers):
Same as BSL-2 plus:
Biosafety Level 4 (BSL-4)
Classification:
This level of protection is required when working with dangerous and exotic agents that pose a high individual risk of aerosol-transmitted laboratory infections and life-threatening diseases. Agents with a close or identical antigenic relationship to known BSL-4 agents and related agents with unknown risk of transmission are handled at this level until sufficient data is obtained to confirm work at BSL-4 or to reclassify them to a lower level.
Standard practices:
Same as BSL-1, BSL-2 and BSL-3.
Special practices:
Same as BSL-3 plus:
Safety equipment (primary barriers):
All procedures within these facilities are conducted in a Class III BSC or in a Class II BSC used in conjunction with full-body, air-supplied, positive pressure suits.
Laboratory facilities (secondary barriers):
There are two models for BSL-4 laboratories and they can follow requirements of either model or a combination of the two:
BSL-4 builds upon BSL-1, -2 and -3. Here are a few different criteria that must be fulfilled in a BSL-4 laboratory:
Additional details may be found in the U.S. Department of Health and Human Services Public Health Service Centers for Disease Control and Prevention National Institutes of Health’s Biosafety in Microbiological and Biomedical Laboratories 5th Edition on pages 51– 58.
Sources
For other documents related to this topic, see:
Quick Tips #206: Disinfectants and Antiseptics
OSHA Lab Standard, 29 CFR 1910.1450.
Biosafety in Microbiological and Biomedical Laboratories (BMBL) 4th Edition.
(Rev. 8/2015)
The information contained in this article is intended for general information purposes only and is based on information available as of the initial date of publication. No representation is made that the information or references are complete or remain current. This article is not a substitute for review of current applicable government regulations, industry standards, or other standards specific to your business and/or activities and should not be construed as legal advice or opinion. Readers with specific questions should refer to the applicable standards or consult with an attorney.
Source: Grainger Know How – https://www.grainger.com/know-how
– Understanding the difference between arc flash and electric shock
– Understanding hazards, injuries, and indirect consequences related to arc flash and electric shock
– Comprehending the way approach protection boundaries are determined
– Connecting approach boundary criteria with worker qualifications
– Recognizing necessary training and skills for qualified workers
– Identifying the primary elements of an electrical safety program
– Understanding the purpose of lock and tag procedures
– Acknowledging different types of lock and tag devices
– Understanding basic procedural steps for lock and tag
– Learning the requirements for the use of test instruments and equipment
– Remembering the requirements, benefits, and components of a job briefing
– Observing the requirements, benefits, and components of an energized work permit
– Acknowledging PPE responsibilities and requirements related to work around energized electrical equipment and parts
OSHA has labeled electrocution as one of the “fatal four” causes of fatalities in the private construction industry, accounting for 9% of deaths.
Death by electrocution is a daily hazard that requires attention for lineman and other utility workers. Especially in the utility sector, daily awareness of electrical hazards must be emphasized by safety and training professionals.
In order to minimize the risk of injury in the utility industry, trade associations and federal agencies now have many safe work practices and procedures in place to protect employees working on or near energized electrical equipment and conductors. Today, following regulations and industry standards protects electrical workers from the hazards of shock, electrocution, arc flash, and arc blast.
The regulatory bodies that govern electrical safety in the workplace are the National Fire Protection Association (NFPA) and the Occupational Safety and Health Administration (OSHA). NFPA provides information and guidelines that protect workers from electrical hazards, while OSHA is the enforcement agency for electrical safety in the workplace.
Industry regulations that govern electrical hazards:
NFPA Standards:
– 70-NEC
– 70B Maintenance Electrical
– 70E “Standard for Electrical Safety in the Workplace”
For the safety of all employees, your company must provide electrical safety training to employees who face a risk of electrical hazards that are not reduced to a safe level by the applicable electrical installation requirements.
NFPA 70E (Arc Flash Training) must teach about:
– All specific hazards around electrical energy.
– Necessary safe work practices and procedures for providing protection from electrical hazards associated with jobs or tasks.
– The relationship between electrical hazards and possible injury.
In the case that there has been a big, recent change in how your workforce operates or interacts with electrical equipment and power generation devices, safety professionals must make appropriate changes to protect the workforce.
When supervision or annual inspections show that employees fail to comply with the safety-related work practices, them retraining is then required. As well, retraining is required if new technology, equipment types, or changes in processes alter the safe work practices, or if workers need to employ safe work practices that are not normally used during regular job duties.
Also, for tasks performed less than once a year, retraining is a must before employees go back in the field for the performance of related work.
For further illustration, NFPA 70E 110.2 (E) states employers need to record each employee receiving the training required for both qualified and unqualified employees.
Training documentation is required to:
– Identify employee names and dates of training.
– Happen when the employee demonstrates proficiency in the work practice involved.
– Continue throughout an employee’s employment.
It is important that electrical tasks involving work around energized electrical equipment or conductors need to be performed only by qualified employees (i.e. employees that have received the necessary training required to safely negotiate specific hazards).
To be qualified, one must have the skills and knowledge related to the construction and operation of the electrical equipment and installations, and have received safety training to recognize and avoid the electrical hazards that might be present with respect to that equipment or work method. As well, they must have received additional training and demonstrate proficiency in working on exposed energized equipment, recognizing the hazards associated with the task or job, and taking precautions needed to prevent injury or death.
Also, a qualified person will be trained in the proper use of special precautionary techniques and in selecting and using the appropriate personal protective equipment (PPE) — including arc flash, insulating and shielding materials, and insulated tool and test equipment. Lastly, they need to have proper training in responding to emergency situations, which is especially important but often overlooked.
To become qualified, the employee needs to actually do the work or have ‘hands on’, performance based training. It should be that only trained and qualified employees ever have access to the space within reach of ‘live’ parts or equipment. NFPA 70E (Arc Flash) enforces that only trained and qualified employees are allowed to work on or near exposed energized electrical parts and supervise unqualified persons in the vicinity of the hazard.
In addition, another requirement of NFPA 70E (Arc Flash) is the development of an overall electrical safety program.
NFPA 70E (Arc Flash) requires that electrical safety programs:
– Supply awareness training of electrical hazards that includes shock and arc flash.
– Implement administrative and engineering controls to measure and monitor methods, and procedures, for working within the Limited Approach Boundary of energized electrical conductors and circuit parts 50 volts or more.
– Evaluate hazards and risks, and job briefing before each job, for repetitive or similar tasks, and for routine work.
– Prescribe activity appropriate for the voltage, energy level, and circuit conditions.
Electrical safety programs need to be audited regularly to ensure principle and procedures are being followed. Ensure that your electrical safety program is frequently reviewed, but also measured for performance. Employers will determine the frequency of audits is determined based on the complexity of the procedures and the type of work being covered. Although, OSHA also requires employers to audit their Safety Programs, which include Electrical Safety Programs, at least every year.
This course covers the harmful effects of spilled oil and regulations for oil pollution prevention. The purpose and requirements of a SPCC Plan, procedures to prevent spills, and measures for stopping a spill from reaching the environment.