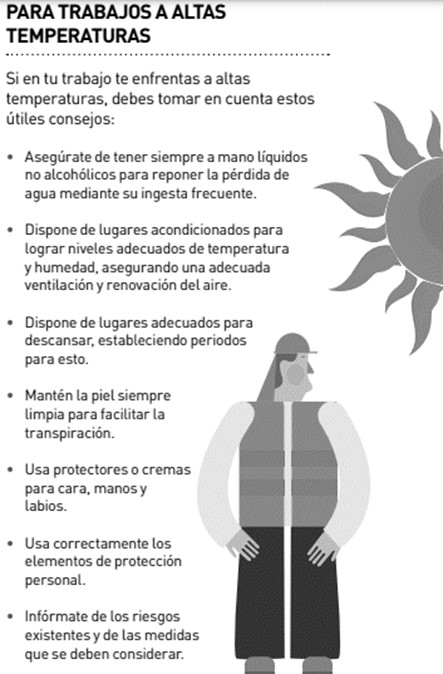
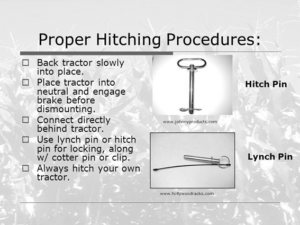
Hitching – Drawbar Connection Picture This
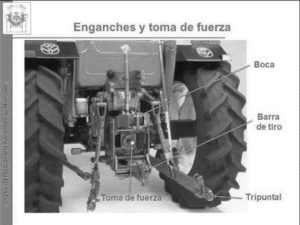
Fuente: https://www.traxco.es/
National Fire Protection Association (NFPA) 704 (Standard System for the Identification of the Hazards of Materials for Emergency Response) is a simple, readily recognized system used for identifying the hazards of materials and the severity of those hazards. A four section multicolor “square-on-point” (diamond/placard) is used to address the health, flammability, instability and special hazards presented by short-term, acute exposures that could occur during fires, spills or other similar emergencies.
Hazard Ratings
The severity of a hazard is indicated by a numerical rating that ranges from zero (minimal hazard) to four (severe hazard). The hazards are arranged and color-coded as follows:
Generally, special hazard symbols are kept to a minimum for emergency and simplicity reasons – W (unusual reactivity with water), OX (oxidizer) and SA (simple asphyxiant gas).

Assignment of Ratings
The assignment of these ratings is to be performed by a technically competent person who is experienced in interpreting the hazard criteria spelled out in Chapters 5 – 8 of NFPA 704. The competent person can determine the ratings for a material by using the information found on a Hazard Communication 2012 compliant Safety Data Sheet (SDS) and comparing it to the criteria. The following sections of the SDS should be reviewed when determining the rating:
The hazard category numbers given in Section 2 of the SDS must not be used as the hazard ratings on the NFPA 704 diamond /placard.
A common question regarding the ratings is how to determine a number when there are a variety of different chemicals in the facility. Section 4.2.3.3 of NFPA 704 provides three different methods to rate multiple chemicals. A single sign can be used to summarize the maximum ratings contributed by the materials. The ratings for a chemical that contains multiple ingredients should be obtained from data for the mixture as presented on the SDS.
Location and Sizes
The NFPA 704 diamond / placard is meant to provide quick hazard information for emergency responders and therefore should be visible where responders are likely to enter. Local authorities have jurisdiction as to where and how many are needed, but NFPA suggests at a minimum the signs should be located on:
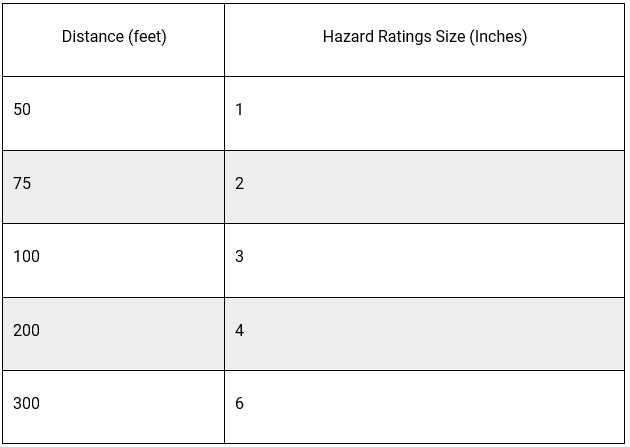
The size of the diamond / placard is dependent on the distance at which the hazard ratings must be legible. The numbers should be visible from a minimum distance of 50 feet. NFPA 704 recommended distances and letter heights are outlined below:
NFPA 704 and the Revised Hazard Communication Standard
One of the integral pieces of the Occupational Safety and Health Administration’s (OSHA’s) revised Hazard Communication Standard was the incorporation of Revision 3 of the United Nations’ Globally Harmonized System of Classification and Labeling of Chemicals (GHS). The revised standard requires the use of standardized “shipped container labels” and 16-section SDSs. However, the revised standard still allows for alternative methods of labeling workplace containers – such as the NFPA 704 labels.
Employers are required to ensure that containers in the workplace are labeled. You may replicate the “shipped container label” or you may label workplace containers with alternative labels, such as the NFPA 704 label. Containers of hazardous chemicals in the workplace must at a minimum include the product identifier and general information concerning the hazards of the chemical. Whatever method you choose, employees need to have access to complete hazard information.
Commonly Asked Questions
Q: Is the NFPA 704 a requirement? Who enforces this requirement?
A: The NFPA 704 standard is a voluntary standard. NFPA 704 signs are required when another federal, state or local regulation or code requires their use. Some of the more widely adopted and used NFPA codes that require 704 signs for specific occupancies, storage and hazardous materials include:
Source
NFPA 704 Standard System for the Identification of the Hazards of Materials for Emergency Response – 2012 Edition
The information contained in this article is intended for general information purposes only and is based on information available as of the initial date of publication. No representation is made that the information or references are complete or remain current. This article is not a substitute for review of current applicable government regulations, industry standards, or other standards specific to your business and/or activities and should not be construed as legal advice or opinion. Readers with specific questions should refer to the applicable standards or consult with an attorney.
Source: Grainger Know How – https://www.grainger.com/know-how
Introduction
Sudden cardiac arrest (SCA) is an unexpected loss of heart function, breathing and consciousness. When SCA occurs, blood stops flowing to the brain, heart and the rest of the body. SCA happens without warning and requires immediate emergency treatment. According to the American Heart Association (AHA), SCA affects more than 1000 non-hospital patients each day in the United States and only 10 percent of these individuals survive. With fast, appropriate medical care, survival is possible. When bystanders provide cardiopulmonary resuscitation (CPR) and use an automated external defibrillator (AED) before emergency personnel arrive, approximately 40 percent of victims survive. Unfortunately, only one-third (32 percent) of SCA victims receive bystander CPR and just two percent are treated with an AED by bystanders.
Cardiopulmonary Resuscitation (CPR)
CPR is a lifesaving procedure performed when someone’s breathing or heartbeat has stopped, as in cases of SCA, electric shock or drowning. CPR is a combination of chest compressions, which help keep the person’s blood circulating, and rescue breathing, which provides oxygen to the person’s lungs. Time is of the essence when an unconscious person is not breathing. Permanent brain damage can begin after only four minutes without oxygen, and death can occur as soon as four to six minutes later.
The following is the Adult Basic Life Support (BLS) Sequence for Healthcare Providers from the 2015 AHA Guidelines for CPR and Emergency Cardiovascular Care (ECC):
Hands-Only CPR
While the AHA’s BLS guidelines for healthcare providers call for the implementation of conventional CPR (30 chest compressions to two breaths), they do recognize the role that hands-only CPR, sometimes referred to as cardio cerebral resuscitation (CCR), can play in saving lives. In 2008 the AHA released a statement that said, “Bystanders who witness the sudden collapse of an adult should dial 911 and provide high-quality chest compressions by pushing hard and fast in the middle of the victim’s chest.”
The survival statistics associated with CCR are quite impressive. The AHA reported in their 2015 Hands-Only™ CPR Fact Sheet that “hands-only CPR has been shown to be as effective as conventional CPR for cardiac arrest at home, at work or in public. It can double or even triple a victim’s chance of survival.” Several studies, in fact, have shown CCR to be superior to the conventional CPR.
Some health professionals believe that the success of the CCR can be attributed to the uninterrupted chest compressions providing a continuous supply of oxygenated blood to the brain. The other huge upside to CCR is that, for the majority of the population, there’s less reluctance to render aid when mouth-to-mouth contact is removed from the equation. The key to surviving SCA is receiving aid as soon as possible, and a simplified procedure like CCR gives more bystanders the confidence and comfort level to get involved quickly.
The AHA continues to recognize the lifesaving impact that CCR can provide. Their 2015 BLS Sequences for both untrained lay rescuers and trained lay rescuers call out the use of CCR. For the trained lay rescuer, rescue breaths are still an option as their recommendation states, “All lay rescuers should, at a minimum, provide chest compressions for victims of cardiac arrest. In addition, if the trained lay rescuer is able to perform rescue breaths, he or she should add rescue breaths in a ratio of 30 compressions to two breaths.”
Whether it’s CPR or CCR, the AHA recommends a compression rate of between 100 to 120 compressions per minute with each chest compression being at least 2 inches but no greater than 2.4 inches in depth. The high end caps on both of these ratios were added to the 2015 AHA guidelines. Previously, the AHA called out “at least 100 compressions per minute” and compression depths of “at least 2 inches.”
Chain of Survival
The AHA’s Chain of Survival is a sequential process for providing treatment to victims of SCA outside of a hospital setting. More people can survive SCA if the following steps occur in rapid succession:
Quick execution of each step is critical because the chances of survival decrease 7 to 10 percent with each passing minute.
Good Samaritan Laws
Most states have enacted Good Samaritan Laws to encourage people to help others in emergency situations. These laws give legal protection to people who provide emergency care to ill or injured persons. They require that the Good Samaritan use common sense and a reasonable level of skill not to exceed the scope of the individual’s training in emergency situations. For more specific information, review your state’s Good Samaritan Law.
Frequently Asked Questions
Q: Is sudden cardiac arrest the same as a heart attack?
A: No. SCA is not the same as a heart attack. A heart attack occurs if blood flow to part of the heart muscle is blocked. During a heart attack, the heart usually doesn’t suddenly stop beating. SCA is when the heart malfunctions and suddenly stops beating. However, sudden cardiac arrest may happen after or during recovery from a heart attack.
Q: What is an AED?
A: An AED is an automatic external defibrillator, a portable, user-friendly electronic device that automatically diagnoses potentially life-threatening heart rhythms. If the AED detects a problem that may respond positively to an electric shock, it permits a shock to be delivered to help restore a normal heart rhythm.
Sources
2015 American Heart Association Guidelines Update for CPR and ECC
National Institute of Health – National Heart, Lung and Blood Institute – Sudden Cardiac Arrest
National Institute of Health – U.S. National Library of Medicine
Mayo Clinic – Diseases and Conditions – Sudden Cardiac Arrest
Heart Disease and Stroke Statistics-2012 Update: A Report From the American Heart Association, Circulation. 2012: 125(1):188-197.
Sudden Cardiac Arrest Foundation
Occupational Safety and Health Administration 29 Code of Federal Regulations 1910.151 Medical Services and First Aid Standard
The information contained in this article is intended for general information purposes only and is based on information available as of the initial date of publication. No representation is made that the information or references are complete or remain current. This article is not a substitute for review of current applicable government regulations, industry standards, or other standards specific to your business and/or activities and should not be construed as legal advice or opinion. Readers with specific questions should refer to the applicable standards or consult with an attorney.
Source: Grainger Know How – https://www.grainger.com/know-how
It is estimated by the Centers for Disease Control and Prevention (CDC) that one in six Americans (or roughly 48 million people) suffer the effects of a foodborne illness annually. Of these individuals, 128,000 will require hospitalization and 3,000 will eventually die as a result of the illness. More than 250 known diseases are contracted through food contaminated by bacteria, viruses, parasites, toxins, metals and prions. Foodborne-disease outbreaks (FBDOs) happen every year, sometimes affecting multiple states and many people, which can be traced back to a variety of food items. Most FBDO attract a lot of media attention due to the improved illnesses reporting, which in most instances will lead to food item recalls.
One well known FBDO case, which started in September of 2008, according to the CDC would spread to 46 states and leave 714 individuals infected and nine dead in its wake. The outbreak would eventually be linked to peanut butter contaminated with Salmonella Typhimurium. This case prompted one of the largest food recalls in U.S. history, and lead to several company executives and employees receiving prison sentences.
Another FBDO the CDC reported in 2015 involved strains of Salmonella Poona infection that was traced to cucumbers imported from Mexico. A total of 907 people were infected in 40 states, which resulted in 204 hospitalizations and several deaths.
Three bacteria, E. coli, Salmonella, and C. perfringens, represent some of the most common causes of foodborne illness. These foodborne illnesses are easily diagnosed due to tests that allow for the detection of the pathogens in a person’s system.
Diagnosis
The foodborne illnesses caused by the pathogens above can be definitively diagnosed by tests that detect the pathogens in a person’s system or in the food that was consumed. However, many foodborne illnesses are caused by pathogens that cannot be detected or have not been identified, thus these sicknesses remain undiagnosed.
This inability to diagnose many of the illnesses caused by these unknown pathogens has led to complications in detecting when FBDOs are occurring in the population. Additionally, although some foodborne diseases cause extreme symptoms such as kidney failure, paralysis, or even death, many cause common flu-like symptoms such as vomiting and fever. Because of this, many cases of foodborne illness simply go unreported. The CDC has instituted procedures that aid in the surveillance of foodborne illnesses in order to determine and act upon any FBDOs that may occur.
The CDC has defined a FBDO as the occurrence of two or more cases of a similar illness resulting from the ingestion of a common food. Often it is a combination of events which contribute to an outbreak. However, the ability to monitor FBDOs has steadily become more effective in recent years due to the electronic Foodborne Outbreak Reporting System (eFORS). This electronic database allows local, state, territorial and federal health agencies to report foodborne illness cases as they happen. The CDC then monitors this database and performs any investigations needed into multiple cases of the same illness, or patterns of illness in the population. This database has made it possible to react to FBDOs that may be occurring within the population quickly and effectively, maximizing the ability of health care providers to treat those that have been affected and increasing the safety and awareness of consumers.
Prevention
Although strides have been made to cope with FBDOs as they happen, there are a few simple habits that you can personally do that significantly decrease your chances of contracting a foodborne illness. When purchasing, transporting, storing and preparing food, there are measures that should be taken in order to ensure the safety of the food you are consuming. Many foodborne illnesses arise out of carelessness in the handling of our food prior to consumption. According to the U.S. Department of Agriculture (USDA), food borne illnesses peak during the summer months. The following is a list of practices that can be followed to minimize the likeliness of contracting a foodborne disease.
Choosing the Right Food at the Right Time:
Storage
Preparation
Restaurant Safety
These prevention measures are needed to limit the possibility of contamination of our food as it travels from the farm to our tables. However, if contamination does occur and a foodborne illness results, it is important to report this to your local health department. With the information you provide, health officials can gain a better understanding regarding the initialization, transmission and other contributing factors to FBDOs.
Commonly Asked Questions
Q: How can I tell if I have a foodborne illness or just the flu? Are there tell-tale signs indicating a foodborne illness?
A: Some of the symptoms of the flu are similar to those of foodborne illness, such as fever, loss of appetite, headache and vomiting. However, in addition to these symptoms the flu carries with it muscle and joint aches, fatigue and cough. A foodborne illness would not display the respiratory symptoms, such as cough, that accompanies the flu.
Q: How long does it take to get sick from ingesting an illness causing pathogen?
A: After a pathogen is ingested an incubation period begins. This incubation period can last from a few hours to a few days. During this period, the microbes move through the stomach and begin multiplying in the intestines. At this point symptoms will be noticed, such as diarrhea or fever. Some microbes will cause symptoms via the intestines, while others will produce a toxin that can enter the bloodstream and attack other organs in the body, causing more severe symptoms, such as temporary anemia or kidney failure, in extreme cases.
Q: Are certain people more susceptible to foodborne illnesses?
A: Infants, pregnant women, the elderly and those individuals with weakened immune systems are more susceptible to foodborne illness because they do not have strong natural mechanisms to fend off a microbial attack in their system. These individuals are also more likely to have severe symptoms associated with a foodborne illness.
Q: What should I do if I suspect a foodborne illness?
A: First and most important, seek medical treatment as necessary, especially if you are considered to be someone more susceptible (infants, pregnant women, the elderly and those individuals with weakened immune systems) to foodborne illness. If you suspect the foodborne illness originated from a restaurant or large gathering, contact your local health department.
Sources
Foodsafety.gov
CDC Food Safety
The information contained in this article is intended for general information purposes only and is based on information available as of the initial date of publication. No representation is made that the information or references are complete or remain current. This article is not a substitute for review of current applicable government regulations, industry standards, or other standards specific to your business and/or activities and should not be construed as legal advice or opinion. Readers with specific questions should refer to the applicable standards or consult with an attorney.
Source: Grainger Know How – https://www.grainger.com/know-how
Employers must set up the workplace to prevent employees from falling off of overhead platforms, elevated work stations or into holes in the floor and walls. OSHA requires that fall protection be provided at elevations of four feet in general industry workplaces, five feet in shipyards, six feet in the construction industry and eight feet in longshoring operations. In addition, OSHA requires that fall protection be provided when working over dangerous equipment and machinery, regardless of the fall distance.
A fall protection plan is a safety plan for workers who will be at elevated work areas. Having a detailed fall protection plan is essential to ensure the highest degree of worker safety.
1. Assess All Fall Hazards In The Work Area.
An essential step to take when developing a fall protection plan is identifying all existing and potential fall hazards in the work area. There are many different types of hazards that are detrimental to worker safety. The 5 fall hazards to watch for include: holes, skylights, platforms, sharp edges, and debris.
2. The Fall Protection Applications Employees Will Be Working In, And The Equipment Needed
Potential fall protection applications include:
Potential equipment includes:
3. Correct Procedures For Assembly, Maintenance, Inspection, And Disassembly Of Fall Protection Systems Used.
Assembly and disassembly of all equipment must be done according to the product manufacturer’s recommended procedures. Inspection of all safety equipment must be done by the end user before each use. Additionally, a Competent Person needs to inspect the user’s equipment in intervals of no more than one year.
4. Correct Procedures For Handling, Storage, And Securing Of Tools And Materials.
Organizations must have a plan to ensure that their fall protection equipment is handled and secured properly. If not stored properly, equipment can become contaminated or otherwise damaged and will not be safe to use. Contamination can include rust, corrosion, discoloration, and deformation, etc.
5. Training Methods For The Employees Working On The Jobsite.
All new and current employees should be given instructions on the proper use of fall protection devices before they begin to work.
6. The Method For Prompt, Safe Rescue Of Injured Workers (I.E., Your Rescue Plan).
A plan for the rescue and recovery of fallen workers is essential to include in all fall protection plans. OSHA requires that employers provide for prompt rescue of employees in the event of a fall, or ensure that employees are able to rescue themselves.
7. The Fall Protection Plan Must Be Jobsite Specific.
Every job is different and will present different types of fall hazards. It is extremely important that each jobsite is analyzed for these hazards, and that they are eliminated prior to the beginning of any work.
8. The Fall Protection Plan Must Be Available To Employees.
Your written fall protection plan should be reviewed before work begins on any jobsite. It is recommended that you have a sheet for employees to sign at the jobsite stating that they have been trained in and understand the fall protection plan.
Vigilance is the key to keep workers safe when working at heights.
Fall protection is not just for working at heights. It can also include slippery or unstable surfaces, working on elevated surfaces, sloping surfaces (e.g. roof), or working in close proximity to an unprotected edge, hole or pit.
LA PROTECCIÓN CONTRA CAÍDAS ES IMPORTANTE
Los empleadores deben preparar el lugar de trabajo para evitar que los empleados se caigan de las plataformas aéreas, los puestos de trabajo elevados o los huecos en el suelo y las paredes. La OSHA exige que se proporcione protección contra caídas a una altura de cuatro pies en los lugares de trabajo de la industria general, cinco pies en los astilleros, seis pies en la industria de la construcción y ocho pies en las operaciones de estiba. Además, la OSHA exige que se proporcione protección contra caídas cuando se trabaje sobre equipos y maquinaria peligrosos, independientemente de la distancia de caída.
PLAN DE PROTECCIÓN CONTRA CAÍDAS PARA LOS TRABAJADORES
Un plan de protección contra caídas es un plan de seguridad para los trabajadores que estarán en zonas de trabajo elevadas. Disponer de un plan de protección contra caídas detallado es esencial para garantizar el mayor grado de seguridad de los trabajadores.
QUÉ DEBE INCLUIRSE EN UN PLAN DE PROTECCIÓN CONTRA CAÍDAS
1. Evaluar todos los riesgos de caída en el área de trabajo.
Un paso esencial a la hora de desarrollar un plan de protección contra caídas es identificar todos los riesgos de caída existentes y potenciales en el área de trabajo. Hay muchos tipos diferentes de peligros que son perjudiciales para la seguridad de los trabajadores. Los 5 peligros de caída que hay que vigilar son: agujeros, tragaluces, plataformas, bordes afilados y escombros.
2. Las aplicaciones de protección contra caídas en las que trabajarán los empleados, y el equipo necesario
Las posibles aplicaciones de protección contra caídas incluyen
El equipo potencial incluye:
3. Procedimientos correctos para el montaje, el mantenimiento, la inspección y el desmontaje de los sistemas de protección contra caídas utilizados.
El montaje y desmontaje de todo el equipo debe realizarse de acuerdo con los procedimientos recomendados por el fabricante del producto. El usuario final debe inspeccionar todos los equipos de seguridad antes de cada uso. Además, una persona competente debe inspeccionar el equipo del usuario en intervalos no superiores a un año.
4. Procedimientos correctos para la manipulación, el almacenamiento y la seguridad de las herramientas y los materiales.
Las organizaciones deben tener un plan para asegurar que su equipo de protección contra caídas se maneja y se asegura correctamente. Si no se almacena adecuadamente, el equipo puede contaminarse o dañarse de alguna manera y no será seguro de usar. La contaminación puede incluir óxido, corrosión, decoloración y deformación, etc.
5. Métodos de capacitación para los empleados que trabajan en la obra.
Todos los empleados nuevos y actuales deben recibir instrucciones sobre el uso adecuado de los dispositivos de protección contra caídas antes de comenzar a trabajar.
6. El método para el rescate rápido y seguro de los trabajadores lesionados (es decir, su plan de rescate).
Es esencial incluir en todos los planes de protección contra caídas un plan de rescate y recuperación de los trabajadores caídos. OSHA exige que los empleadores prevean el rápido rescate de los empleados en caso de caída, o que se aseguren de que los empleados son capaces de rescatarse a sí mismos.
7. El plan de protección contra caídas debe ser específico para el lugar de trabajo.
Cada trabajo es diferente y presentará diferentes tipos de riesgos de caída. Es extremadamente importante que cada sitio de trabajo sea analizado para estos peligros, y que sean eliminados antes de comenzar cualquier trabajo.
8. El plan de protección contra caídas debe estar disponible para los empleados.
Su plan de protección contra caídas por escrito debe ser revisado antes de comenzar el trabajo en cualquier sitio de trabajo. Se recomienda tener una hoja para que los empleados firmen en el lugar de trabajo indicando que han sido capacitados y entienden el plan de protección contra caídas.
MANTENER A LOS TRABAJADORES A SALVO DE LAS CAÍDAS
La vigilancia es la clave para mantener la seguridad de los trabajadores cuando trabajan en altura.
La protección contra las caídas no se limita a los trabajos en altura. También puede incluir superficies resbaladizas o inestables, trabajar en superficies elevadas, superficies inclinadas (por ejemplo, el techo), o trabajar muy cerca de un borde, un agujero o un pozo sin protección.
OSHA adapted a general standard for occupational exposure to hazardous chemicals in laboratories. This standard recognizes the unique characteristics of working in a laboratory. The goals of the OSHA Laboratory Standard are to reduce the risk of injury or illness to laboratory workers by ensuring that they have the information, equipment, training and support required to work safely. Failure to comply could result in heavy fines, especially EPA infringements regarding hazardous waste regulations. Even fines for minor violations can be financially crippling, so pay close attention to compliance requirements.
Lab safety programs should be tailored to the work and experiments done there. Chemical experiment planning decisions are affected by a company’s personnel knowledge and skill level, the experiment size and scale, the chemical hazards or the operations being considered, company policies and environmental regulations that might apply.
The following outline provides an overview of information that can be included in a company’s or institution’s lab safety program.
III. Laboratory Equipment
Company policies
Companies should have a written health, safety and environmental affairs (HS&E) policy statement. Companies can organize an HS&E committee consisting of employees, management, faculty, staff and students who can meet regularly to discuss HS&E issues. Companies should develop an HS&E orientation for all new employees and/or students.
Roles and Responsibilities
There are four typical roles involved in laboratory safety; the Chemical Hygiene Officer, a Supervisor or Principal Investigator, Environmental Health and Safety Personnel, and the Laboratory Worker.
The Chemical Hygiene Officer is responsible for developing and implementing the Chemical Hygiene Plan.
The responsibilities of a Supervisor or Principal Investigator may include sending laboratory workers to additional lab safety training. This might include: chemical awareness; procedural safety; understanding engineering controls; personal protective equipment needed to work safely with hazardous materials; and how to use equipment safely. They may also have laboratory workers complete hazardous substance approval forms and submit them for approval before using any particularly hazardous substance.
Environmental Health and Safety Personnel responsibilities typically include providing training, resources and consultation for a variety of laboratory safety issues. This might include chemical safety, biological safety, electrical safety, laser safety, radiation safety or other related topics. They may review the Chemical Hygiene Plan, develop and maintain laboratory safety manuals, conduct exposure monitoring, inspect fume hoods annually and perform safety audits.
Laboratory workers prepare and conduct experiments and actively monitor conditions. They pariticipate in and contribute to the planning process.
The highest level of leadership must introduce and support effective implementation of lab review programs. Individuals who supervise laboratory activities should be responsible for supporting functions and individuals. While laboratory workers prepare and conduct experiments, the laboratory supervisor determines what level of planning is required. They are accountable for required training, documentation and compliance with regulations. Each worker should be responsible for safety and for a specific role in the experiment.
Standard Operating Procedures
A requirement of the CHP is to develop Standard Operating Procedures (SOP) relevant to safety and health considerations to be followed when laboratory work involves the use of hazardous chemicals. This is especially the case when select carcinogens, reproductive toxins and substances that have a high degree of acute toxicity are present. SOP can be stand-alone documents or supplemental information included as part of research notebooks, experiment documentation, or research proposals. Operating procedures should help ensure a process is in place so that an experiment is well-planned and includes and addresses relevant health and safety issues.
Employee Exposure/Controlling Chemical Exposure
CHP also requires monitoring, measuring and controlling employee exposure to chemicals in the lab.
A hazard analysis can help determine if a fume hood is necessary for an experiment. Such an analysis should include: a review of the physical characteristics; the quantity and toxicity of the materials to be used; the experimental procedure; the volatility of the materials present during the experiment and the probability of their release; the number and sophistication of manipulations; and the skill level of the person performing the work.
Many laboratories use equipment and apparatuses that can generate airborne contaminants, but cannot be used within a fume hood. Examples include gas chromatographs, ovens, and vacuum pumps.
Chemical and Hazard Identification
Chemical manufacturers or distributors perform an assessment of the physical and health hazards of each chemical they produce. This information is included in a material safety data sheet (MSDS) and partial information contained on the MSDS is also listed on container labels. The information found on the original container label and the MSDS may provide a great deal of information about the identity of the chemical constituents and their health and physical hazards. The manufacturer or distributor is required to provide an MSDS with the initial shipment of their products. Any MSDSs received by a laboratory must be maintained in a central location in the laboratory or department and be readily available to laboratory workers. The Chemical Hygiene Plan should outline what to do with MSDSs received by a laboratory. The manufacturer’s label should always be kept intact. When a chemical is transferred to another container for storage, the new containers should be labeled with the name of the product, the chemical constituents, any hazard warnings and the appropriate precautions.
Information and Training
Employers must provide information and training regarding safe work practices for employees on such issues as: hazard awareness; handling of chemicals; procedures and permissible exposure limits; health and hygiene; physical hazards; electrical safety; emergency procedures; personal protective equipment; working alone in the laboratory; laboratory security;, and handling visitors to the lab. Laboratory workers may need very specific training on safe work practices when working in areas such as controlled environments and cleanrooms. Employees should learn and be aware of the location of the Chemical Hygiene Plan, the Laboratory Standard and all pertinent MSDS information and be familiar with the details and contents.
Employers should schedule regular departmental safety meetings for all students and/or employees to discuss the results of inspections and aspects of laboratory safety. Employers should also forbid employees from working alone in any laboratory or if this is impossible, employees should always alert a staff member when working alone. Experiments should not be allowed to run unattended unless they are failsafe. Good housekeeping practices should be performed in all work areas.
Recordkeeping
It is essential for any lab where chemicals are used to keep accurate records such as MSDS, Certificates of Analysis, lab analysis documentation, logs of chemical usage, cleaning logs and maintenance logs. This information can be used in inspections and audits.
Laboratory supervisors are responsible for the health and safety conditions in the laboratories under their management. An important tool in managing this responsibility is the laboratory self-inspection. Properly conducted, self-inspections help ensure healthful working conditions and improve regulatory compliance. The laboratory supervisor is responsible for correcting all problems found during these audits, and for maintaining copies of self-inspection checklists and forms. These forms should be available for review by lab workers, other company personnel and external auditors.
If your company requires laboratory auditing as part of its qualification or quality policy, the lab supervisor or manager should develop a well-defined laboratory Audit Plan. Some aspects that this laboratory Audit Plan should address include: the audit purpose; identification of laboratory auditors and responsibilities; scope; objectives; requirements; and criteria for the laboratory audit. Once the laboratory Audit Plan is approved, communication of plan, an audit schedule and checklist help set expectations.
Emergency Procedures/Response
Spills and chemical exposure can occur if chemicals are transported incorrectly, even when moving chemicals only a short distance within the lab. Regulations require companies and institutions to develop plans and conduct drills for dealing with emergencies such as fire, explosion, accidental poisoning, chemical spill or vapor release, electric shock, bleeding and personal contamination. Individual departments should have a written emergency action plan, a designated emergency coordinator and a designated assembly point. The emergency coordinator is the first point of contact for questions about the emergency procedures and the emergency action plan. A designated assembly point is where building occupants should gather in the case of a building evacuation. Make sure you are accounted for before leaving the assembly point. Rescue personnel are required to enter a building and search for individuals who are thought to still be in the building. Be sure to familiarize yourself with the emergency action plan for your department.
Employers must provide appropriate safety equipment and first aid kits in case of emergency. Safety equipment may include fire extinguishers, fire blankets, AEDs, safety showers, eye wash fountains, spill control materials and fume hoods. These items should be tested or checked monthly. An appropriate supply of first aid equipment should be provided as well as instructions for their proper use.
What To Do in the Event of:
Your laboratory or work area should have access to sufficient quantity of sorbents or other types of materials to control any spill that can be reasonably anticipated. Absorption and neutralizing materials may include acid neutralizer, caustic neutralizer and solvent neutralizer. For mercury spills, necessary clean up equipment may include a small mercury vacuum, Hg Absorb Sponges, Hg Absorb Powder, Hg Vapor Absorbent and Mercury Indicator.
III. Laboratory Equipment
Laboratory equipment may include refrigerators, centrifuges, microscopes, glassware, vacuum systems, stirring and mixing devices, heating devices and autoclaves. Laboratory workers should be trained in their use and know the possible hazards when working with this equipment. Laboratory workers should follow cleaning, maintenance and calibration schedules to ensure all lab equipment is working properly.
Electrically powered equipment, such as hot plates, stirrers, vacuum pumps, electrophoresis apparatus, lasers, heating mantles, ultrasonicators, power supplies, and microwave ovens are essential elements of many laboratories. These devices can pose a significant hazard to laboratory workers, particularly when mishandled or not maintained. Many laboratory electrical devices have high voltage or high power requirements, carrying increased risk. All electrical connections should be removed from the inside of chemical refrigerators and magnetic closures should be required. Temperature monitoring may be required for incubators, refrigerators and freezers. Require grounded plugs on all electrical equipment and install ground fault interrupters (GFIs) where appropriate.
Compressed gases can be toxic, flammable, oxidizing, corrosive, inert or a combination of hazards. In addition to the chemical hazards, compressed gases may be under a great deal of pressure. The amount of energy in a compressed gas cylinder makes it particularly dangerous. Appropriate care, handling and storage of compressed gas cylinders is essential. Always secure all compressed gas cylinders.
Working with hazardous chemicals at high or low pressures requires planning and special precautions. Procedures should be implemented to protect against explosion or implosion through appropriate equipment selection and the use of safety shields. Care should be taken to select glass apparatus that can safely withstand designated pressure extremes. Always provide safe guards on all vacuum pumps. Vacuum work can result in an implosion and the hazards of flying glass, splattering chemicals and fire. All vacuum operations must be set up and operated with careful consideration of the potential risks. Equipment at reduced pressure is especially prone to rapid pressure. Such conditions can force liquids through an apparatus, which can also be dangerous.
Related EZ Facts Topics
208 First Aid Regulation, 29 CFR 1910.151 and Z308.1-2003 Summary
240 Personal Protective Equipment Standards
190 Selecting Chemical Protective Clothing
145 Fume Extraction: Engineering Controls for Reducing Employee Chemical Exposure
120 Emergency Eye/Face Wash/Shower Requirements
200 Hazard Communication Labeling
147 Spill Cleanup: Assessing Your Needs and Choosing the Right Sorbents
Source
OSHA Standard 1910.1450 Occupational Exposures to Hazardous Chemicals in Laboratories
The information contained in this article is intended for general information purposes only and is based on information available as of the initial date of publication. No representation is made that the information or references are complete or remain current. This article is not a substitute for review of current applicable government regulations, industry standards, or other standards specific to your business and/or activities and should not be construed as legal advice or opinion. Readers with specific questions should refer to the applicable standards or consult with an attorney.
Source: Grainger Know How – https://www.grainger.com/know-how
Handheld infrared (IR) thermometers are used in many industries and work environments to measure surface temperatures rapidly and at a safe distance. Elevated temperature can be the first sign of trouble for mechanical equipment, electrical circuits and building systems. A quick temperature check of key components can find potential trouble areas and prevent catastrophic failures. This article will discuss the basics of infrared radiation, as well as two important concepts to understand when choosing and using an infrared thermometer: D:S ratio and emissivity.
Infrared Radiation and the Electromagnetic Spectrum
Infrared radiation is one type of radiation in the electromagnetic spectrum. Other types of electromagnetic radiation include microwaves, X-rays and visible light.
We can’t see infrared radiation—its wavelength is slightly too long for our eyes to perceive it as visible light—but we feel it on the skin as the sensation of warmth.
How is Infrared Radiation Used to Determine Temperature?
Like visible light, infrared energy can be focused, reflected and absorbed. Handheld IR thermometers use a lens to focus the infrared energy from an object onto a sensor that measures it, typically a thermopile. The sensor absorbs infrared radiation and converts it to an electrical signal, with more intense radiation creating a stronger signal. The IR thermometer processes this signal in order to deliver a temperature readout.
What Is Emissivity?
Everything emits infrared energy, but some things emit it more efficiently than others. Emissivity is a measure of this efficiency and the measurement is expressed in a range from 0 to 1. In general, surfaces that are reflective or shiny have lower emissivity than other surfaces. It’s important to understand emissivity, especially if you’ll be taking measurements from shiny or reflective surfaces. Failing to take it into account can result in incorrect temperature readings.
The simplest IR thermometers are designed to produce accurate measurements from surfaces that have an emissivity of approximately 0.95. According to test instrument manufacturer Fluke, most organic, oxidized or painted surfaces have emissivities close to that value. However, reflective surfaces have a much lower emissivity, which means that fixed-emissivity IR thermometers are not able to accurately measure their temperature directly. Polished aluminum, for example, has an emissivity of around 0.05.
One way to take more accurate temperature measurements from reflective surfaces is to use an IR thermometer that has variable emissivity settings. These can range from simple “high, medium and low” settings to fully adjustable settings. Check your device’s manual for the manufacturer’s recommended emissivity setting for specific materials.
Another way to take more accurate measurements from shiny surfaces is to add a piece of flat-black, non-reflective tape or a patch of high-temperature paint to the surface and take the reading from this non-shiny area, after it’s had time to come to temperature.
Selection tip: If you’ll frequently be measuring the temperature of shiny or reflective surfaces, you’ll probably want to consider an infrared thermometer that offers variable emissivity settings.
Using an Infrared Thermometer: Understanding Field of View and D:S Ratio
Because an IR thermometer uses an optical system with a lens to focus infrared energy, the area from which that energy is focused is sometimes called the thermometer’s field of view. The field of view is also sometimes called the spot. To get the best results from an infrared thermometer, you need to understand its field of view.
The field of view widens as the distance between the IR measuring device and the surface it’s measuring increases. The orientation of the device to the surface being measured also affects the field of view. To get the tightest field of view, hold the device at a perpendicular or 90° angle to the surface you’re measuring.
To use an IR thermometer correctly, it’s important to keep in mind that an IR thermometer measures the average temperature over its entire field of view. When a surface does not fill the instrument’s field of view, the instrument will be unable to measure its temperature well, because its readout will also include the temperature of things that are next to or behind the surface.
To determine the size of an IR thermometer’s field of view at a given distance, you can use the device’s distance-to-spot (D:S) ratio, also sometimes called distance-to-target ratio (DTR). The D:S ratio is related to the sophistication of the device’s optical system and can vary from 1:1 on inexpensive infrared thermometers to 60:1 or higher on high-end instruments.
This chart below shows examples of the field of view diameter for different D:S ratios at different measurement distances.
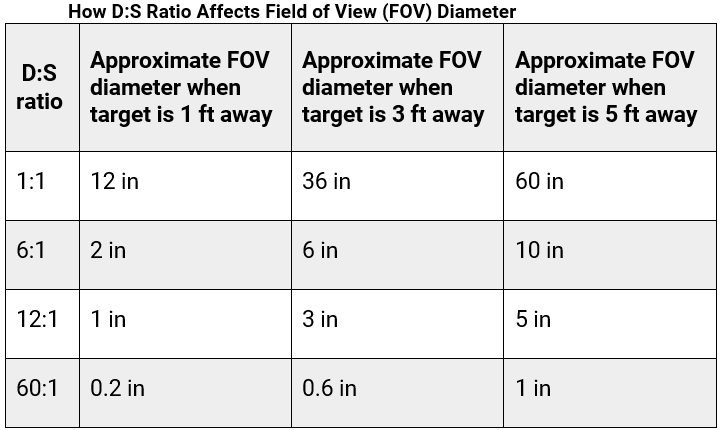
IR thermometers with high D:S ratios, such as 60:1, can measure smaller areas from a greater distance. Because the field of view of a device with a 1:1 D:S ratio expands so quickly as you get further away from the object, manufacturers typically recommend using them at as close distance as possible.
Selection tip: When choosing an IR thermometer, think about how far away you’ll need to be from the things you’re measuring, and how small those things are. The smaller and farther away the target, the higher D:S ratio you’ll need.
Laser Targeting System
Most IR thermometers have laser pointers to help target the measurement. The simplest of these targeting systems is a single laser that points at the approximate center of the field of view.
IR thermometers with more complex targeting systems use two or more lasers to indicate the full size of the field of view at the measured distance, which can save you the trouble of estimating its size on the fly using the D:S ratio. A dual-laser or multiple-laser instrument may be easier to use correctly, especially for an inexperienced operator.
Other Causes of Incorrect Readings
As described above, to get accurate measurements, the two most critical things to keep in mind are: field of view (D:S ratio) and emissivity. Nevertheless, there are a few other things that can potentially influence results:
Temperature Range
IR thermometers have maximum temperature readouts that can be anywhere from a few hundred degrees to several thousand degrees Fahrenheit. Manufacturers usually describe the accuracy of the temperature measurements in both relative and absolute terms. For example, one thermometer might be accurate to within 3° F or 3%, whichever is greater. This means that at very high temperatures, the accuracy diminishes in absolute terms—but practically speaking, a difference of, say, 30° F is inconsequential when the measured temperature is 1000° F.
Selection tip: The three most important factors to consider when choosing an IR thermometer are temperature range, D:S ratio and emissivity functionality.
Clinical Non-contact Infrared Thermometers
Clinical non-contact infrared thermometers (also called medical non-contact thermometers) work on the same basic principles as industrial IR thermometers, but they have a specialized design that helps them produce accurate measurements of body temperature.
Clinical non-contact IR thermometers are considered medical devices and normally must be cleared for sale by the Food and Drug Administration (FDA). However, during the COVID-19 pandemic, the FDA temporarily relaxed this restriction to help prevent a shortage of these devices.
How Are Clinical Infrared Thermometers Different from Industrial Infrared Thermometers?
Here are some of the important differences between infrared thermometers designed to measure body temperature and industrial IR thermometers:
Additionally, clinical non-contact IR thermometers have a feature that compensates for the expected difference between skin temperature and internal body temperature. This compensation allows the clinical non-contact IR thermometer to produce a reading that’s more directly comparable to body temperature as measured by an under-the-tongue thermometer. Clinical non-contact IR thermometers are typically used for screenings, rather than for diagnostic measurements. In other words, a non-contact IR thermometer can identify people who may have a fever, but a readout from a complementary device, such as an under-the-tongue thermometer, would usually be required to diagnose that person with a fever.
Frequently Asked Questions
Q: Can infrared thermometers see through glass and plexiglass?
A: Glass, plexiglass and other visually transparent materials are usually “opaque” to infrared light. If you try to measure a temperature of something on the other side of a window, for example, the readout will tell you the temperature of the glass, even if the thermometer’s laser pointer passes through it.
Q: Can I use an industrial infrared thermometer to measure body temperature?
A: Most industrial IR thermometers are not well-suited to measuring body temperature. Many industrial IR thermometers produce measurements that are accurate to within three or four degrees Fahrenheit, which is acceptable for industrial applications but would not be helpful for determining whether or not a person has a fever. Also, the temperature of a person’s forehead is somewhat cooler than their internal body temperature, and clinical IR thermometers are designed to deliver readouts that compensate for this difference, while industrial IR thermometers are not. Check manufacturer’s specifications to determine whether an instrument can be used to measure body temperature.
Q: What’s the best way to clean an IR thermometer?
A: To be accurate, IR thermometers must be kept clean. To clean, use a soft cloth or cotton swab with water or medical grade rubbing alcohol and carefully wipe first the lens and then the body of the thermometer. Allow the lens to dry fully before using the thermometer. Never use soap or chemicals and never submerge any part of the thermometer in water. Industrial IR thermometers should be cleaned when dirty, or roughly every six months according to some manufacturers. Consult the instructions for your device before cleaning. Clinical IR thermometers used for temperature screening should be cleaned and disinfected according to manufacturer’s instructions and facility policies, according to the Centers for Disease Control and Prevention.
Q: How close do I need to be to an object to measure its temperature accurately with an IR thermometer?
A: There’s a quick way to estimate the maximum distance from which you can reliably measure an object of a certain size with an infrared thermometer: Multiply the size of the object by the first number in the distance-to-spot ratio.
For example, an IR thermometer with a D:S ratio of 12:1 can measure a 4-inch surface at a maximum distance of about 48 inches (12 x 4 = 48). This shortcut won’t work if the second number in the D:S ratio is anything other than 1, but instruments with such ratios are uncommon.
The information contained in this article is intended for general information purposes only and is based on information available as of the initial date of publication. No representation is made that the information or references are complete or remain current. This article is not a substitute for review of current applicable government regulations, industry standards, or other standards specific to your business and/or activities and should not be construed as legal advice or opinion. Readers with specific questions should refer to the applicable standards or consult with an attorney.
Source: Grainger Know How – https://www.grainger.com/know-how
These modern-day tape measures consolidate the functions of voltmeters, ammeters, and ohmmeters into a single unit.
As one of most widely-used electronic testing instruments, the digital multimeter (DMM) is more commonly known as the modern-day tape measure. But instead of being able to handle a single function (i.e., linear measurement), DMMs consolidate the functions of multiple instruments, such as voltmeters, ammeters, and ohmmeters into one unit.
DMMs are used in electrical engineering design, maintenance, quality control, inspection, and/or any application requiring electrical servicing and diagnostic testing. A basic DMM works with energized and de-energized electrical circuits and measures alternating current (AC), AC voltage, direct current (DC), DC voltage, resistance, continuity, and diodes. Advanced models measure capacitance, frequency, temperature, pressure, and vacuum (special accessories are required for some of these measurements).
Choosing a Multimeter
When selecting a DMM for a specific application, consider these three points:
Another important consideration to factor in when selecting a DMM is whether it is a True RMS (root mean square) meter or not. True RMS meters allow non-sinusoidal AC signals to be accurately measured. The typical DMM is not a True RMS meter, and the former will produce misleading voltage readings when used to measure anything other than DC signals or pure sine wave AC signals.
Regardless of which multimeter you chose, electrical test equipment should be used with caution, respect, and maintained in accordance with the manufacturer’s guidelines. As with all electrical test equipment, individuals using a DMM should receive training in its proper operation.
It’s important to use extreme caution anytime you work with current (AC or DC) and voltage. To avoid catastrophic consequences, an electrical safe work program should be established and followed whenever working with electricity.
The information contained in this article is intended for general information purposes only and is based on information available as of the initial date of publication. No representation is made that the information or references are complete or remain current. This article is not a substitute for review of current applicable government regulations, industry standards, or other standards specific to your business and/or activities and should not be construed as legal advice or opinion. Readers with specific questions should refer to the applicable standards or consult with an attorney.
Source: Grainger Know How – https://www.grainger.com/know-how
According to the Centers for Disease Control and Prevention (CDC), across all workers, approximately 20% of all fall injuries involve a ladder. Among construction workers – especially roofing, framing, siding, and painting contractors – the dangers of ladder falls are even more clear: An estimated 81% of fall injuries treated in emergency rooms across the country involve a ladder. Construction has the highest rate of ladder fall injuries of any industry.
Ladders come in a variety of shapes, sizes, and materials. They are useful in many industries for a variety of applications. This document offers an overview of the Occupational Safety and Health Administration (OSHA) and the American National Standards Institute (ANSI) Accredited Standards Committee (ASC) standards for ladders, along with tips for proper ladder usage. A critical component of fall prevention is making sure all ladders meet OSHA and ANSI-ASC standards. Read on to see if yours pass the test.
OSHA Regulatory Requirements
In late 2016, OSHA published an update to its walking-working surface rule (subpart D) for general industry. Subpart D applies to all general industry workplaces and covers all walking-working surfaces unless specifically excluded by an individual section of the subpart. Specifically, the update incorporates advances in technology, industry best practices and national consensus standards to provide effective and cost-efficient worker protection addressing slip, trip and fall hazards.
The update ushered in some sweeping changes where ladders were concerned. As part of the update, OSHA combined its previously separate regulations for portable wood ladders, portable metal ladders and fixed ladders under one comprehensive ladder standard: 29 Code of Federal Regulations (CFR) 1910.23 which applies to all ladders used in general industry with a few exceptions. Those exceptions are ladders used in emergency operations such as firefighting, rescue and tactical law enforcement operations, or training for those operations, and ladders that are an integral part of a machine or piece of equipment.
The four main components of OSHA’s ladder standard cover:
Under the General Requirements for all ladders, 29 CFR 1910.23(b)(11-13), OSHA addresses proper ladder climbing technique When ascending or descending a ladder, employees must always maintain three points of contact by:
Employers are required to ensure that every employee follows this climbing technique.
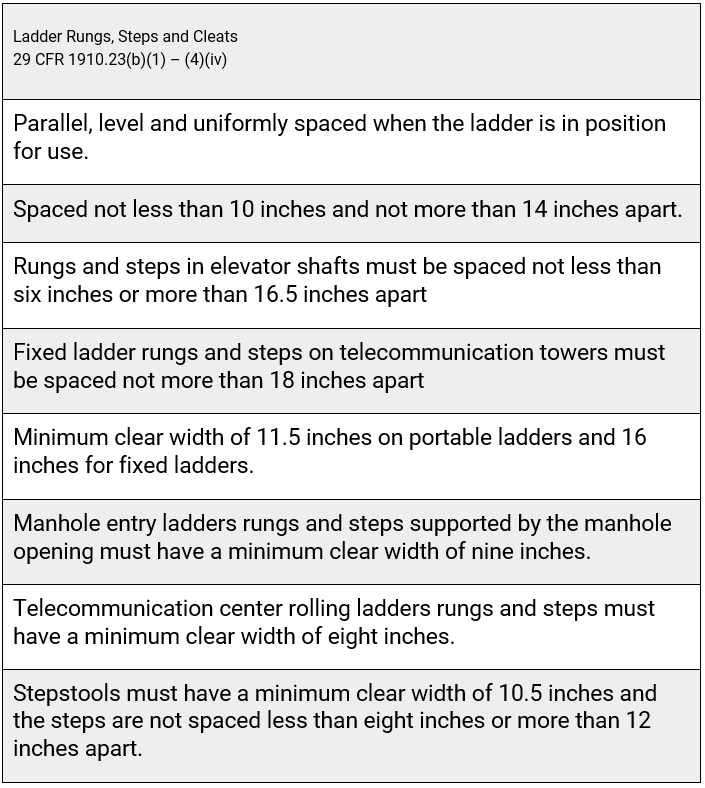
The General Requirements for all ladders also covers the design specifications for rungs and steps used on ladders and stepstools. The design for rungs and steps must meet the following criteria:
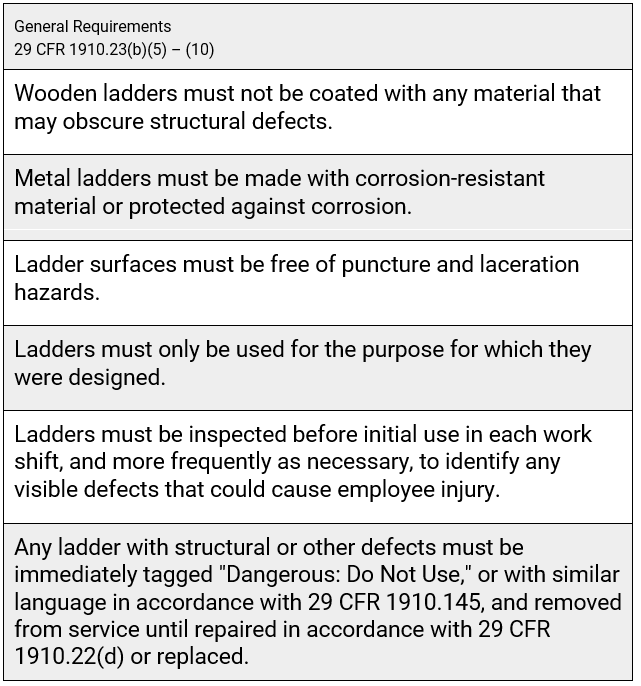
In addition, the General Requirements for all ladders mandate the following:
Portable Ladders
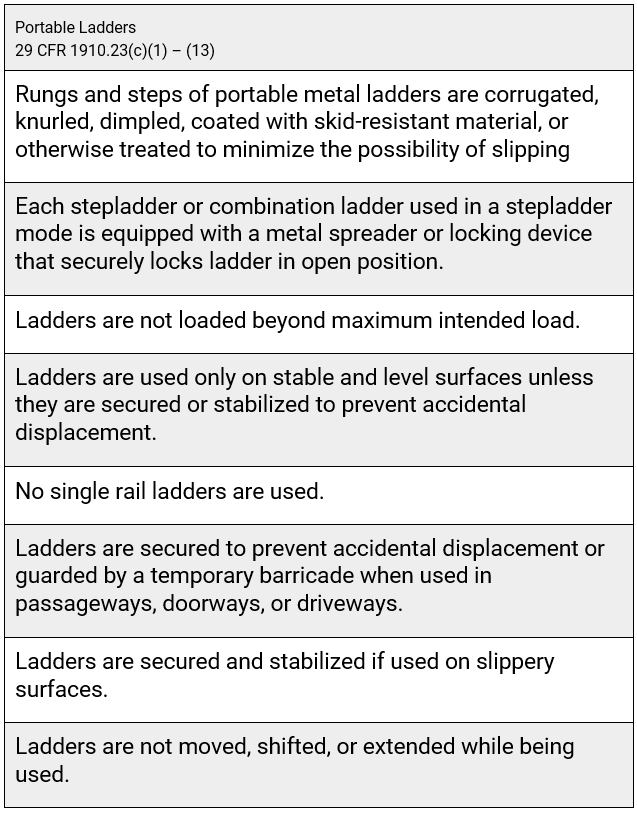
OSHA defines a portable ladder as one that can readily be moved or carried, usually consisting of side rails joined at intervals by steps, rungs, or cleats.(29 CFR 1910.21(b)). They can be self-supporting or lean against a supporting structure (non-self-supporting).
Employers must ensure that:
Fixed Ladders
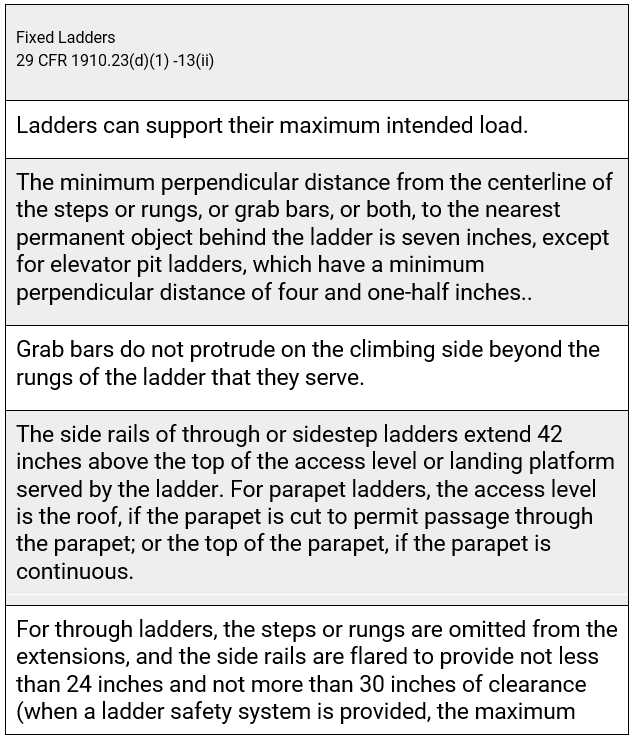
OSHA defines a fixed ladder as a ladder with rails or individual rungs that is permanently attached to a structure, building or equipment (29 CFR 1910.21(b)). These do not include ship stairs, step bolts, or manhole steps.
OSHA gets more granular with design requirements for specific types of fixed ladders above and beyond what’s specified under the General Requirements. Employers must ensure that:
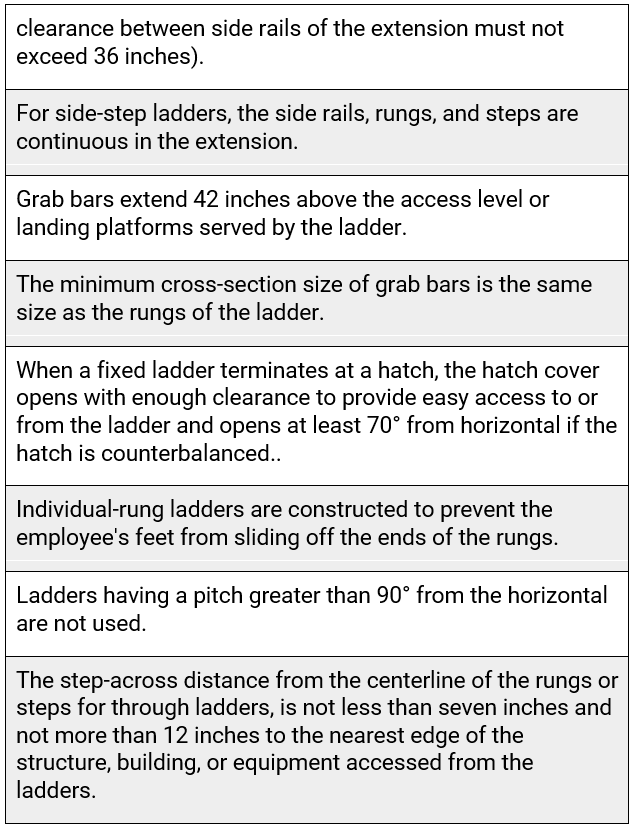
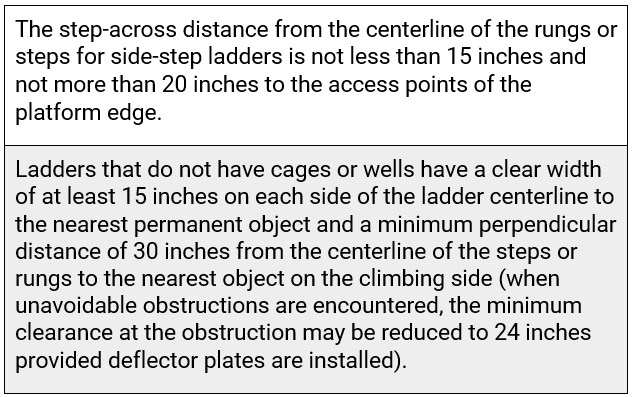
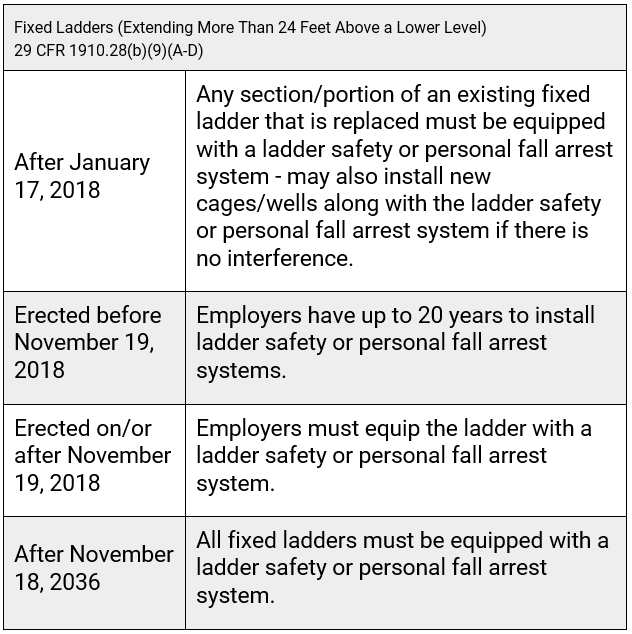
OSHA’s updated walking-working surfaces rule also addresses fixed ladders under 29 CFR 1910.28(b)(9), Duty to Have Fall Protection and Falling Object Protection. The rule phases in, over 20 years, a requirement to equip fixed ladders (that extend over 24 feet above a lower level) with ladder safety or personal fall arrest systems, and it prohibits the use of cages and wells as a means of fall protection after the phase-in deadlines. The rule grandfathers in cages and wells on existing ladders but requires that employers equip new ladders and replacement ladders/ladder sections with ladder safety or personal fall arrest systems during the phase-in period. Shown below are the established phase-in dates:
Mobile Ladder Stands and Mobile Ladder Stand Platforms
OSHA defines a mobile ladder stand as a mobile, fixed-height, self-supporting ladder that usually consists of wheels or casters on a rigid base and steps leading to a top step (29 CFR 1910.21(b)). A mobile ladder stand may also have handrails and is designed for use by one employee at a time. OSHA defines a mobile ladder stand platform as a mobile, fixed-height, self-supporting unit having one or more standing platforms that are provided with means of access or egress. Employers must ensure that:
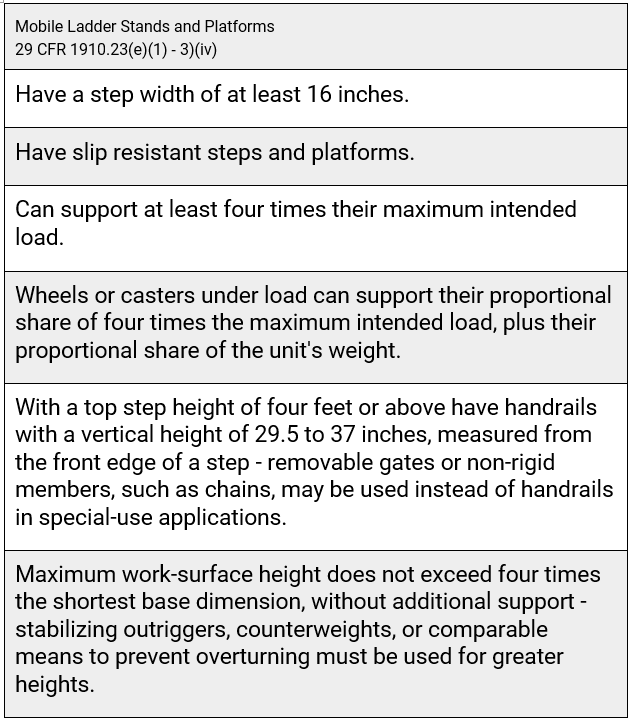
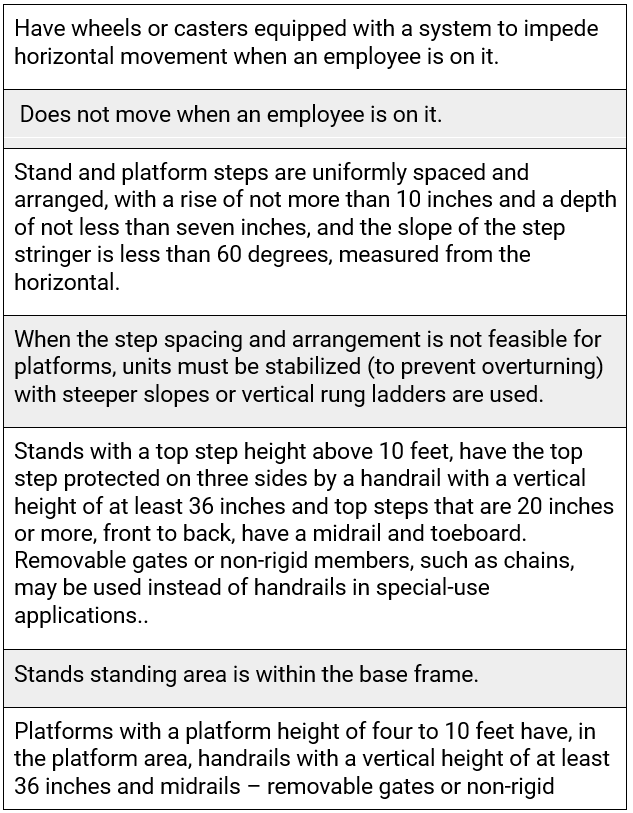
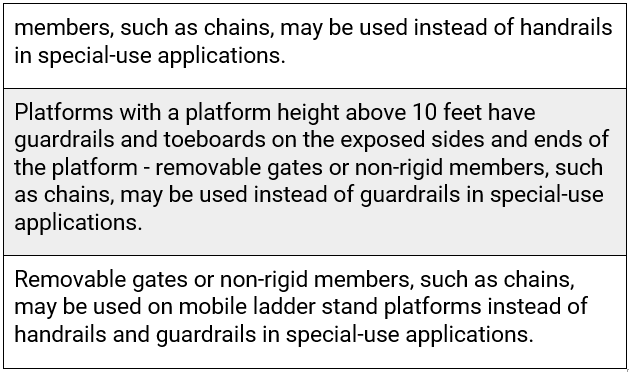
ANSI-ASC Ladder Standards
ANSI – ASC consensus standards for ladders detail the materials, safe construction, design, testing, care and use, and labeling/marking for various types and styles of ladders, and include:
Portable Ladder Styles and Types
Portable ladder styles include stepstools, stepladders, extension ladders, trestle ladders, combination ladders which may also be used separately as single ladders, mobile ladder stand ladders, and mobile ladder stand platform ladders,.
The duty rating of a ladder is an indication of the maximum weight capacity the ladder can safely carry. There is no relationship between ladder length and weight capacity. There are five categories of ladder duty ratings:
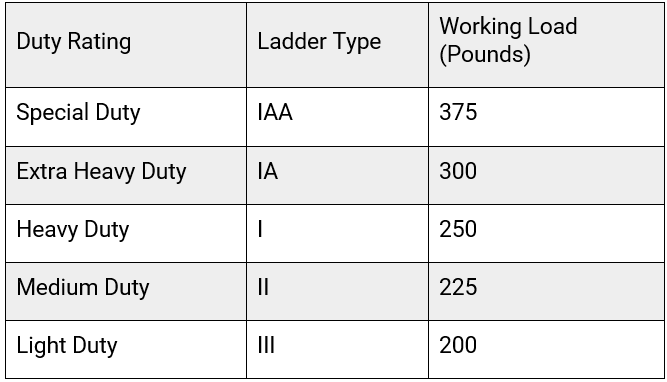
Portable Ladder Material Guidelines
The environment the finished ladder will encounter (electrical hazards, temperature extremes, corrosion, outdoor weathering, etc.) should determine the material.
ANSI-ASC recommends various species of wood that are suitable for ladders. Physical characteristics such as grain, knot, pitch, and compression must be controlled when constructing wood ladders.
Specific design and construction requirements for metal ladders are minimized because of the wide variety of materials and design possibilities. However, the designs must produce ladders of enough strength and stiffness to meet the performance requirements and must not have any structural defects or hazards such as sharp edges, burrs, etc.
Reinforced plastic ladders must use fully cured, commercial-grade, thermosetting polyester resin with glass-fiber reinforcement.
Test Requirements for Portable Ladders
Test requirements for the ladder materials vary. However, ladders generally are evaluated on their resistance to bending, strength in various positions, and the quality of the individual components that make up the ladder.
Portable Ladders Usage Guidelines
Usage guidelines for portable ladders encompass selecting the proper ladder for the job being performed; inspecting before use to verify proper operation and cleanliness; evaluating ladder placement so that footing and top supports are secure and not creating a traffic hazard for pedestrians; utilizing proper climbing technique; and caring for and storing ladders properly.
Before working with a ladder, read the manufacturer’s instructions. Do not use a ladder if sleepy or ill, if you are taking medication, or if there’s bad weather. Do not use ladders in doorways or other high-traffic areas. If a ladder must be used near a door, make sure the door is locked and it is marked with warning signs and/or cones. If the door must be open or the ladder is in a raised position, ask a coworker to stay with the ladder to make sure an incident does not occur. Use fiberglass or wood ladders, rather than metal, near power lines or other sources of electricity to avoid electrical shock hazards. Inspect your ladder for damage before using. During your inspection, if you find it is damaged remove the defective ladder from service and identify it with a “Do Not Use” tag.
Choose the right portable ladder for the job. When deciding which ladder to use – four key choices must be made:
The Centers for Disease Control and Prevention / National Institute for Occupational Safety and Health (NIOSH) has developed a Ladder Safety App for mobile devices that features a multimodal indicator and a graphic-oriented guide for ladder selection, inspection, positioning, accessorizing and safe use. The app is available in English and Spanish and can be downloaded for both iOS and Android users.
Marking Requirements
Ladders must be marked with ladder size, type and/or duty rating, maximum working length (if extension ladder), highest standing level, total length of sections (if extension ladder), model number or name, manufacturer’s or distributor’s name, manufacturer’s plant location (if multiple plants may be coded), month and year of manufacture, and ANSI compliance and warranty (if applicable). Usage guidelines and other warning statements must also be placed on the ladders in specific locations depending on ladder type.
Sources
29 CFR 1910.21 Scope and definitions
29 CFR 1910.22 General requirements
29 CFR 1910.23, Ladders
29 CFR 1910.28, Duty to have fall protection and falling object protection
29 CFR 1910.29 Fall protection systems and falling object protection-criteria and practices
29 CFR 1910.145 Specifications for accident prevention signs and tags
ANSI-ASC A14.1-2017 – American National Standard for Ladders – Wood Safety Requirements
ANSI-ASC A14.2-2017 American National Standard for Ladders – Portable Metal – Safety Requirements
ANSI-ASC A14.3-2018 American National Standard for Ladders – Fixed – Safety Requirements
ANSI-ASC A14.4-2018 American National Standard for Ladders Safety Requirements for Job-Made Wooden Ladders
ANSI-ASC A14.5-2017 American National Standard for Ladders – Portable Reinforced Plastic – Safety Requirements
ANSI-ASC A14.7-2011 American National Standard for Mobile Ladder Stands and Mobile Ladder Stand Platforms
ANSI-ASC A14.8-2020 American National Standard Safety Requirements for Ladder Accessories
ANSI-ASC A14.9-2019 American National Standard Safety Requirements for Disappearing Attic Stairways ANSI-ASC A14.11-2018 American National Standard Safety Requirements for Stepstools
Centers for Disease Control and Prevention / NIOSH Ladder Safety
Commonly Asked Questions
Question: How should I handle objects safely while on a ladder?
Answer: According to the U.S. Bureau of Labor Statistics, 50% of all ladder related accidents were due to individuals carrying items as they climbed. Keeping tools in a tool belt will keep them handy and free up your hands for climbing. The use of accessories such as tool lanyards to keep tools tethered to the worker can prevent them from falling while working on a ladder. Any heavy or bulky items should be brought up only after you have reached the top. Signs or barricades can be used to warn others that work is proceeding above them, and that they should be aware of possible falling objects.
The information contained in this article is intended for general information purposes only and is based on information available as of the initial date of publication. No representation is made that the information or references are complete or remain current. This article is not a substitute for review of current applicable government regulations, industry standards, or other standards specific to your business and/or activities and should not be construed as legal advice or opinion. Readers with specific questions should refer to the applicable standards or consult with an attorney.
Source: Grainger Know How – https://www.grainger.com/know-how
Hay muchos actos inseguros específicos por parte de los empleados, así como condiciones inseguras que conducen a incidentes de caídas. A menudo son el resultado de múltiples condiciones y acciones inseguras combinadas.
1. Condiciones inseguras que conducen a las caídas
2. Acciones inseguras que provocan caídas
3. A pesar de los esfuerzos de prevención, los trabajadores siguen cayendo porque
There are many specific unsafe acts by employees as well as unsafe conditions that lead to fall incidents. They are often the result of multiple unsafe conditions and unsafe actions combined.
1. Unsafe Conditions that Lead to Falls
2. Unsafe Actions that Lead to Falls
3. Despite prevention efforts, workers continue to fall because
This quick course covers the importance of taking safety seriously off the job including how to protect yourself when you’re not at work and tips on working safely in places like your garage or in your vehicle or during recreational activities.
Safety Data Sheets – or SDS’s – are summary documents that provide information about the hazards of a product and advice about safety precautions. This course covers what an SDS is, when an SDS should be used, what information is found on the SDS and more.
Cessco Fabrication and Engineering Ltd. pleaded guilty in Edmonton Alberta provincial court to a single charge of failing to ensure a worker used a fall protection system for the Jan. 19, 2016, death of Barry Maitland.
Maitland, a pressure welder for 29 years, was fatally injured after falling more than five metres (17 feet) from the top of a liquified natural gas storage vessel on which he was preforming a weld. He later died in hospital.
Maitland had just started a night shift in a fabrication shop at Cessco’s Edmonton facility at 7310 99 St. on the day of the accident.
Maitland, 52, was setting up to perform a weld on top of the LNG equipment, which measured 28 metres long and just over four metres in diameter. At some point, he stepped off an aerial work platform used to hold his welding equipment.
An agreed statement of facts states Maitland did not anchor the lanyard on his fall protection harness before stepping off the platform. A short time later, the night shift supervisor and another worker heard Maitland hit the concrete floor, though no one witnessed the fall itself.
His son Steven Maitland, who also works at Cessco, was on the earlier shift and rushed back to site to find police officers everywhere, Linda Maitland said. He then went to the hospital.
The parties agreed that while Cessco’s fall protection plan complied with occupational health and safety legislation, it did not specifically cover welding work on the LNG vessels.
Under a joint submission on sentencing, Cessco will pay a $5,000 fine and pay the Manufacturer’s Health and Safety Association $170,000 to create an enhanced fall protection program.
An autopsy found Maitland’s cause of death was blunt cranial trauma, according to the agreed facts. It also found evidence of alcohol in his system and severe heart disease, including an enlarged heart.
A medical examiner said it was possible Maitland experienced symptoms of angina or irregular heartbeat, which could have contributed to the fall.
Court heard Maitland was known as a very safety conscious worker who regularly raised issues during safety meetings. His family described him as “anal retentive when it came to safety.”
He loved to cook, and was famous within his family for his homemade pizzas. He also mentored family members entering the welding trade.
Linda Maitland said that while she received compensation from Occupational Health and Safety for her husband’s death, she will end up having to sell her home.
Cessco Fabrication and Engineering Ltd. se declaró culpable en el tribunal provincial de Edmonton, Alberta, de un único cargo por no garantizar que un trabajador utilizara un sistema de protección contra caídas por la muerte de Barry Maitland el 19 de enero de 2016.
Maitland, soldador a presión durante 29 años, resultó herido de muerte tras caer más de cinco metros (17 pies) desde la parte superior de un recipiente de almacenamiento de gas natural licuado en el que estaba realizando una soldadura. Posteriormente falleció en el hospital.
El día del accidente, Maitland acababa de empezar un turno de noche en el taller de fabricación de las instalaciones de Cessco en Edmonton, en el 7310 de la calle 99.
Maitland, de 52 años, se disponía a realizar una soldadura en la parte superior del equipo de GNL, que medía 28 metros de largo y algo más de cuatro metros de diámetro. En algún momento, se bajó de una plataforma de trabajo aéreo utilizada para sostener su equipo de soldadura.
Una declaración de hechos acordada afirma que Maitland no ancló el cordón de su arnés anticaídas antes de bajarse de la plataforma. Poco después, el supervisor del turno de noche y otro trabajador oyeron cómo Maitland se golpeaba contra el suelo de hormigón, aunque nadie presenció la caída en sí.
Su hijo Steven Maitland, que también trabaja en Cessco, estaba en el turno de mañana y volvió corriendo al lugar para encontrarse con agentes de policía por todas partes, dijo Linda Maitland. A continuación, acudió al hospital.
Las partes acordaron que, aunque el plan de protección contra caídas de Cessco cumplía la legislación sobre salud y seguridad en el trabajo, no cubría específicamente los trabajos de soldadura en los buques de GNL.
En virtud de una propuesta conjunta de sentencia, Cessco pagará una multa de 5.000 dólares y abonará a la Asociación de Salud y Seguridad del Fabricante 170.000 dólares para crear un programa mejorado de protección contra caídas.
La autopsia determinó que la causa de la muerte de Maitland fue un traumatismo craneal cerrado, según los hechos acordados. También se encontraron pruebas de la presencia de alcohol en su organismo y de una grave enfermedad cardíaca, incluido un corazón agrandado.
El médico forense dijo que era posible que Maitland experimentara síntomas de angina de pecho o latidos irregulares del corazón, lo que podría haber contribuido a la caída.
El tribunal escuchó que Maitland era conocido por ser un trabajador muy consciente de la seguridad, que planteaba regularmente cuestiones durante las reuniones de seguridad.
Le encantaba cocinar y era famoso en su familia por sus pizzas caseras. También fue mentor de los miembros de su familia que se iniciaban en el oficio de soldador.
Linda Maitland dijo que, aunque recibió una indemnización de Salud y Seguridad en el Trabajo por la muerte de su marido, acabará teniendo que vender su casa.
Horseplay on the job is dangerous. This quick course covers the dangers of horseplay at work and how you can help get rid of this dangerous habit.
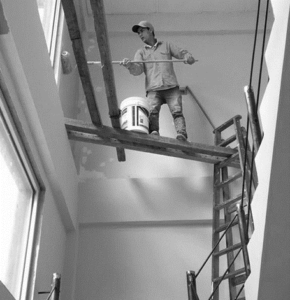
What’s wrong in this picture? There is a man painting a wall without any fall protection. He is standing on thin boards that are not well secured. How dangerous and painful can it be if this person falls from that height?
One of the most frequent causes of slips, trips, and falls is the presence of poor walking/working surface conditions, such as slippery, uneven, or wet floors; dimly lit walkways; or areas covered with debris.
Fall injuries constitute a considerable amount of workers’ compensation and medical costs; approximately $70 billion annually in the United States, according to the National Safety Council.
Fall protection gear and proper equipment, such as ladders and scaffolds, are required for workers who are six feet or more above a lower level. Different ladders and scaffolds are appropriate for different jobs, so make sure you are providing the correct kind. If your job requires the use of personal fall arrest systems (PFAS), make sure each worker has a harness. Be sure to inspect all of the equipment to make sure it’s in good order before using it.
¿Qué hay de malo en esta foto? Hay un hombre pintando una pared sin ninguna protección contra caídas. Está de pie sobre unas finas tablas que no están bien aseguradas. ¿Cuán peligroso y doloroso puede ser que esta persona se caiga desde esa altura?
Una de las causas más frecuentes de los resbalones, tropiezos y caídas es la presencia de superficies de trabajo o de tránsito deficientes, como suelos resbaladizos, irregulares o húmedos, pasillos poco iluminados o zonas cubiertas de escombros.
Las lesiones por caídas suponen una cantidad considerable de gastos médicos y de indemnización a los trabajadores; aproximadamente 70.000 millones de dólares anuales en Estados Unidos, según el Consejo Nacional de Seguridad.
El equipo de protección contra caídas y el equipamiento adecuado, como las escaleras y los andamios, son necesarios para los trabajadores que se encuentran a seis pies o más por encima de un nivel inferior. Hay diferentes escaleras y andamios que son apropiados para diferentes trabajos, así que asegúrese de que está proporcionando el tipo correcto. Si su trabajo requiere el uso de sistemas personales de detención de caídas (PFAS), asegúrese de que cada trabajador tenga un arnés. Asegúrese de inspeccionar todo el equipo para comprobar que está en buen estado antes de utilizarlo.
Joe llevaba poco más de una semana trabajando en el campo de tabaco de Carolina del Norte. Los primeros días en la granja fueron calurosos y húmedos, con bienvenidas pausas de lluvia. Pero ese día no llovió. El termómetro ya había subido a 95F cuando Joe se detuvo para su descanso de refresco y galletas a las 10 a.m. Para cuando la temperatura alcanzó entre 100F y 108F a las 3 p.m., Joe se quejó con el líder de la cuadrilla de que no se sentía bien. El jefe de la cuadrilla le dio a Joe un vaso de agua y lo llevó de vuelta a la vivienda de los trabajadores. El líder de la cuadrilla le dio a Joe un trago de agua y lo llevó de vuelta a la vivienda de los trabajadores, donde lo dejó descansar un rato. Cuarenta y cinco minutos después, Joe fue encontrado en las escaleras de la casa. Estaba inconsciente. Se llamó a los servicios médicos de emergencia y Joe fue trasladado al hospital, donde su temperatura corporal central se registró en 108F. Pero Joe no respondió a los intentos del personal médico por enfriarlo. Su muerte se atribuyó a un golpe de calor.
Un poco sobre Joe
Joe, de 44 años, había viajado desde México a Estados Unidos para unirse a una cuadrilla de 12 trabajadores H-2A contratados por el agricultor, que también empleaba a 5 trabajadores a tiempo completo y 3 a tiempo parcial. (Los trabajadores H-2A son trabajadores extranjeros temporales, no inmigrantes, que son contratados para realizar trabajos agrícolas en Estados Unidos cuando no hay trabajadores estadounidenses disponibles). Joe no tenía experiencia en el cultivo de tabaco y, cuando murió, llevaba 11 días en Estados Unidos.
La investigación
Los investigadores se enteraron de que el agricultor había distribuido a todos los trabajadores agrícolas, incluido Joe, un folleto de seguridad y salud escrito en español que incluía información sobre las enfermedades y los golpes de calor. Lamentablemente, el empresario no exigió que los trabajadores leyeran el folleto ni se discutió o revisó su contenido.
Joe had been working in the North Carolina tobacco field for just over a week. The first few days on the farm were hot and humid, with welcome breaks of rain. But on this day, there was no rain. The thermometer had already climbed to 95F when Joe stopped for his soda and cracker break at 10 a.m. By the time the temperature reached between 100F and 108F at 3 p.m., Joe complained to the crew leader that he wasn’t feeling well. The crew leader gave Joe a drink of water and drove him back to the workers? Housing, where he left Joe to rest for a while. Forty-five minutes later, Joe was found on the steps of the house. He was unconscious. Emergency medical services were called and Joe was transported to the hospital, where his core body temperature was recorded at 108F. But Joe didn’t respond to the medical personnel’s attempts to cool him. His death was attributed to heat stroke.
A Little about Joe
Joe, 44, had traveled from Mexico to the US to join a crew of 12 H-2A workers employed by the farmer, who also employed 5 full-time workers and 3 part-time workers. (H-2A workers are temporary, nonimmigrant foreign workers who are hired under contract to perform farm work in the United States when American workers are not available.) Joe had no tobacco farming experience and when he died he’d been in the United States for 11 days.
The Investigation
Investigators learned that the farmer had distributed to all farm workers, including Joe, a safety and health booklet written in Spanish that included information on heat illness and heat stroke. Unfortunately, the employer did not make it a requirement that the workers read the booklet nor were the contents of the booklet discussed or reviewed.