Hazards and Eye Protection on the Farm Fatality File

Tragedy Inspires Prevention 

Barry Weatherall worked for a plumbing and heating company in Alberta, Canada more than 15 years ago. Today he spends his time telling his story to thousands of industrial workers across Canada, on how he lost his eyesight. In the hopes of inspiring change in the common “it-won’t-happen-to-me” attitude, he leads 90-minute interactive workshops on eye safety in the workplace. Weatherall’s life-altering story starts after he was on the job and received incorrect information from a chemical company about the risk involved in neutralizing sulfuric acid with another chemical called caustic soda bead.

Weatherall was wearing personal protective equipment, including safety glasses, a face mask, and gloves while performing his work. After he finished neutralizing the chemicals and believed that there was no longer a risk of explosion he left to remove his PPE. His life changed forever when he went back to check on the chemicals, without putting his PPE back on. A chemical explosion occurred which left Weatherall permanently blind. Eye contact with chemicals make up 20 percent of eye injuries. Flying particles, a combination of flying or falling objects or sparks striking the eye, account for 70 percent of total injuries.  “Companies can train people until they’re blue in the face, but once the worker is on the job-site by himself, it’s up to that worker to take the time to be safe” he said. The program’s intention is to provide workers with an intense and entirely new perspective on eye safety. 


Farming Around Power Lines Stats and Facts

FACTS

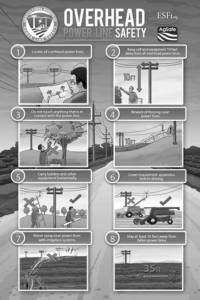
  1. The most common risk of electrocution is contact with an overhead power line. This can occur when farm equipment hits the lines, which are typically not insulated. Even if the lines are insulated, the insulation may have worn away in areas due to exposure to the elements.
  2. Exposed underground power lines also pose electrocution risk, and defective wiring and extension cords are other common causes of electrocution, along with internal wiring in farm buildings. 

STATS

  • The Energy Networks Association says one to two people die each year from electrocution caused by touching power lines with machinery.
  • Every year farmers are injured or killed in electricity-related accidents. According to the National Ag Safety Database, every year 62 farm workers in the United States are electrocuted. To raise an additional cause for concern, 3.6% of deaths among youth under 20 years-of-age are caused by electrocution.
  • Between 2011 and 2018, 38% of all electrically related workplace fatalities were caused by overhead power lines. In the majority of these cases, fatalities occurred in occupations with little to no electrical safety training. 
  • In 2016, 53% of all fatal electrical injuries occurred in the agriculture industry. The agriculture industry remained the leading source of fatal electrical injuries with 82, about three times the contribution of the second-highest source.
  • Contact with overhead power lines is the leading cause of electrical fatalities for agricultural workers. Of the 1,001 reported power line contact incidents from 2003-2009, nearly 70% resulted in death.
  • There were 1,140 near-miss incidents involving machinery and equipment contacting overhead electric power lines where serious injury or death was a possibility in the past five years.  


Farming Around Power Lines Stats and Facts – Spanish

HECHOS

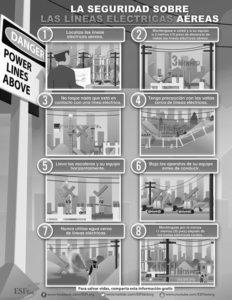
  1. El riesgo más común de electrocución es el contacto con una línea eléctrica aérea. Esto puede ocurrir cuando los equipos agrícolas golpean las líneas, que normalmente no están aisladas. Incluso si las líneas están aisladas, el aislamiento puede haberse desgastado en zonas debido a la exposición a los elementos.
  2. Las líneas eléctricas subterráneas expuestas también suponen un riesgo de electrocución, y el cableado defectuoso y los alargadores son otras causas comunes de electrocución, junto con el cableado interno de los edificios agrícolas.

ESTADÍSTICAS

  • La Asociación de Redes de Energía afirma que cada año mueren entre una y dos personas por electrocución al tocar las líneas eléctricas con la maquinaria.
  • Todos los años los agricultores resultan heridos o mueren en accidentes relacionados con la electricidad. Según la National Ag Safety Database, cada año se electrocutan 62 trabajadores agrícolas en Estados Unidos. Para aumentar un motivo de preocupación adicional, el 3,6% de las muertes entre los jóvenes menores de 20 años son causadas por la electrocución.
  • Entre 2011 y 2018, el 38% de todas las muertes en el lugar de trabajo relacionadas con la electricidad fueron causadas por líneas eléctricas aéreas. En la mayoría de estos casos, las muertes ocurrieron en ocupaciones con poca o ninguna capacitación en seguridad eléctrica. 
  • En 2016, el 53% de todas las lesiones eléctricas mortales se produjeron en la industria agrícola. La industria agrícola siguió siendo la principal fuente de lesiones eléctricas mortales con 82, aproximadamente tres veces la contribución de la segunda fuente más importante.
  • El contacto con cables eléctricos aéreos es la principal causa de muertes por electricidad entre los trabajadores agrícolas. De los 1.001 incidentes de contacto con líneas eléctricas notificados entre 2003 y 2009, casi el 70% resultaron mortales.
  • En los últimos cinco años se produjeron 1.140 incidentes con maquinaria y equipos que entraron en contacto con líneas eléctricas aéreas en los que existía la posibilidad de que se produjeran lesiones graves o la muerte.  


Safe Ladder Use Meeting Kit

Ladders are an essential tool on many job sites and at home. Because of their widespread use and the inherent danger of working at heights, they are responsible for a significant number of injuries both on and off the job.

 LADDER USE PITFALLS

  1. Despite some of the safety rules being very simple—they get ignored. When a piece of equipment is very familiar and used every day, it’s easy to become complacent and misuse it. Every year many experienced workers fall off ladders, seriously injuring themselves or dying, because they’ve become so comfortable with working at heights that they’ve forgotten how dangerous it is. Frequent reminder training for ladder safety is an effective way to curb the effects of complacency.
  2. The portability of ladders can give you a leg up just about anywhere, so ladder safety habits need to be carried everywhere too. Ladders are one of those pieces of equipment that are used at work and at home. Even though the same rules and risks apply both on and off the job, it can be easy to forego or forget workplace procedures when nobody is watching or the perception of risk changes in a more comfortable home environment.
  3. The more frequently someone uses ladders at work, the more comfortable they’ll be at home. This makes it especially important to instill strong safety habits and help people understand the temptation they’ll face to take shortcuts, change their behavior or relax their attention to safety without the company culture and supervision that makes them think twice.
  4. When using ladders at home, people are more likely to find reckless workarounds to work-impeding problems. If a ladder is too short, prop it up on something. No PPE handy? Use a hand to shield your eyes. These kinds of solutions would make a safety manager shudder and get employees into trouble, but at home there is only the person’s knowledge, judgment, habits and internal culture of safety to guide them.
  5. Employees who don’t use ladders at work may have never been trained or given even a basic understanding of ladder use. So consider providing your entire staff with some level of ladder knowledge regardless of whether it is a requirement of the job. If they fall from a ladder at home, it may not be your responsibility, but it can lead to a lost-time injury that will affect your company negatively in many ways.
  6. Whether you’re talking ladder safety, PPE or DIY projects around the home, all types of workers would benefit from having a good understanding about how human factors like rushing, frustration, fatigue and complacency can lead them to make mistakes or not follow sound safety practices at home that could lead to serious, unexpected outcomes.

DO’S AND DONT’S OF LADDER USE

DO’S

  • Avoid using the ladder if you feel dizzy or tired or are impaired.
  • Make certain the ladder is free of grease, oil, mud and other sticky or slippery materials. Wear slip-resistant shoes with clean soles for maximum traction.
  • Face the ladder and always grip the rungs, not the side rails.
  • Extension ladders should extend 3 feet above the roof or platform you’re trying to reach.
  • Block or guard doorways near any type of ladder so no one can open it and knock you off.
  • Make certain the area is free of clutter both at the base and top of the ladder.
  • Read and follow all labels/markings on the ladder.
  • Avoid electrical hazards. Look for overhead power lines before handling a ladder. Avoid using a metal ladder near power lines or exposed energized electrical equipment.
  • Always inspect the ladder prior to using it. If the ladder is damaged, remove it from service and tag it until repaired or discarded.
  • Always maintain a three-point (two hands and a foot, or two feet and a hand) contact on the ladder when climbing. Keep your body near the middle of the step, and always face the ladder while climbing.
  • Only use ladders and appropriate accessories (ladder levelers, jacks or hooks) for their designed purposes.
  • Use a ladder only on a stable and level surface, unless it has been secured (top or bottom) to prevent displacement.
  • The proper angle for setting up a ladder is to place its base a quarter of the working length of the ladder from the wall or other vertical surface.
  • Be sure that all locks on an extension ladder are properly engaged.
  • Use the correct ladder for the job. There are many types of ladders to work in different situations. Check weight ratings to ensure you do not overload the ladder during use.

Don’ts

  • If using a ladder outside, do not use in windy or inclement weather.
  • Do not use a self-supporting ladder (e.g., step ladder) as a single ladder or in a partially closed position.
  • Do not place a ladder on boxes, barrels, or other unstable bases to obtain additional height.
  • Do not move or shift a ladder while a person or equipment is on the ladder.
  • Do not stand on the three top rungs of a straight, single, or extension ladder.
  • Do not exceed the maximum load rating of a ladder. Be aware of the ladder’s load rating and of the weight it is supporting, including the weight of any tools or equipment.
  • Do not lean or reach to grab something while on a ladder.
  • Do not carry objects up the ladder in your hands. Use a tool belt or a retrieval system to bring tools up to you once you have climbed the ladder.

FINAL WORD

Ladders are used at home and the workplace. People who use them at home often do not use ladders in the workplace, and rules at home are often more relaxed than in the workplace. Using a ladder improperly causes many accidents resulting in injuries and even death.


Safe Ladder Use Meeting Kit – Spanish

QUÉ ESTÁ EN RIESGO

Las escaleras son una herramienta esencial en muchos lugares de trabajo y en el hogar. Debido a su uso generalizado y al peligro inherente al trabajo en altura, son responsables de un número importante de lesiones tanto dentro como fuera del trabajo.

CUÁL ES EL PELIGRO

PELIGROS EN EL USO DE LAS ESCALERAS

  1. A pesar de que algunas de las normas de seguridad son muy sencillas, se ignoran. Cuando un equipo es muy familiar y se utiliza a diario, es fácil caer en la complacencia y hacer un mal uso de él. Cada año, muchos trabajadores experimentados se caen de las escaleras, lesionándose gravemente o muriendo, porque se han acostumbrado tanto a trabajar en altura que han olvidado lo peligroso que es. La capacitación frecuente para recordar la seguridad de las escaleras es una forma eficaz de frenar los efectos de la complacencia.
  2. La portabilidad de las escaleras puede darte una ventaja en casi cualquier lugar, por lo que los hábitos de seguridad de las escaleras también deben llevarse a todas partes. Las escaleras son uno de esos equipos que se utilizan en el trabajo y en casa. Aunque las mismas normas y riesgos se aplican tanto en el trabajo como fuera de él, puede ser fácil renunciar u olvidar los procedimientos del lugar de trabajo cuando nadie está mirando o la percepción del riesgo cambia en un entorno doméstico más cómodo.
  3. Cuanto más frecuente sea el uso de escaleras en el trabajo, más cómodo se sentirá en casa. Esto hace que sea especialmente importante inculcar fuertes hábitos de seguridad y ayudar a las personas a entender la tentación que tendrán de tomar atajos, cambiar su comportamiento o relajar su atención a la seguridad sin la cultura y la supervisión de la empresa que les haga pensárselo dos veces.
  4. Cuando se utilizan escaleras en casa, es más probable que la gente encuentre soluciones imprudentes a los problemas que dificultan el trabajo. Si una escalera es demasiado corta, apóyela en algo. ¿No tiene EPP a mano? Utilice una mano para protegerse los ojos. Este tipo de soluciones harían temblar a un responsable de seguridad y meterían a los empleados en problemas, pero en casa sólo hay que guiarse por los conocimientos, el juicio, los hábitos y la cultura interna de seguridad de la persona.
  5. Es posible que los empleados que no utilizan escaleras en el trabajo no hayan recibido nunca capacitación ni hayan recibido siquiera conocimientos básicos sobre el uso de las mismas. Por ello, considere la posibilidad de proporcionar a toda su plantilla algún nivel de conocimientos sobre escaleras, independientemente de que sea un requisito del puesto de trabajo. Si se caen de una escalera en casa, puede que no sea su responsabilidad, pero puede provocar una lesión con pérdida de tiempo que afectará negativamente a su empresa de muchas maneras.
  6. Tanto si se trata de la seguridad de las escaleras como de los EPP o de los proyectos de bricolaje en el hogar, todo tipo de trabajadores se beneficiarían de tener un buen conocimiento de cómo los factores humanos, como las prisas, la frustración, la fatiga y la complacencia, pueden llevarles a cometer errores o a no seguir unas prácticas de seguridad adecuadas en el hogar que podrían provocar resultados graves e inesperados.

COMO PROTEGERSE

LO QUE HAY QUE HACER Y LO QUE NO HAY QUE HACER EN EL USO DE UNA ESCALERA

LO QUE SE DEBE HACER

  • Evite utilizar la escalera si se siente mareado o cansado o está impedido.
  • Asegúrese de que la escalera está libre de grasa, aceite, barro y otros materiales pegajosos o resbaladizos. Lleve calzado antideslizante con suelas limpias para obtener la máxima tracción.
  • Colóquese de cara a la escalera y agárrese siempre a los peldaños, no a los raíles laterales.
  • Las escaleras de extensión deben extenderse 3 pies por encima del techo o la plataforma que está tratando de alcanzar.
  • Bloquee o proteja las puertas cercanas a cualquier tipo de escalera para que nadie pueda abrirla y derribarle.
  • Asegúrese de que la zona está libre de desorden tanto en la base como en la parte superior de la escalera.
  • Lea y siga todas las etiquetas/marcas de la escalera.
  • Evite los riesgos eléctricos. Busque las líneas eléctricas aéreas antes de manipular una escalera. Evite utilizar una escalera metálica cerca de líneas eléctricas o de equipos eléctricos expuestos.
  • Inspeccione siempre la escalera antes de utilizarla. Si la escalera está dañada, retírela del servicio y etiquétela hasta que sea reparada o desechada.
  • Mantenga siempre un contacto de tres puntos (dos manos y un pie, o dos pies y una mano) en la escalera al subir. Mantenga su cuerpo cerca del centro del peldaño, y siempre de cara a la escalera mientras sube.
  • Utilice las escaleras y los accesorios adecuados (niveladores de escaleras, gatos o ganchos) únicamente para los fines previstos.
  • Utilice una escalera sólo en una superficie estable y nivelada, a menos que haya sido asegurada (arriba o abajo) para evitar su desplazamiento.
  • El ángulo adecuado para colocar una escalera es situar su base a un cuarto de la longitud de trabajo de la escalera desde la pared u otra superficie vertical.
  • Asegúrese de que todos los cierres de una escalera extensible están bien enganchados.
  • Utilice la escalera correcta para el trabajo. Hay muchos tipos de escaleras para trabajar en diferentes situaciones. Compruebe los pesos nominales para asegurarse de que no sobrecarga la escalera durante su uso.

LO QUE NO SE DEBE HACER

  • Si utiliza una escalera en el exterior, no la utilice cuando haya viento o mal tiempo.
  • No utilice una escalera autoportante (por ejemplo, una escalera de mano) como escalera simple o en posición parcialmente cerrada.
  • No coloque una escalera sobre cajas, barriles u otras bases inestables para obtener una altura adicional.
  • No mueva o desplace una escalera mientras haya una persona o un equipo en ella.
  • No se sitúe en los tres peldaños superiores de una escalera recta, simple o de extensión.
  • No supere la capacidad de carga máxima de la escalera. Sea consciente de la capacidad de carga de la escalera y del peso que soporta, incluido el peso de cualquier herramienta o equipo.
  • No se incline ni intente agarrar algo mientras esté en una escalera.
  • No transporte objetos por la escalera con las manos. Utilice un cinturón de herramientas o un sistema de recuperación para subir las herramientas una vez que haya subido la escalera.

CONCLUSIÓN

Las escaleras se utilizan en el hogar y en el lugar de trabajo. Las personas que las usan en casa no suelen utilizar las escaleras en el lugar de trabajo, y las normas en casa suelen ser más relajadas que en el lugar de trabajo. El uso inadecuado de una escalera provoca muchos accidentes con resultado de lesiones e incluso de muerte.


Hazards and Eye Protection on the Farm Picture This

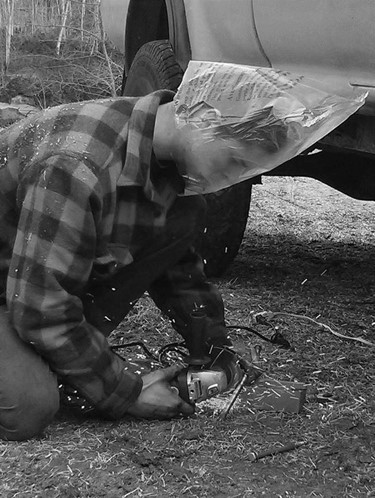
What’s wrong with this picture? Is this a new form of eye protection? Can he even breathe properly? 

Personal protective equipment (PPE) is important for agricultural producers to reduce their risk of injury or death. Most eye injuries can be prevented by wearing the appropriate PPE.

Injuries to the eye can be expensive, painful, and may cause partial or total blindness. Proper eye protection is the best strategy in preventing eye injuries because most eye injuries are a result of flying particles. The eye has its own built-in protection from the surrounding bone structure, eyelashes, tearing, and blinking; but they are no match for particles entering the eye at a high rate of speed. Eye protection should be worn when completing the following types of jobs: feed grinding, handling chemicals, haying, welding, repairing equipment, and any task completed in a dusty environment.


Hazards and Eye Protection on the Farm Picture This – Spanish

¿Qué hay de malo en esta foto? 

¿Es una nueva forma de protección para los ojos? ¿Puede siquiera respirar correctamente? 

Los equipos de protección individual (EPP) son importantes para que los productores agrícolas reduzcan el riesgo de lesiones o de muerte. La mayoría de las lesiones oculares pueden evitarse llevando el EPP adecuado.

Las lesiones oculares pueden ser costosas, dolorosas y pueden causar ceguera parcial o total. La protección adecuada de los ojos es la mejor estrategia para prevenir las lesiones oculares, ya que la mayoría de las lesiones oculares son el resultado de partículas que salen despedidas. El ojo tiene su propia protección incorporada de la estructura ósea circundante, las pestañas, el lagrimeo y el parpadeo; pero no son rivales para las partículas que entran en el ojo a gran velocidad. Debe utilizarse protección ocular cuando se realicen los siguientes tipos de trabajos: trituración de piensos, manipulación de productos químicos, henificación, soldadura, reparación de equipos y cualquier tarea realizada en un entorno polvoriento.


Farming Around Power Lines Fatality File

Father-of-two killed after backing digger into overhead cable on farm 

A father-of-two died after being electrocuted when the digger he was driving hit a live overheard power line, an inquest was told.

Mr Drummond was pronounced dead at the scene.

The farmer who desperately tried to save Mr Drummond suffered a major electric shock himself and ended up in hospital after being thrown backwards.

Mr Drummond’s wife Claire last saw her husband on the morning of his death.

During the hearing she said: “That morning he was absolutely fine. He was his normal happy and chatty self. He was excited about the job because he might get more work from this man. We said we would meet up for lunch but I didn’t hear from him.”

Farmer David Heywood first thought the young man was having a heart attack.

He said: “I started to walk towards the wagon. I could see him and I thought he was having a heart attack. I said “What’s wrong with you? 


Farming Around Power Lines Fatality File – Spanish

Un padre de dos hijos muere tras chocar su excavadora con un cable aéreo en una granja 

Un padre de dos hijos murió tras electrocutarse cuando la excavadora que conducía chocó con un cable de alta tensión, según se dijo en una investigación.

El Sr. Drummond fue declarado muerto en el lugar de los hechos.

El agricultor que trató desesperadamente de salvar al Sr. Drummond sufrió una importante descarga eléctrica y acabó en el hospital tras ser arrojado hacia atrás.

La esposa de Drummond, Claire, vio por última vez a su marido la mañana de su muerte.

Durante la audiencia dijo: “Esa mañana estaba absolutamente bien. Era el mismo alegre y parlanchín de siempre. Estaba entusiasmado con el trabajo porque podría conseguir más trabajo de este hombre. Dijimos que quedaríamos para comer, pero no volví a saber nada de él”.

El agricultor David Heywood primero pensó que el joven estaba teniendo un ataque al corazón.

Dijo: “Empecé a caminar hacia el carro. Le vi y pensé que estaba sufriendo un ataque al corazón. Le dije: “¿Qué te pasa?


Farming Around Power Lines Picture This

Source: http://files.esfi.org/file/Overhead-Power-Lines-Safety-C7B8.pdf


Farming Around Power Lines Picture This – Spanish

Fuente: https://www.esfi.org/


How to Solicit Feedback From Trainees – Train the Trainer

When you plan a training and development program for your organization, you expect it to improve your employees’ skills, productivity, and retention. As a learning and development professional, you will want to consider the effectiveness of training to determine if it was worth the time and money. To determine whether training was a success you need to gather feedback from your employees.

HOW TO COLLECT USEFUL FEEDBACK FROM TRAINEES

It’s standard practice to hand out survey forms when a day of training is done, or to email feedback forms to trainees the next day. Getting the right feedback in the right ways can lead to continuous improvement in training efforts.

Collect Operational Feedback as Soon as Sessions End

It is too early to collect data on the long-term effects that training produce. But it is the time to ask trainees to comment on the quality of the program, by asking questions like these:

  • Did you learn what you expected to in the training sessions?
  • Was the trainer knowledgeable, prepared, and able to answer questions and resolve any problems?
  • Did the training keep you interested and engaged?
  • Which concepts do you think will be the most helpful and productive?
  • How soon will you start to apply the ideas that you took away?
  • Was there a good mixture of presentations, breakout sessions and other forms of learning?
  • Did any problems occur during the session? If so, how were they resolved?
  • What was the best part of the program?
  • What part of the program needed the most improvement?
  • What suggestions would you like to make about future training?

TAKEAWAY

Training is all about improving individual learning and in turn, improving overall business. It is important to evaluate the effectiveness of the training you’re conducting. That can be hard to do; but with an intentional approach, you can build data that proves the true value of your program.


Farm Machinery Fire Prevention Meeting Kit – Spanish

QUÉ ESTÁ EN RIESGO

INCENDIOS EN LAS EXPLOTACIONES AGRÍCOLAS – RIESGOS

La maquinaria, como los tractores y las cosechadoras, son esenciales para el trabajo diario en las granjas. La maquinaria puede ser un peligro de incendio cuando no se le da el mantenimiento adecuado. Un incendio en la granja es una gran preocupación. Las largas distancias del departamento de bomberos significan tiempos de respuesta de emergencia más largos, y un incendio en su granja podría ser extremadamente costoso y potencialmente peligroso.

CUÁL ES EL PELIGRO

CÓMO ARDEN LOS INCENDIOS

Los elementos necesarios para crear un incendio son el combustible, el calor y el oxígeno. Estos elementos constituyen el triángulo del fuego. La eliminación o el control de uno de los elementos eliminará o controlará el peligro de incendio.

COMO PROTEGERSE

3 FORMAS DE PREVENIR LOS INCENDIOS DE MAQUINARIA

Los incendios de grandes máquinas -incluidos los que se producen en las cosechadoras agrícolas- causan cada año unos 20 millones de dólares en pérdidas materiales, incalculables millones en pérdidas de productividad y hasta 50 lesiones personales graves. Pero se pueden prevenir prestando atención a los tres componentes de la seguridad contra incendios de las cosechadoras agrícolas.

  1. Inspeccione su cosechadora para minimizar el riesgo de incendio

La atención a la seguridad contra incendios comienza mucho antes de que gire la rueda de una cosechadora agrícola o de una cosechadora. Comienza en el taller agrícola o en cualquier lugar donde se almacene la máquina durante todo el año. Añada lo siguiente a sus inspecciones rutinarias de mantenimiento después de la cosecha para minimizar los riesgos de incendio:

  • Limpie los residuos de la cosecha o los fluidos del motor, como el combustible o la grasa, alrededor de la máquina que podría inflamarse fácilmente en presencia de una fuente de calor externa.
  • Limpie el material vegetal de los cojinetes, las correas y otros componentes potencialmente generadores de calor.
  • Siga las recomendaciones del fabricante para el mantenimiento y la lubricación antes de almacenar su cosechadora durante un largo período de tiempo, prestando especial atención a las posibles fugas en las mangueras o accesorios.
  • Asegúrese de que su máquina está almacenada lejos de fuentes de calor externas como hornos u otros elementos de calefacción que puedan provocar un incendio.
  1.  Controle el equipo para evitar el calor excesivo

Avance unos meses hasta la cosecha; una vez que esté lista para salir al campo, es cuando la seguridad de su cosechadora o cosechadora agrícola debe ampliarse para incluir la detección y notificación de incendios.

La avanzada tecnología de sensores disponible hoy en día puede supervisar el calor generado alrededor de los componentes clave para garantizar que están dentro de los rangos de temperatura de funcionamiento y no están creando un mayor riesgo de incendio.

Las imágenes térmicas también pueden ayudar a la detección de incendios. Dado que los equipos pueden mostrar problemas en forma de calor excesivo antes de que fallen, la identificación temprana de las anomalías es un paso fundamental para prevenir posibles incendios en las cosechadoras.

  1. Esté preparado equipando su cosechadora con extintores

Una cosechadora puede arder en cuestión de minutos. Si ha detectado un componente que se sobrecalienta o un pequeño incendio a tiempo, aún puede tomar medidas para evitar que arda la máquina. Asegúrese de disponer de extintores tanto en la cabina como cerca de los puntos problemáticos más probables alrededor de la máquina para poder actuar rápidamente. Y asegúrese de que se inspeccionan y están siempre en funcionamiento.

ELEMENTOS DE SEGURIDAD EN EL REPOSTAJE 

  • No repostar nunca con el motor en marcha.
  • Deje que los motores calientes se enfríen antes de repostar.
  • No utilice dispositivos electrónicos, como teléfonos móviles, mientras reposta.
  • No entre en el equipo. Hacerlo podría crear electricidad estática que podría crear una chispa y encender los vapores del combustible.
  • No fume en absoluto mientras reposta. Sólo se debe fumar en zonas bien alejadas de la maquinaria y de las fuentes de ignición.
  • Limpie los pequeños derrames y deje que se evapore el combustible derramado sobre el motor antes de ponerlo en marcha.

EN CASO DE INCENDIO

  • Si se produce un incendio en una máquina que esté operando, apague rápidamente el motor, coja el extintor, salga y pida ayuda.
  • Acérquese a cualquier incendio con extrema precaución. Incluso un pequeño incendio puede estallar dramáticamente cuando se abren las puertas, escotillas u otras áreas.
  • Si es posible, utilice la manguera flexible del extintor para disparar el producto químico desde una distancia segura a la base de las llamas que vea.
  • Recuerde que tal vez no sea posible apagar todos los incendios. Si está en una zona de difícil acceso o parece estar fuera de control, no se arriesgue y espere a que llegue la ayuda.

CONCLUSIÓN

Hay tres elementos principales que se combinan para crear el fuego. Son el aire, el calor y el combustible. Es imposible eliminar el aire de los alrededores de la maquinaria agrícola. La prevención de incendios en la maquinaria agrícola se centra en mantener la maquinaria limpia de posibles materiales causantes de incendios (combustible) y en eliminar todas las posibles fuentes de calor que puedan provocar un incendio.


Farm Machinery Fire Prevention Meeting Kit

FIRES ON FARMS – HAZARDS

Machinery like tractors and combines are essential to daily farm work. Machinery can be a fire hazard when it is not properly maintained. A fire on the farm is a major concern. Long distances from the fire department mean longer emergency response times, and a fire on your farm could be extremely costly and potentially dangerous.

HOW FIRES BURN

The elements necessary to create a fire are Fuel, Heat and Oxygen. These elements constitute the fire triangle. Removal or control of one element will remove or control a fire hazard.

3 WAYS TO PREVENT MACHINERY FIRES

Large machinery fires — including those on and in farm combines and harvesters — cause around $20 million in property losses, untold millions in lost productivity and up to 50 serious personal injuries every year. But they can be prevented with attention to the three components of farm combine fire safety.

  1. Inspect Your Combine Harvester to Minimize Fire Risk

Attention to fire safety starts well before a farm combine or harvester wheel turns. It starts at the farm shop or wherever a machine is stored year-round. Add the following to your routine post-harvest maintenance inspections to minimize fire risks:

  • Clean crop residue or engine fluids like fuel or grease around the machine that could easily ignite in the presence of an external heat source.
  • Clear plant material from bearings, belts and other potentially heat-generating components.
  • Follow manufacturer’s recommendations for maintenance and lubrication prior to storing your harvester for a long period of time, paying close attention for potential leaks in hoses or fittings.
  • Make sure your machine is stored away from external heat sources like furnaces or other heating elements that can lead to fire.
  1.  Monitor Equipment for Excessive Heat

Fast forward a few months to harvest; once ready to hit the field, that’s when your farm combine or harvester safety should broaden to include fire detection and notification.

Advancing sensor technology available today can monitor heat generated around key components to ensure they’re within operating temperature ranges and aren’t creating enhanced fire risk.

Thermal imaging can also help with fire detection. Because equipment can show problems in the form of excessive heat before they fail, early identification of anomalies is a critical step in preventing possible combine fires.

  1. Be Prepared by Equipping Your Combine Tractor with Fire Extinguishers

A combine or harvester can go up in flames in a matter of minutes. If you’ve detected an overheating component or small fire early on, you can still take action to prevent it from engulfing the machine. Make sure you have fire extinguishers both in the cab as well as near likely trouble spots around the machine so you can take quick action. And make sure they’re inspected and in working order at all times.

ELEMENTS OF SAFE FUELING 

  • Never refuel equipment with the engine running.
  • Allow hot engines to cool down before refueling.
  • Do not use electronic devices like cell phones while fuelling.
  • Do not enter the equipment. Doing so could create static electricity that could create a spark and ignite fuel vapors.
  • Absolutely no smoking while refueling. Smoking is only to be done in areas well away from machinery and ignition sources
  • Clean up minor spills and allow any spilled fuel on the engine to evaporate before starting.

IN CASE OF FIRE

  • If a fire does break out on a machine you’re operating, quickly shut off the engine, grab your extinguisher, get out, and get help.
  • Approach any fire with extreme caution. Even a small fire can flare up dramatically when doors, hatches, or other areas are opened.
  • If possible, use the extinguisher’s flexible hose to shoot the chemical from a safe distance at the base of any flames you see.
  • Remember that it may not be possible to put out every fire. If it’s in a difficult-to-reach area or seems out of control, don’t risk it, wait for help to arrive.

FINAL WORD

There are the three major elements that combine to create fire. They are air, heat, and fuel. It’s impossible to eliminate air from around farm machinery. Farm machinery fire prevention focuses on keeping the machinery clean of possible fire causing materials (fuel) and eliminating all possible sources of heat that could lead to a fire.


Confined Spaces on the Farm Meeting Kit

DEFINING FEATURES OF CONFINED SPACES 

  • The space is enclosed or partially enclosed.
  • The space is not designed or intended for continuous human occupancy.
  • The space has limited or restricted means of entry or exit that may complicate the provision of first aid, evacuation, rescue or other emergency response services.
  • The space is large enough and configured in a way that a worker could enter to perform assigned work.

CONFINED SPACE HAZARDS ON THE FARM

  • Grain and feed storage facilities
  • Corrugated steel bins
  • Silos
  • Sumps, tunnels, and pump pits
  • Forage storage
  • Manure storage tanks
  • Manure transport vehicles 
  • Bulk transport vehicles
  • Sprayer and chemical transport vehicles
  • Forage and silage dump wagons
  • Feed grinders/mixers
  • Feed mixer wagons tanks
  • Storage and mixing tanks, bins, and silos
  • Bulk liquid storage tanks
  • Containment areas around diked storage tanks
  • Wells, cisterns, dry wells, septic tanks
  • Grain driers
  • Fuel storage tanks

DETERMINING WHETHER A SPACE IS A CONFINED SPACE – RECOGNITION 

Once you have determined the confined spaces at your farm, you must identify the associated hazards. 

  • Evaluate all confined spaces to determine if they contain any actual or potential hazards.
  • Train workers to never enter a confined space before the hazards have been identified and steps have been taken to mitigate those hazards.
  • Ensure workers review, understand, and follow the written procedures before entering confined spaces and know how and when to exit. Ensure there is a safe means to enter and exit the space.
  • Consider chemical reactions that could occur based on the materials in the confined spaces, and potential byproducts that could create a hazardous atmosphere.
  • Ensure air sampling is conducted prior to anyone entering the space.
  • Ensure that sampling equipment can measure potential by products.
  • Use an appropriate routine and simple detection approach. A 4-gas meter will only detect oxygen deficiency and three additional hazards (usually flammability, carbon monoxide, and hydrogen sulfide). Detector tubes or a simple hand-held meter such as a photoionization detector may also be needed.
  • Ensure confined spaces are properly ventilated.
  • Ensure that workers entering confined spaces maintain contact at all times with a trained attendant either visually, by phone, or by two-way radio.
  • Use appropriate equipment (fall protection, rescue, air monitoring, lighting, and communication) according to entry procedures.
  • Develop an emergency action plan that includes quick removal of the entrant and procedures for facility operators and local responders. 
  • Wear proper equipment: Use the correct respirator and make sure all equipment is tested and grounded.
  • Follow lock-out procedures to avoid accidental start-up of equipment, and disconnect and cap all input lines.
  • Have at least one trained and equipped coworker standing by in case there’s trouble. Decide ahead of time how to communicate.
  • Use spark-proof tools, lights, and fans.
  • A harness and attached lifeline is key for performing a rescue. Simply putting a rope around the waist isn’t enough. 
  • If a worker must be rescued, never go in after them unless another trained and equipped worker is there. Have trained rescuers on standby.

FINAL WORD

The safest approach for preventing injuries in confined spaces is to simply perform all work from outside of the confined space when possible. 


Confined Spaces on the Farm Meeting Kit – Spanish

QUÉ ESTÁ EN RIESGO

CARACTERÍSTICAS QUE DEFINEN DE LOS ESPACIOS CONFINADOS 

  • El espacio está cerrado o parcialmente cerrado.
  • El espacio no está diseñado o destinado a la ocupación humana continua.
  • El espacio tiene medios de entrada o salida limitados o restringidos que pueden complicar la prestación de primeros auxilios, evacuación, rescate u otros servicios de respuesta a emergencias.
  • El espacio es lo suficientemente grande y está configurado de manera que un trabajador pueda entrar para realizar el trabajo asignado.

CUÁL ES EL PELIGRO

RIESGOS DE LOS ESPACIOS CONFINADOS EN LA GRANJA 

  • Instalaciones de almacenamiento de cereales y piensos
  • Depósitos de acero corrugado
  • Silos
  • Sumideros, túneles y pozos de bombeo
  • Almacenamiento de forraje
  • Tanques de almacenamiento de estiércol
  • Vehículos de transporte de estiércol 
  • Vehículos de transporte a granel
  • Vehículos de transporte de pulverizadores y productos químicos
  • Vagones de descarga de forraje y ensilado
  • Trituradoras/mezcladoras de piensos
  • Vagones mezcladores de piensos
  • Depósitos, cubetas y silos de almacenamiento y mezcla
  • Tanques de almacenamiento de líquidos a granel
  • Zonas de contención alrededor de los tanques de almacenamiento con diques
  • Pozos, cisternas, pozos secos, fosas sépticas
  • Secadores de grano
  • Tanques de almacenamiento de combustible

COMO PROTEGERSE

DETERMINAR SI UN ESPACIO ES UN ESPACIO CONFINADO – RECONOCIMIENTO 

Una vez que haya determinado los espacios confinados en su granja, debe identificar los peligros asociados. 

  • Evalúe todos los espacios confinados para determinar si contienen algún peligro real o potencial.
  • Capacite a los trabajadores para que nunca entren en un espacio confinado antes de que se hayan identificado los peligros y se hayan tomado medidas para mitigarlos.
  • Asegúrese de que los trabajadores revisan, entienden y siguen los procedimientos escritos antes de entrar en los espacios confinados y saben cómo y cuándo salir. Asegúrese de que existe un medio seguro para entrar y salir del espacio.
  • Tenga en cuenta las reacciones químicas que podrían producirse en función de los materiales presentes en los espacios confinados, así como los posibles subproductos que podrían crear una atmósfera peligrosa.
  • Asegúrese de que se realiza un muestreo del aire antes de que nadie entre en el espacio.
  • Asegúrese de que el equipo de muestreo pueda medir los posibles subproductos.
  • Utilice una rutina adecuada y un enfoque de detección simple. Un medidor de 4 gases sólo detectará la deficiencia de oxígeno y tres peligros adicionales (normalmente la inflamabilidad, el monóxido de carbono y el sulfuro de hidrógeno). También pueden ser necesarios los tubos detectores o un medidor manual sencillo, como un detector de fotoionización.
  • Asegúrese de que los espacios confinados están correctamente ventilados.
  • Asegúrese de que los trabajadores que entren en espacios confinados mantengan contacto en todo momento con un asistente capacitado, ya sea visualmente, por teléfono o por radio de dos vías.
  • Utilice el equipo adecuado (protección contra caídas, rescate, control del aire, iluminación y comunicación) de acuerdo con los procedimientos de entrada.
  • Elabore un plan de acción de emergencia que incluya la retirada rápida del entrante y los procedimientos para los operadores de las instalaciones y el personal de respuesta local. 
  • Lleve el equipo adecuado: Utilice el respirador correcto y asegúrese de que todo el equipo está probado y conectado a tierra.
  • Siga los procedimientos de bloqueo para evitar la puesta en marcha accidental del equipo, y desconecte y tape todas las líneas de entrada.
  • Tenga al menos un compañero de trabajo capacitado y equipado en caso de que haya problemas. Decida de antemano cómo comunicarse.
  • Utilice herramientas, luces y ventiladores a prueba de chispas.
  • Un arnés y una línea de vida conectada son fundamentales para realizar un rescate. No basta con ponerse una cuerda alrededor de la cintura. 
  • Si hay que rescatar a un trabajador, no entre nunca tras él a menos que haya otro trabajador capacitado y equipado. Disponga de personal de rescate capacitado en espera.

CONCLUSIÓN

El enfoque más seguro para prevenir lesiones en espacios confinados es simplemente realizar todo el trabajo desde fuera del espacio confinado cuando sea posible.


Safe Ladder Use Stats and Facts

FACTS

  1. Falls from ladders are the leading cause of deaths on construction sites.
  2. Over the past decade, the number of people who have died from falls from ladders has tripled.
  3. Falls from ladders are the leading cause of ladder-related injuries, followed by using a ladder improperly, using a faulty or defective ladder, and simple carelessness.
  4. Ladders are available in many forms ranging from: attic ladders, orchard ladders, and roof ladders to sectional ladders, cat ladders, Christmas tree ladders,
  5. There are 4 main types of ladder injuries. These include injuries related to: selecting the wrong type of ladder, using worn/damaged ladders, using ladders incorrectly, and placing ladders incorrectly.
  6. Fractures are the most common type of ladder-related injury.

STATS

  • In 2018, 150 workers died while using a ladder. (BLS)
  • In 2017, there were 20,000 non-fatal workplace injuries involving ladders. (BLS)
  • According to the BLS, 50% of all ladder-related injuries occurred when the individual was climbing with objects in their hands.
  • 500,000 people receive medical treatment in the U.S. annually due to ladder use, according to the CPSC.
  • According to the World Health Organization, the United States leads the world in ladder deaths. Each year, there are more than 164,000 emergency room-treated injuries and 300 deaths in the U.S. that are caused by falls from ladders.
  • Most ladder deaths are from falls of 10 feet or less.
  • Elevated falls account for almost 700 occupational deaths annually.
  • More than 90,000 people receive emergency room treatment from ladder-related injuries every year.
  • The most common type of ladder-related injury, with 32%, is fractures.


Safe Ladder Use Stats and Facts – Spanish

HECHOS

  1. Las caídas desde escaleras son la principal causa de muerte en las obras de construcción.
  2. En la última década se ha triplicado el número de personas que han muerto por caídas desde escaleras de mano.
  3. Las caídas desde escaleras son la principal causa de lesiones relacionadas con las mismas, seguidas por el uso inadecuado de la escalera, el uso de una escalera defectuosa y el simple descuido.
  4. Las escaleras están disponibles en muchas formas que van desde: escaleras de ático, escaleras de huerto y escaleras de tejado hasta escaleras seccionales, escaleras de gato y escaleras para árboles de Navidad,
  5. Hay cuatro tipos principales de lesiones por escaleras. Entre ellos se encuentran las lesiones relacionadas con la selección del tipo de escalera incorrecto, el uso de escaleras desgastadas/dañadas, el uso incorrecto de las escaleras y la colocación incorrecta de las mismas.
  6. Las fracturas son el tipo más común de lesiones relacionadas con las escaleras.

ESTADÍSTICAS

  • En 2018, 150 trabajadores murieron mientras usaban una escalera. (BLS)
  • En 2017, hubo 20.000 lesiones no mortales en el lugar de trabajo que involucraron escaleras. (BLS)
  • Según el BLS, el 50% de todas las lesiones relacionadas con escaleras se produjeron cuando el individuo estaba subiendo con objetos en las manos.
  • Según la CPSC, 500.000 personas reciben tratamiento médico anualmente en EE. UU. debido al uso de escaleras.
  • Según la Organización Mundial de la Salud, Estados Unidos está a la cabeza del mundo en muertes por el uso de escaleras. Cada año se producen más de 164.000 lesiones tratadas en urgencias y 300 muertes en EE. UU. causadas por caídas desde escaleras.
  • La mayoría de las muertes por escaleras se producen por caídas de 3 metros o menos.
  • Las caídas elevadas suponen casi 700 muertes laborales al año.
  • Más de 90.000 personas reciben tratamiento en urgencias por lesiones relacionadas con escaleras cada año.
  • El tipo más común de lesiones relacionadas con las escaleras, con un 32%, son las fracturas.


Importance of Breaks in Adult Learning – Train the Trainer

Breaks keep our brains healthy and play a key role in cognitive abilities such as reading comprehension and divergent thinking (the ability to generate and make sense of novel ideas).

Breaks play an important role during a training session, particularly in the case of longer sessions. If you are delivering a full day training session, then you should give at least 2 breaks during the training day. The first break could be a coffee break in the morning while the second can be a lunch break in the afternoon.

LUNCH BREAK

It is essential that the lunch be a light meal so that participants can come back to the training with energy. The trainer may provide some physical activities, such as a game that involves movement, to participants right after the lunch break in order to re-energize participants. Alternatively, the trainer may keep participants seated right after the lunch break providing them with a video or a brief activity that does not require movement, then follow that with a physical activity. This allows participants to get a brief rest first after lunch before they go ahead with the physical activity. The transitional step helps reduce trainee resistance for carrying out the physical activity the trainer asks them to do after the lunch break.

For shorter training sessions, (i.e. 3 hours in length), a trainer may proceed with one break only. The break should be timed near the middle of the training session.

BREAK LENGTH

As a rule of thumb, the trainer should include 10 minutes of rest for each hour of training. For instance, for a 3-hour training session, the trainer may give a 30-minute break.

For a training day that is 8 hours long, the trainer should provide a total of 80 minutes in breaks. If the trainer is giving 2 breaks, then one of them can be for 20 minutes (coffee break) and the other for 1 hour (lunch break) which together amount for a total of 80 minutes. Alternatively, the 80 minutes may be divided into 30 and 50 minutes respectively. A trainer may even decide to divide the 80 minutes on 3 breaks instead. For instance, the 3 breaks can be set to 20, 40 and 20 minutes respectively, with the longest break being reserved for lunch.

BE FLEXIBLE

The time interval of breaks does not have to be set in stone. A trainer may decide on more or less than 10 minutes of break time for each hour of training depending on circumstances. However, the trainer should be very clear about the exact time the break ends so that trainees come back in time.

Getting your employees to take breaks that are actually beneficial takes some effort. But creating a break-positive environment and educating your workers about the importance of mental and physical rest can help.

BENEFITS OF BREAKS

Improves memory. It has been shown that short, repeated sessions of learning with breaks increase concentration and facilitate the memorization of new contents.

Energy boosts. It is very common to feel drained of energy when we focus all our attention on one task. Resting can be useful to allow your body to recover. Power naps of 10-20 minutes can be a great way to feel revitalized.

Stress Reduction. Constant worry can lead to chronic stress, and learners have been reported to be more likely to suffer higher levels of stress, which can have a physical and mental impact.

Boosts performance and creativity. New creative approaches to problems may arise when doing different activities. So, the next time you’re stuck, try to take a break, rest and do something different.

KEY TAKEAWAYS

  • Learning is promoted by periods of rest in between training times.
  • Taking breaks should be distributed throughout the day when learning a new task.


Meeting Minutes – Tips and Tricks – Train the Trainer

SIMPLE TIPS FOR BETTER MEETING MINUTES

Meeting minutes help with communication at work and they ensure people have a common understanding of what the meeting was about, what was done, and what they should be doing next.

PURPOSE OF MINUTES

Minutes are particularly helpful for formal meetings as they serve as a permanent record of the discussion and the decisions that were made.

A written record of the meeting in the form of minutes can be especially useful for people who were not able to attend in person as they get to see what came up in the meeting.

TIPS FOR WRITING EFFECTIVE MEETING MINUTES

  1. Strike When the Iron Is Hot

Don’t leave writing up your minutes until the meeting is a distant memory. If you can’t remember everything, get someone else to read your minutes and clarify any points before you send out your final version.

  1. Start with an Action Review and Agenda

Whether or not you reviewed the actions from last time at the beginning of the meeting, put them at the start of the minutes.

Know the agenda so you are prepared for the topics.

Write down all the actions from the last meeting and a summary of their progress.

If the action was completed, don’t bother to write it out again. Instead, add a line at the top of the action section that says all other actions were completed or are no longer relevant.

  1. Document Actions and Owners

During the meeting, identify the new actions from this meeting.

In the minutes, include these actions in the flow of the text. You can also include an action summary at the end of the minutes.

Tabular format works well for this. Remember to include the names of the people who are going to work on these actions and, if possible, a date by which they are going to have the task completed.

  1. Record Attendance

Make a note at the top of your minutes to reflect who attended and who wasn’t able to make it.

  1. Include Images

If you use flip charts or mind mapping software in the meeting, include links to the documents, screenshots or embedded files.

You can take photos of what you wrote on flip charts with a phone camera. The resolution will be good enough to include in the minutes.

  1. Have a Standard Template or a Designed One

If your company does not have a standard template for minutes, feel free to make one. A standard template saves time. Attendees will also get used to reading the minutes in that format.

  1. Document Decisions

Use your minutes to confirm the decisions that were made in the meeting. For example, make a note of any project change requests that were approved or rejected, or budget decisions.

If the group decided anything, write it down!

  1. Use Tables

A tabular format works well for minutes. Use three columns: item number, discussion summary and action owner. People can scan down the right-hand column for their initials to see what actions they picked up. This format works well if your minutes record lots of actions. If the meeting is mainly discussion with few actions, this column then looks bare. Choose a format that works for you.

You can also type your minutes directly into word processing software without entering the text in a table, but use sub-headings to flag which area of discussion you are writing about.

  1. To Delay is To Deny

Ideally, you should send out minutes within the week. Sooner is better. And they should definitely be circulated before the next meeting! Be sure to send them to people who weren’t able to attend as well.

  1. Syntax / Grammar

Minutes are issued after the meeting has happened, so minutes should be written in the past tense.

  1. Apologies

Apologies are notifications from attendees to let you know they can’t come to the meeting. Note this at the top of the minutes so everyone knows who was invited but couldn’t come.

TAKEAWAY

Listen: Your job is to summarize, not write everything.

Focus on making sure decisions, actions, and problems are recorded.


Public Speaking Tips – Train the Trainer

BETTER PUBLIC SPEAKING

Public speaking ability is a key ingredient to success in any profession. Here are some tips to help improve your public speaking, from preparation to practice to delivery.

  1. Start practicing when you’re not under pressure. Practice your skills in venues where you are not under pressure, which could include:
  • Formal debate clubs such as Toastmasters, a nonprofit dedicated to improving public speaking skills
  • Games such as Talking Points and Drink Talk Learn
  • Mock “debate nights” with friends
  1. Understand the assignment and the audience. Before you start working on your presentation’s content and structure, understand who will be watching your presentation. Learn about the following:
  • How long of a presentation is expected?
  • Has the topic already been determined?
  • Is there information your topic must include?
  • Will you be presenting remotely or in person?
  • What technology will be available to you?
  • Is a slide deck expected?
  • How familiar is the audience with the topic? Should you avoid technical terms?
  • Does the audience expect handouts?
  • Is there an expected tone for your presentation — formal, informal, somewhere between?
  1. Craft a strong opening and conclusion. Though the meat of your presentation comes in the middle, the beginning and end can leave the strongest impressions. Generally speaking, your intro should take 10-20% of your presentation’s length. It helps to start with a 30-45 second hook, which can take the form of a:
  • Relevant statistic
  • Description of a current problem
  • Provocative rhetorical question

During your conclusion, pull together the story you’ve told or point you’ve argued. To do this, try:

  • Describing possibilities you envision
  • Quoting a public figure who inspires you
  1. Practice by yourself — and record yourself practicing. You can start perfecting your presentation by practicing on your own. Record yourself giving the presentation solo and review the video with a critical eye for tone and vocal inflections, body language, and presentation length. Watch out for mistakes like filler words, word choices, eye contact, and rhythm.
  2. Be mindful of pace. The ideal talking speed for a presentation is close to normal conversation. Speaking too quickly will confuse and overwhelm your audience. Too slowly, and their attention will begin drifting. Either way, they may end up not retaining much of your speech.
  3. Loosen up. Remember to relax. Memorization isn’t worth much if your delivery is stilted and robotic. While you should take care to memorize your intro and conclusion for the sake of structure, the middle section benefits from loosening up.
  4. Minimize your notes; maximize their effectiveness. To maximize your presentation’s effectiveness, try minimizing your reliance on notes. Your notes should cue you to stay on track and hit every main point. Over-reliance on them looks bad and will hurt your confidence.

If you’re using a slideshow or other visual aid, you can incorporate cues for yourself, including graphs, tables or stock imagery.

  1. Prepare your mind. Do something that will regulate your heart rate and ease your nerves. This could include:
  • Meditating
  • Walking in nature
  • Reading a book
  • Listening to a calming music
  • Listening to a speech you find inspiring
  1. Look for familiar faces in the audience. You need a non-adversarial picture of your audience to give a successful presentation. Your audience is at worst neutral and at best hungry to understand your perspective. To help reduce the fear of speaking to a group, connect with your audience as they enter the room. Shake hands, smile, introduce yourself. Direct your eye contact towards familiar faces, whether you are in a virtual or in-person setting.
  2. Overcome the adrenaline rush. Presenters’ nerves are at their worst when they first begin to speak. Start with an icebreaker to engage the audience and give your mind and body time to settle. You could ask audience members to raise a hand if the situation you’re addressing has affected them or turn to a neighbor and rate how helpful a certain process is.
  3. Don’t fear pauses. Dead air and a staccato, stop-start rhythm can ruin a presentation, but this does not mean pauses are your enemy! Try adding a pause whenever you need to allow the emotional impact or deeper implications of a statement to sink in for your audience.
  4. Be willing to say, “I don’t know”. If someone asks a question that you cannot answer, own it.

TAKEAWAY

Public speaking is a learned skill, and can increase emotional intelligence, confidence, and professional pride in one’s work.


Showing Appreciation – Train the Trainer

WHAT IS APPRECIATION?

Appreciation generally means “recognition and enjoyment of the good qualities of someone or something”. In the workplace, appreciation can be as simple as saying “thank you” for a job well done, for completing a project quickly, or for coming to a meeting prepared and on time.

WHY SHOW APPRECIATION IN THE WORKPLACE?

  1. Appreciation improves productivity.
  2. Appreciation improves workplace morale.
  3. Appreciation keeps employees engaged.
  4. Appreciation helps build staff loyalty.

CREATIVE RECOMMENDATIONS TO SHOW EMPLOYEE APPRECIATION – MORE THAN A “THANK YOU”

Send a handwritten note. Handwritten notes are rare and can have a huge impact on the recipient. A thoughtful handwritten note is often saved by being taped in their work area or saved in a drawer that is referenced many times over.

Display a photo of the person. Have a Wall of Fame that highlights all of your employees. Add their photo on the company website and post it on company social media sites. Best practice is to use a professional photo.

Hold an appreciation ceremony. This can be a formal event or as informal as part of an agenda item for your weekly team meeting where you take a few minutes for employees to verbally acknowledge the efforts of coworkers.

Offer a paid day off. Everyone can use a day to take care of personal issues or to enjoy a little more leisure time. A paid day off can afford a three-day weekend or other excursion.

Give credit to others. Cite your sources, publicly applaud the ideas of others and recognize the people that have helped you.

Cater a monthly lunch. Have lunch brought in that allows employees to eat with other coworkers. Take a few minutes to let everyone know how much the company values their contributions.

Provide development training. Offering ongoing training in areas like team building, leadership, effective communication, goals setting, and time management can build a powerful company culture.

Rotating trophy. Get a trophy that circulates through your team. Each person awarded the trophy holds it for one week then passes it on to another coworker.

Give the power of voice. Create a culture of insight and innovation by allowing employees to be heard. This confirms that you value their opinion and perspective.

Be polite. Politeness opens doors while rudeness closes them. One tool to increase the probability of gaining the help you want is to attach the word “please” when asking.

Offer an award plaque. Have a special plaque with their name and achievement on it that can be hung on the wall or placed on a shelf honoring them.

Support community outreach. Let employees use a couple hours of company time to give back to the community.

Ask instead of telling. Exercise the habit of asking people to do what you would like them to do instead of telling them what to do.

Encourage collaboration. Allow for brainstorming and input from everyone on how to best achieve goals.

Compliment more than you criticize. If you are only criticizing, it will be hard to establish a positive working relationship that is needed to achieve organizational goals.

TAKEAWAY

Appreciation is a powerful everyday tool that managers and leaders can use with their staff. Unfortunately, it is greatly underutilized.


Training Across Cultures in the Workplace – Train the Trainer

Technologies that allow employees and organizations to collaborate virtually has exposed the cultural differences gap in the workplace. As a result, there is a need for cross-cultural training programs. These programs aim to brief employees on what to expect when working with those of other cultural backgrounds, how to work through differences, and maximize the benefits of cultural teams.

WHAT IS CROSS-CULTURAL TRAINING?

CROSS-CULTURAL TRAINING (CCT) refers to a procedure or practice that aims to enable learners to develop the awareness, knowledge and skills required to be culturally competent in cross-cultural situations, domestically and abroad. The three pillars of successful CCT are:

  • It is key to remain aware of unconscious biases that influence us as a result of our own culture. Doing so allows employees to recognize that cultural differences are present, and is therefore the first step in managing these differences.
  • It’s important to understand the notion of culture, its basic features, and how it affects human behavior. Gaining new knowledge about other cultures helps us to counter stereotypes and understand cultural motivations and behaviors.
  • Key skills to developing cultural intelligence include: interpersonal skills, tolerance for uncertainty, empathy, discernment and adaptability.

WHY IS CROSS-CULTURAL TRAINING IMPORTANT

Different cultures approach the workplace in different ways, and the resulting cultural gap can leave employees feeling frustrated or stressed if there’s a lack of sensitivity to cultural norms. Taking the time to help colleagues understand each other makes all the difference in setting expectations and building a rapport among employees from different cultures.

TIPS FOR MAXIMIZNG THE EFFECTIVENESS OF CCT

Observation techniques

  • How are ideas presented? Pay attention to tone, body language and metaphors.
  • How are decisions made, in or out of official settings?
  • Look for congruence or inconsistency between what people say and what they do.

Ask Questions

  • Ask questions about things that seem to be common sense. Assumptions are how most misunderstandings happen.
  • Ask questions more than once. Make questioning a normal part of interactions.
  • Ask for specific examples of positive and negative interactions. In the answer, listen for clues about:
    • Employer-employee relations.
    • How conflict is addressed in this setting (e.g., directly, indirectly).
    • Expectations and understandings of safety.
    • The priority of safety in relation to other company priorities.

Be Prepared and Proactive

  • Be prepared to have your assumptions questioned.
  • Make sure colleagues feel comfortable communicating with you about cultural differences.
  • Be aware that power dynamics can impede communication and may take time and concerted effort to overcome.

TAKEAWAY

Cultural training will become increasingly important as the global economy grows and diversifies. Safety professionals who develop the ability to work effectively in cross-cultural settings will be better positioned to promote workers health, safety and well-being in the increasingly global economy.


Understanding Communication Styles – Train the Trainer

UNDERSTANDING COMMUNICATION STYLES MATTERS

Communication style is the key to fostering positive relationships, avoiding miscommunications, and ensuring the message you send is understood by the recipient. The advantages are even more pronounced in a business context, where effective communication is essential to success on an individual, team, and company-wide level.

FOUR PRIMARY COMMUNICATION STYLES

  1. Passive Communication Style. Passive communicators are typically quiet and don’t seek attention. They may act indifferent during debates and rarely take a strong stance or assert themselves. They don’t usually share their needs or express their feelings, so it may be difficult to know when they are uncomfortable or need help. You can identify a passive communicator by these tendencies:
  • Inability to say no
  • Poor posture
  • Easy-going attitude
  • Lack of eye contact
  • Soft voice
  • Apologetic demeanor
  • Fidgeting

Consider these methods to encourage a good working relationship if dealing with a passive communicator:

  • Take a direct approach.
  • Ask for their opinions.
  • Use broad language. Avoid asking “yes” or “no” questions that can be answered with little elaboration.
  1. Aggressive Communication Style. Aggressive communicators frequently express their thoughts and feelings and tend to dominate conversations, often at the expense of others. An aggressive communicator may also react before thinking, which can negatively affect relationships and decrease productivity in the workplace.

Aggressive Communicators Have These Tendencies:

  • Interrupting people while they’re speaking
  • Invading personal spaces
  • Presenting an overbearing posture
  • Using aggressive gestures
  • Maintaining intense eye contact

Consider these methods when working with an aggressive communicator:

  • Be calm and assertive.
  • Keep conversations professional.
  • Know when to walk away.
  1. Passive-Aggressive Communication Style. Passive-aggressive communicators appear passive on the surface but often have more aggressive motivations driving their actions. While their words might sound agreeable, their actions don’t always align with what they say. Passive-aggressive communicators can quietly manipulate a situation into one that benefits them.

Examples Of Passive-Aggressive Communicators

  • Muttering
  • Using sarcasm
  • Exhibiting denial
  • Giving the silent treatment
  • Presenting a happy face when they’re clearly upset

Consider the following approaches when dealing with a passive-aggressive communicator:

  • Make clear requests. Try not to leave room for misinterpretation or confusion.
  • Confront negative behavior. Talk to them directly about their behavior.
  • Ask for feedback. Directly ask for feedback in one-on-one situations to try to elicit honest response.
  1. Assertive Communication Style. The assertive style is typically the most respectful and productive type of communication in the workplace. Assertive communicators share their thoughts and ideas confidently, but they’re always respectful and polite. They readily take on challenges but know how to say “no” when it’s required. These individuals understand their own limits and protect their boundaries without acting overly aggressive or defensive.

Assertive Behavior Exhibits Itself Through:

  • Expansive gestures
  • Collaborative and sharing tendencies
  • Healthy expression of ideas and feelings
  • Good posture
  • A clear voice
  • Friendly eye contact

If you have assertive communicators on your team, encourage them to share their ideas, place them in positions of leadership and enlist their help dealing with passive, passive-aggressive and aggressive communication styles.

TAKEAWAY

Recognizing different forms of communication will dramatically enhance the quality of your working relationships. That’s because your skill of managing difficult conversations depends on communication ability.


Using Incentives and Rewards – Train the Trainer

Training is important. It helps people succeed at their jobs, becoming more efficient and effective in the workplace. There are those people who are self-motivated and make the time for training on their own. It’s all too easy for the rest of us to push training aside or rush through it without retaining the information.

IT’S ALL ABOUT MOTIVATION

In our increasingly busy world, it can be challenging to get people to actually show up to training, let alone retain the information. How do you get people to be present and engaged? Incorporate training incentives to give people the extra encouragement they need to participate and make training a priority. Rewards add immense value to learning and development, and can result in high-performing channel partners, improved customer service, and increased sales. Organizations often notice an immediate increase in eLearning participation and engagement because people enjoy being rewarded.

TRAINING INCENTIVES TO IMPROVE TRAINING PARTICIPATION

Crafting an appealing online training incentives program is an excellent way to motivate distributed workforces and members of your extended enterprise. Effectively training your contractors, resellers, partners, and employees is one proven way to reinforce key business objectives and improve your bottom line.

3 KEY THINGS TO MAKE SURE OF WHEN DEVELOPING AN INCENTIVES PROGRAM

  1. The incentive is something people want. Chances are high that branded water bottles or flashlights will not motivate learners. But a gift card to the retailer of their choice, a donation to their favorite cause or a little extra paid-time-off could very well give just the push they need.
  2. The incentive is accessible. If trainees have to jump through countless hoops in order to earn the incentive, it will have to be a pretty significant reward, which typically isn’t budget friendly. Instead, make sure the amount of effort expected is in line with the reward and the results are attainable.
  3. The incentive is delivered quickly and simply. If it takes six weeks after the incentive is earned to actually receive it, you are going to lose the interest of your learners.

TRAINING INCENTIVES TO IMPROVE PARTICIPATION

You must be strategic in developing training incentives that show partner appreciation and provide a compelling reason to excel. Training incentives to improve participation are:

Gift Cards

A popular way to improve training participation is by awarding partners with gift cards for completing online courses. Gift cards have shown to be superior over cash because they are more memorable. They serve as a reminder of achievement and are perceived as a true gift, rather than compensation for performance. It is tempting to spend cash on necessities like bills, but gift cards allow for guilt-free spending on special items. As businesses move to non-cash training incentives, gift cards prove to be a strong motivator because people enjoy using them.

Gamified Points Program

Rewarding your partners with points rather than cash has become the go-to strategy in many training incentive programs. After the successful completion of each training, participants earn points to either redeem immediately or use in the future. They like this option because of the flexibility in choosing their reward, which empowers them and boosts morale. You can offer incentives like travel, merchandise, and electronics that your partners will love and work hard to earn.

Paid Time Off (PTO)

A proven method to win your workforce over is through paid time off. Show employees you care about their education and learning, but also understand the need for work-life balance. Refreshed, focused, and dedicated people are the foundation of a successful business. Therefore, rewarding them with personal time is a win-win!

Create a training incentives program that strongly encourages your workforce to get involved and rewarded for their effort. It is always important to start with what your partners and employees want out of a program.  This way, you’ll build a training incentives program they will actually use.

TAKEAWAY

There’s no question, training is important. Motivating learners to take training on their own, rather than having to remind them to do it, is not only valuable for learners, but also good for business. Moreover, one of the best ways to motivate learners is with a properly developed incentives program. Offering learners something they want, that’s both attainable and immediately redeemable, will give them the extra push they need to participate in training.