Lockout Tagout Employer’s Guide Step 6: Hazardous Energy Control Procedures

What You NEED To Do
HECPs must be developed and documented in writing, and used for cleaning, repairing, servicing, setting-up or adjusting prime movers, machinery, and equipment. Each machine, piece of equipment or prime mover must have separate procedural steps for their safe lockout tagout. Download a model HECP that you can quickly edit and make your own.

BACK TO START | NEXT STEP OF 9

Who is responsible for the lockout program?

Each party in the workplace has a responsibility in the lockout program. In general:

Management is responsible for:

  • Drafting, periodically reviewing, and updating the written program.
  • Identifying the employees, machines, equipment, and processes included in the program.
  • Providing the necessary protective equipment, hardware and appliances.
  • Monitoring and measuring conformance with the program.

Supervisors are responsible for:

  • Distributing protective equipment, hardware, and any appliance; and ensuring its proper use by employees.
  • Making sure that equipment-specific procedures are established for the machines, equipment and processes in their area.
  • Making sure that only properly trained employees perform service or maintenance that require lockout.
  • Making sure that employees under their supervision follow the established lockout procedures where required.

Authorized individuals are responsible for:

  • Following the procedures that have been developed.
  • Reporting any problems associated with those procedures, the equipment, or the process of locking and tagging out.

Hazardous Energy Control Procedures (HECPS)

Hazardous Energy Control Procedures (HECPS)

HECPS must be developed and documented in writing, and used for cleaning, repairing, servicing, setting-up or adjusting prime movers, machinery, and equipment.

Each machine, piece of equipment or prime mover must have separate procedural steps for their safe lockout tagout.

Exception

The same procedural steps may be used for the safe lockout tagout of groups or types of prime movers, machines or equipment, under the following conditions:

  • Operational controls are configured in a similar manner, and
  • Locations of disconnect points (energy isolating devices) are identified, and
  • The sequence of steps to safely lockout or tagout the machinery or equipment are similar.

OR

  • Machinery or equipment has a single energy supply that is readily identified and isolated and has no stored or residual hazardous energy.

The HECPS must clearly and specifically outline at least the following:

  • The machines, equipment, operations, and processes where they apply (i.e., scope)
  • What the procedures are used for (i.e., purpose and intended use)
  • The name of the people who will carry out the procedures (i.e., authorization)
  • Rules for carrying out the procedures
  • The means to enforce compliance with the procedures
  • Techniques used for the control of hazardous energy
  • The steps (meaning the procedures and requirements) for:
    • Shutting down, isolating, blocking, and securing machines or equipment to control hazardous energy;
    • The placement, removal, and transfer of lockout tagout devices and who is responsible (i.e., responsibilities) and,
    • Testing to determine and verify the effectiveness of lockout and tagout devices and other hazardous energy control devices.

Best Practices - How to Develop Your HECPs

Best Practices – How to Develop Your HECPs

Listed below are the general steps for writing your HECPs. This is followed by more information on each step to help you develop and put into place your HECPs.

  • Step 1 – State the purpose and use of your HECPs
  • Step 2 – Name the Authorized Employee(s) responsible for carrying out the HECPs and restoring equipment, machines, and prime movers back to service
  • Step 3 – Develop specific procedures for the transfer of responsibilities
  • Step 4 – State the rules that apply to your HECPs and how you will enforce compliance
  • Step 5 – List all the equipment, machinery, prime movers, and ALL their source(s) of hazardous energy that your HECPs apply to
  • Step 6 – For each piece of equipment, machinery or prime mover describe the specific techniques and steps to follow in order to control all hazardous energy sources, and how to safely restore the machinery and equipment to service
    • Consider work activities
    • Specify hazardous energy control steps
    • Secure hazardous energy control points
    • Test for effectiveness
    • Restore equipment, machines, and prime movers back to service

Remember that the specific procedures that you need to develop to protect workers depends on:

  • Your machines, equipment and prime movers, and
  • Their sources of hazardous energy, and
  • The work activities being performed

More on the Steps

Employee participation in developing your HECPs is extremely valuable because they can provide valuable information and help identify deficiencies. Also employee participation promotes their acceptance and compliance with the procedures.

Posting your HECPs on or close to the equipment/machine serves as a reminder and improves compliance.

Step 1 – State the purpose and use of your HECPs

Step 2 – Name the Authorized Employee(s) Responsible for Carrying Out the HECPs and Restoring Equipment, Machines, and Prime Movers Back to Service

  • Remember, your HECPs can only be carried out by Authorized Employees
  • Develop a way to notify all Affected Employees that a lockout is required and the reasons for it

Step 3 – Develop Specific Procedures for the Transfer of Responsibilities

  • Procedures must be designed to ensure the orderly transfer of lockout or tagout device protection between off-going and incoming employees, to minimize exposure to hazards from the unexpected energization or start-up of the machines, equipment or prime movers.
  • Develop procedures in advance for the transfer of responsibility when the Authorized Employee(s) who applied the lockout or tagout device(s) is not available to remove them (such as during shift or personnel changes). Steps should include:
    • Informing all Affected Employees
    • Confirming that the Authorized Employee who applied the device(s) is not at the facility
    • Making all reasonable efforts to contact the Authorized Employee who applied the device(s) and inform them that the device(s) have been removed
    • Naming in advance the new Authorized Person(s) responsible for the removal of the device(s)
    • Specifying the specific steps necessary for the new Authorized Person (s) to remove the lockout or tagout devices that were originally placed (e.g., transfer of keys for locks, or transfer of tags or signs or placement of new locks or tags and signs, etc.)

Step 4 – State the rules that apply to your HECPs and how you will enforce compliance.

Step 5 – List All the Equipment, Machinery, Prime Movers, and ALL their Source(s) of Hazardous Energy that your HECPs apply to.

For each of your machines, equipment, or prime movers make sure to identify all their sources of hazardous energy, and the magnitude of each energy source. Remember that each machine, piece of equipment, or prime mover may have multiple sources of hazardous energy feeding into them. Examples of types of hazardous energy sources include: electrical, mechanical, hydraulic, pneumatic, chemical, thermal, potential, stored, and others.

Once identified, label all hazardous energy source(s) for all machines and equipment to prevent employees from mistaking the machines or equipment it feeds.

Step 6 – For each piece of equipment, machinery, or prime mover describe the specific techniques and steps to follow in order to control all hazardous energy sources and how to safely restore the machinery and equipment to service

a. Consider Work Activities

First consider the work activities of each Authorized or Affected Employee on the specific machine or piece of equipment, and the potential for injury from hazardous energy sources. Your HECPs must contain procedures to notify all Authorized and Affected Employees each time before any work activities involving lockout tagout start.

b. Specify Hazardous Energy Control Steps

Then specify the steps to control all hazardous energy sources for each machine, piece of equipment or prime mover that you identified. In your procedures, remember to identify and control all hazardous energy sources including main and secondary power supplies, potential, and stored energy (e.g., capacitors, springs, elevated machine members, rotating flywheels, hydraulic systems, and air, gas, steam or water pressure.)

There are three basic ways to control hazardous energy sources which are isolation, blockage, or dissipation at points of control. Include steps and procedures for:

  • Shutting down operating equipment by the normal procedure (e.g., depressing a button, opening a toggle switch)
  • Hazardous energy control such as:
    • Closing switches, valves
    • Bleeding or draining valves
    • Inserting blank flanges
    • Dissipating, disconnecting, relieving, or restraining potential and stored energy by grounding, repositioning, blocking or bleeding. If there is a possibility of re-accumulation of stored energy to hazardous levels, verification of isolation shall continue until the work is completed.

c. Secure Hazardous Energy Control Points

You must now develop procedures to ensure that the control measures can not be overridden or by-passed. Hazardous energy sources are considered adequately secured for each machine, piece of equipment, or prime mover when an unplanned event would not reactivate the flow of energy or cause inadvertent movement.

Your procedures must specify how lockout and tagout devices will be placed and removed, and if necessary transferred between employees at the point of control. They must also specify who is responsible for each of these functions. There are two basic ways to secure hazardous energy points of control. These are:

  • Lockout – using personal padlocks (where only the authorized person has the key) or seals that can be readily secured to the point of control
  • Tagout – posting accident prevention signs and tags which can be readily secured to the point of control. Tagout device attachment means must be of a non-reusable type, attachable by hand, self-locking, and non-releasable with a minimum unlocking strength of no less than 50 pounds.

d. Test for Effectiveness

Once your hazardous energy control procedures have been developed you must also develop procedures to test their effectiveness. These procedures should specify that testing be done each time you de-energize your machines, equipment, and prime movers regardless of the time interval between de-energizing and start-up. Your procedures should also specify that where there is a possibility of re-accumulation of energy to hazardous levels, testing should be continued until work activities are completed. Procedures for testing should include:

  • Removal of employees from the area of the machine, equipment, or prime mover
  • Having Authorized Employee push the start button to activate the machine, equipment, or prime mover to make sure it does not start. This means all energy sources have been positively locked out
  • Returning controls to the “off” position following testing which means the machine, equipment, or prime mover is now locked out.

If sensing devices are used for testing they must be used according to established procedures and be regularly inspected and/or calibrated.

e. Restore Equipment, Machines, and Prime Movers Back to Service

You must develop procedural steps for the removal of lockout and tagout devices. The same Authorized Employee(s) responsible for carrying out the Hazardous Energy Control Procedures should be responsible for restoring machines, equipment, and prime movers back to their normal operation. Steps include:

  • Installing guards and verifying that the equipment is fully assembled and ready to resume safe operation.
  • Removing unnecessary tools, spare parts, etc.
  • Notifying all employees who would be affected by the startup of the equipment to be safely positioned before the lockout device(s) are removed.
  • Removing materials and hardware (i.e., locks, tags etc.)
  • Re-energizing machines, equipment, and prime movers

Remember, you must also develop in advance a procedure for the transfer of responsibility when the Authorized Employee(s) who applied the lockout or tagout device(s) is not available to remove them (see Step 2, above).


BACK TO START | NEXT STEP


Lockout Tagout Employer’s Guide Step 7: Lockout Tagout Solutions

What You NEED To Do
Having the right tools for the job is important no matter what industry you work in, but when it comes to lockout safety, it is critical that you have the most versatile and sure-fit devices available for your employees. Four types of lockout devices are available to help you meet OSHA requirements in your facility and establish responsibility and accountability among your employees.

BACK TO START | NEXT STEP OF 9

Having the right tools for the job is important no matter what industry you work in, but when it comes to lockout safety, it is critical that you have the most versatile and sure-fit devices available for your employees. Four types of lockout devices are available to help you meet OSHA requirements in your facility and establish responsibility and accountability among your employees.

1. Padlocks

1. Padlocks

Like all lockout devices, safety lockout padlocks must be provided by the employer and standardized. They must be distinguishable from other locks, used only for lockout purposes and always be identifiable with the name of the person who applied the lock.

Optimally, lockout padlocks should be key-retaining to ensure the padlock is secured and locked before the key can be removed. A best practice for choosing a safety padlock is to select a lightweight, non-conductive model that can easily be customized for your facility.

2. Tags

2. Tags

  1. Tags play a critical role in lockout tagout. They provide a warning against hazardous conditions that may occur if a machine or piece of equipment is energized. Tags communicate important information about the lockout condition and can provide photo identification of the employee performing the maintenance.

Lockout tags commonly are used in two ways: With locks to identify the lock owner; or on an exception basis, tags can be used without a lock. If the tag is used without a lock, OSHA stipulates the tag must:

  • Withstand the environment to which it is exposed
  • Be standardized and distinguishable from other tags
  • Include clear warnings and instructions
  • Be attached with a non-reusable, self-locking device that can withstand 50 pounds of pull force

3. Devices

3. Devices

Many different types of lockout devices are available to effectively and safely secure energy isolation points. Three types of lockout devices will help ensure the energy isolation and lockout that are needed in every facility.

Electrical lockout devices: These provide ways to secure the electrical power of machinery equipment in an “off” position. Examples include circuit breaker lockout devices and an electrical plug lockout device.

Multi-purpose cable lockout devices: These devices are used when a padlock or other fixed device does not provide the flexibility required for proper lockout. Often, a single cable lockout device is used to lock out several energy isolation points.

Valve lockout devices: A wide variety of valves supply compressed gases, liquids, steam and more in a facility. A valve lockout device will conceal or physically prevent the valve’s operation. The four main types are gate valves, ball valves, plug valves and butterfly valves.

4. Safety Hasps

4. Safety hasps

Safety hasps permit multiple workers to apply padlocks to a single energy isolation point. The two types of safety hasps are labeled lockout hasps, which feature write-on labels, and durable steel lockout hasps that are made of high-tensile steel.

Here is a link to various devices available for LOTO on Grainger.

BACK TO START | NEXT STEP


Lockout Tagout Employer’s Guide Step 8: Training

What You NEED To Do
Your LOTO program is only valuable if all your employees are trained on LOTO fundamentals and your organizations process. ICW Group has instructor-led and online safety training for you to use, but it is also critical that you communicate your specific LOTO procedure and policy as well.

BACK TO START | NEXT STEP OF 9

Lockout Tagout Training.

Lockout Tagout Interactive Training Program. OSHA eTool.

Small Business Handbook. OSHA Publication 2209, (2005).

Lockout Tagout. National Ag Safety Database (NASD) Research Publications-11.

BACK TO START | NEXT STEP


Lockout Tagout Employer’s Guide Step 9: Audit

What You NEED To Do
Lockout Tagout (LOTO) procedures are used to make sure that a machine or equipment is isolated from the energy source and rendered inoperative. The OSHA LOTO standard has ranked among the top five most cited violations for each of the last five consecutive years.

Download a model LOTO procedure that you can quickly edit and make your own.

BACK TO START

OSHA’s Lockout Tagout Standard

Lockout Tagout (or isolation) aims to protect workers from the unexpected release of stored energy during the servicing and maintenance of machines and equipment. There are many sources of hazardous energy, including electrical, mechanical, hydraulic, pneumatic, chemical, thermal, etc. The unexpected startup or release of stored energy can result in serious injury or fatality.

According to OSHA, failure to control hazardous energy accounts for almost 10% of serious accidents in many industries. Craft workers, electricians, machine operators, and laborers are among the 3 million workers in the U.S. who service equipment routinely and face the greatest risk of injury.

Lockout Tagout (LOTO) procedures are used to make sure that a machine or equipment is isolated from the energy source and rendered inoperative. The OSHA LOTO standard has ranked among the top five most cited violations for each of the last five consecutive years.

Audits and Inspections Are Different

OSHA’s LOTO standard requires periodic inspections:

1910.147(c)(6)(i): The employer shall conduct a periodic inspection of the energy control procedure at least annually to ensure that the procedure and the requirements of this standard are being followed.

1910.147(c)(6)(ii): The employer shall certify that the periodic inspections have been performed. The certification shall identify the machine or equipment on which the energy control procedure was being utilized, the date of the inspection, the employees included in the inspection, and the person performing the inspection.

Be careful not to confuse inspections required by OSHA, and audits that verify whether inspections are being performed. In addition to inspections, conduct an annual audit to ensure compliance and to verify the effectiveness of your energy control or LOTO program.

Here are the main items to verify during the audit:

  • Energy control procedures: Are procedures developed, documented and used for the control of potentially hazardous energy for each applicable machine or equipment? A generic procedure for all machines and equipment will not work. Also, check out section 1910.147(c)(4)(i) of the standard for a list of exceptions regarding the documentation of procedures.
  • Protective materials and hardware: Are locks, tags, chains, wedges, key blocks, adapter pins, self-locking fasteners, or other hardware provided for isolating, securing or blocking machines or equipment from energy sources? Are they durable and easily identifiable?
  • Periodic Inspections: Are periodic inspections of energy control procedures conducted at least annually to correct deviations or inadequacies? Are there certifications identifying the machine or equipment associated to the procedure, the date of the inspection, employees included in the inspection and the person performing the inspection?
  • Training: Is training provided to ensure that the purpose of the energy control program is understood, and that knowledge and skills required for the safe application, usage and removal of energy controls are acquired? Is there retraining when there is a change in job assignments, a change in machines, equipment or processes that present a new hazard, or a change in the energy control procedures?

BACK TO START


Ergonomics Fatality File

Work-Induced Carpal Tunnel Syndrome

Carpal tunnel syndrome (CTS) is common in people working in a variety of professions. CTS is caused by frequent, repetitive movements of the upper limb, frequent bending and strain of the elbow, and hand-arm vibrations. Dentists, dental hygienists and dental assistants, soldiers, laboratory workers, and secretaries are some of those at risk due to their occupation. Presently described is a case with the diagnosis of work-related carpal tunnel syndrome.

The patient was 46 years old and female. She was referred to the occupational diseases polyclinic for a suspicious lesion on the lungs. She had a complaint of numbness in her hands. She was exposed to repeated hand-wrist movements and hand wrist force.

Testing led to a diagnosis of carpal tunnel syndrome. Musculoskeletal system diseases are common in occupational diseases. Employees are often exposed to various risks in the work environment and frequently systemically affected. This case is a clear reminder of the value and importance of a detailed anamnesis and work history.

Carpal tunnel syndrome (CTS) is one of the most common musculoskeletal disorders in the working population. CTS is a disease caused by excessive pressure on the median nerve passing through the wrist carpal tunnel. If CTS is not treated, the patient may develop pain, numbness, loss of strength. CTS can be treated with surgical decompression in the later period. Dentists, dental hygienists and dental assistants, soldiers, laboratory workers and secretaries are at risk due to occupationally. For this reason, we found it appropriate to present a case with carpal tunnel syndrome.


Ergonomics Fatality File – Spanish

Síndrome del túnel carpiano inducido por el trabajo

El síndrome del túnel carpiano (STC) es frecuente en personas que trabajan en diversas profesiones. El STC está causado por los movimientos frecuentes y repetitivos de la extremidad superior, la flexión y tensión frecuentes del codo y las vibraciones mano-brazo. Los dentistas, los higienistas y los asistentes dentales, los soldados, los trabajadores de laboratorio y las secretarias son algunas de las personas que corren riesgo debido a su ocupación. Actualmente se describe un caso con el diagnóstico de síndrome del túnel carpiano relacionado con el trabajo.

La paciente tenía 46 años y era mujer. Fue remitida a la policlínica de enfermedades profesionales por una lesión sospechosa en los pulmones. Se quejaba de adormecimiento de las manos. Estaba expuesta a repetidos movimientos de la mano-muñeca y a la fuerza de la mano-muñeca.

Las pruebas condujeron a un diagnóstico de síndrome del túnel carpiano. Las enfermedades del sistema musculoesquelético son habituales en las enfermedades profesionales. Los empleados suelen estar expuestos a diversos riesgos en el entorno laboral y con frecuencia se ven afectados sistémicamente. Este caso es un claro recordatorio del valor y la importancia de una anamnesis e historial laboral detallados.

El síndrome del túnel carpiano (STC) es uno de los trastornos musculoesqueléticos más comunes en la población trabajadora. El STC es una enfermedad causada por una presión excesiva sobre el nervio mediano que pasa por el túnel carpiano de la muñeca. Si el STC no se trata, el paciente puede desarrollar dolor, entumecimiento y pérdida de fuerza. El STC puede tratarse con una descompresión quirúrgica en el período posterior. Los dentistas, los higienistas y los asistentes dentales, los soldados, los trabajadores de laboratorio y las secretarias están en riesgo debido a la ocupación. Por este motivo, nos ha parecido oportuno presentar un caso de síndrome del túnel carpiano.


Ergonomics Infographic

Ergonomics-Infographic

Source: https://www.purdue.edu/


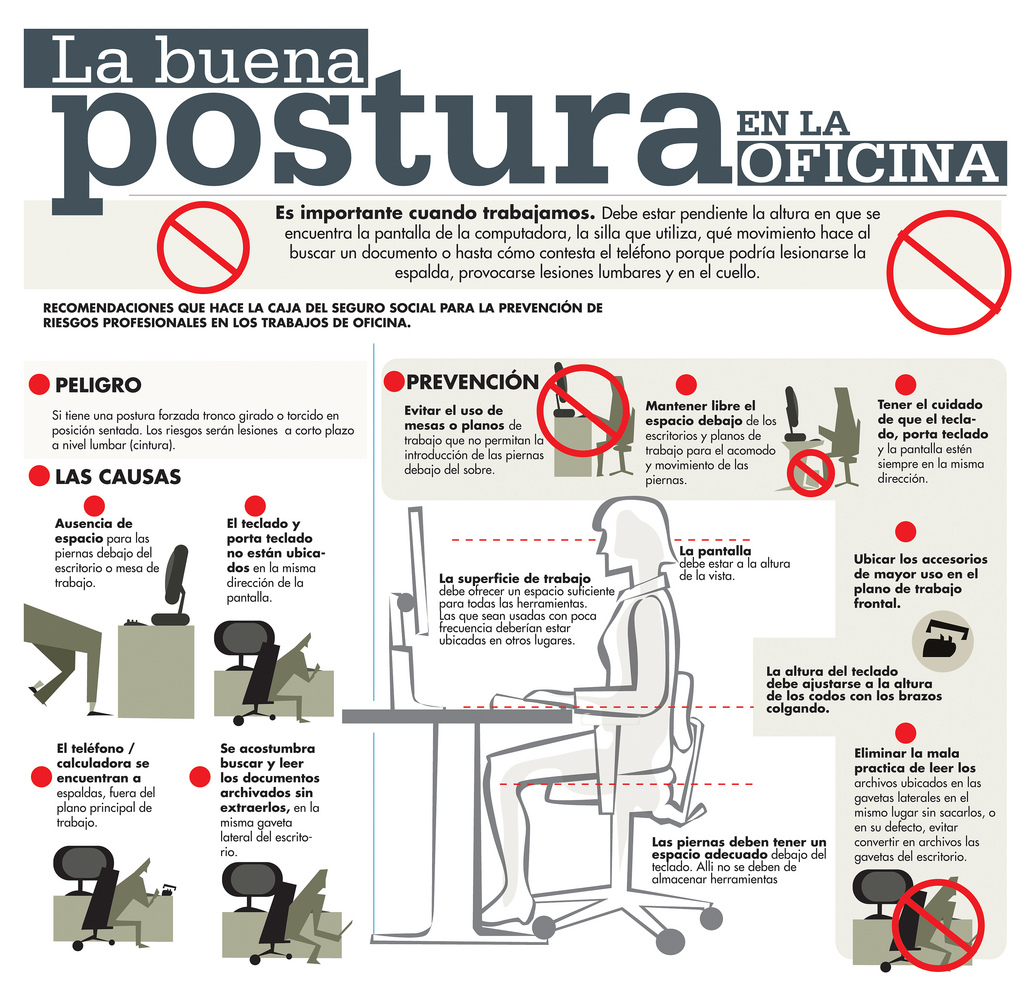
Ergonomics Infographic – Spanish

Ergonomics-Infographic-Spanish

Fuente: https://aizpuruaasesoresblog.files


Establishing A Hazard Communication Program Meeting Kit

What’s At Stake

OSHA’s hazard communication standard (HazCom or HCS) requires employers with hazardous chemicals in the workplace to implement a formal hazard communication program that includes processes for managing and maintaining safety data sheets (SDSs), container labels, chemical inventory lists, a written HCS plan, and employee training on OSHA’s HCS standard specific to the employer’s work environment.

What’s the Danger

AVOID THESE MISTAKES IN THE WORKPLACE 

Mistake 1: Relying Too Heavily on the SDS Information

Mistake 2: Not Reviewing the SDS before Using the Chemical

Mistake 3: Not Having the Proper PPE for the Chemicals Used in the Workplace

Mistake 4: Failing to Label Containers of Chemicals

Mistake 5: Not Making HazCom Training Site-Specific

Mistake 6: Inadequate Precautions about Smoking & Chemicals

HOW TO PROTECT YOURSELF

SIX KEY STEPS TO IMPLEMENT A HCS PROGRAM 

Step ONE: Know the Standard and Identify Who Will Manage It. Learning OSHA’s hazard communication standard and understanding how it affects you and your workforce is the first step for employers that produce, use or store hazardous chemicals.

Designating the appropriate personnel to manage it. It’s best to identify a specific employee or group of qualified individuals to implement and oversee associated activities, such as training.

Step TWO: Prepare and Implement a Written Plan. All workplaces where employees are exposed to hazardous chemicals must have a written HCS plan describing, in detail, how that facility will implement the standard.

A written HCS plan must include an inventory of all hazardous chemicals present in the workplace. OSHA recommends preparing this list using the product identifier (e.g., product name, common name, or chemical name) to more easily track the status of SDSs and labels for a particular chemical. It’s equally important that the product identifier be the same name that appears on the label and SDS for that chemical.

Step THREE: Ensure Chemical Containers Are Labeled. OSHA requires that all hazardous chemical containers in the workplace be sufficiently labeled. When it comes to workplace or secondary container label compliance, you have the option to replicate the corresponding HCS-compliant shipped label, or choose an alternative labeling system that uses a combination of the UN’s Globally Harmonized System (GHS) elements that, in conjunction with training and other information, provide employees with immediate access to information on chemical hazards.

Step FOUR: Maintain Your Safety Data Sheets (SDSs). SDSs are required for all hazardous chemicals in the workplace, and must be made accessible to employees during work shifts. Traditionally, this has been accomplished by managing physical copies of SDSs in three-ring binders. However, a more modern and cost-efficient method is to use an online software system that electronically manages these documents. A good chemical management software solution stores SDSs in a secure, cloud-based library — making them readily-accessible to your employees. The best solutions offer an online database of indexed, manufacturer-original documents to help you track down and obtain newly updated or missing SDSs, and are mobile-enabled so employees can access them no matter where they are — even from remote, offline locations.

Step FIVE: Inform and Train Employees. Workers must receive training in accessing and using the information on labels and SDSs. They must also be aware of the protective measures available in the workplace, how to use or implement these measures, who to contact if issues arise, and all other aspects of your HCS program.

A key provision of OSHA’s HCS training requirement is that it occurs in a language and manner that employees understand, and reoccur whenever necessary to ensure retention.

One area often overlooked by employers is the need to retrain employees regularly. This should occur whenever new employees come on-board, new hazardous chemicals are introduced to the workplace, or when employee retention of previous content has been lost.

Step SIX: Evaluate and Reassess Your Program. Your hazard communication program must remain current and relevant for you and your employees. This is best achieved by periodically reviewing your program to make sure it’s effective in protecting employees from chemical hazards and revise your Written Plan as appropriate to address any workplace changes, such as the introduction of new chemicals, new hazards, or changes to processes, policies and personnel, etc.

FINAL WORD

A HazCom program describes how your organization will meet the provisions for labeling, safety data sheets and employee training. The program should also include a list of all hazardous chemicals in the workplace, how the employer will inform employees of the hazards of non-routine tasks and the hazards associated with chemicals contained in unlabeled pipes in their work areas.


Establishing A Hazard Communication Program Meeting Kit – Spanish

QUÉ ESTÁ EN RIESGO

La norma de comunicación de riesgos de la OSHA (HazCom o HCS) exige a los empleadores con productos químicos peligrosos en el lugar de trabajo que apliquen un programa formal de comunicación de riesgos que incluya procesos para gestionar y mantener las hojas de datos de seguridad (SDS), las etiquetas de los contenedores, las listas de inventario de productos químicos, un plan HCS por escrito y la capacitación de los empleados sobre la norma HCS de la OSHA específica para el entorno de trabajo del empleador.

CUÁL ES EL PELIGRO

EVITE ESTOS ERRORES EN EL LUGAR DE TRABAJO 

Error 1: Confiar demasiado en la información de la FDS
Error 2: No revisar la FDS antes de utilizar el producto químico
Error 3: No tener el EPP adecuado para los productos químicos utilizados en el lugar de trabajo
Error 4: No etiquetar los contenedores de sustancias químicas
Error 5: No hacer la capacitación sobre HazCom específica para el lugar de trabajo
Error 6: Precauciones inadecuadas sobre el tabaquismo y las sustancias químicas

COMO PROTEGERSE

SEIS PASOS CLAVE PARA IMPLEMENTAR UN PROGRAMA DE HCS 

Paso UNO: Conozca la norma e identifique quién la gestionará. Conocer la norma de comunicación de riesgos de la OSHA y comprender cómo le afecta a usted y a su personal es el primer paso para los empleadores que producen, utilizan o almacenan sustancias químicas peligrosas.
Designar al personal adecuado para gestionarla. Lo mejor es identificar a un empleado específico o a un grupo de personas cualificadas para implementar y supervisar las actividades asociadas, como la capacitación.
Segundo paso: Preparar y aplicar un plan escrito. Todos los lugares de trabajo en los que los empleados están expuestos a sustancias químicas peligrosas deben contar con un plan HCS por escrito que describa, de forma detallada, cómo esa instalación aplicará la norma.
Un plan HCS escrito debe incluir un inventario de todas las sustancias químicas peligrosas presentes en el lugar de trabajo. La OSHA recomienda preparar esta lista utilizando el identificador del producto (por ejemplo, el nombre del producto, el nombre común o el nombre químico) para rastrear más fácilmente el estado de las FDS y las etiquetas de una sustancia química concreta. Es igualmente importante que el identificador del producto sea el mismo nombre que aparece en la etiqueta y en la FDS de esa sustancia química.
Paso TRES: Asegúrese de que los contenedores de productos químicos estén etiquetados. La OSHA exige que todos los contenedores de sustancias químicas peligrosas en el lugar de trabajo estén suficientemente etiquetados. Cuando se trata del cumplimiento de la etiqueta del lugar de trabajo o del contenedor secundario, tiene la opción de replicar la etiqueta correspondiente que cumple con la HCS, o elegir un sistema de etiquetado alternativo que utiliza una combinación de los elementos del Sistema Globalmente Armonizado (SGA) de la ONU que, junto con la capacitación y otra información, proporciona a los empleados un acceso inmediato a la información sobre los peligros químicos.
Paso CUARTO: Mantenga sus hojas de datos de seguridad (SDS). Las FDS son obligatorias para todas las sustancias químicas peligrosas en el lugar de trabajo, y deben estar accesibles para los empleados durante los turnos de trabajo. Tradicionalmente, esto se ha logrado mediante la gestión de copias físicas de las FDS en carpetas de tres anillos. Sin embargo, un método más moderno y rentable es utilizar un sistema de software en línea que gestione electrónicamente estos documentos. Una buena solución de software de gestión de sustancias químicas almacena las FDS en una biblioteca segura basada en la nube, lo que las hace fácilmente accesibles para sus empleados. Las mejores soluciones ofrecen una base de datos en línea de documentos indexados y originales del fabricante para ayudarle a localizar y obtener las FDS recién actualizadas o que faltan, y están habilitadas para dispositivos móviles, de modo que los empleados puedan acceder a ellas sin importar dónde se encuentren, incluso desde ubicaciones remotas y sin conexión.
Paso CINCO: Informar y capacitar a los empleados. Los trabajadores deben recibir capacitación para acceder y utilizar la información de las etiquetas y las FDS. También deben conocer las medidas de protección disponibles en el lugar de trabajo, cómo utilizar o aplicar estas medidas, a quién dirigirse si surgen problemas y todos los demás aspectos de su programa HCS.
Una disposición clave del requisito de capacitación en HCS de la OSHA es que se produzca en un idioma y de una manera que los empleados entiendan, y que se repita siempre que sea necesario para garantizar la retención.
Un aspecto que los empleadores suelen pasar por alto es la necesidad de volver a capacitar a los empleados con regularidad. Esto debe ocurrir siempre que se incorporen nuevos empleados, se introduzcan nuevas sustancias químicas peligrosas en el lugar de trabajo o cuando se pierda la retención del contenido anterior por parte de los empleados.
Paso SEIS: Evaluar y reevaluar su programa. Su programa de comunicación de riesgos debe permanecer actualizado y relevante para usted y sus empleados. La mejor manera de lograrlo es revisar periódicamente su programa para asegurarse de que es eficaz para proteger a los empleados de los peligros químicos y revisar su Plan Escrito según corresponda para abordar cualquier cambio en el lugar de trabajo, como la introducción de nuevas sustancias químicas, nuevos peligros o cambios en los procesos, políticas y personal, etc.

CONCLUSIÓN

Un programa HazCom describe el modo en que su organización cumplirá las disposiciones sobre etiquetado, hojas de datos de seguridad y capacitación de los empleados. El programa también debe incluir una lista de todas las sustancias químicas peligrosas en el lugar de trabajo, la forma en que el empleador informará a los empleados de los peligros de las tareas no rutinarias y los peligros asociados a las sustancias químicas contenidas en las tuberías no etiquetadas en sus áreas de trabajo.


Workplace Violence Meeting Kit

Workplace violence is any threat, disruptive behaviors, intimidation, physical aggression, or act of violence in the workplace including homicide.

Workplace violence is one of the major causes of death in the corporate world, second only to transportation. This growing issue can have very damaging effects on morale, reputation and revenue; making it something business have to address now.

Different factors contribute to whether someone may experience violence at work. People who work where money is exchanged are at a higher risk factor for workplace violence. Other career fields such as EMS, police officers, healthcare workers, customer service representatives, and delivery drivers are more likely to experience violence while on the job. Factors such as time of day worked, geographical area of work, working alone or in small groups, also has impact on whether someone is more likely to experience workplace violence.

THOSE AT RISK OF WORKPLACE VIOLENCE 

The health care industry is one of the most susceptible to workplace violence. Nearly half of emergency physicians say they have experienced a physical assault at work. Some of the other vulnerable industries include education, transportation and retail.

Women in particular are vulnerable to domestic violence in the workplace.

They have more than double the rate of on-the-job homicides than men (19% to 8%), with 32% of the homicides committed by a domestic partner.

Taxi drivers, healthcare workers, and other social work occupations have some of the highest rates of workplace violence.

The occupations with the highest risk of workplace violence include any that interact with the public, are open after dark, and serve alcohol.

Many workplace risk factors can increase the likelihood of violence at work. Employees may be at higher risk of violence if they:

  • Exchange money with the public — for example, as sales associates or bank tellers.
  • Work with volatile, unstable people.
  • Work alone, in a small group or an isolated area.
  • Provide services or care.
  • Work in an establishment that serves alcohol.
  • Work late at night or in an area with a high crime rate.
  • Work as delivery or taxi drivers, health care professionals, customer service reps, public service workers or law enforcement officers.

MEASURES TO PREVENT WORKPLACE VIOLENCE 

Research shows that preventing workplace violence is possible even with a small amount of effort.

1. Analyze your workplace: A thorough analysis of your workplace is necessary to understand where the bulk of your workplace violence prevention training should focus. Ask yourself these questions.

  • Has there been violence in your workplace before?
  • When, what kind, and who was involved?
  • How was it handled?
  • What systems were put in place afterwards, and were they effective?
  • If there have been no violent incidents in your company’s history, what are you doing well?
  • Are there gaps in your workplace violence policies? Where?
  • How safe is the physical environment? Which doors stay locked? How are employees protected if they leave late at night?

2. Create a supportive environment: Every training program starts with developing a relationship with employees. It is important that you and your HR department make employees feel heard and supported at work.

3. Offer communication and empathy training: Workplace violence training is often about how to handle a violent episode as it is occurring, but offering workers training in effective, empathic communication can prevent it before it starts.

4. Establish a clear workplace violence policy: How will you handle workplace violence? What supports or disciplinary actions are in place for verbal and nonverbal threats and actions?

5. Commit to a non-violent workplace: Commitment to a non-violent workplace means regularly allocating resources – money and time – to training workers and preventing workplace violence.

6. Train employees to recognize warning signs: Training employees to be alert to warning signs of potential workplace violence can stop an incident before it starts. Warning signs of potential violence include some or all of the following:

  • Excessive use of alcohol or drugs
  • Behavioral changes that include poor job performance
  • Depression or withdrawal
  • Complaints about unfair treatment
  • Violation of company policies
  • Mood swings and overreaction to criticism or evaluations
  • Paranoia

7. Create an action plan, share it with employees, and practice: The 1950s had nuclear attack drills; these have been replaced in the 21st century by active shooter simulations and lockdown drills. No one wants to think about the worst-case scenario, much less practice it regularly, but having a plan in place could save lives.

FINAL WORD

Report any suspicious activities whether it be the public or another employee when dealing with situations that can lead to violence on the job. When faced with workplace violence dealing with another coworker, do not become confrontational with them. Leave the area when you can do so safely and report the situation immediately to a supervisor. If your immediate supervisor does not take the report seriously, go to a higher level of supervision to correct the issue.


Ergonomic Breaks, Rest Periods, and Stretches Fallen Phrases

Ergonomic-Breaks-Rest-Periods-and-Stretches-fallen-phrases

Answer:

Ergonomic breaks help to increase worker productivity and reduce the occurrence of injuries. Stretches can help you warm up before work and relax during breaks.


Ergonomic Breaks, Rest Periods, and Stretches Fallen Phrases – Spanish

Ergonomic-Breaks-Rest-Periods-and-Stretches-fallen-phrases-Spanish

Respuesta: 

Las pausas ergonómicas ayudan a aumentar la productividad del trabajador y a reducir la aparición de lesiones. Los estiramientos pueden ayudar a calentar antes del trabajo y a relajarse durante las pausas.


Ergonomic Breaks, Rest Periods, and Stretches Infographic – Spanish

Ergonomic-Breaks-Rest-Periods-and-Stretches-Infographic-Spanish

Fuente: https://www.clinicadinan.com


Ergonomic Breaks, Rest Periods, and Stretches Infographic

Ergonomic-Breaks-Rest-Periods-and-Stretches-Infographic

Source: https://beenznriceart.wordpress.com/


Ergonomics Meeting Kit

What’s At Stake

THE OBJECTIVE 

Ergonomics (i.e., the scientific study of people at work) is to prevent soft tissue injuries and musculoskeletal disorders (MSDs) caused by sudden or sustained exposure to force, vibration, repetitive motion, and awkward posture. To create an ergonomically sound work environment, ergonomists and industrial hygienists recommend designing tasks, workspaces, controls, displays, tools, lighting, and equipment to fit employee’s physical capabilities and limitations.

What’s the Danger

COMMON SYMPTOMS OF ERGONOMIC INJURIES

Ergonomic problems most commonly arises in a person’s neck, shoulders, back, or extremities. Depending on the condition, common symptoms can include:

  • Tingling or numbing
  • Dull and aching, sharp and stabbing, or burning pain
  • Muscle weakness, decreased grip strength, or cramping
  • Loss of coordination
  • Decreased range of motion or discomfort
  • Coldness or discoloration of the affected area
  • Swelling of inflammation
  • Joint stiffness
  • Visual fatigue
  • Blurred vision
  • Burning or watery eyes

HOW TO PROTECT YOURSELF

PREVENTION THROUGH ERGONOMICS – THE RISK ANALYSIS 

Assessing work-related hazards and minimizing injury risk is a critical part of controlling the cost of work-related injuries, keeping employees healthy, and returning injured employees to work faster. Important elements of an ergonomic process are:

  • Provide Management Support – A strong commitment by management is critical to the overall success of an ergonomic process. Management should define clear goals and objectives for the ergonomic process, discuss them with their workers, assign responsibilities to designated staff members, and communicate clearly with the workforce.
  • Involve Workers – A participatory ergonomic approach, where workers are directly involved in worksite assessments, solution development and implementation is the essence of a successful ergonomic process. Workers Can: Identify and provide important information about hazards in their workplaces.
  • Identify Problems – An important step in the ergonomic process is to identify and assess ergonomic problems in the workplace before they result in CTDs.
  • Encourage Early Reporting of CTD Symptoms – Early reporting can accelerate the job assessment and improvement process, helping to prevent or reduce the progression of symptoms, the development of serious injuries, and subsequent lost-time claims.
  • Evaluate Progress – Established evaluation and corrective action procedures are required to periodically assess the effectiveness of the ergonomic process and to ensure its continuous improvement and long-term success. As an ergonomic process is first developing, assessments should include determining whether goals set for the ergonomic process have been met and determining the success of the implemented ergonomic solutions.

DO´S AND DONT´S IN WORKSTATIONS TO AVOID PAIN 

DO keep moving. Set an alarm to remind you if you need it! Sitting for long periods wreaks havoc on your spine and circulation. Get up, stretch, MOVE!

DO try to keep your body in a neutral posture, which creates the least strain on your body.

DO keep your desk clear so you’re not forcing your body to work awkwardly around clutter.

DO wear a headset if a good portion of your day is spent on the phone.

DO invest in workstation essentials that are ergonomic, and make sure they are adjusted to where you need them.

DON’T keep your monitor too close or too far away, or hunch over a laptop. This can cause eye strain and headaches in addition to neck and back pain.

DON’T use a desk or chair that’s not the proper height for your size. Everyone is different; find what works for you.

DON’T cradle your phone between your shoulder and ear.

BEST ERGONOMIC PRACTICES TO WORK WITHOUT PAIN 

Make adjustments to your work habits and your work area so you can work comfortably without stress or strain.

  • Back strain– is a common injury caused by sitting or standing in an incorrect position for extended periods of time. You may be able to prevent back injuries by using a footrest or a multi-position work station where you can either sit or stand. By changing positions frequently, you can ease the strain on back and leg muscles.
  • Neck strain– can be caused by holding your arms in an incorrect position. The extra stress on the arms and hands will affect the neck muscles as well. For computer users the top of the screen should be at eye level.
  • Carpal Tunnel Syndrome– is another repetitive strain injury which can permanently disable the hands and wrists. The major factor with a CTS injury is the hand and wrist positioning. An incorrect height or an awkward bent-wrist position will increase the risk dramatically. Is your work table set at a comfortable height? How about your chair or stool? Do you keep your arms in a “neutral” or level position? Examples of occupations which have a high rate of CTS are carpenters, cashiers and airline reservation agents.
  • Shoulder strain– is common when your supplies are positioned at an awkward height. Excessive bending, stretching or lifting can put added pressure on the shoulder joint. Can you re-organize your work area to eliminate this strain?
  • Muscle tension– can be caused by many things including working too long in the same position, and even stress. Do you incorporate some short breaks and stretching exercises into your work day to avoid strain injuries and fatigue? Simple stretching, flexing and strength building exercises can decrease your chances of injury. Warming up with a few exercises before you begin work is also important.

FINAL WORD

In addition to reducing the risk of injury, good ergonomics and a healthy work environment can increase productivity, improve quality, reduce rework, lower employee turnover rates, reduce training costs and improve workplace morale.


Ergonomics Meeting Kit – Spanish

QUÉ ESTÁ EN RIESGO

EL OBJETIVO 

La ergonomía (es decir, el estudio científico de las personas en el trabajo) consiste en prevenir las lesiones de los tejidos blandos y los trastornos musculoesqueléticos (TME) causados por la exposición repentina o sostenida a la fuerza, las vibraciones, los movimientos repetitivos y las posturas incómodas. Para crear un entorno de trabajo ergonómico, los ergónomos e higienistas industriales recomiendan diseñar las tareas, los espacios de trabajo, los controles, las pantallas, las herramientas, la iluminación y los equipos de forma que se adapten a las capacidades y limitaciones físicas de los empleados.

CUÁL ES EL PELIGRO

SÍNTOMAS COMUNES DE LAS LESIONES ERGONÓMICAS

Los problemas ergonómicos surgen con mayor frecuencia en el cuello, los hombros, la espalda o las extremidades de una persona. Dependiendo de la condición, los síntomas comunes pueden incluir

  • Hormigueo o adormecimiento
  • Dolor sordo y punzante, agudo y punzante, o ardor
  • Debilidad muscular, disminución de la fuerza de agarre o calambres
  • Pérdida de coordinación
  • Disminución de la amplitud de movimiento o incomodidad
  • Frialdad o decoloración de la zona afectada
  • Hinchazón de la inflamación
  • Rigidez articular
  • Fatiga visual
  • Visión borrosa
  • Ardor o lagrimeo en los ojos

COMO PROTEGERSE

 PREVENCIÓN MEDIANTE LA ERGONOMÍA: EL ANÁLISIS DE RIESGOS 

Evaluar los peligros relacionados con el trabajo y minimizar el riesgo de lesiones es una parte fundamental para controlar el coste de las lesiones relacionadas con el trabajo, mantener a los empleados sanos y devolver a los empleados lesionados al trabajo más rápidamente. Los elementos importantes de un proceso ergonómico son

Proporcionar apoyo a la dirección – Un fuerte compromiso por parte de la dirección es fundamental para el éxito general de un proceso ergonómico. La dirección debe definir metas y objetivos claros para el proceso ergonómico, discutirlos con sus trabajadores, asignar responsabilidades a los miembros del personal designados y comunicarse claramente con la plantilla.

Involucrar a los trabajadores – Un enfoque ergonómico participativo, en el que los trabajadores se involucren directamente en las evaluaciones del lugar de trabajo, el desarrollo de soluciones y la implementación es la esencia de un proceso ergonómico exitoso. Los trabajadores pueden: Identificar y proporcionar información importante sobre los peligros en sus lugares de trabajo.

Identificar los problemas – Un paso importante en el proceso ergonómico es identificar y evaluar los problemas ergonómicos en el lugar de trabajo antes de que den lugar a los TCE.

Fomentar la notificación temprana de los síntomas de TCE – La notificación temprana puede acelerar el proceso de evaluación y mejora del puesto de trabajo, ayudando a prevenir o reducir la progresión de los síntomas, el desarrollo de lesiones graves y las subsiguientes reclamaciones por tiempo perdido.

Evaluar el progreso – Es necesario establecer procedimientos de evaluación y acción correctiva para evaluar periódicamente la eficacia del proceso ergonómico y garantizar su mejora continua y su éxito a largo plazo. Cuando un proceso ergonómico se está desarrollando por primera vez, las evaluaciones deben incluir la determinación de si los objetivos establecidos para el proceso ergonómico se han cumplido y la determinación del éxito de las soluciones ergonómicas implementadas.

QUÉ HACER Y QUÉ NO HACER EN LOS PUESTOS DE TRABAJO PARA EVITAR EL DOLOR 

Muévase. Ponga una alarma para que se lo recuerde si lo necesita. Estar sentado durante mucho tiempo causa estragos en la columna vertebral y en la circulación. Levántese, estírese, ¡Muévase!
Intente mantener su cuerpo en una postura neutra, que crea la menor tensión en su cuerpo.
Mantenga su escritorio despejado para no forzar su cuerpo a trabajar de forma incómoda entre el desorden.
Utilice auriculares si pasa una buena parte del día al teléfono.
Invierta en elementos esenciales para el puesto de trabajo que sean ergonómicos y asegúrese de que se ajustan a sus necesidades.
NO mantenga el monitor demasiado cerca o demasiado lejos, ni se encorve sobre el portátil. Esto puede provocar fatiga visual y dolores de cabeza, además de dolor de cuello y espalda.
NO utilice un escritorio o una silla que no tenga la altura adecuada para tu tamaño. Cada persona es diferente; encuentre lo que le funciona.
NO coloque el teléfono entre el hombro y la oreja.

MEJORES PRÁCTICAS ERGONÓMICAS PARA TRABAJAR SIN DOLOR 

Adapte sus hábitos de trabajo y su área de trabajo para poder trabajar cómodamente sin estrés ni tensión.

La tensión en la espalda – es una lesión común causada por estar sentado o de pie en una posición incorrecta durante largos períodos de tiempo. Puedes prevenir las lesiones de espalda utilizando un reposapiés o un puesto de trabajo multiposición en el que puedas estar sentado o de pie. Cambiando de posición con frecuencia, puedes aliviar la tensión de los músculos de la espalda y las piernas.

Tensión en el cuello: puede estar causada por mantener los brazos en una posición incorrecta. La tensión adicional en los brazos y las manos afectará también a los músculos del cuello. Para los usuarios de ordenadores, la parte superior de la pantalla debe estar a la altura de los ojos.

Síndrome del Túnel Carpiano – es otra lesión por esfuerzo repetitivo que puede inutilizar permanentemente las manos y las muñecas. El factor principal de una lesión por STC es la posición de la mano y la muñeca. Una altura incorrecta o una posición incómoda de las muñecas dobladas aumentará el riesgo de forma drástica. ¿Está su mesa de trabajo a una altura cómoda? ¿Y su silla o taburete? ¿Mantiene los brazos en una posición “neutra” o nivelada? Ejemplos de ocupaciones que tienen un alto índice de STC son los carpinteros, los cajeros y los agentes de reservas de las aerolíneas.

Tensión en los hombros: es común cuando los suministros se colocan a una altura incómoda. Doblar, estirar o levantar en exceso puede suponer una presión añadida sobre la articulación del hombro. ¿Puede reorganizar su área de trabajo para eliminar esta tensión?

Tensión muscular: puede estar causada por muchas cosas, como trabajar demasiado tiempo en la misma posición, e incluso por el estrés. ¿Incorpora algunas pausas breves y ejercicios de estiramiento en su jornada laboral para evitar las lesiones por tensión y la fatiga? Unos simples ejercicios de estiramiento, flexión y fortalecimiento pueden reducir las posibilidades de sufrir lesiones. También es importante calentar con algunos ejercicios antes de empezar a trabajar.

CONCLUSIÓN

Además de reducir el riesgo de lesiones, una buena ergonomía y un entorno de trabajo saludable pueden aumentar la productividad, mejorar la calidad, reducir las repeticiones de trabajo, disminuir las tasas de rotación de los empleados, reducir los costes de formación y mejorar la moral en el lugar de trabajo.


Ergonomics Stats and Facts

FACTS

Prolonged exposure to ergonomic risk factors can cause MSDs. Conditions that cause MSD problems include:

  1. Exerting excessive force.
  2. Excessive repetition of movements that can irritate tendons and increase pressure on nerves.
  3. Awkward postures, or unsupported positions that stretch physical limits, can compress nerves and irritate tendons.
  4. Static postures, or positions that a worker must hold for long periods of time, can restrict blood flow and damage muscles.
  5. Motion, such as increased speed or acceleration when bending and twisting, can increase the amount of force exerted on the body.
  6. Compression, from grasping sharp edges like tool handles, can concentrate force on small areas of the body, reduce blood flow, nerve transmission and damage tendon sheaths.
  7. Inadequate recovery time due to overtime, lack of breaks and failure to vary tasks, leave inadequate time for tissue healing
  8. MSDs can affect nearly all tissue in the body: nerves, tendons, tendon sheaths and muscles. The most frequently affected areas of the body are arms and the back.

STATS

  • Ergonomics-related injuries accounted for over 380,000 days-away-from-work cases. That means 1 in every 3 cases are because of an ergonomics issue. (Bureau of Labor Statistics)
  • Carpel tunnel syndrome may affect as many as 1.9 million people in the United States. Doctors perform up to 500,000 surgeries each year to correct this issue. (Centers for Disease Control and Prevention [CDC])
  • There were almost 27,000 CTS cases which involved days away from work, averaging 25 days away compared to just 6 days for all non-fatal illnesses and injuries. (Bureau of Labor Statistics)
  • Back symptoms are among the top ten reasons for medical visits. For 5% to 10% of patients, the back pain becomes chronic.
  • The Bureau of Labor Statistics reported 372,683 back injury cases involving days away from work. Most cases involved workers who were aged 25–54 (79%), male (64%), and white, non-Hispanic (70%)
  • Two occupational groups accounted for more than 54% of back injury cases: operators, fabricators, and laborers (38%); and precision production, craft, and repair (17%).
  • The healthy body can only tolerate staying in one position for about 20 minutes. After that time, most workers will experience discomfort.


Ergonomics Stats and Facts – Spanish

HECHOS

La exposición prolongada a factores de riesgo ergonómicos puede causar TME. Las condiciones que causan problemas de TME incluyen:

  1. Ejercer una fuerza excesiva.
  2. La repetición excesiva de movimientos que pueden irritar los tendones y aumentar la presión sobre los nervios.
  3. Posturas incómodas, o posiciones sin apoyo que estiran los límites físicos, pueden comprimir los nervios e irritar los tendones.
  4. Las posturas estáticas, o posiciones que el trabajador debe mantener durante mucho tiempo, pueden restringir el flujo sanguíneo y dañar los músculos.
  5. El movimiento, como el aumento de la velocidad o la aceleración al agacharse y girar, puede aumentar la cantidad de fuerza ejercida sobre el cuerpo.
  6. La compresión, al agarrar bordes afilados como los mangos de las herramientas, puede concentrar la fuerza en pequeñas zonas del cuerpo, reducir el flujo sanguíneo, la transmisión nerviosa y dañar las vainas de los tendones.
  7. El tiempo de recuperación inadecuado debido a las horas extras, la falta de descansos y la no variación de las tareas, dejan un tiempo inadecuado para la curación de los tejidos
  8. Los TME pueden afectar a casi todos los tejidos del cuerpo: nervios, tendones, vainas tendinosas y músculos. Las zonas del cuerpo más frecuentemente afectadas son los brazos y la espalda.

ESTADÍSTICAS

  • Las lesiones relacionadas con la ergonomía representaron más de 380.000 casos de bajas laborales. Esto significa que 1 de cada 3 casos se debe a un problema de ergonomía. (Oficina de Estadísticas Laborales)
  • El síndrome del túnel carpiano puede afectar a 1,9 millones de personas en Estados Unidos. Los médicos realizan hasta 500.000 cirugías cada año para corregir este problema. (Centros para el Control y la Prevención de Enfermedades [CDC])
  • Hubo casi 27.000 casos de STC que implicaron días de ausencia del trabajo, con una media de 25 días de ausencia, en comparación con sólo 6 días para todas las enfermedades y lesiones no mortales. (Oficina de Estadísticas Laborales)
  • Los síntomas de la espalda se encuentran entre los diez principales motivos de consulta médica. Entre el 5% y el 10% de los pacientes, el dolor de espalda se vuelve crónico.
  • La Oficina de Estadísticas Laborales informó de 372.683 casos de lesiones de espalda que supusieron días de baja laboral. La mayoría de los casos corresponden a trabajadores de entre 25 y 54 años (79%), hombres (64%) y blancos no hispanos (70%).
  • Dos grupos profesionales representaron más del 54% de los casos de lesiones de espalda: operadores, fabricantes y obreros (38%); y producción de precisión, artesanía y reparación (17%).
  • El cuerpo sano sólo puede tolerar mantenerse en una posición durante unos 20 minutos. Después de ese tiempo, la mayoría de los trabajadores experimentan molestias.


Entering and Exiting Vehicles Safely Meeting Kit

What’s At Stake

Truckers, delivery drivers, farmers, firefighters, and workers that drive or ride in large commercial trucks and vans, farm equipment, and fire apparatus get injured when they enter and exit vehicles unsafely.

THE SAFEST METHOD FOR ENTERING AND EXITING A VEHICLE OR EQUIPMENT – 3 POINT RULE

The recommend practice is the 3-point rule. This means always having at least three points of contact with the equipment – two hands & one foot or one hand & two feet. Following the 3-point rule will provide you with the most stability, and therefore reduce the risk of slips and falls.

What’s the Danger

DANGERS ON THE GROUND FOR WORKERS

Vehicle safety is important in a variety of jobs. All employees should be alert to these dangers on the ground:

  • Mud, ice and potholes can create slip-and-fall hazards.
  • Traffic hazards can endanger police officers and employees in work zones.
  • Wet or icy parking lots can create risk for any employee.

HOW TO PROTECT YOURSELF

EMPLOYEE SAFETY TIPS

  • Do not mount and dismount when equipment is in motion.
  • Never jump off equipment.
  • Face towards the machine when entering or exiting.
  • Do not break your three points of contact until you reach your destination: the ground, the vehicle’s cab, or the platform.
  • Keep your movements slow and steady as you enter and exit.
  • Be extra cautious in wet, snowy, or icy conditions.
  • Wear appropriate footwear with adequate support and slip resistance for the weather conditions and the equipment surfaces.
  • Avoid loose or bulky clothing as it could get caught in the equipment or interfere with your contact points.
  • Don’t step on tires or wheel hubs. Don’t use the door frame or edge as a handhold.

EMPLOYER ROLE

Employers can help reduce the risk of these injuries by evaluating vehicles and equipment. Do they all have adequate steps, non-slip surfaces, and hand holds? Are these surfaces all in good condition? Do you inspect them on a regular basis? Have you considered displaying decals near the entry and exit points to remind your workers to use three points of contact?

TRAINING

Training on safe entering and exiting should be conducted with all new employees. But also remember to provide reminders to veteran employees to help reinforce the safety techniques – especially as winter weather arrives.

NO JUMPING OFF HAZARD

Jumping increases the force and strain on your bones and joints (mostly ankle, knee, and back). For example, in a cab-over-engine tractor, jumping from the top step can apply 7.1 times your body weight to your back and leg joints (1420 pounds of force for a 200-pound person). Jumping from a delivery step-van with a package in hand causes an impact of 3.5 times the body weight plus package weight.

ESSENTIAL WORK PRACTICES IN ENTERING AND EXITING A VEHICLE

To enter the left/driver’s side, stand on your left leg and lift your right leg up. You may need to change hand and feet positions while entering and exiting. Keep three points of contact with the vehicle at all times (one hand and two feet, or two hands and one foot). To avoid falling out backwards, maintain the three-point rule until you are securely seated or firmly on the ground.

To exit the vehicle, examine the ground before you step out. Look for ice, water, cracks, and uneven surfaces. Face the vehicle and step down backward while holding onto the grab bar or other stable surface. Use all of the steps until you reach the ground. Don’t use some of the stairs, then jump and hurt yourself by skipping one. Never jump down or “fall” down forward out of a vehicle; you can catch your clothing on the door handle, seat adjustments, seat belt, etc. causing a serious, uncontrolled fall.

BEST SAFETY PROCEDURES TO GET ON AND OFF EQUIPMENT

  1. Check that the machine is equipped with grab rails and steps. (If possible, add stickers to remind workers about safe procedure and mark grab rails and steps.)
  2. Scrape mud off shoes before climbing onto the machine. Also, keep steps and grips clear of mud, grease and other hazards.
  3. Face the machine as you step onto the first step. Maintain 3-point contact at all times (two hands and one foot, or two feet and one hand). Use the surfaces the manufacturer designed for mounting and dismounting—steps, running boards, traction strips, footholds and hand grips.
  4. Climb into the cab or other areas that have non-slip surfaces.
  5. To get off the machine, be sure the machine is first parked and stable. Shut off the machine if necessary.
  6. Step out of the cab or off of the machine—while facing the machine, use the provided surfaces to climb down, always maintaining 3-point contact. Do not jump from equipment! Jumping is dangerous to bones and joints.
  7. Only break 3-point contact with the machine when you reach the ground.

FINAL WORD

It sounds rudimentary, but statistics say  otherwise. OSHA says that 50% of truck driver injuries resulting in strains and sprains are falls from a truck – with an average of 13 days off work to recover.


Entering and Exiting Vehicles Safely Meeting Kit – Spanish

QUÉ ESTÁ EN RIESGO

Los camioneros, repartidores, agricultores, bomberos y trabajadores que conducen o viajan en grandes camiones y furgonetas comerciales, equipos agrícolas y aparatos de bomberos se lesionan cuando entran y salen de los vehículos de forma insegura.

EL MÉTODO MÁS SEGURO PARA ENTRAR Y SALIR DE UN VEHÍCULO O EQUIPO – LA REGLA DE LOS 3 PUNTOS

La práctica recomendada es la regla de los 3 puntos. Esto significa tener siempre al menos tres puntos de contacto con el equipo: dos manos y un pie o una mano y dos pies. Seguir la regla de los tres puntos le proporcionará la máxima estabilidad y, por tanto, reducirá el riesgo de resbalones y caídas.

CUÁL ES EL PELIGRO

PELIGROS EN EL SUELO PARA LOS TRABAJADORES

La seguridad de los vehículos es importante en diversos trabajos. Todos los empleados deben estar atentos a los peligros del suelo:

  • El barro, el hielo y los baches pueden crear riesgos de resbalones y caídas.
  • Los peligros del tránsito pueden poner en peligro a los agentes y empleados en las zonas de trabajo.
  • Los aparcamientos mojados o con hielo pueden crear riesgos para cualquier empleado.

COMO PROTEGERSE

CONSEJOS DE SEGURIDAD PARA LOS EMPLEADOS

  • No se monte ni se desmonte cuando el equipo esté en movimiento.
  • Nunca salte del equipo.
  • Mire hacia la máquina cuando entre o salga de ella.
  • No rompa sus tres puntos de contacto hasta llegar a su destino: el suelo, la cabina del vehículo o la plataforma.
  • Mantenga sus movimientos lentos y constantes al entrar y salir.
  • Extreme las precauciones en condiciones de humedad, nieve o hielo.
  • Lleve un calzado apropiado con una sujeción y resistencia al deslizamiento adecuadas a las condiciones meteorológicas y a las superficies del equipo.
  • Evite la ropa suelta o voluminosa, ya que podría quedar atrapada en el equipo o interferir con sus puntos de contacto.
  • No pise los neumáticos ni los cubos de las ruedas. No utilice el marco o el borde de la puerta como asidero.

PAPEL DE LOS EMPLEADORES

Los empresarios pueden ayudar a reducir el riesgo de estas lesiones evaluando los vehículos y el equipamiento. ¿Tienen todos ellos peldaños adecuados, superficies antideslizantes y asideros? ¿Están todas estas superficies en buen estado? ¿Las inspecciona regularmente? ¿Ha pensado en colocar calcomanías cerca de los puntos de entrada y salida para recordar a sus trabajadores que deben utilizar tres puntos de contacto?

FORMACIÓN

La formación sobre la entrada y la salida seguras debe impartirse a todos los nuevos empleados. Pero recuerde también que debe recordar las técnicas de seguridad a los empleados veteranos, especialmente cuando llega el invierno.

NO SALTAR DEL PELIGRO

Los saltos aumentan la fuerza y la tensión en los huesos y las articulaciones (sobre todo en los tobillos, las rodillas y la espalda). Por ejemplo, en un tractor con cabina, saltar desde el escalón superior puede aplicar 7,1 veces su peso corporal a las articulaciones de la espalda y las piernas (1420 libras de fuerza para una persona de 200 libras). Saltar desde un escalón de una furgoneta de reparto con un paquete en la mano provoca un impacto de 3,5 veces el peso del cuerpo más el peso del paquete.

PRÁCTICAS DE TRABAJO ESENCIALES PARA ENTRAR Y SALIR DE UN VEHÍCULO

Para entrar por el lado izquierdo/del conductor, párese sobre la pierna izquierda y levante la pierna derecha. Es posible que tenga que cambiar la posición de las manos y los pies al entrar y salir. Mantenga tres puntos de contacto con el vehículo en todo momento (una mano y dos pies, o dos manos y un pie). Para evitar caerse hacia atrás, mantenga la regla de los tres puntos hasta que esté bien sentado o apoyado en el suelo.
Para salir del vehículo, examine el suelo antes de salir. Busque hielo, agua, grietas y superficies irregulares. Mire hacia el vehículo y baje hacia atrás mientras se sujeta a la barra de sujeción o a otra superficie estable. Utilice todos los escalones hasta llegar al suelo. No utilices algunos de los escalones para luego saltar y lesionarte al saltarte uno. Nunca salte o se “caiga” hacia delante fuera de un vehículo; puede engancharse la ropa con el pomo de la puerta, los ajustes del asiento, el cinturón de seguridad, etc. provocando una caída grave e incontrolada.

MEJORES PROCEDIMIENTOS DE SEGURIDAD PARA SUBIR Y BAJAR DEL EQUIPO

  1. Compruebe que la máquina está equipada con barandillas y escalones. (Si es posible, añada pegatinas para recordar a los trabajadores el procedimiento seguro y marque los pasamanos y los escalones).
  2. Quítese el barro de los zapatos antes de subir a la máquina. Además, mantenga los escalones y los agarres libres de barro, grasa y otros peligros.
  3. Mirar hacia la máquina al subir el primer escalón. Mantenga un contacto de tres puntos en todo momento (dos manos y un pie, o dos pies y una mano). Utilice las superficies que el fabricante ha diseñado para el montaje y desmontaje: escalones, estribos, bandas de tracción, puntos de apoyo y asideros.
  4. Suba a la cabina o a otras zonas que tengan superficies antideslizantes.
  5. Para bajarse de la máquina, asegúrese primero de que la máquina está aparcada y estable. Apague la máquina si es necesario.
  6. Salga de la cabina o de la máquina: mientras esté de cara a la máquina, utilice las superficies previstas para bajar, manteniendo siempre un contacto de 3 puntos. No salte del equipo. Saltar es peligroso para los huesos y las articulaciones.
  7. Sólo rompa el contacto de tres puntos con la máquina cuando llegue al suelo.

CONCLUSIÓN

Parece rudimentario, pero las estadísticas dicen lo contrario. La OSHA afirma que el 50% de las lesiones de los camioneros que provocan esguinces y torceduras son caídas del camión, con una media de 13 días de baja para recuperarse.


Entering and Exiting Vehicles Safely Stats and Facts

FACTS

  1. Truck drivers had more non-fatal injuries than any other industry. More than half of those were sprains and strains caused in part by slip and falls while getting in or out of trucks.
  2. To reduce or prevent injuries, use the “three points of contact system” when entering and exiting a truck. The three points of contact system means three of four limbs are in contact with the vehicle at all times (two hands and one foot, or two feet and one hand, etc.).
  3. Three-points of contact form a triangle of anchor points, which changes in form when mounting or dismounting a vehicle.
  4. Drivers have the most stability when the center of the triangle is closest to their center of gravity. Sideways movement should be avoided since it creates an imbalance of weight distribution.
  5. Preventing injuries on the job requires education, demonstration and continuous training to reinforce proper techniques and habits. Training should begin when a driver is hired and be reinforced frequently.
  6. Slips, trips, and falls are one of the leading causes of workplace injuries. For drivers, these types of injuries commonly occur when improperly entering or exiting the cab and trailer.

STATS

  • In 2018, the transportation industry accounted for 20% of all non-fatal workplace illnesses and injuries that required time off of work, according to the U.S. Bureau of Labor Statistics. On average, a driver needed 13 days away from work to recover from a workplace injury. The Occupational Safety and Health Administration estimates that 50% of truck driver injuries result in strains and sprains, which are common when a driver falls from a truck.
  • There was an estimated annual average of 607,000 non-crash injuries involving passenger vehicles seen in emergency departments. The three most common injury patterns were injuries from closing vehicle doors such as doors closed on fingers or hands (22% of all injuries), falls while entering or exiting vehicles (13%), and overexertion such as when unloading cargo from trunks or the backs of pickups (10%).
  • The most common types of non crash injuries seen in emergency departments were injuries while entering or exiting a vehicle (estimated 164,000 per year), injuries from closing doors (estimated 148,000 per year) and injuries from overexertion such as while unloading cargo or pushing a disabled vehicle (estimated 88,000 per year).
  • Falls that occur other than while entering or exiting vehicles accounted for an estimated 10 % of the non-crash injuries. This injury mechanism included falls from the exteriors of vehicles such as from tailgates or trunk lids and falls against the exteriors of vehicles such as when slipping on ice or while washing vehicles.


Entering and Exiting Vehicles Safely Stats and Facts – Spanish

HECHOS

  1. Los conductores de camiones sufrieron más lesiones no mortales que cualquier otro sector. Más de la mitad de ellas fueron esguinces y torceduras causadas en parte por resbalones y caídas al entrar o salir de los camiones.
  2. Para reducir o prevenir las lesiones, utilice el “sistema de los tres puntos de contacto” al entrar y salir de un camión. El sistema de tres puntos de contacto significa que tres de las cuatro extremidades están en contacto con el vehículo en todo momento (dos manos y un pie, o dos pies y una mano, etc.).
  3. Los tres puntos de contacto forman un triángulo de puntos de anclaje, que cambia de forma cuando se sube o baja de un vehículo.
  4. Los conductores tienen más estabilidad cuando el centro del triángulo está más cerca de su centro de gravedad. Se debe evitar el movimiento lateral, ya que crea un desequilibrio en la distribución del peso.
  5. La prevención de lesiones en el trabajo requiere educación, demostración y formación continua para reforzar las técnicas y hábitos adecuados. La formación debe comenzar cuando se contrata a un conductor y reforzarse con frecuencia.
  6. Los resbalones, tropiezos y caídas son una de las principales causas de lesiones en el lugar de trabajo. En el caso de los conductores, este tipo de lesiones suele producirse al entrar o salir indebidamente de la cabina y el remolque.

ESTADÍSTICAS

  • En 2018, la industria del transporte representó el 20% de todas las enfermedades y lesiones no mortales en el lugar de trabajo que requirieron una baja laboral, según la Oficina de Estadísticas Laborales de Estados Unidos. En promedio, un conductor necesitó 13 días fuera del trabajo para recuperarse de una lesión laboral.
  • La Administración de Seguridad y Salud Ocupacional estima que el 50% de las lesiones de los conductores de camiones son esguinces y torceduras, que son comunes cuando un conductor se cae de un camión.
  • Se calcula que hay una media anual de 607.000 lesiones no relacionadas con accidentes de vehículos de pasajeros atendidas en los servicios de urgencias. Los tres tipos de lesiones más comunes fueron las provocadas por el cierre de las puertas del vehículo, como las que se cierran sobre los dedos o las manos (22% de todas las lesiones), las caídas al entrar o salir de los vehículos (13%) y los sobreesfuerzos, como los que se producen al descargar la carga de los maleteros o la parte trasera de las camionetas (10%).
  • Los tipos más comunes de lesiones no relacionadas con colisiones atendidas en los servicios de urgencias fueron las lesiones al entrar o salir de un vehículo (estimadas en 164.000 al año), las lesiones por cierre de puertas (estimadas en 148.000 al año) y las lesiones por sobreesfuerzo, como al descargar carga o empujar un vehículo inutilizado (estimadas en 88.000 al año).
  • Las caídas que no se producen al entrar o salir de los vehículos representaron un 10% de las lesiones no relacionadas con colisiones. Este mecanismo de lesión incluía las caídas desde el exterior de los vehículos, como desde los portones traseros o las tapas de los maleteros, y las caídas contra el exterior de los vehículos, como al resbalar en el hielo o al lavar los vehículos.


Entering and Exiting Vehicles Safely Fatality File

Two cases of employee injuries sustained in company parking lot during employees commute to work.

The first employee opened the driver side door and started to exit his car when he caught his right foot on the raised door threshold. The employee subsequently fell onto the parking lot surface and sustained a right knee cap injury.

The second employee was in the process of exiting his pick-up truck when he slipped on a rail used to enter and exit the vehicle. The employee fell onto the parking lot surface and sustained a twisted right knee.

While both employees’ sustained injuries in the company parking lot, neither case involved a motor vehicle accident. Instead, the two employees were injured when they fell out of their parked vehicle and struck the parking lot surface (work environment). As a result, neither case meets the exception in Section 1904.5(b)(2)(vii), and, therefore, must be recorded on the establishment’s log, if they meet the other recording criteria listed in the regulation (e.g., medical treatment, days away from work, etc.).


Entering and Exiting Vehicles Safely Fatality File – Spanish

Dos casos de lesiones de empleados sufridas en el aparcamiento de la empresa durante el trayecto de los empleados al trabajo.

El primer empleado abrió la puerta del lado del conductor y empezó a salir de su vehículo cuando se enganchó el pie derecho en el umbral elevado de la puerta. Posteriormente, el empleado cayó sobre la superficie del aparcamiento y sufrió una lesión en la rótula derecha.

El segundo empleado estaba saliendo de su camioneta cuando se resbaló en un riel utilizado para entrar y salir del vehículo. El empleado cayó sobre la superficie del aparcamiento y se torció la rodilla derecha.

Si bien ambos empleados sufrieron lesiones en el aparcamiento de la empresa, ninguno de los dos casos fue un accidente de tráfico. En cambio, los dos empleados se lesionaron al caerse del vehículo aparcado y golpear la superficie del aparcamiento (entorno de trabajo). En consecuencia, ninguno de los dos casos se ajusta a la excepción prevista en el artículo 1904.5(b)(2)(vii) y, por lo tanto, deben consignarse en el registro del establecimiento, si cumplen los demás criterios de registro enumerados en el reglamento (por ejemplo, tratamiento médico, días de ausencia del trabajo, etc.).